Faux Batik with Candy Colwell
Candy Colwell here with a very fun Tim Holtz inspired embossing technique for you to try. I have created a one of a kind scarf using a really fun and easy technique called “Faux Batik” that can easily be done on fabric as well as paper.
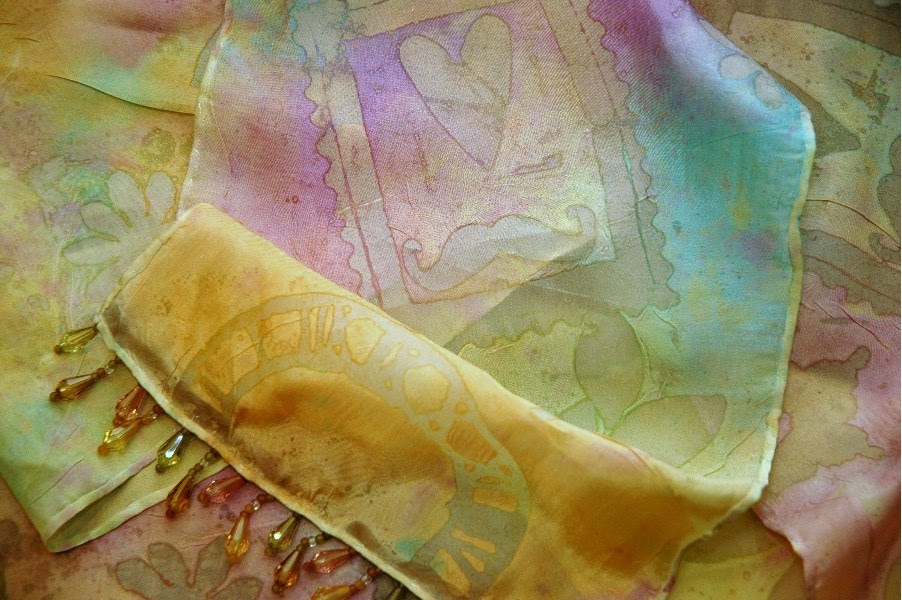
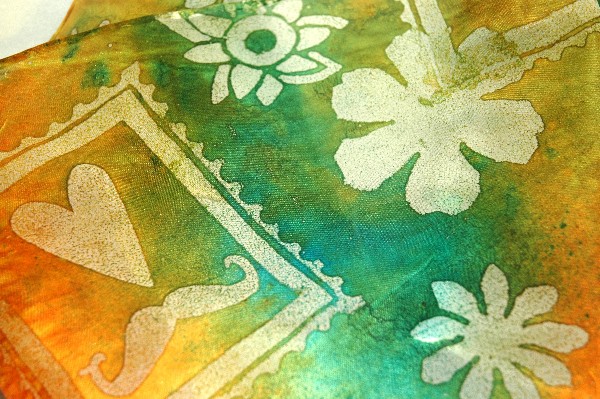
This is my finished silk scarf that started out as pure white. I wanted this scarf to be less vivid in color so I’ll tell you the secret that I did to create a softer color from the Color Wash Sprays in this tutorial. Faux Batik is such a fun technique to do on silk or sheer fabrics. You can create some absolutely gorgeous faux batik designs using larger stamped images that you either own or create from die cuts you already have!
Are you ready? Let’s begin!
First, prepare your work areas. You will need to have an area that you can have room to stamp several images at a time onto your sheer fabric, use Clear Embossing Powder, and heat set that powder. The surface underneath this area needs to include a Non Stick Craft Sheet so that you do not damage your work surface and for easy clean up.
You will also need an area to iron the wet fabric, once it has been sprayed. This area needs to include either an ironing board or a padded ironing surface. You will probably want to put something protective over it, in case of bleed through with the dye ink. You will need either a craft iron or a household iron and two pieces of newsprint; one for underneath your fabric and the other to lay on top before ironing it. Prepare your ironing surface now with the protective covering and a piece of newsprint on top of it. Have the other piece of newsprint close by to lay over your fabric before you begin ironing.
Re-cap of supplies you will need for this technique:
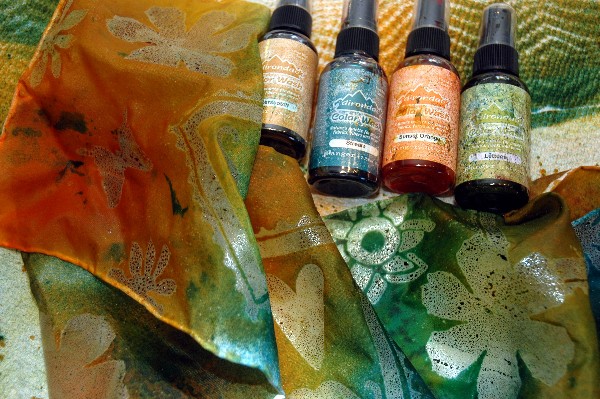
Non-Stick Craft Mat, Embossing Ink, Clear Embossing Powder, a heat tool, foam stamps, a sheer fabric, Color Wash Sprays, protective gloves, a craft or household iron and newsprint optional: a bottle to sprinkle the embossing powder, a large tray to catch the extra embossing powder, parchment paper or something to lay underneath the newsprint before ironing, and beaded trim

1. Begin with larger stamps, preferably foam stamps because the larger and less intricate the image, the better results you will have. The foam stamps shown above are all Tim Holtz Sizzix dies! To make my dies into foam stamps I cut out of black foam with my Vagabond and then mounted using 1/4″ Scor Tape onto left over packaging from Tim Holtz Ideaology. The packaging is useful for so many things- I recommend never throwing it away! In this case, a great backing for my new stamps.
Note: during this tutorial you will also see me use Claudine Hellmuth’s Bloom Stamp Set. Her foam stamps are perfect for this technique!
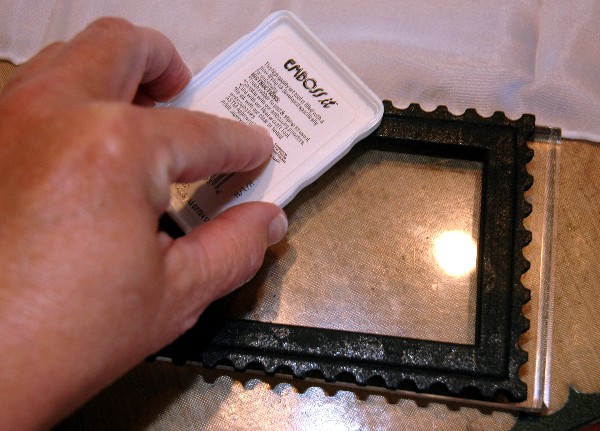
2. Working on a Non Stick Craft Sheet, lay out your sheer fabric. Use sheer fabric because that better enables the clear embossing ink to soak through the fabric, creating a double sided design. Ink up your stamp using Embossing Ink and begin to stamp onto the sheer fabric.
Tip: On hot summer days, you may want to work in sections so that your Embossing Ink will not dry before you get a chance to add the Clear Embossing Powder.
3. After stamping several images, cover them with Clear Embossing Powder. Repeat this process until all of the inked images have been covered with Clear Embossing Powder and lightly shake off any excess powder before heat setting it.
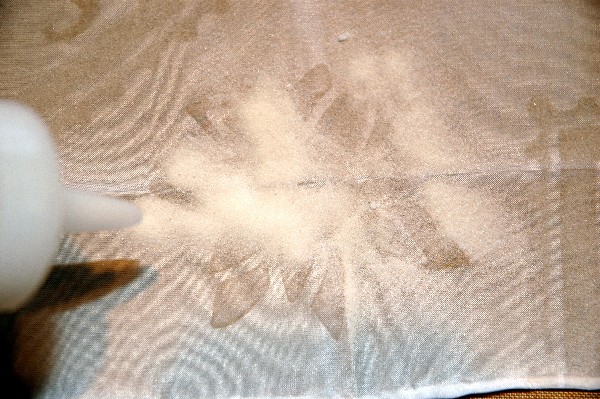
Here’s a trick that I learned from Tim: instead of sprinkling the Clear Embossing Powder onto each ink embossed image, put some Clear Embossing Powder into a little bottle that can gently spray out onto the stamped images. Cover several at a time and then gently “walk” the Clear Embossing Powder down the length of the scarf by lifting one end and letting the powder roll down the fabric, covering the stamped images as it passes over them. Have a tray or paper at the bottom to catch all of the excess embossing powder so it can be used again.
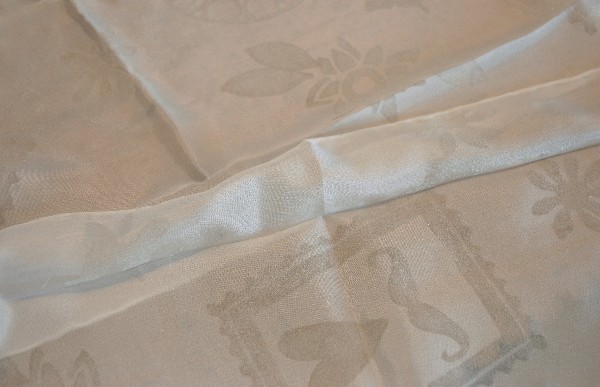
Here is a photo of my scarf completely stamped and covered with Clear Embossing Powder. The scarf is laying on my Non Stick Craft Sheet.

4. Begin using the heat tool to heat the Clear Embossing Powder. The brown you see on this picture is the Non Stick Craft Sheet underneath the design. You need to keep moving the heat tool so that you don’t scorch the fabric as it is delicate and sheer. I also found that once I started embossing with the heat tool, it went much faster and easier if I raised the end of the scarf and let the hot air pass through the fabric rather than leaving it lay on the Non Stick Craft Sheet. This way, the design did not sometimes try to stick to the Non Stick Craft Sheet as it cooled.
Important: put gloves on for this step, as Ranger’s Color Wash is a permanent dye ink!
5. Choose the colors you want to use and just begin spraying your fabric that is laying on your Non Stick Craft Sheet.
If you don’t cover all of the scarf with a color, you can simply add more color or you can spray with water to allow the colors to wick together. You also don’t have to worry about laying part of the wet scarf on top of another area of wet scarf. Just let the colors blend and run together. That’s part of the fun! Here you can see the clear embossed images are resisting the Color Wash dyes.
Note: This is where I diverged from Tim’s original technique. I wanted my colors to be more muted so at this point, I rinsed my scarf in a sink with cold water and a little vinegar to help set the color. If you want more of a pastel end result, you might try rinsing the ink now. For more vibrant color, do not rinse now and continue the step by step- we will rinse in step #7.
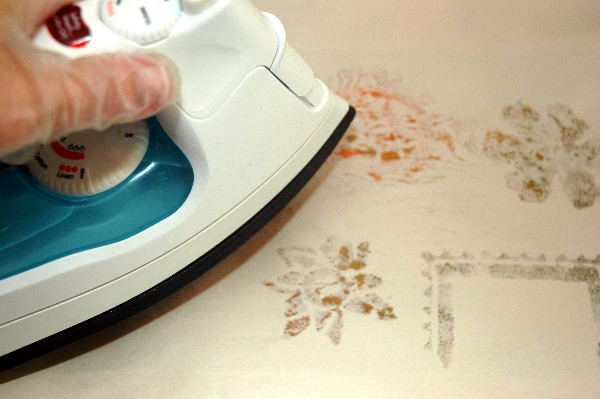
6. Move the sprayed fabric over to the area you’ve set up to iron your piece. Place the fabric on top of the ironing surface that you have covered with newsprint. Lay the fabric out as flat as possible and then cover it with the other piece of newsprint. Iron one side of the fabric using the high and dry setting. You will see the designs soak into the newsprint. This is the Clear Embossing Ink soaking to the newsprint. Once you have done one side, turn the entire thing over, newsprint and all, and iron the other side.
Note: I chose to put some parchment paper underneath to protect my ironing board cover, in case the dyes would bleed through the newsprint.

Begin peeling away the newsprint from the fabric. If you reach a point that is sticking, simply run the iron over that area again to melt or re-melt the Clear Embossing Powder and then gently remove the newsprint. Continue doing this until you have removed the all of the newsprint from the fabric.
Tip: Save that newsprint for future projects. You can get some really cool and colorful designs from the images embossed onto the newsprint!
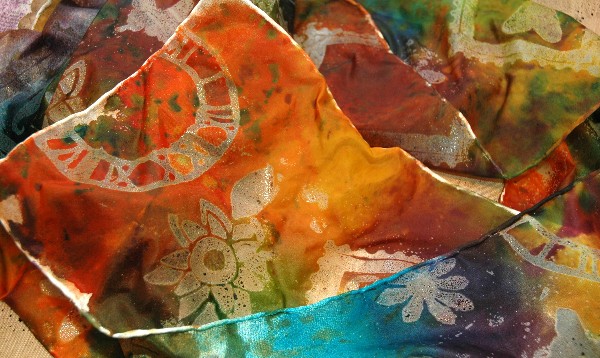
Here is a photograph of a scarf that has not been rinsed first. The colors are vibrant and you can clearly see the stamped and embossed images.
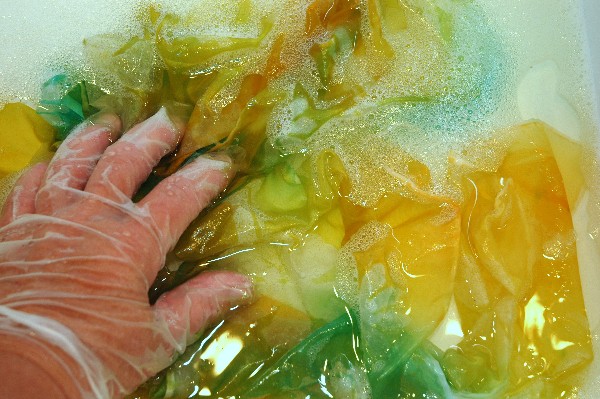
7. Take the ironed and color set fabric to the sink that has cold water and just a touch of soap waiting. You need to rinse out the excess dye (and there will be a lot!). Rinse the fabric in the water until the water is clear. (Notice that the protective gloves are still on!) You might need to change the cold water a few times so you can see that the water is clear after rinsing.
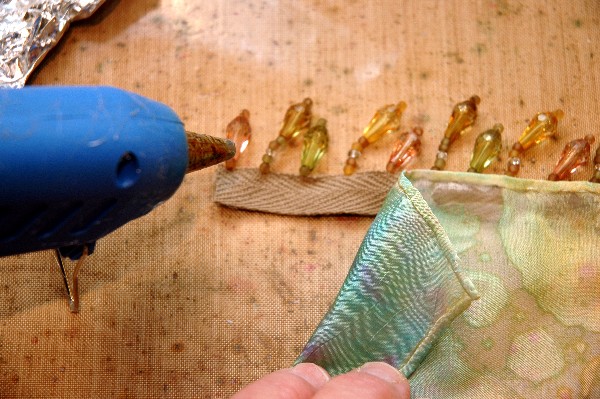
8. Let the material dry. You can either re-iron the fabric to dry and press it or you can simply let it air dry; allowing the fabric to dry as it will with wrinkles and interesting patterns. Once it is dry, you can add trims to the edges if you choose. In this case, I am hot gluing some beaded trim to the ends of my scarf.
The color of the scarf should be permanently set after 72 hours and you can throw it in the dryer without fear of the color transferring.

So there it is – faux batik. You can also do this same technique on paper. Just use a semi-sheer paper, like mulberry paper for best results. And of course, you would not submerge the paper in cold water. You simply sandwich your sprayed paper between two sheets of newsprint and iron it. You will still see the Clear Embossing Ink image soaking into the newsprint, creating the faux batik effect on the paper. Then back the faux batik paper with something like white Glossy Cardstock to contrast the image against the dyed paper.
I hope you enjoyed this tutorial and will give this very special kind of embossing a try. It is so much fun and really easy!
Supplies Used:
Tim Holtz Sizzix Vagabond,Non Stick Craft SheetHeat It Craft Tool, Claudine Hellmuth Bloom Foam Stamps, 1/4″ Scor Tape, Color Wash Sprays, Clear Embossing Powder, Emboss It Clear Ink, Butterscotch, Lettuce, Sunset Orange, Stream,Weathered Clock, Tattered Florals, Gadget Gears, Mini Mustache, Mini Hearts, Postage Stamp, Sized Rectangles, Mini Butterflies

Thank you for the awesome tutorial Candy! I think this would make an amazing gift, and with the holidays sneaking up quick – the timing was perfect for this tutorial!
Now – what are you waiting for? Join us in this week’s embossing challenge! For the full rules, read the “challenge rules” posted in the side-bar here on our blog, and be sure to enter the challenge in the post below this one.
Challenge Badge

Spotlight Badge


Stunning! I love how you softened the colors and the patterns. Beautiful scarf and the tutorial was fantastic!
Oh wow…… this is one of the seriously cool things I’ve EVER seen done with embossing powders. Great technique for an amazing result!! TFS
Absolutely amazing Candy, what a glorious effect you have achieved! The colours are out of this world, such a gorgeous, gorgeous scarf!! Love the beaded trip at the end of it too, gives it such class! Fab tutorial too!
this is absolutely gorgeous and such a clever and effective make.Love those beads on the edge too, really beautiful candy x hugsx trace x
It´s a beautiful sharf and the tutorual is so clear and easy to follow! Thanks for sharring! Inky greetings, Gerrina
That is one unique and beautiful work of art in a scarf!! LOVE it! TFS
This is a wonderful tutorial, A new way to use clear embossing powder! Thanks for sharing! BArbarayaya
Fabulous project a great tutorial for a great technique! Thankyou so much x
Wow… this is such an awesome and unique tutorial, Candy. I love the amazing result and the colors are fantastic! Thank you for the great inspiration! :)
Hi Candy, this is such a fabulous project, you make it look so easy and the end result is just stunning. I love the softer colours and the handmade stamps are just brilliant. Thank you for the very clear step by step. You are such an inspiration! Hugs, Anne x
Candy! What an absolutely gorgeous project!
Thanks for the concise instructions and the step-out photos!
Wow! Pinning it!
Yep! VERY do-able! thanks for the tips Candy!
Wow, what a beautiful technique! :)
I love this technique Candy but have only ever used it on paper but to see it on fabric is fabulous. I love the more subtle colour palette too. The step by steps are fantastic as is your design. Loved reading the instructions, so clear and precise. Tracy x
So stunning, Candy! I’ve tried the faux batik on paper, but seeing it on this delicate silk is a whole different ball game – exquisite. Thanks so much for all the detailed tips and tricks (and for the reminder about cutting some foam stamps from my dies – must get round to that some time soon!)… a really fabulous tutorial, as well as a beautiful piece of wearable art.
Alison x
WOW! This is GORGEOUS!
Thanks for sharing. I can’t wait to try this! :)
ahem, you were brave to try that on a silk scarf and look how wonderful it turned out. wow. spectacular.
This is one of my all-time favorite techniques, but I’ve never seen an end result as beautiful as this. Candy, you ROCKED it!!! Great job on the tutorial, and an absolutely stunning work of art!
Wow Candy! What a gorgeous scarf! I’ve never tried this technique before ~ I’ll have to give it a try! Thanks for the inspiration!
Wow beautiful scarf. Looks labour intensive but well worth it. The outcome is stunning.
Candy, your scarf is fabulous. I have never seen this technique but I am so impressed that now I want to experiment with it. Beautiful and good step by step tutorial.
This is a wonderful idea presented with a great tutorial, thanks! I’ll be looking for many different types of sheer papers to try this on.
Candy, this is truly gorgeous! You must love to wear it. Thanks for sharing the how to with us.
Candy — this is amazing!! Gorgeous — I have to try this!!!! Thanks for the idea for an incredible scarf! — Mary Elizabeth
This is so gorgeous… do you know where I can find the original technique you mention from Tim Holtz?
Hi Ellie. I originally saw this technique on a very old DVD that Tim had out called “An Altered Journey”. There are several neat projects that he shows on that DVD. Unfortunately Simon Says Stamp doesn’t carry it any more but you may be able to find it through Amazon.com or something like that. <3 Candy
Thank you so much to everyone who left a comment about the Faux Batik tutorial! I am so happy that you all liked it and found the tutorial interesting and hopefully it inspired you to try it! <3 Candy
oh my goodness!!!! This is just stunning!!!!
Wow Candy, this is a fabulous technique! Such a great idea and you presented it perfectly. Love your finished scarf! What a great gift that would be to someone. The colours are wonderful and all the stamps you used too. Thank you so much for sharing!!
Absolutely beautiful and the outcome is so lovely!
*mwah*
Steph
Simon Says Stamp!
Saw you over on Pinterest….well on Simon too…beautiful, beautiful!
Would alcohol inks work as well?
I am such a huge fan of Candy’s work…and this scarf is a prime example of why I faithfully follow her. Everything she does is beautiful, true…but also innovative and inspiring. I can’t wait to try this. Thanks for the wonderful tutorial!
Hello Miss Candy OMG, I’m standing and applauding, this outstanding post, brilliant tutorial your the BOMB***** thanks so much for sharing…
This is really great! It reminded me of my batik painting experience at MyBatik, Kuala Lumpur. I’d recommend everyone to go for batik painting if you were to visit Malaysia, because it is one of Malaysia’s ancient traditional arts. I had the privilege to experience batik painting while i was on my visit to the capital city of Malaysia, Kuala Lumpur. I stumbled upon MyBatik whilst i was walking around KL, from KLCC. I didn’t even know the place existed, it is a beautiful place, very relaxing in the midst of chaotic Kuala Lumpur. I was really pleased with the batik painting that i made there, by myself. I find the price reasonable too. For anyone who is visiting Kuala Lumpur, this is an opportunity not to be missed! Give batik painting a try!