Feel Better: Watercolored Background and Inlaid Die Cut Technique
Hi readers! Happy Monday to you! I’m happy to be back today with our monthly feature with the always awesome and creative Andrea Walford of Paper Crafter’s Library. Be sure to view her video for a full tutorial. Enjoy!
WATCH THE VIDEO:
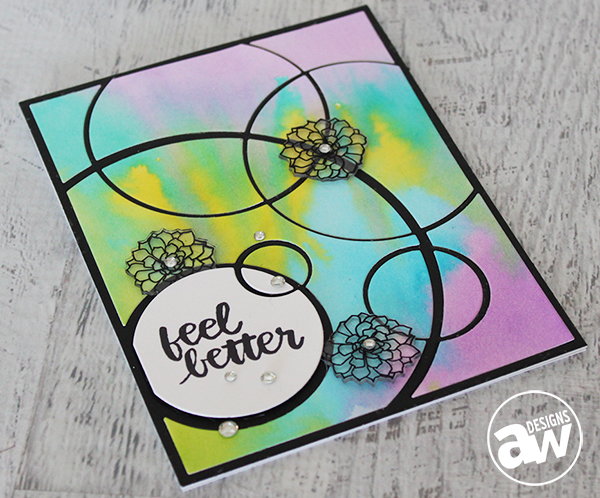
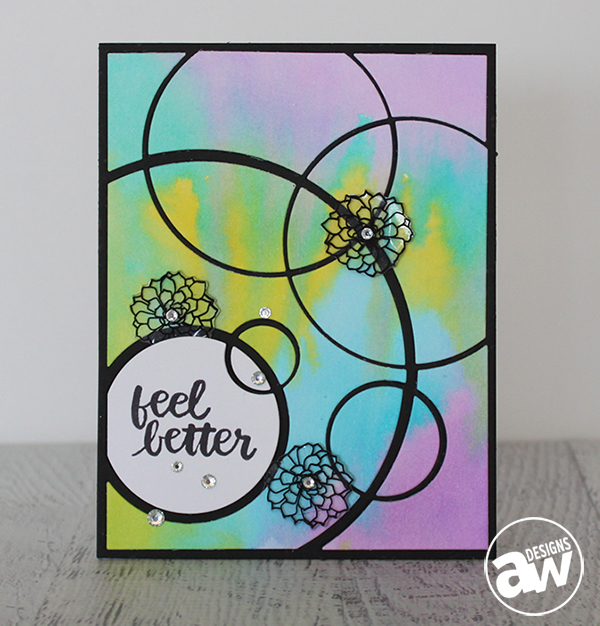
For today’s project I created the “Feel Better” card using some Exclusive Simon Says Stamp products. The card features a few different techniques: creating a watercolor background, an inlaid die cutting technique, and creating acetate embellishments using shrink plastic.
When you open up your little pots of Twinkling H2O’s you’ll notice that they are dry and hard and may even be cracked and have a few air bubbles. That is totally normal! Before using them you need to spritz them with some water and then let them sit for a few minutes to activate the paint – so the paint will soften a little and you can then start picking it up with your paintbrush. Here’s a super important tip for you: when you are finished with them, leave their covers off for a few hours until you are certain they are completely dry. Whatever you do, do not put the lids back on the little pots while the paint is wet. One of two things can happen – if there was any paint on the rim as it dries it will seal making it impossible for you to open it again. The second thing that could happen is it could start to develop mold.
You’ll notice in the video that I first spritzed my watercolor paper with a little water before applying my Twinkling H2O’s with a paintbrush dipped in water. This step is optional, but I have found that the colors seem to move and blend better when the watercolor paper is spritzed before hand.
The inlaid die cutting technique is pretty self-explanatory, but I did want to mention a few thinks about the Shrink Plastic. Remember the days of Shrinky Dink? It’s still just as fun. Because it is a non-porous surface you do need to use a permanent ink when stamping – I used my Ranger Archival inks, but you could also use StazOn inks. For the Feel Better card I chose an outline image and left it uncoloured because I wanted the watercolored background to show through. If you were creating acetate embellishments and wanted to add color to them – you could use Alcohol markers (Copic or Spectrum Noir), you could also dab on colors using an ink blending tool with the felt pads and Ranger Alcohol inks. The only thing to keep in mind if you add color using any of these products is that you absolutely have to make sure you apply the color to the side opposite the side you stamped on. If you try to color over top of the Archival ink or StazOn ink – the alcohol markers and alcohol inks will react, and smear the stamped lines.
So that’s all for today. I hope you enjoyed this video tutorial. I’d like to extend a huge thanks to Simon Says Stamp for having me as a guest designer.
SUPPLIES:
 |
 |
 |
 |
 |
 |
 |
 |
 |
 |
 |
 |
 |
 |
 |
 |
 |
 |
 |
 |
 |
Thanks for reading today and thanks to Andrea for being our guest!

Blog Candy Alert!! Follow our blog via email and comment on this post for a chance to win a special blog candy!
Congrats! Blog Candy Winners!
From: Happy Easter!: Dawn Skene!
From: Robot Love: Pat McCleary!
From: April’s Color of the Month Is…: Melissa Friedrich!
From: Multi Medium: Art Journal Page!: Keysha Sain!
From: Thanks Card: Jeanie Gregory!
From: How to: Fineline: Andrea Houston!
Please email Samantha ([email protected]) with your mailing address and the name of the blog you won from to claim your prize!


I absolutely just love the card you made! Thank you so much for sharing it!
Dear Andrea, thank you for this awesome card and for the great techniques you have given to us!
The contrast among the serene background and black die cutted parts is amazing! I also love the Shrink Plastic embellishing flowers, they look like real jewels! Thank you for the inspiration!
Those colors look amazing against black! Love it!
What a beautiful card!
Wonderful tutorial Andrea! I love those shrinky dink flowers. They made a beautiful embellishment for your beautiful card!
I love the card and Andrea is a wonderful video maker.
Great tutorial! Beautiful card!
Love the card.
craftymom205 at yahoo dot com
Gorgeous watercolor card. Love the flowers you created.
Gorgeous, stricking card. I wish I had all the stuff to make this card. Thanks so much for sharing.
wow—wow! Love the effects of the colors together!!
A colorful and creative card
stamping sue
http://stampingsueinconnecticut.blogspot.com/
THAT is beautiful Andrea! I love it.
Awesome card and fabulous techniques! Great video, Andrea! I think I need to add some shrink plastic to my stash – love the little flowers Andrea added!
Soooo Gorgeous!! I Love these types of dies for inlaying!! Love your watercolored background!!
Beautiful card! I especially enjoyed the video tutorial:)
This is lovely! Reminiscent of a stained glass window! Beautiful!
Such a beautiful card! Thanks for sharing the video.
Great tutorial. Love the results!
Beautiful card. Never think to use my H2O’s for backgrounds. Thanks for the idea.
Love the shrink plastic flowers! Have to see if I can find my plastic. Haven’t used it in years!
I have not seen this technique before and just love it!! Beautiful work and can’t wait to try it myself :)
Love all the techniques used here.
Love the card and the techniques!
Beautiful, beautiful card.
Loved the video, I learned several new things! The card is so pretty, the colors pop so beautifully against the black frame!!
Wow, what a colorful and pretty card!
Love the card. I never thought of using the shrink plastic, great idea.
Love this look! It reminds me of the stained glass technique used in quilting with ⅛” black bias tape. Very sharp!
OH WOW!! What a fabulous card!!!! I love the colors and that die is just fantastic!!!! It is definitely going on my wish list!!!
I love this card. A always tell myself I have enough “Stuff” then I see a wonderful card like this and I want the products. Beautiful,
Great choice of colors – look really nice with the black. Very nice card!
What a great idea! Thanks for sharing!! =)
This is a very nice water colored card. I own this set and love what you have done with it. Thank you for the video.
What a fun card! I love all the techniques, I will have to give them a try. I love the colors used also, so bright and cheerful!
That card is so beautiful! I love the contrast of the black and watercolor.
Such a fabulous video for this cute card.
So very beautiful! I enjoyed the tutorial too. The colors you have chosen are so pretty and makes it such a cheerful card. Hugs, Robin
Great card. I love the pretty colors, and how they show up with the black. Michelle t
Thanks for the great tutorial. Some new techniques for me.
Wow, what a striking card, off to watch the video and thanks for sharing your techniques!
Gorgeous card with lots of techniques all in one! SO MUCH FUN! Thank you for video tutorial!
The black really makes a nice contrast doesn’t it?
Love this card & the great tutorial! I really appreciate the tips on using my H2O’s.
beautiful card. Wonder if I could get a similar effect using plain circle dies, since that’s all I have…. Think i’ll give it a try. Thanks for the inspiration.
love the this die cut – what a beautiful card and such fun with the srinky embellishments.
Wow! This card is fantastic, as is the video. TFS.
What an artistic card! Loved the use of the twinkling h2o’s and the shrink plastic. Such fun.
Gorgeous card and thanks for sharing your video.
Andrea is an awesome designer, I’ve seen her SSS projects before and as always she explains the techniques very clearly. Also, the watercolors blended beautifully. The rhinestones added a bit of bling :)