Create with Prima!
Hi readers! Happy Tuesday to you! I’m so pleased to welcome back Finn to Simon as a guest on our blog! What some of you may not know is that she was on our (now Wednesday challenge blog, at that time our only challenge blog) long ago! It’s fun to see how she has continued to inspire, create, & grow! She has created a really cool mixed media project for us today!
Enjoy!

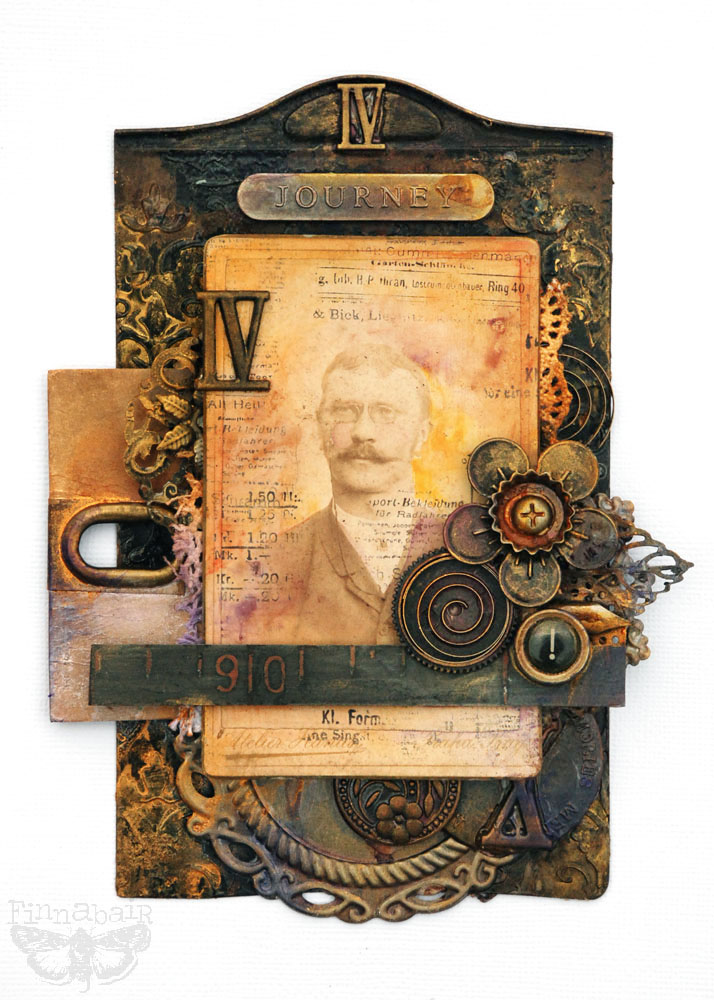
I just love collecting vintage objects – and old photos and cabinet cards have a special place in my heart. Looking at them I’m always wondering what is the story of people captured on them, who were they and why their photos were left behind. To create this project I picked one of the cabinet cards I had in my collection and combined it with an old photo plate I found on the flea market.
Because the surface of the cabinet card was glossy I covered it with a coat of Art Basics Clear Gesso – and when it was dry it turned into beautifully matte, easy to work on surface. I added a bit of color to it using watercolor pencils blended with waterbrush and I stamped it a bit with Archival Ink (Jet Black) and Vintage Vanity Stamps to create more artistic vintage look.
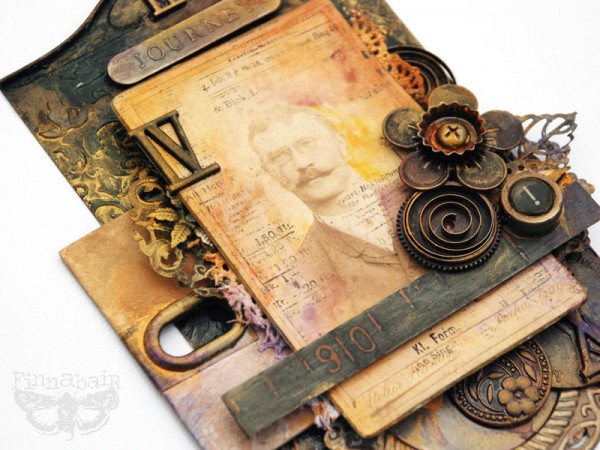
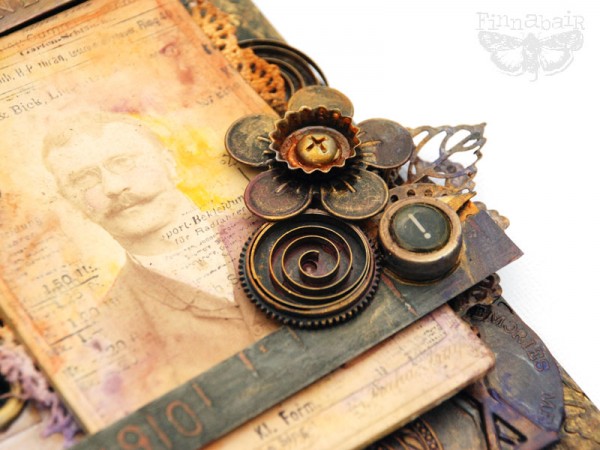
My next step was applying Art Basics 3D Gloss Gel – medium which is not only great to create texture but also great dimensional glue – on the vintage metal plate to create interesting texture. Damask stencil was a great choice and the effect was just beautiful! I dried it with heating tool until it started to turn clear and I was ready to continue: building multi-layered composition. I used a selection of my Mechanicals and Ingvild’s Junkyard Findings which I glued down to the plate and photo with Art Basics 3D Gloss Gel. To add more dimension t the project I used 3D Foam Squares too – my favorite are from Scrapbook Adhesives by 3L. The combination of Prima embellishments and a bit of found objects added a nice, “grungy” touch to my little collage – and strong vintage feeling of course!
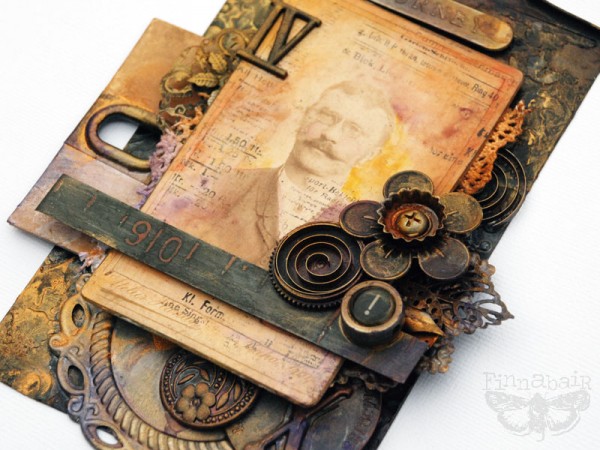
When the composition was finished I dried it for a moment with heating tool to make sure they will stay in place and I covered all my slippery embellishments such as metals or plastics with a coat of Clear Gesso to help my paints to stay on them. When the Clear Gesso was dry I sprayed them a bit with Color Bloom Sprays (Gold Foil, Iris, and Pressed Petal) and dried them again.
Finishing touches were made with a selection of 3 colors of Silks Acrylic Glazes: Ginger Peach, Boysenberry and Honey Amber. I took just a bit of this acrylic paint on my brush and dry brushed it in the selected places to balance the color and add some extra shine.
Supplies:
 |
 |
 |
 |
 |
 |
 |
 |
 |
 |
 |
 |
 |
 |
 |
 |
 |
 |
Thanks so much for reading, and thanks to Finn for being our guest today!
Blog Candy Alert!! Follow our blog via email and comment on this post for a chance to win a special blog candy!

Congrats! Blog Candy Winners!
From: Art Journal Cover: Barbara Martin!
From: Happy Christmas Creative Uses: Michelle Yuen!
Please email Samantha ([email protected]) with your mailing address and the name of the blog you won from to claim your prize!


Incredibly amazing, eyes never stop watching all the details…love it!
very cool project
Amazing mixed media project! Thanks for sharing!
Gorgeous!! I love the layering and vintage look.
Wow! This is stunning with a gorgeous vintage look.
Looks like it came from the past….something from the attic…love the vintage feel.
This is absolutely stunning!
I am absolutely speechless! This is just gorgeous! I have never had the never to try something like this but so wish I did because I LOVE IT!
Beautiful project :-D
this is amazing
Very vintage vogue! Way cool. TFS !
I love this piece. I like pictures from the past and also wonder what’s behind the photo. I’m looking forward to whatever Prima has been hinting about. And I love ALL of Finn’s work. The world is blessed, amazed and thankful for her and the artistic eye she shares.
DELIGHTFUL piece – LOVE IT!!!
LOVE the INSPIRATION and LOVE learning how it was made too, especially with all the metal mechanicals & findings!!!
THANK YOU for sharing :)
CONGRATULATIONS to the lucky winners too – it is always a joy to see a friend on the winner’s list – WTG Nancy :)
wow, so gorgeous! I love the vintage Prima products and this project here is so beautiful!
OMGosh, this is phenomenal! My husband collects vintage chests, coins and photos (tintypes and daguerreotypes) so this type of project really catches my eye! Love it and thanks so much for sharing!
Wooow! This is awesome! I love vintage looking projects!
FABULOUS project, Finn! LOVE the design and all of the wonderful details. :)
What a cool mixed media project! This would be so cool to do with a family photo. My grandmother entrusted me with the family photos after she passed and I have some amazing sepia toned and black and white photos that would lend themselves beautifully to a project like this!
wow—so envious of people who can create beauty so effortless, it seems!
What an amazing project, and a beautiful way to use your collected items.
Beautiful project. Such a lot of work. Happy Holidays!
So unique. Lovely. Thanks for sharing.
Lovely project!
What a breathtaking project.
Gorgeous project! Merry Christmas to everyone at Simon Says Stamp!
Such a cool project! Merry Christmas to the folks at SSS!!!
I love the depth and texture of this piece! The glazes make for such rich colors.
I love this Fin!! Thank you so much for sharing and I can’t wait till your new products are available!!
Wow! This is beautiful and has so many fascinating details.
Fin always inspires me! Love all the gorgeous colors and texture of this project.
I wish my mind could come up with stuff like this.
I love mixed media projects. This one is beautiful.
What a neat project so beautiful.
Wow, thanks for the vintage inspiration Finn! Great mix of elements.
Amazing project!
This is fabulous!
I have to keep looking at it to really see all the details~ So Awesome
Absolutely awe-inspiring work!
Wow! This is beyond fabulous!
Wow absolutely stunning
I just love the aged metal look! Wonderful creation!
I am absolutely in love with the project! Awesome design. Thanks for the inspiration.
Gorgeous!! Love this new collection! Congratulations to the winners!! TFS
Beautiful vintage design!
Nice little piece of art!
WOW this inspires me to maybe get my hands on a project like this. Merry Christmas to all at Simon’s says! I am so glad I discovered you a few weeks ago.
Love all the great vintage details on this.
Love that vintage look..!! Amazing!!!
I love your project! I love anything vintage or old. Thank you
Love this multimedia art piece, that vintage photo plate is beautiful and your project is fabulous! Thanks for sharing the steps, like getting rid of the glossy finish.