Weekender with Wanda – Christmas Thank You Cards with Tim Holtz Products!

Hi everyone! Happy weekend! And happy week before Christmas! Welcome back to the latest edition of Weekender with Wanda here on the Simon Says Stamp Blog! Is your shopping all done? Cards mailed? I still have a few things left to do and still need to go to the post office (I have been procrastinating on that) but otherwise I’m ready! I’ve been enjoying the season, drinking hot chocolate and driving around looking at Christmas lights. Christmas light hunting is one of my fav things to do this time of year. People are so creative and festive! My husband is such a good sport driving me all around. He even installed battery operated Christmas lights on my car!
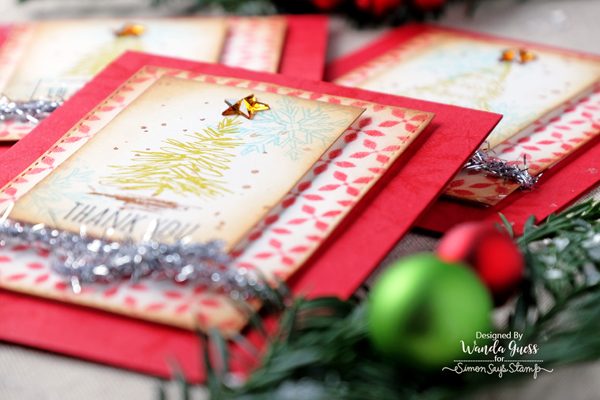
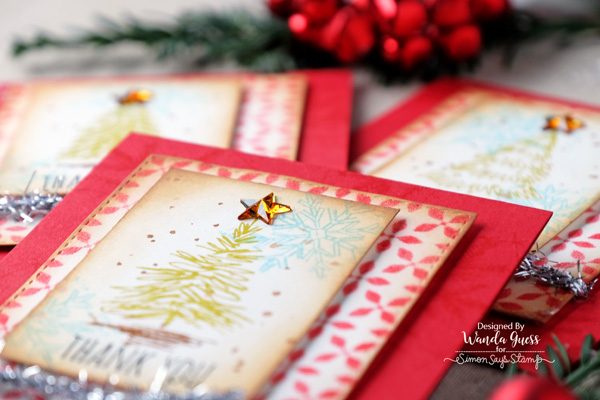
I think it’s safe to say that we are winding down on our holiday crafting and maybe looking ahead to the new year. One of the things I like to do every year before I put away all of my Christmas stamps and supplies is make Thank You cards! It’s so nice to have some holiday themed Thank You notes on hand to give out if someone invites me over or gives me a present. I am always glad that I made some. Today is my monthly post in which I use supplies from Tim Holtz and Ranger. I used lots of my favorite Tim Holtz stamps and Distress inks and a lovely new stencil to create a set of three cards to share today.
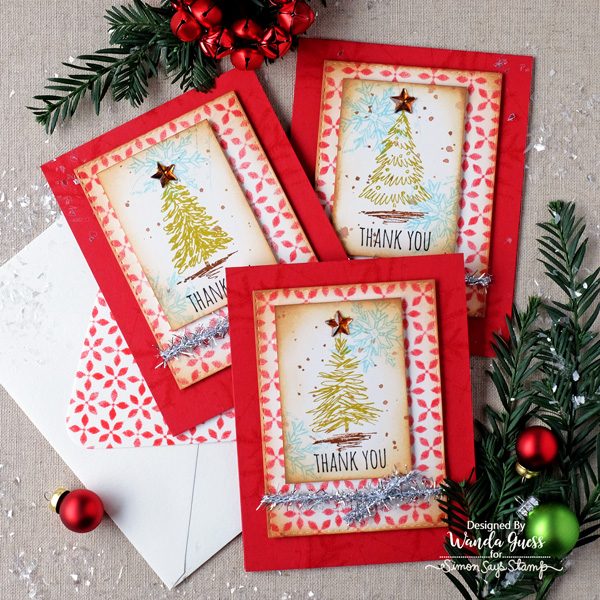
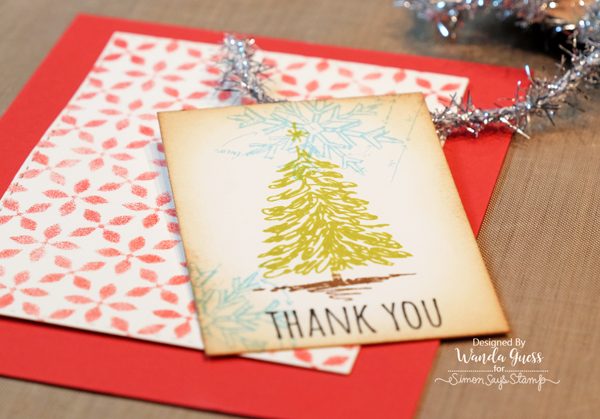
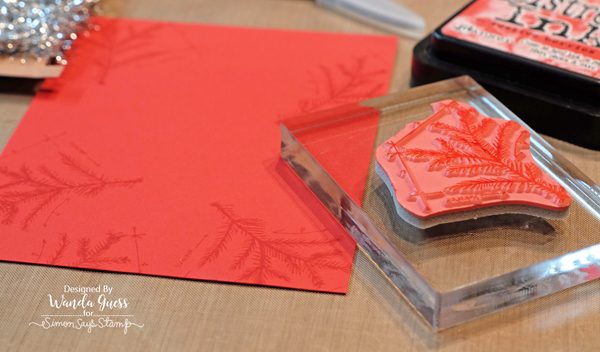
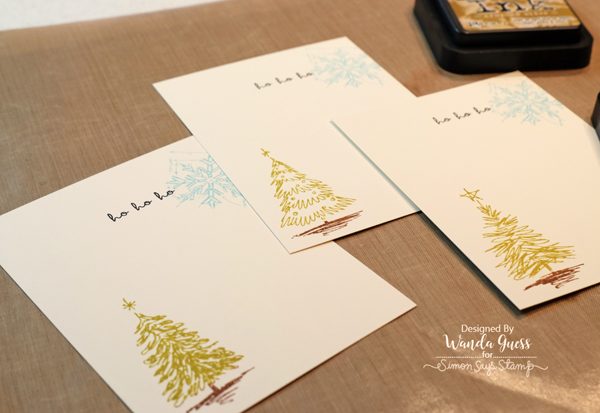
The Tim Holtz Scribbly ChristmasTrees stamp set has beautiful tree stamps that are the perfect size for cards! I used three different trees for my card set. All the other supplies are the same on each card. For the sentiment I used Thank You from the Crazy Talk stamp set. Here is a close up of my stamping layers. The snowflakes are from the Tim Holtz Mini Blueprints stamp set.

The cards have a few layers, but are basically flat for easy mailing. This card layout is a good one for many occasions and a nice way to use your stencils to create background paper layers.
Here is a close up of the layers. I started with a vivid red A2 card base. My stamped and stenciled layers are with cream cardstock for more of a vintage feeling. I’ve inked the edges of the two top layers using Antique Linen and Vintage Photo Distress Inks and a sponge.

I used a mini sponge dauber and Festive Berries Distress Ink with the gorgeous Nordic Stencil! I used a light touch so that the images would not be completely solid red. I always use washi tape to tape my stencils onto my craft sheet. Makes it a lot easier to get a clean impression.
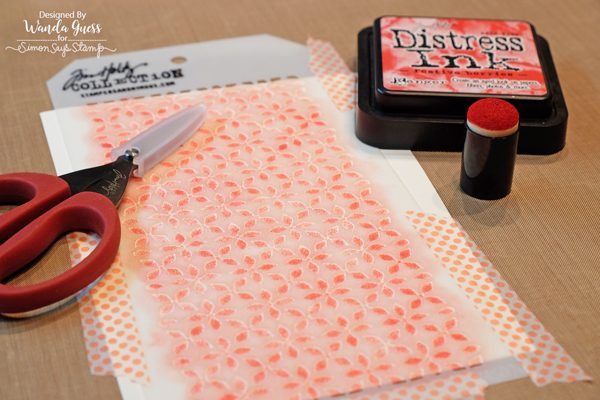
I stamped the Blueprint Mini Snowflake in Tumbled Glass Distress Ink. My stenciled layer was die cut into a rectangle using the Simon Says Stamp Stitched Rectangles Dies. A strand of shiny tinsel trim completed the vintage notes!
When I was putting my card together, I thought that the red layer seemed like it needed a little something. One trick I use a lot is tone on tone stamping. I did that here by using Festive Berries (red) ink on red cardstock. It gives just that little pop of interest and texture to the card base. I used the pine bough image from Mini Blueprints 7.
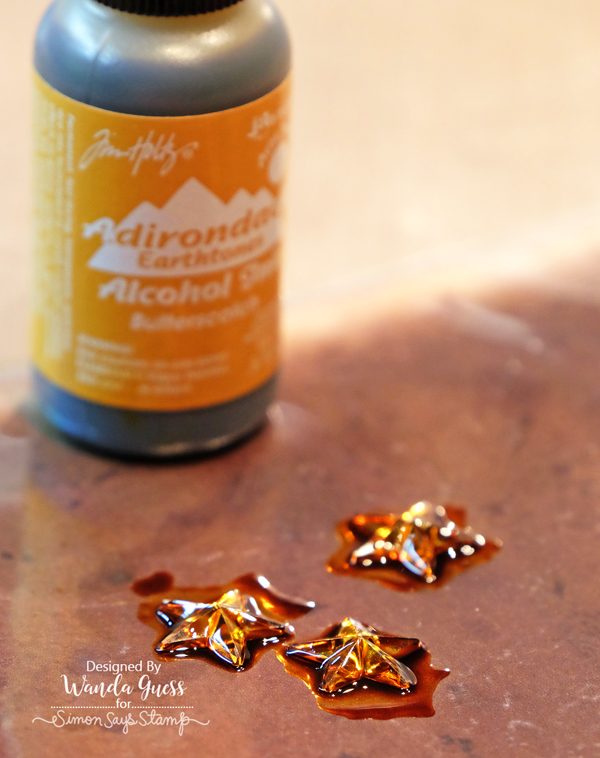
I colored the pretty mirrored stars with Alcohol Ink in Butterscotch. This color is a beautiful vintage-y gold!
These are the insides of the three cards. I matched the trees on the front to the ones inside to tie it all together. Clean and simple, with room to write a greeting or message.
Then I had an idea! Why not stencil the envelopes! Another nice touch to make your project look polished and pretty. This just took a minute – but what a great impact!
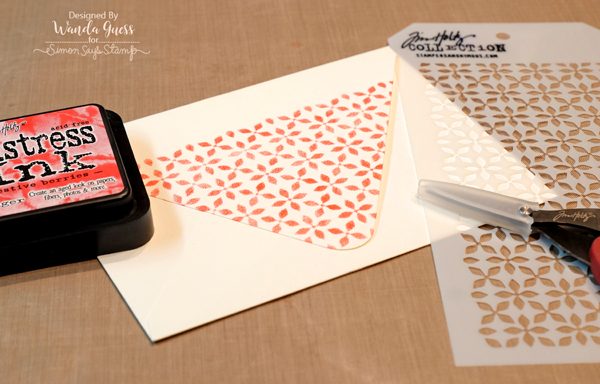
I love that the envelope matches the card! The top two layers are attached to the card base using foam tape. I wrapped the silver tinsel around the stenciled layer before attaching it.

The gold stars are the perfect touch with all that red!

Thanks for stopping by the Simon Says Stamp Blog today! Have a great week! I’ll see you one more time before Christmas is here!
SUPPLIES:
 |
 |
 |
 |
 |
 |
 |
 |
 |
 |
 |
 |
 |
 |
 |
 |
 |
 |
 |
 |
 |
 |
 |
 |
 |
 |
 |
 |
 |


Lovely Thank You cards and matching envelopes, Wanda.
Sure do love this one.
I love how you colored the stars and made the envelope match!
Thank you for sharing your stencil work ! I’ve got loads to use !
Love these cards!
Great cards! :)
Very pretty cards. And a great way to send thank you cards for those Christmas gifts that we receive, I think that a lot of really forget to do that anymore. I really love how you did the cards, very pretty. Thanks for sharing.
Love your project with TH products–I love to use alcohol inks and distress inks with his stamps, awesome!
WOW Wanda, these ARE awesome and we ARE winding down to Christmas… Whew! My MIL always said time went faster as we age…She wasn’t kidding!
Merry Christmas to you and your loved ones!
Really Pretty cards!!!!
Great idea! Nice and simple.
Nice cards. Thanks for sharing all the design tips! Love the stenciled envelopes also!
Wow those are spectacular cards!
Wonderful colors and layering! Such beautiful cards!
These are amazing and look like they worked up pretty quickly! Thanks for sharing!
Love the use of all these diverse products….most of which I have, so time to get crafting! LOL
beautiful cards. . .nice touch on envelopes
Wonderful cards!
These cards are gorgeous, love the vintage feel, the mailable layered design and the matching insides and envelopes really make them WOW! Thanks for the tutorial steps, and a great idea to have on hand. I think I will make some with and without a sentiment, so if I have any leftovers they will be the start of 2017 Christmas cards.
So many neat features about this beautiful card, I really like how you dressed up the envelope too.
Lovely card and I love that you stenciled the envelope too.
Oh beautiful cards, I love that the envelopes are all dressed up too!
Nice design!
So very beautiful, Wanda! Love the stenciled backgrounds, perfect for the trees.
Great idea! I love how you stenciled the envelopes too! Lovely set of cards! TFS
Great cards Wanda, love the stenciling :)
Wanda–I never thought about making Christmas thank you cards! I do have thank you cards–but I never thought about making special cards with Christmas designs. Thank you so much for sharing not only a great idea but a truly GREAT card! I just love it!
Lovely card and envelope. Thanks for the reminder to do Thank you cards too. So much to do and so little time but enjoying the creative spirit of the season.
Lovely card – love how you used tinsel
Wonderful cards.l.love all the little details you added.
Lovely. I don’t seem to see many thank you cards though, not much anyway any more. Cards in general don’t seem to be sent often either. What’s wrong with us for not being and expressing thankfulness .
Wanda, your cards always make me so happy.
You surely know how to use color.
These cards are just so pretty! I love the different layers and their details– and the envelopes are the perfect finishing touch!
Beautiful cards easy to make
Very cute idea! Thank you for sharing!
I love these! Thanks for the great ideas to use products.
I love these Christmas thank you cards. I love the distress and aged look.
Stenciled background is nice touch, Wanda. Love these TH trees.
I have a thing for trees! Love these tree stamps and your cards are very pretty!
Love the decorated envelope. I would have never thought to use a stencil pattern!
I love the idea for making matching envelopes! The stencil ing looks fabulous.
Lovely cards!
Love all the beautiful layers, and the matching envelopes are a perfect finishing touch!
Beautiful cards and
hoping you have a
Merry Christmas!
Carla from Utah
These are beautiful! The stencilled background is lovely!
Pretty layering and fun trees! Love the embellishments!
this is so fun cute and definitely memorable
I love the fun stenciled background on these cards! So festive
With matching envelopes the fun begins even before you open it!
These are such pretty and simple cards. I love the matching envelopes.