Tim Holtz Fragments
Hi readers! Happy Saturday! We’re very pleased to welcome back guest designer Paula Cheney to share a fun and unique project with us that features lots of fun goodies from Tim Holtz!
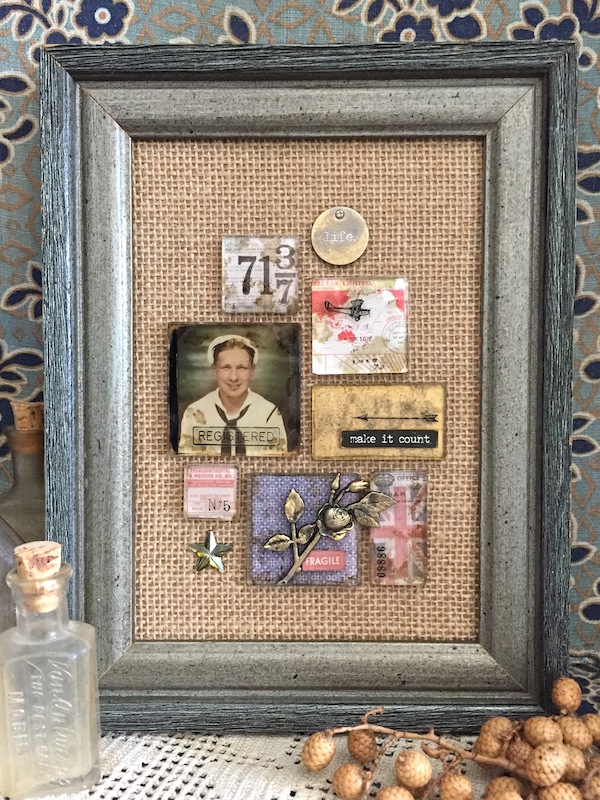
Hi everyone! I’m glad to be back at Simon Says Stamp today to share another idea-ology project with you. Today’s project is all about Fragments. What are Fragments you say? Well they are clear tiles used to create custom adornments by gluing to paper or inking. Follow along while I’ll show you how to use Fragments in a small frame, as well as some trick’s to giving your piece a vintage look. Come on, lets get started!
-
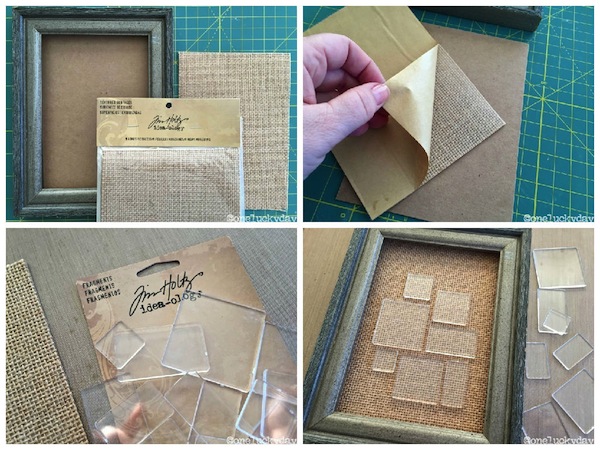
I am using a frame I already had for this project – the opening is about 5 x 7”. My frame is kinda chunky, but really any shape or size will do, either adding or or subtracting Fragments until you are satisfied. I am also using the burlap from the Textured surfaces pack. This pack comes with 4 corrugate, 3 cork and 2 burlap. All are self-adhesive.
-
I cut a piece of chipboard to fit the frame and adhered the burlap to the surface. The burlap is thin and a nice weave. It makes for a really smooth surface over the chipboard.
-
Time to break open the package of Fragments! The new Fragments pack comes with 34 pieces in 8 different shapes. You can make a lot of projects with just one pack!
-
I placed my frame over the burlap to get the right placement for the Fragment pieces.
-
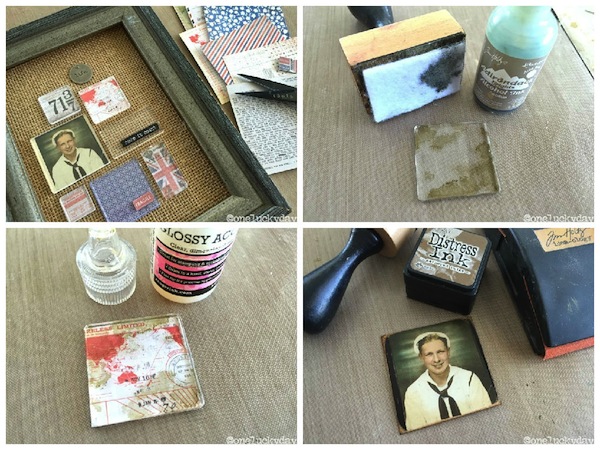
I am using a page of 3 x 3” squares from the back of the Correspondence Paper Stash for this project. Using the miniaturized versions of the Correspondence paper is perfect for this project since the Fragments are small. Begin cutting paper to match each Fragment, leaving some blank for pictures and words.
-
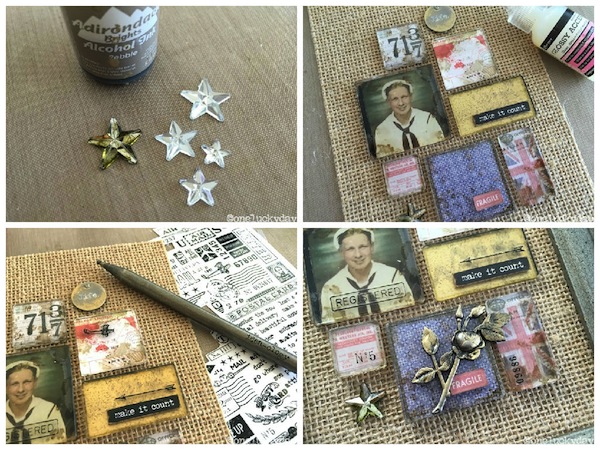
You can leave the Fragments clear or add Alcohol ink to create a vintage look. To do this, add a small amount of Alcohol Ink to the felt pad on the Blending Tool. Then pounce the tool onto the Fragment.
-
HINT: It does not matter what side of the fragment you add the Alcohol ink to (there is no right or wrong side) but it does matter what side you place down on the surface. Alcohol Ink on bottom = darker, bolder look. Alcohol Ink on the top = lighter, more subtle vintage.
-
Add glossy accents to the back of the Fragment. Adhere paper to the Fragment by moving the paper around in a circle to squeeze out any air bubbles. After a few seconds the paper will become adhered to the plastic and will become permanent. Trim off any paper from edges.
-
The Photobooth picture was a bit narrower than the Fragment. I used a permanent marker to color the edges black, then sanded with the Sanding Grip and inked with Gathered Twigs to give it a vintage look.
-
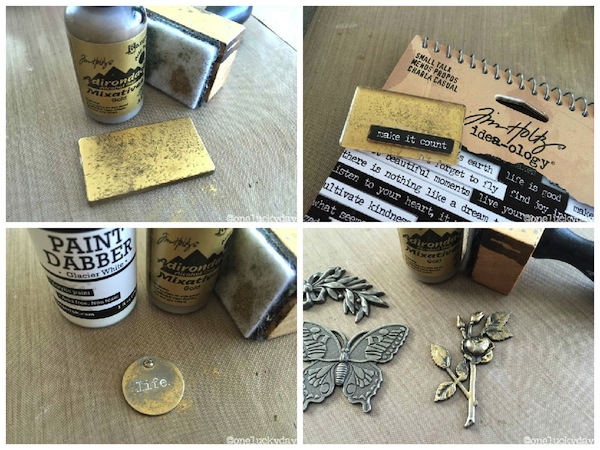
I added Gold Mixative (meaning you have to shake it up before use) to one of the blank Fragment pieces. When this is flipped over onto the burlap it will look like old mercury glass.
-
I added a phrase from the Small Talk sticker book (one of my favorites of the new releases). So many phrases to choose from…and they come in black and white. It’s the perfect sticker book!
-
Now for some small embellishments: Typed Tokens are small, lightweight word coins that have a hole at the top for hanging, or in this case, I added a Mini Fastener that will make it look like it is screwed in. I added white paint to the word, then wiped away the excess. Once dry, I added some gold Alcohol ink to the edges.
-
I also added a bit of gold over the top of the rose from the Nature Adornments pack.
-
Mirrored Stars are also fun to color with Alcohol Ink. One drop of Pebble is all you need to make the change from clear to vintage.
-
Adhere all pieces to the burlap with Glossy Accents.
-
Once the pieces are in place, add small Remnant Rubs to the Fragments using the Remnant Rub tool. This new metal stylus can be used to transfer and lift rub-ons to a surface. Works like a charm!
-
The last thing to do is to add the metal rose over the Fragments at the bottom and add to the frame.
I hope you enjoyed today’s project! The Fragment tiles are easy to work with and just a little bit addicting once you get started. So many idea-ology products could be added to a Fragment frame like Letterpress, Heirloom Roses and Adornment Arrows. The possibilities for personalization is endless…think wedding, birthday and graduation!
Happy crafting!!
SUPPLIES:
 |
 |
 |
 |
 |
 |
 |
 |
 |
 |
 |
 |
 |
 |
 |
 |
 |

Blog Candy Alert!! Follow our blog via email and comment on this post for a chance to win a special blog candy!


What a great idea! Very clean, neat and orderly but still a collage of memories. Love it! And I have plenty of fragments just begging to be used!
So delicate and cute project!
Love the look of this project-simple yet elegant!
Love the look…perfect for Father’s day!!
So clever; it looks old by the colours and pictures and it looks modern by the combination of fabrics, wood and plexiglass… Like it!
Great project – lots of possibilities!
Such a great vintage project! Thanks to Paula for her detailed Fragment tutorial. It’s great when you can see a new-to-me product altered in so many ways. Looking forward to giving it a try.
A wonderful project, thanks for the tutorial.
Nice vintage look.
stamping sue
http://stampingsueinconnecticut.blogspot.com/
Oh Paula! I just got the new Textured Surfaces pack yesterday! This project gives me a wonderful idea of a gift I can make for John with some of his dads old Army memorabilia. Thank you for the inspiration!
That is a fantastic project.
Clever! I don’t make mixed media projects too often, but it amazes me at how talented eveyone who does it is!
Just gorgeous! Love the gold detail, thanks for sharing! :)
Absolutely fantastic! x
Oh my goodness this is absolutely Brilliant! So many new things to add to my wish list …lol. Thanks so much for showing how to use all of these items. I can see so many possibilities now that it’s all been explained to me.
Hugs,
Snoopy :D
LOVE your project, this is so cool!
Great arrangement for ephemera and pictures!
Carol b
Paula, you make it look so easy! TFS!
Love this fabulous project, such a fantastic way to cherish memories!!!
Great idea. Cant wait to personalize a frame of my own.
This is awesome! Love those fragments and yummy alcohol ink ♥
I learned so much in all the details of your step-by-step… Thanks for all the helpful hints!
Really inspirational, fun project and detailed tutorial. Thank you for sharing your knowledge on how best to use these fragment tiles:)
What a unique combination of old and new, so beautiful!
Super cool…I forgot I have those clear fragments. Now to find where they are hiding…
What a great way to show case some older pictures and create a great memory piece for the family.
LOVE working with burlap and this beautiful project shows why
Loveeee the fragments! So fun!~kim
Great idea. Love the burlap. The finished project is great.
What a special project!! Think I might try to make something similar:) Thanks for the tutorial!
Like the creation w/ Tim Holtz items. I made some of the alcohol ink Easter Eggs that TH has a video for on his blog.
Melissa
“Sunshine HoneyBee”
Fabulous project, Paula! Thanks for the inspiration.
lovely décor piece!
Beautiful project with a great vintage feel!
Love your project. Amazing!! Got to try some fragments….. Thanks!
I love vintage and this is a beautiful example of that. Great job and you can never go wrong using Tim Holtz products.
Wow! This is amazing! I can only DREAM of ever creating something fabulous like this!
I LOVE this project! Thanks for the inspiration.
Thanks Paula for a great project and tutorial, I need to play with some fragments!
Great project. I’ve seen the fragments and wondered how to use them. The instructions are so clear and helpful.
Very cool! Such a great vintage piece!
I like the products you used on this project.
This is fabulous project. Thanks for the inspiration.Tim Holtz products are highly innovative!!!
Love this, makes me want to get out my alcohol inks out.
Thanks for sharing! =)
This project is ,soft, simple, wonderful, clever! Every time I admire your art I’m speechless! BArbarayaya
Sooo cool :-D
Pretty frame, I love the vintage look!
AWESOME!! LOVING!! THANKS for sharing and have a FABULOUS WEEKEND!! =)
very interesting technique. I like the framed results.