One Stamp, Five Ways: Toil and Trouble!

Hi friends! Happy STAMPtember® eve! Can you believe we’re wrapping the month of August already? This year is flying! Please keep reading to check out this adorable addition to our “5 Ways in 5 Days” series with Suzy Plantamura who is seasonably sharing Halloween cards! Enjoy!
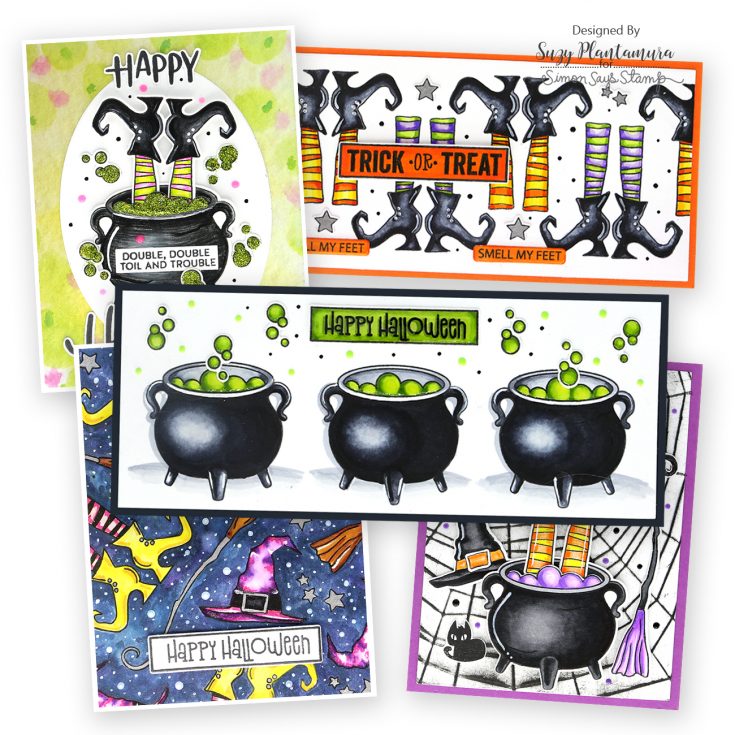
Hello my crafting friends! Today I have a “one stamp, five ways” post to share with you that is certainly going to get you in the Halloween mood! I know it’s a little early, but when it comes to making cards, is it ever too early?!!! I say get ‘em done now and then you can enjoy the holiday. Speaking of “witch”, who loves Halloween? I have to say, I’m not a big fan. But the stamp set I picked for today’s post is so cute, how could I not love it? It’s called Toil or Trouble and is actually a few years old, so some of you may already own it! If not, it is sold as a bundle or alone with a set of matching dies available as well. Here are my five cards!
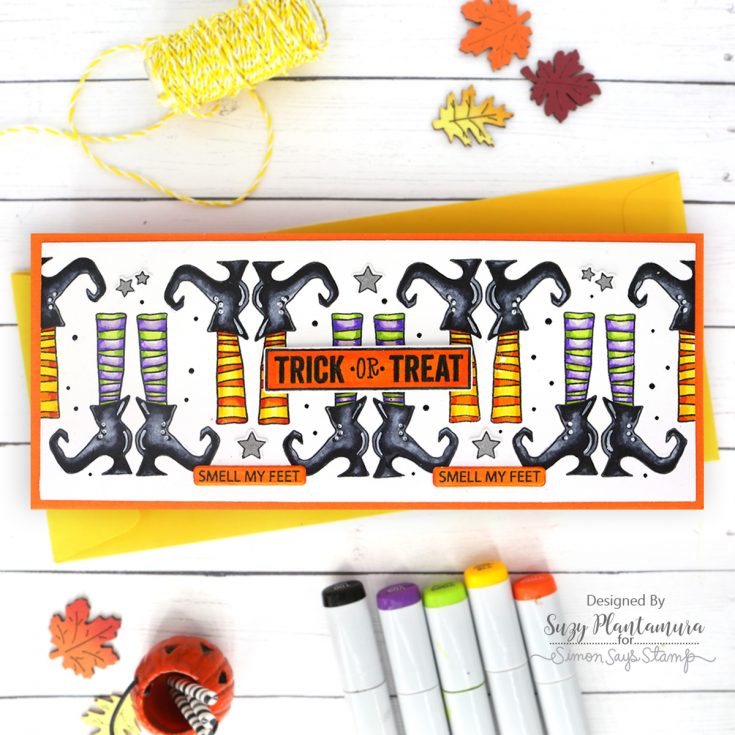
When I saw the witch legs with the big shoes, I wanted to make them the star of a card. I decided to stamp them repeatedly on a slimline card. I started with a rectangle die-cut using the SSS Nested Slimline Rectangle Dies and white cardstock. I then measured the center and measured the width of the stamp so I could put pencil markings where they would fit the best. I stamped them right side up and upside down to create a pattern using Intense Black Ink. I attached this piece to an orange cardstock slimline card base.
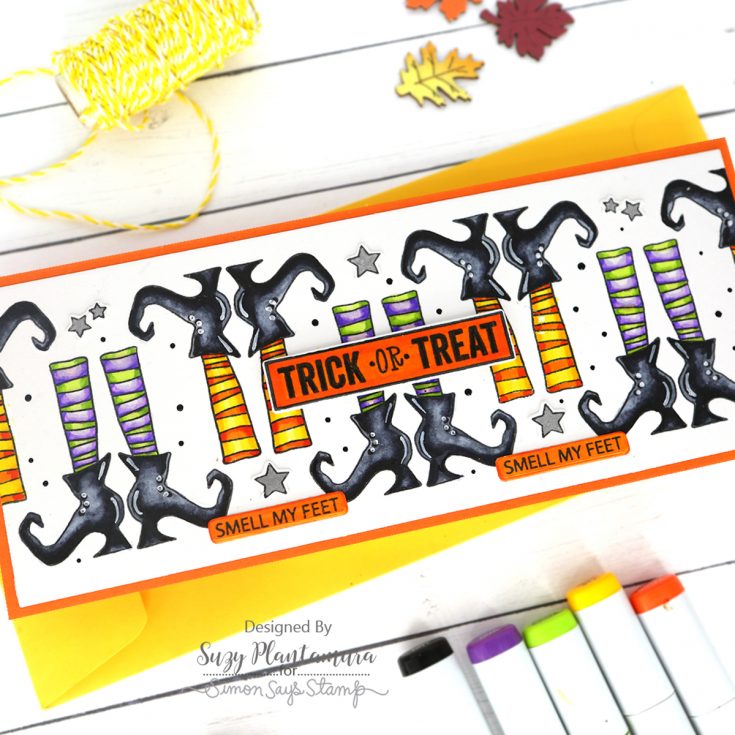
I then colored them all in with Copic Markers. I used a White Uniball Gel Pen to add lines and buttons on the shoes. I also stamped some of the 3-star stamps with black ink and colored them in with a silver glitter pen. I die-cut them out and cut the large one off the two small ones and arranged some between the shoes. I stamped the “smell my feet” stamp on two small banners die-cut with the Folksy Cat dies. I stamped the main sentiment from the Toil and Trouble Stamp Set as well as the rectangle and die-cut it out. I colored all the sentiments with orange Copics and added them to the card front. I finished with some Ebony Black Nuvo Drops around the stamped images.
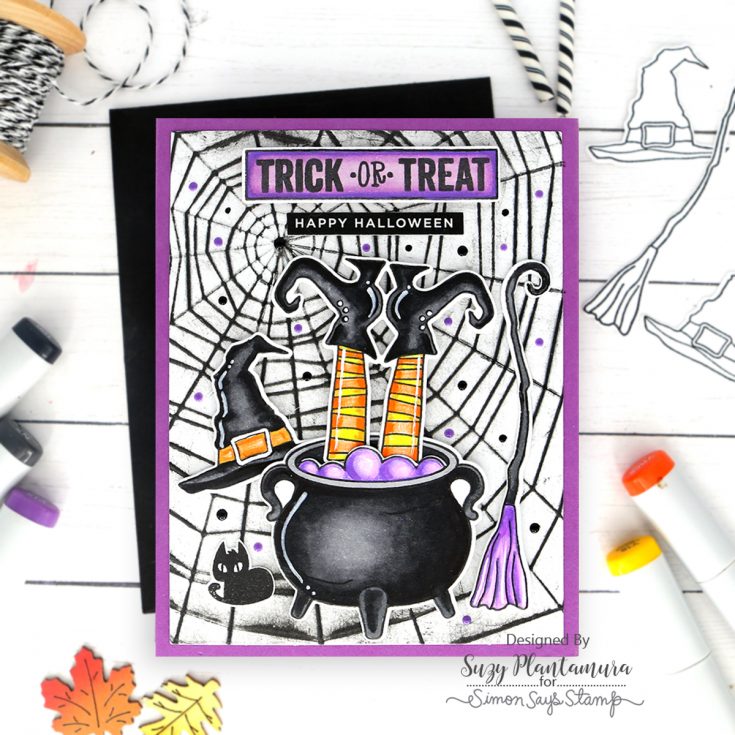
I embossed the Tangled Web Embossing Folder with white cardstock. I then rubbed an Intense Black Inkpad over the embossed image not pushing down too hard, so the ink just attached the the raised images. I die-cut this down with a SSS Basic Rectangle Die and attached it to a purple cardstock card base.
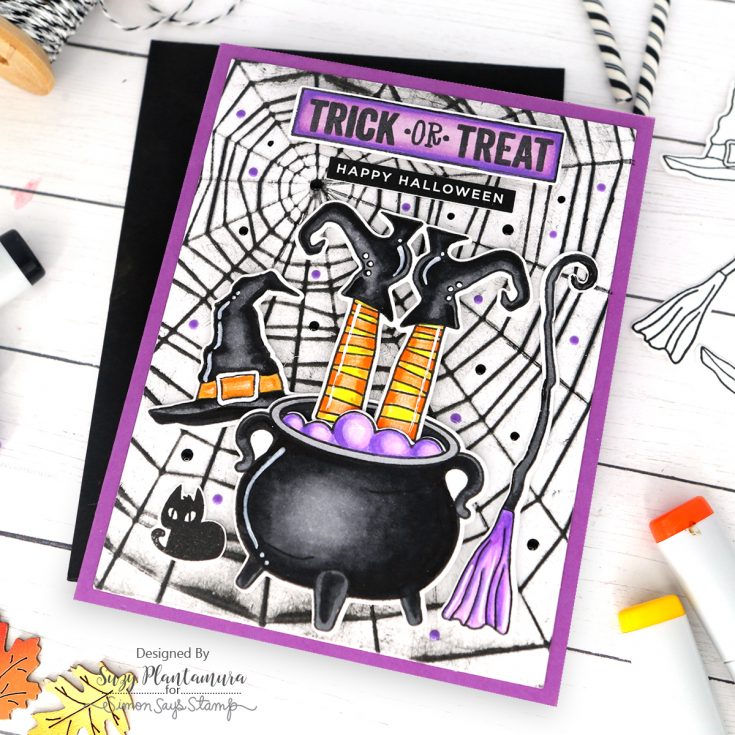
I stamped all the images in the Toil and Trouble stamp set with black ink on white cardstock. I colored them all in with Copic Markers. I added details again with a white Uniball. I die-cut them out and attached them over the background with foam tape behind some of them. I found a little black cat I had left over from a Halloween card at some point – not sure where it came from, but I added it to the bottom. I colored the sentiment banner stamp with the same color pencils and then stamped the sentiment on it with black ink. I also added a small sentiment label that said “Happy Halloween” to complete the greeting. I used black and purple Nuvo Drops around the background.
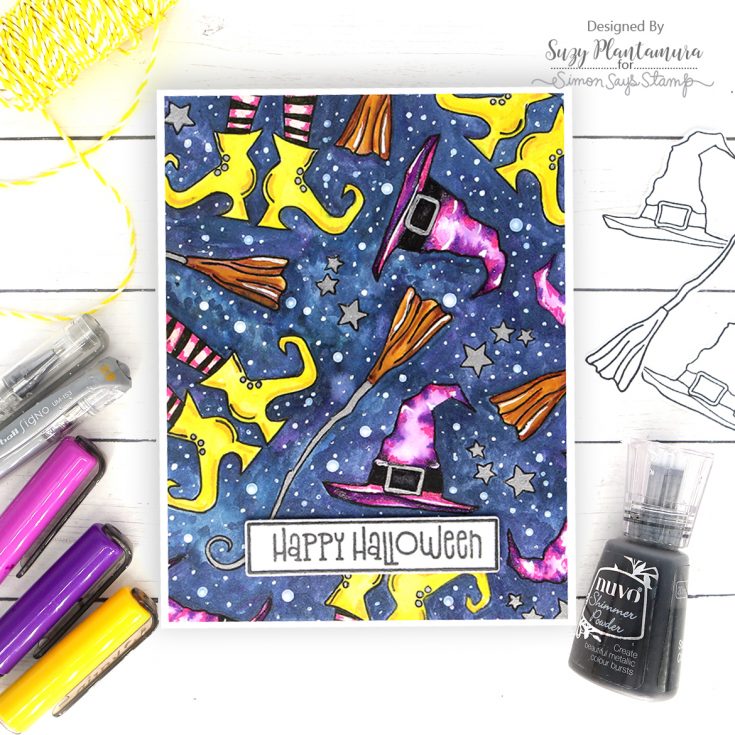
You know I always like to do a “random stamping” card and these images were perfect for it. I started with Tim Holtz Watercolor Paper cut to be the size of an A2 card. I then stamped all the images in the stamp set with black ink fitting together like puzzle pieces. It was nice having the smaller bubbles and star stamps to fit into the small spaces. I painted them all in with Karin Brushmarkers. I wet the images first with water and then dropped the color into them to get that mottled look you see on the hats. Then I added some white Uniball gel pen for more details and shading. I used a silver glitter pen inside the stars, the broom handle, and the hat buckle.
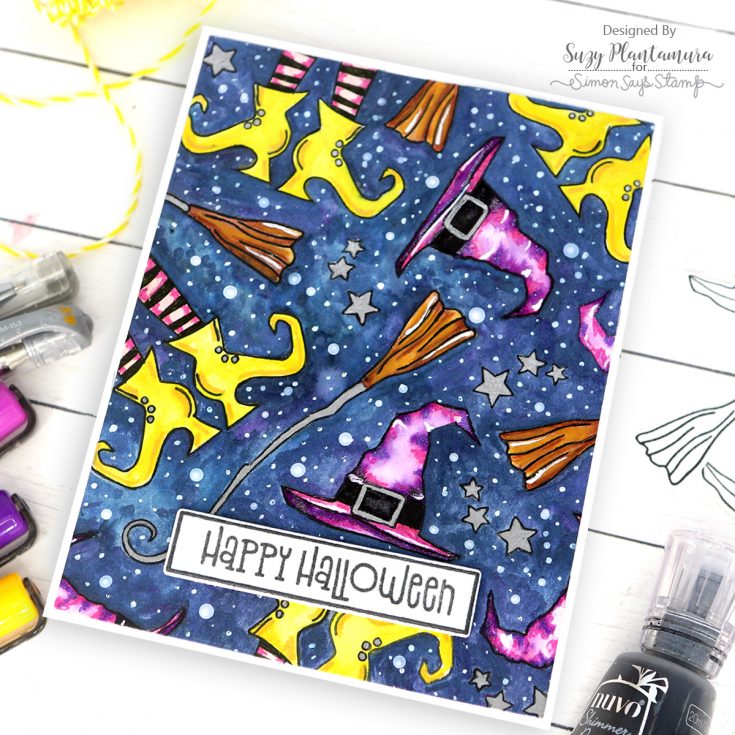
I painted the background with Meteorite Shower Nuvo Shimmer Powder. This has always been my favorite color as it is perfect for night skies. After it was dry, I added some white dots with white acrylic paint and a white Uniball. I die-cut this piece down with the SSS A2 Thin Frame die and attached it to a white card base. I then stamped the sentiment from the stamp set on the banner in the set and added that to the bottom center of the card with foam tape behind it.
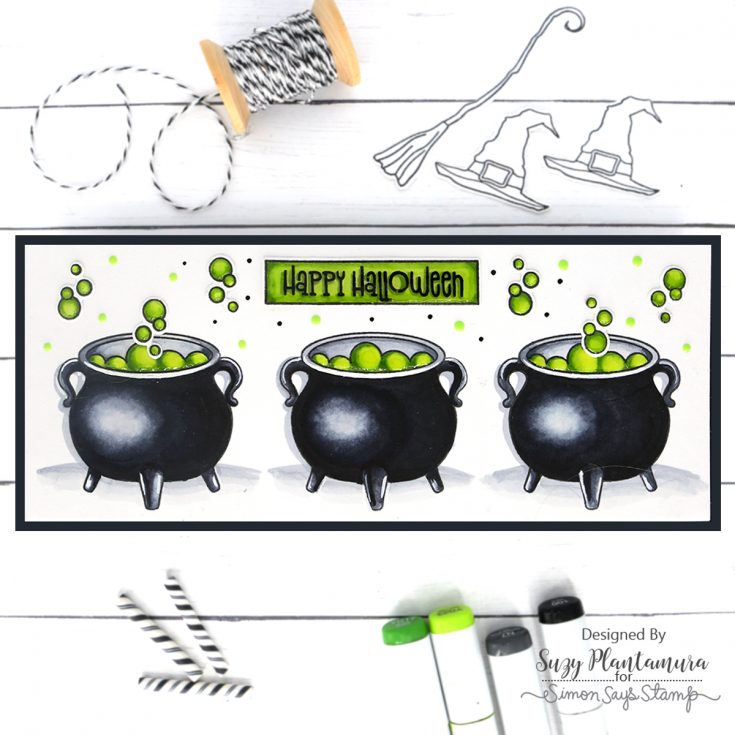
I ended up making two slimline cards this time! I die-cut another rectangle using the SSS Nested Slimline Rectangle Dies. I then stamped the witches pot three times along the front of the card (I measured to make sure they were evenly spaced). I colored them in with Copic markers. I stamped a few of the bubbles with black ink and colored them to match and die-cut them out with the dies. I arranged them around the top of the pots.
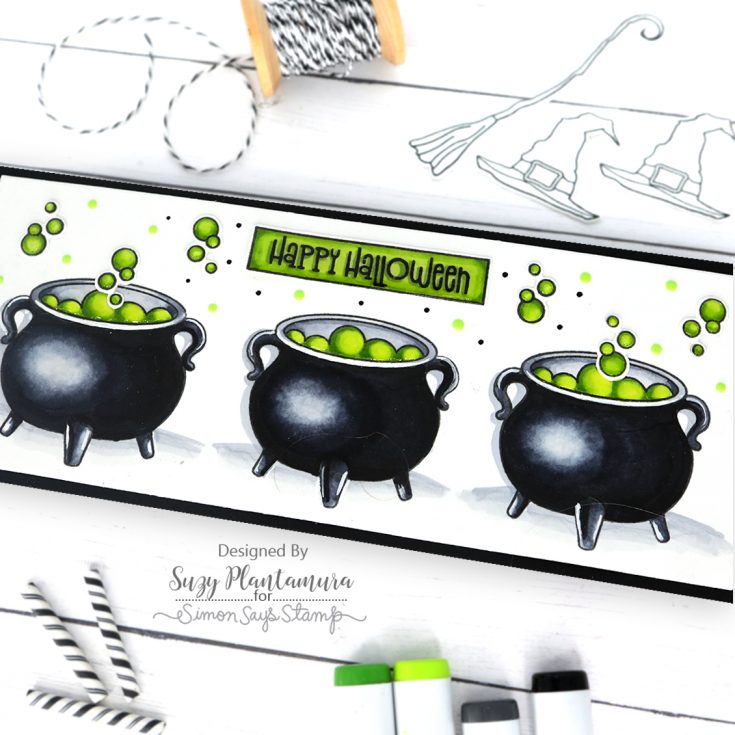
I stamped Happy Halloween on the banner in the stamp set. I colored around the letters with the same green Copic Markers I had used for the potion! I added some shadows behind the pots and ground around them to ground them with a gray Copic marker. I attached this to a piece of black cardstock and then a white card base. I added some Nuvo Drops in Ebony Black and Apple Green around the background.
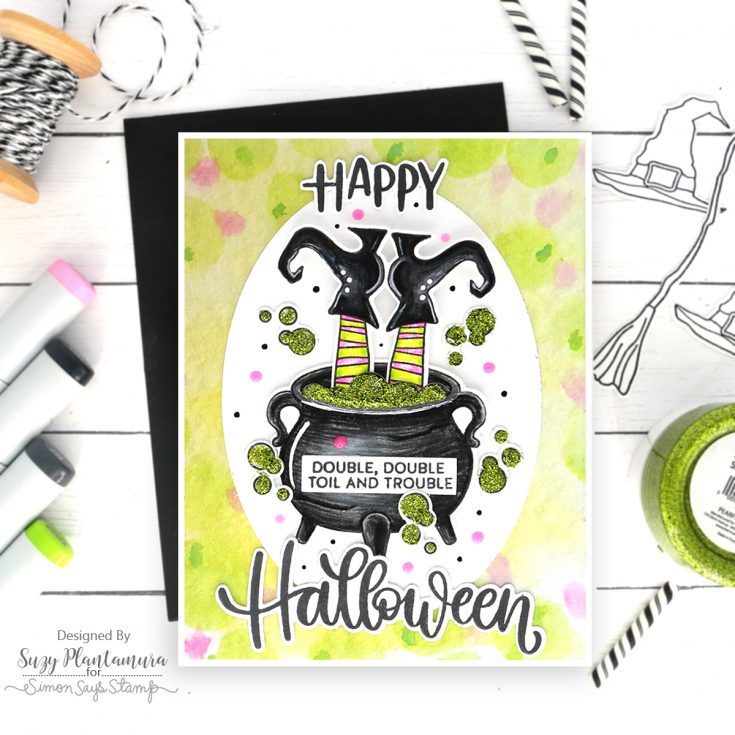
The part of this card that took the longest was picking out that patterned paper for the background! I used a piece that matched perfectly from a 6×6 paper pad I had just purchased called Fairy Hugs Lotus Wish. I die-cut it with the SSS A2 Thin Frame Die and attached it to a white card base. I also die-cut a SSS Nested Oval Die from white cardstock and attached that to the center of the paper.

I stamped the pot and the feet as well as several of the bubbles from the Toil and Trouble Stamp Set with black ink on white cardstock. I colored them all in with Copic Markers and Prismacolored pencils. I used green glitter paste over all the bubbles applying it with a Q-tip! I die-cut them all out and attached them to the front of the oval. I stamped Happy Halloween using another older stamp set called Handlettered Halloween and die-cut them out with the matching dies. I added them to the top and bottom of the oval. I also stamped a small sentiment from the stamp set on a SSS Sentiment Label Die and attached that to the center of the pot. I used some Nuvo Drops in pink and black around the scene.
Even if you aren’t a big Halloween person like me, you can’t not love this Toil or Trouble stamp set as it is so cute! I love doing these “one stamp, five ways” blog posts as they really make me think out of the box for different ways to use my stamps. I love pulling out items I’ve had for a while and never had time to use! I hope this motivates you to a) use your stamps more b) start your Halloween cards ahead of time and c) pull out some of your older products that you haven’t had a chance to use! Thanks so much for visiting today! –Suzy
SUPPLIES:
|


Thanks so much for stopping by, and thanks to Suzy for being our guest!


Absolutely SPOOK-tacular!!!! Your coloring is Amazing!!!
AWESOME Halloween ideas!
These are amazing … thank you so much for this blog feature
so fun and cute