Sparkly Thank You
Hi friends! Thanks for stopping by today and please welcome back special guest Dana Joy!! This very talented crafter made a gorgeously glittered “thank you card” as inspiration. Please read on and enjoy!
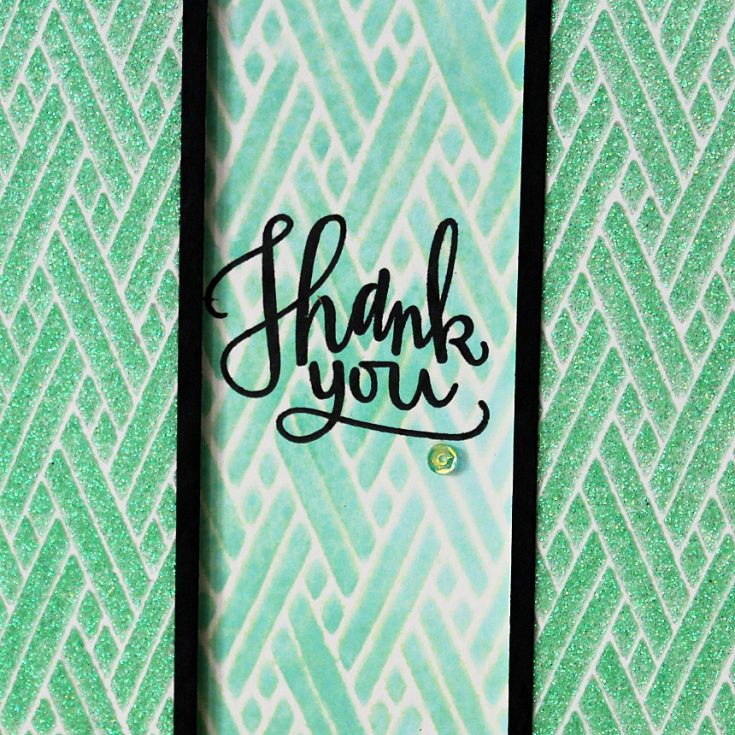
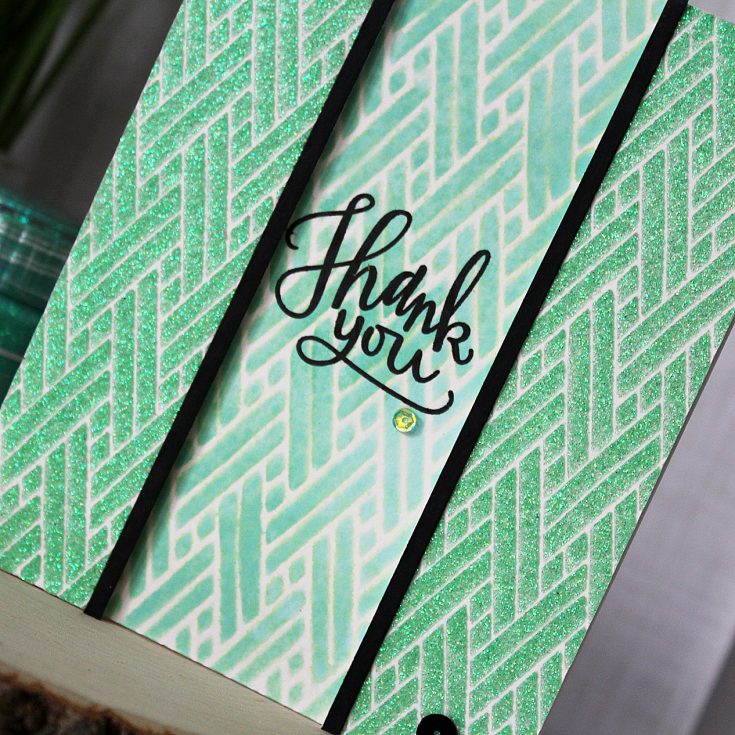
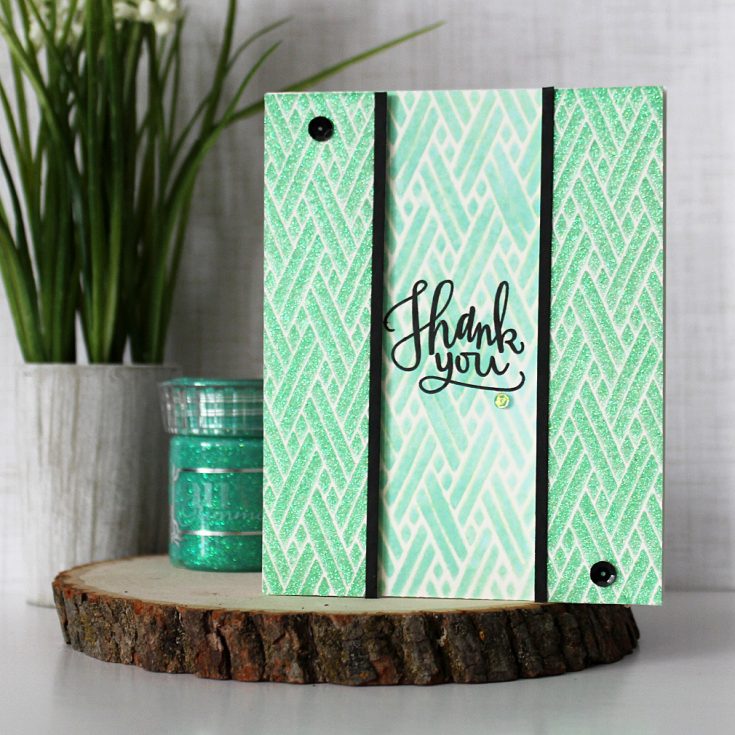
I love working with anything that sparkles and this Peridot Green nuvo glimmer paste does that and so much more. To begin, I made sure to temporary tape down my Tim Holtz layering stencil in Woven with over my watercolor paper to keep it in place. This stencil is very delicate so I didn’t want it to move around. I added a thin layer of glimmer paste over the stencil with gentle and even strokes. This will ensure an even coverage. I made sure to put any excess paste back in the jar as to not waste any of it. Once I removed the stencil I had this gorgeous background. I set the panel aside to dry and started working on my background panel.
Continuing onto my base panel, I cleaned off my stencil and reused it to blend on some cracked pistachio distress oxide ink onto another piece of watercolor paper. I left the stencil in place and spritzed on some water to activate the oxidization process. I let the water sit for approximately 10 seconds then removed the stencil and blotted up the excess water. Heat setting it with my heat gun ensured the color was locked in place.
Now that my glitter panel is dry, I cut it down the center. I trimmed each piece down to 1 ¼ inches wide cutting from the outside edge. I attached a thin strip of black cardstock to each inside corner for added contrast. I used some multi medium matte to attach a black sequin to each panel.
Next I stamped a thank you greeting from Simon Says Clear Stamps Big Scripty Greetings in Versafine onyx black ink in the center of my card panel with my mini Misti and added a pale green sequin underneath it. Keeping the sentiment very simple kept the focus on the gorgeous stencil work. To assemble the card, I used some foam tape and pop the two glitter panels to each side of the sentiment panel and attached that panel to a white card base.
I have already made several of these cards in different colors. I hope you enjoyed your visit here today and have been inspired to create something beautiful. Have a great day and we will see you back here soon.
 SUPPLIES:
 |
 |
 |
 |
 |
 |
 |
 |
 |
 |
 |
 |
 |
 |
 |
 |
 |
 |
Thanks so much for reading today, and thanks to Dana for being our guest!

Blog Candy Alert!! Follow our blog via email and comment on this post for a chance to win a special blog candy!


I love sparkling thing, beautiful work!
Such a beautiful sparkly card!! Love it:)
That green is so yummy.
wow! I really like this technique!
Beautiful! Think I’ll be trying this out today!
Love the green sparkles!
Love this. Green is my fav color and of course anything that sparkles!!!
Wow, never heard of glimmer paste before.
WOW! This is full of sparkles! I love it.
WHAT A LOVELY COLOR OF GREEN! ;) AND the SPARKLE! SUCH A BEAUTIFUL JOB you’ve done on this, Dana! ;)
WOW factor! Beautiful. Love how your used the stencil.
Love how you created depth to your card with glitter!
So beautiful! I am going to have to try glitter paste! Lovely!
I love this. The green colors are beautiful and the simplicity of the card makes it a lovely card.
I’m so digging this colour! Nuvo is coming out with such uber-awesome products!!
Love ❤️ the sparkles! Fun card! Thanks for the giveaways and inspiration!
So beautiful! Love all the sparkle & the great design. I have got to get some if that gorgeous paste!!
Sooo pretty, shiny and glittery!
So pretty with all of the sparkle.
Beautiful card! Love the colors!
Very pretty!
I love all the sparkly without the hassle of glitter. I am going to have to check that product out. Thanks for the idea.
Very pretty card,, lovely colour of glitter.
This is such a beautiful, sparkly card. The color is just perfect in the sparkle.
Oh this is lovely and different. Two things I love about cards!!
Lovely sparkly card!
Love the color on this glittery card:)
Very pretty! I love the two uses of the stencil.
Beautiful sparkly card, LOVE that colour!
That glimmer paste is amazing! Such a beautiful card!
How absolutely gorgeous! Love the shade of green and that sparkle is heavenly!
Gorgeous card! Love the glimmer paste.
Fun card, I love glitter too. I do need this paste. I already follow by email.
Oh my gosh this card is absolutely stunning!!! I love it!!
Super amazing card!
Such a beautiful and glam card today. I am going to buy this glitter paste and and start making beautiful things.
Dana, this card is so beautiful. I absolutely love the colour of the Nuvo Glimmer Paste that you used. You have done an amazing job on it my dear! A real stunner!
Beautiful card! Love the glimmer paste.
That is an amazing card! Love the glittery panels on either side!
Just love the way you used the stencil to work with various media for this card. It’s a wonderful setting for your sentiment. Can’t wait to try this with my stencils. Thanks for sharing.
That green glitter paste is just stunning!
Love the sparkle!!
I love the Nuvo glitter paste over the stencil along with adding the distress oxide ink! Loving the background piece! Just makes the entire card pop!! Thanks for sharing .
So pretty !
Wow, this one really sparkles. I have to give this great glimmer paste a try.
Love Love Love the sparkley background!
I love this card! The muted color and the sparkle looks fabulous! What a talent you have!
What a beautiful color for this card. It really POPS!
Hi Dana ~ Stunning card….love the colors and the glitz of it all. Very nicely done. ~HUGS~
#kindnessmatters
Hmmmm….Nuovo glitter paste…on my wish list