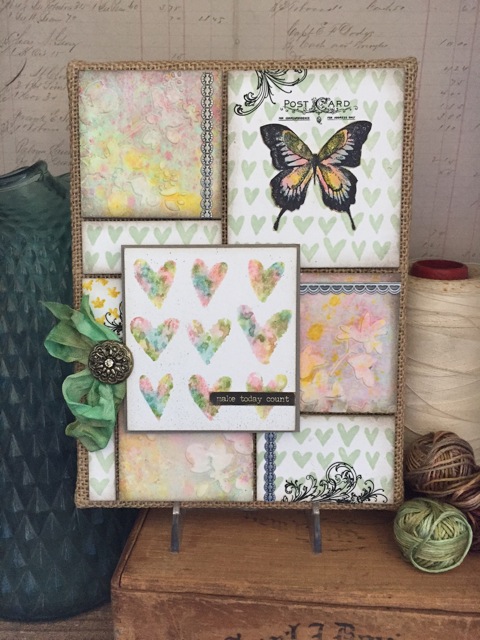
Make Today Count!
Hi readers! TGIF! I hope you’ve had a great week and have something fun planned for the weekend! Perhaps you may want to give this project designed by Paula Cheney a go? Doesn’t it look fun? Enjoy the tutorial!
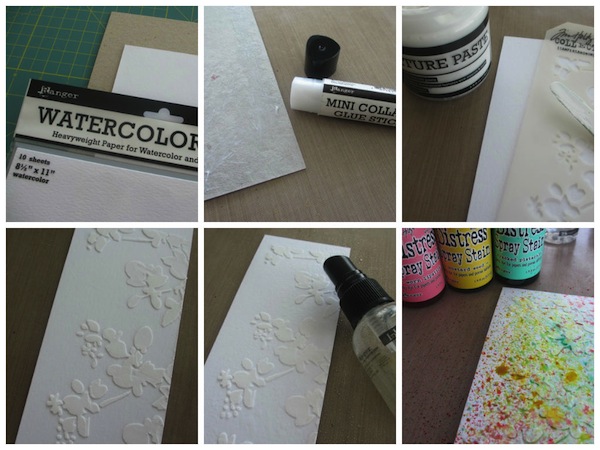
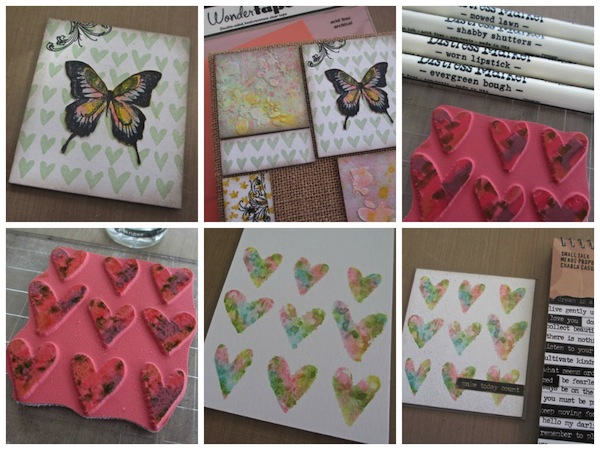
All the “tiles” on the 6 x 8” Burlap Panel are made of Ranger Watercolor Paper and Chipboard. I used one sheet (8 1/2 x 11”) of Ranger Watercolor Paper and a matching piece of chipboard.
Adhere Watercolor Paper to chip with Ranger Collage Glue Stick. I did cut mine in half just to make it more manageable to work with.There are three different types of “tiles” Texture Paste, Stamped hearts and Stamped flowers.
Texture Paste:
- Cut a 2 1/2” strip of the heavyweight Watercolor Paper you just created. Gather Ranger Texture Paste, a pallet knife or craft scrapper and the Tim Holtz Layering Stencil, Blossom. Load the pallet knife with Texture Paste. While holding the Layering Stencil in place, drag the pallet knife from the top to the bottom of the stencil, filling in the pattern with paste. Remove Stencil and wash immediately.
- Let Texture Paste dry naturally or use a Heat It Tool to speed up the drying time.
- Once paste is dry, spritz lightly with water.
- One at a time, spray small amounts of three Distress Spray Stains – Worn Lipstick, Mustard Seed and Cracked Pistachio over the textured strip.
- Lightly spray with more water to make the Distress colors run.
- Dry with a heat tool. If one color is too to dominate, spritz again with water and pat with a paper towel to remove some of the color. Dry again. Note:the Ranger Watercolor Paper is super thick and can stand up to multiple layers of ink and water.
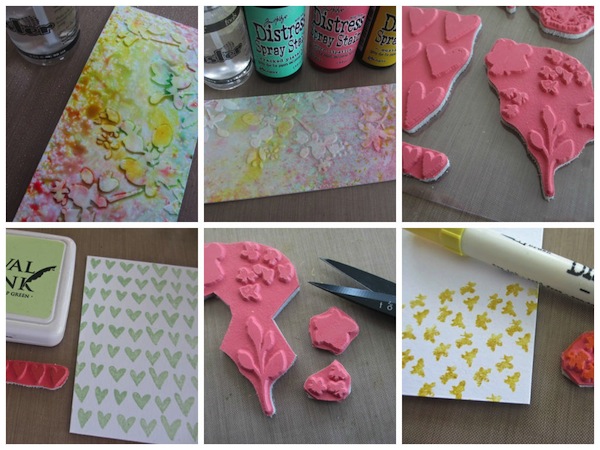
Stamped Hearts:
- I am using the new Stamper Anonymous set called, Watercolor. The set comes with butterflies, hearts and flowers. Perfect for a springtime pallet!
- Using another piece of the watercolor paper we created, repeatedly stamp the small hearts using Archival Ink in Sap Green.
Stamped Flowers:
- The flowers on this stamp set are in a cluster that you will need to cut out with your Tonic scissors. I’m going to use the small cluster of buds.
- I colored the stamp using the brush end of a Mustard Seed Distress Marker. I stamped the paper repeatedly, filling the space I thought I might need for the right size tile.
- Once finished with all the pieces, they can be cut to fit the Burlap Panel. Ink edges with a Mini Blending Tool and Pumice Stone Distress Ink.
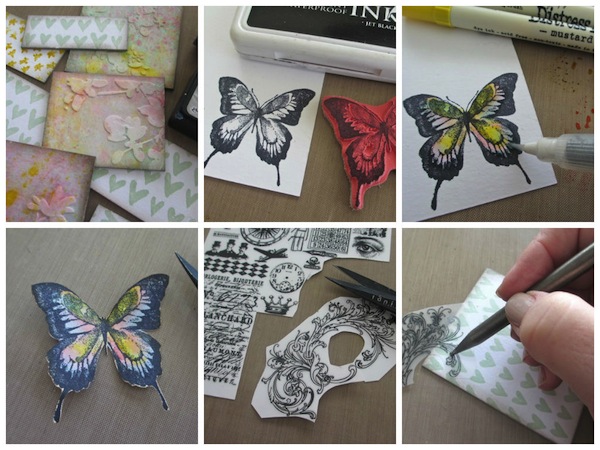
Butterfly:
- Use Black Soot Archival ink to stamp the image of a butterfly onto plain Watercolor Paper so it can be easily cut out.
- Use Distress Markers and a Detail Waterbrush to color the inside of the butterfly.
- Cut the butterfly out and set aside.
- Cut the large flourish from the Elements Remnant Rub sheet.
- Add to Remnant Rubs to random tiles using the new Remnant Rub Tool. It’s the perfect tool for rubbing the image onto a surface, then lifting the plastic away.
- Use the Collage Glue Stick to adhere the butterfly to one of the stamped tiles.
Putting it all together:
- Gather tiles and adhere to Burlap Panel with cut pieces of Wonder Tape. Did you know Wonder Tape comes in sheets? Well it does, and it’s perfect for holding the tiles in place on the Burlap Panel.
- I need one more tile for the center of the panel so I used the brush end of the Distress Marker to hand color the group of nine hearts stamp.
- Lightly spritz the colored surface of the stamp with water, then stamp onto Watercolor Paper.
- The hearts take on a beautiful watercolor effect!
- Cut the hearts to size and mount on Core’dinations Cardstock. Add a phrase from the new Small Talk stickers (love the black with white lettering!!).
- Spray Crinkle Ribbon with Distress Spray Stain Cracked Pistachio, Gathered Twigs and water to color. Use a Heat it Tool to dry.
- Add heart card with foam squares so it floats over the other tiles. Add a Crinkle Ribbon bow and a button from the Fanciful, Accoutrements pack.
- Some final touches…more Remnant Rubs where needed and trim strips from the Industrious Stickers, Frames & Trims.
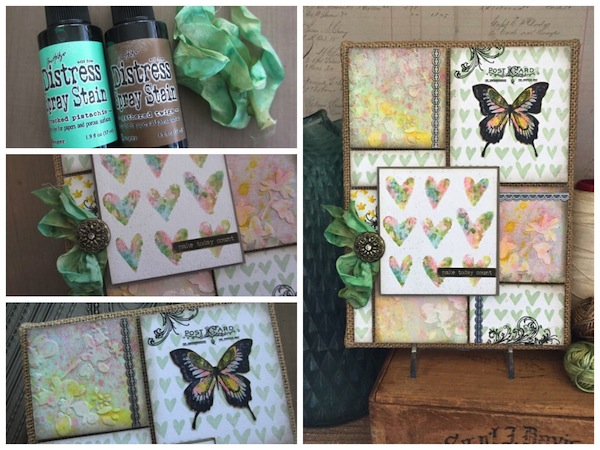
Hope you liked today’s tutorial using stamps, Texture Paste and the new Blossom Stencil to create this fun background for the Burlap Panel. The same techniques could be used to make cards, layouts or even small pocket cards. No matter your surface, it’s a great time to try a new technique or step out of your comfort zone just a bit. Think of it as a creative “stretch”! Happy Crafting!
SUPPLIES:
 |
 |
 |
 |
 |
 |
 |
 |
 |
 |
 |
 |
 |
 |
 |
 |
 |
 |
 |
 |
 |
 |
 |
 |
 |
 |
 |
 |
 |
 |
 |
 |
Thanks for reading today, and thanks to Paula for being our guest today!

Blog Candy Alert!! Follow our blog via email and comment on this post for a chance to win a special blog candy!
Congrats! Blog Candy Winner!
From: Anything Goes on the Wednesday Challenge: Elena Las!
Please email Samantha ([email protected]) with your mailing address and the name of the blog you won from to claim your prize!


That looks beautiful! A true piece of art for any home…
Beautiful, just lovely. I just love all the techniques together on the panel.
How gorgeous this is!! I love the new Watercolor S.A. set! Thanks, Paula, for the step by step!
WOWOWOWOWOWOW!! I LOVE this!! THANKS for sharing the tutorial and have a Fabulous Weekend!! ;)
This is absolutely stunning!! LOVELOVELOVE everything about it!
I am so totally envious of all the creativity that oozes from this page…
This is so pretty. I wish I could combine colors and papers and get a harmonious look.
Marvelous work
Love this! Beautiful job!
NICE piece of art! VERY cool!~
lovely décor piece!
So many products went into this.
Each panel is so beautiful. Simply stunning. I follow the blog by email.
LOVE this project – gorgeous! Plus the tutorial breaks it down into parts so it’s not as overwhelming to me, thanks so much!
I loved the project. The colors and textures are lovely.
This project is just stunning!! I love playing with watercolors and modeling paste. It is such a great combination. Also, who would of ever thought that we would use our stamps with watercoloring.
Great decors
Absolutely gorgeous, Paula! Love all the texture and colors!!!
Very beautiful! Thanks for sharing.
I really must try this technique, it’s so interesting and I just love the colors you used!
Gorgeous panel, Paula!
Paula, this is a beautiful panel. The colors are so soft and your layout of the panels is so nice. You did such a great job on this card. The way you made the 9 hearts look as if spent hours painting them. You did a good job!!! TFS
Absolutely gorgeous! I bookmarked this to come back and try some day soon!!
That is REALLY pretty. Really. Just breathtaking. And I will now proceed to steal- umm I mean borrow, yeah, that’s the one!- your idea for one for my house. I need new decor. :)
Wow!! This is so beautiful and would look gorgeous in any room!
So pretty … the colors are YUMMY !!
This was my year to cut back on my Tim toys… how ever will I do it if you keep showing me such beautiful projects ??! LOL <3
Seriously there are soooooo many things I want … I'm a Tim-A -holic for life :)
What a fantastic project Paula! Thanks so much for showing all the steps and providing clear directions – can’t wait to try this!
Gee! That looks like more fun than an all day sucker! So many details to create. Thanks for sharing.
That is just beautiful!!! LOVE the soft colors and all the texture on the panels!!
<3 J
jwoolbright at gmail dot com
HerPeacefulGarden.blogspot.com
can’t wait to try this. . . .
love it!
Love all of these beautiful techniques.
Beautiful projects!
Such pretty colours and design!
Gorgeous! I love the butterfly and hearts.
How beautiful. I really must try the techniques. Thank you for the detailed tutorial.
Cool project, love all the different elements!
Absolutely stunning and the steps are easy to follow. Thanks for sharing.
As always a wonderful project, great tutorial , so inspirational!! I love it PAula! Barbarayaya
Just a beautiful collage. Lovely colors!
Absolutely gorgeous project! Thanks for the instructions!
Beautiful piece of art.
Love the technique and the colors. Can’t wait to try with my spray inks
This is stunning Paula! Love what you have done with all the new stamps, especially the hearts. I can’t wait to try these techniques. Wonderful project.
Looks so interesting! love the idea of using different tiles.
This is a gorgeous piece of artwork, and it’s giving me ideas of making my own!!! Only problem that I have is getting the time!! Thanks for sharing this!!
Thanks so much for the directions. I love that you even included measurements.
I REALLY love the second project, beautiful!
Wow, what a pretty project!
Looks great. Thanks for sharing the techniques used to create this.