Doodling with Debby: Batching Last Minute Christmas Cards
Hi friends! Happy Tuesday! Please join me in welcoming the always inspiring Debby Hughes as she joins us for the December 2019 edition of Doodling with Debby, a monthly blog series on our blog! Don’t miss the video for more details on these gorgeous cards and enjoy!

Hi, it’s Debby here and for my Doodling With Debby video series for Simon Says Stamp this month, I am batch creating Christmas Cards. It is that time of year where the to-do list can seem unending! I can’t believe I am so far behind this year with not a single card written yet, and I still need to make more cards too. When time gets tight like this, my productivity ramps up by batch creating Christmas cards!
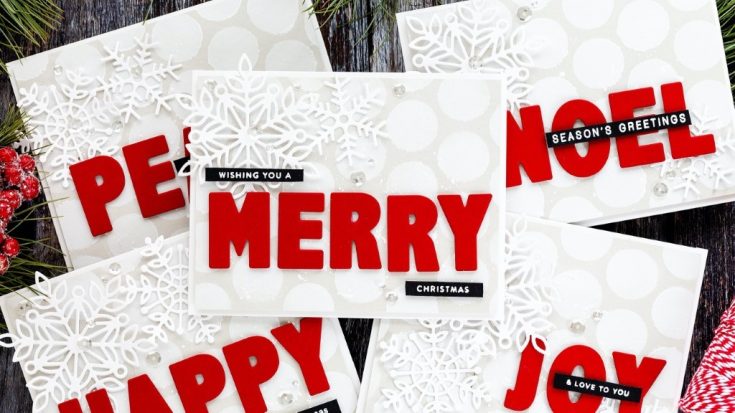
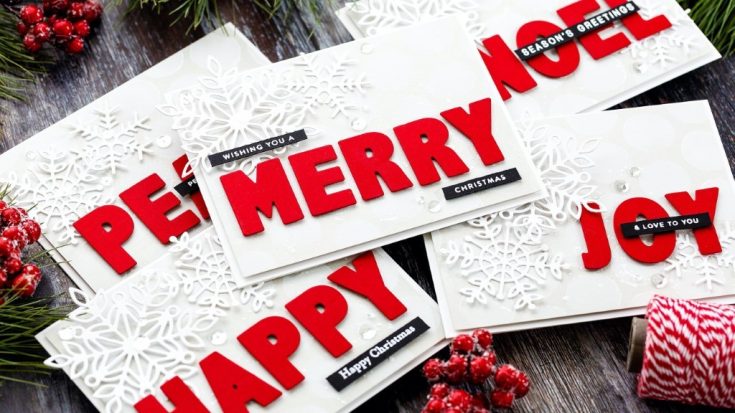
Today I’m going to create five cards with the same basic design using the Ornate Alphabet dies from Simon Says Stamp. These dies are designed to coordinate with the Ornate Alphabet stamp set, but I’ll not be using that today. I kept the letters together and placed the whole alphabet on my die cutting sandwich with Schoolhouse Red card. I ran the die through my die cutting machine three or four times, and from the die-cut letters, I was able to put together several Holiday-themed words.

I put the words to one side while I continued die-cutting. And I think that is the benefit of batch creating to cut down on the time it takes to create the finished card. If you do all the same types of things at the same time, you spend less time switching backwards and forwards between things. So, while I had my die-cutting machine going I also cut several snowflakes from Bazzill Marshmallow card using the Grace, Lea and Marie snowflake dies. I cut enough snowflakes to have two of three die-cuts for each of my five cards. I use the Tim Holtz craft pick all the time, it’s a great little tool and makes pushing out the negative pieces on intricate designs a doddle.

Moving on and the next process I batched was creating a soft subtle background for the die-cut words and snowflakes using the Extra-Large Dots stencil and five pieces of Fog card cut to 4.25 x 5.5 inches. I will cut these pieces down slightly at the end and mount them onto card bases, but for now, the slightly larger size allowed for keeping the card in place with a piece of washi tape. I then cut this area off later. I used a Picket Fence Life Changing Blending Brush and White Pigment ink and gently blended the ink through all the dots in the stencil. I repeated the stencil design on all five pieces of card and then squeezed a small amount of white gouache onto my craft mat and mixed with a little water to get a consistency suitable for splattering. I used a paintbrush to splatter and tried to concentrate the splatters in the lower right corner of the panels of the card where I planned to add the die-cut words.
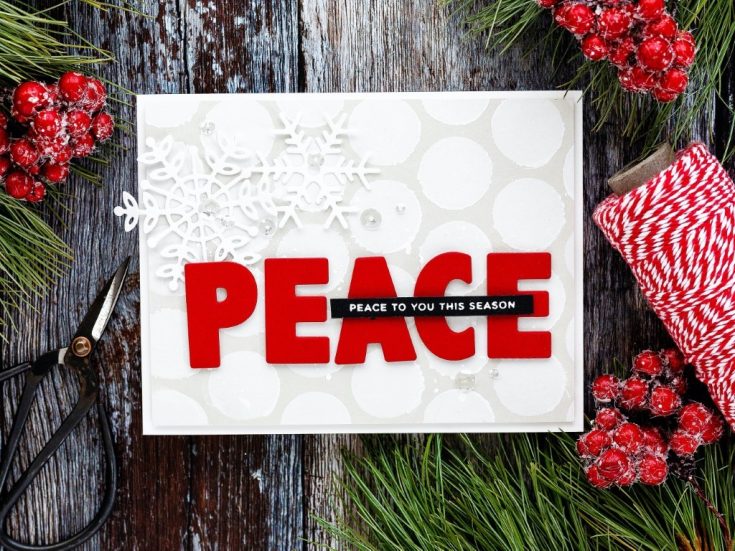
I then gathered my die-cut words together and added foam adhesive to the back of all the words. From a few passes of the Ornate Alphabet dies through the die cutting machine I’d made out the phrases, Peace, Joy, Merry, Noel and Happy and you could make many other options too. The letters are a good size for making an impact, and yet you can fit five or so letters comfortably on a landscape orientated card to spell out the more extended options such as peace and merry.

I planned out the designs for each phrase option working out where to place snowflakes and letters and then set everything to once side while I worked on adding coordinating sentiments to each card. I used the Holiday Greetings Mix 1 set and pulled out any of the smaller, skinny sentiments which would work with the words I was using. I laid these on a piece of Black card in the Mini Misti and also drew on some options from the Clean line Christmas set. I treated the card with an anti-static powder bag and then stamped all the greetings in one go with clear embossing ink before sprinkling with white embossing powder. I used a dry paintbrush to tidy up any stray spots of embossing powder and then heat set. I used a scalpel, and metal-edged ruler to trim out the sentiments and paired them with the cards.

I foam mounted the stencilled fog panels onto card bases cut from Bazzill Marshmallow card. Again, I batched each process, adding foam adhesive to all the card fronts before adding them to the card bases. Now it was just a case of adding the die-cuts to the card fronts. For this, I needed to use a T square ruler. For me, a ruler such as this is essential. I don’t seem to be able to see a straight line, and even with the help of the ruler I’m sometimes not perfect but accept that these are handmade cards and each one is unique even if that means slightly wonky.
On the larger snowflakes, I’d placed a piece of foam adhesive in the centre to adhere them to the card and with the smaller snowflakes where this wasn’t an option, I used Gina K Connect Glue. I arranged two or three snowflakes around the letters and then used the T Square ruler to help me align the words on straight. Once I had the main phrase in place, I then added the coordinating greeting on the skinny black strips overlapping the large letters. I again used foam adhesive for this and tried to place the extra greetings either centred or off to the right depending on where I felt they sat best. However, a couple of the cards I felt the greeting was better placed off the letters especially this Wishing You A Merry Christmas card where I split the coordinating elements above and below the main word on two skinny black strips.
To complete the cards, I added a few Ice Crystal sequins from Little Things From Lucy’s Cards which I held in place with Gina K Connect Glue.
Deciding on a simple design and then batching the various processes to make the cards is a great way to save time and create multiple cards at one time. Now I just need to get myself in gear and get to writing these cards! Thanks for joining me today and I hope you join me next time for Doodling With Debby.
Watch below or in HD on YouTube.
SUPPLIES:
|


Thanks so much for stopping by, and thanks to Debby for being our guest!

Blog Candy Alert!! Follow our blog via email and comment on this post for a chance to win special blog candy!
Blog Candy Winners!
Art Journaling with Shari Carroll: Merry and Bright: Sheri K!
Yippee for Yana: Modern Christmas Cards: Becca Yahrling!
Amore Laurafadora: Large Outline Thanks: Anastasia M.!
Please email [email protected] with the name of the blog you won from, your prize(s), and your address if applicable!


Beautiful cards, love the design and all the dimension for these quick(er) cards! The red, gray and white color combo and those snowflakes are so pretty and festive.
Love these quick design when you’re short on time!
Debby, I absolutely love theses cards. They are so stunning yet so pretty! And fast which is what I need this time of year. Plus, I have all the elements to make them, because I have I have several different alphabet dies, snowflakes, (love SSS snowflake dies!), and I even have a similar doted stencil!) So excited to be able to steal your design. Thanks so much for sharing!
SQUEAL!! I LOVE ALL of the Design options!! Such AMAZING Inspiration and I appreciate the Video too!! THANKS SO MUCH for sharing and have a FABULOUS WEEK!!
Awesome cards, Debby, so perfect for batch making!
The best part next to these do have a good impact? They look like they took so much time to make!
love this card design..simple but elegant
So festive, bold & pretty!
thanks for a great video and sharing your clever techniques for mass producing Holiday cards
These look beautiful and I’ll be finishing my last batch (5) of Christmas cards today! I, too am running late and though I love to create different cards, I found it necessary to create most of them this year in this way. Actually, I like this idea for if I create a card I really love, I have more than one to send. I love this Doodling with Debby series and hope it’s going to continue into the new year!
These are Fabulous cards!!! I Love Fast and Fabulous!!!
I LOVE the big bold red lettering!
stunning cards!
Simple yet amazing designs and colors!! Wonderful cards to make in bulk in quick time :)
White on White with a pop if red is one of my favorite festive designs.
These are stunning, Debby! I love the simple, clean design and you’ve reminded me that I really need to start using my white pigment ink more. Thanks for the inspiration!
Beautiful cards! I just watched the video and enjoyed seeing how they came together!
Beautiful, elegant cards. Unfortunately (or fortunately?), I’ve finished my Christmas cards for this year, but I’m definitely saving this for next year!
Beautiful, bright and happy cards! Love the bold sentiments.
So beautiful, I love the bold sentiments!!
LOVE these pretty cards!!!!
These backgrounds, the snowflakes and the red sentiments go really well together!
Such an elegant card. Love everything about it.
Thanks for sharing.
These cards are simple and strikingly beautiful.
These simple cards look great. No one would know they were last minute :)
Beautiful cards!! I love the quick design!
Love that bold red against the white.
Spectacular. thanks for sharing
txmlhl(at)yahoo(dot)com
Love the all white with the pop of color. Beautiful cards for Christmas!
Lovely cards! Perfect for mass production during this time of year!
Great design and coloring for batching holiday cards. Debby, your creations are always a celebration of crafting inspiration. tfs
Love these! Such elegant and pretty cards and yet rather quick to make a batch.
Your cards are absolutely beautiful! What a terrific idea using those big letters, snowflakes and a pretty stencil! Love!
These cards are so beautiful and elegant! Love the subtle background and the bright sentiments.
Great design and lots of good tips. I am easily distracted so I appreciate the ideas to keep me on track. Hugz
I love that red on that gorgeous white. Beautiful Christmas cards! I love those lovely snowflakes.
LOVE these cards Debby and you have shared some things I hadn’t tried yet. Being as I need a few more cards I am going to try these. Thanks for sharing them.
Congratulations to this week’s winners.
What a simple and beautiful design! Love that red against the white.
Loving the color scheme!
Beautiful cards! Thanks for sharing…
Beautiful color contrast on these cards…so striking.
Good idea. I’m feeling very festive this year. x
Great idea! I need to get started soon. Beautiful cards!
I like the blended white ink on the fog card stock. The red color letters really pop. And who doesn’t like snowflakes? Lovely!
elegant, clean and simple!
Lovely cards Debbi, just gorgeous and a smart way to get more cards done!
love the pop of red
These cards are eye catching! I think the bold red letters makes this card. I will make some of these; as always I need about 15 more cards to complete my list. Thanks for the inspiration.
Very pretty cards!
Very pretty simple cards. Making a bunch of cards is no problem, sitting down and writing them is. I already follow by email.
Really great cards, and really great tips – thanks!