Combining Acrylic & Watercolor Painting
Hi readers! Happy Monday! I’m so happy to welcome back blog guest Jocelyn Olson to the blog today! If you haven’t perused her blog at Red Balloon Cards, be sure to stop by! Are you loving these stylish bright cards? Be sure to read on to learn how to recreate them for yourself! Enjoy!
Hi everyone! I’m super happy to be on the Simon Says Stamp blog sharing a Paper Smooches project! We have snow on the ground where I live, but in hopes of Spring starting soon, I made a couple of cheery spring cards with a mix of Paper Smooches products.To start, I used a few techniques to make several backgrounds. I saw a post by Wilna Furstenburg using acrylic paints and watercolors together, and I thought I would try it.
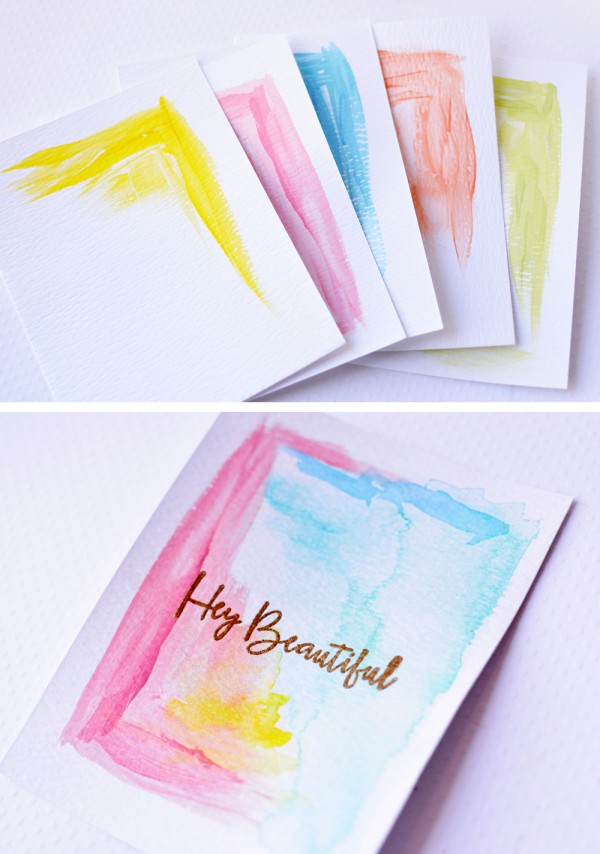
1. Using a flat brush, I painted the backgrounds with acrylic paint. I used acrylic paint to create a resist for the watercolor and to create texture.
2. After allowing the paint to dry, I did a watercolor wash in a contrasting color in the opposite corner.
3. Next, I watercolored around the acrylic paint with a similar color. I blotted the acrylic paint to wipe up the extra water.
4. Once the backgrounds were fully dry, I finished the backgrounds by splattering yellow spray mist.
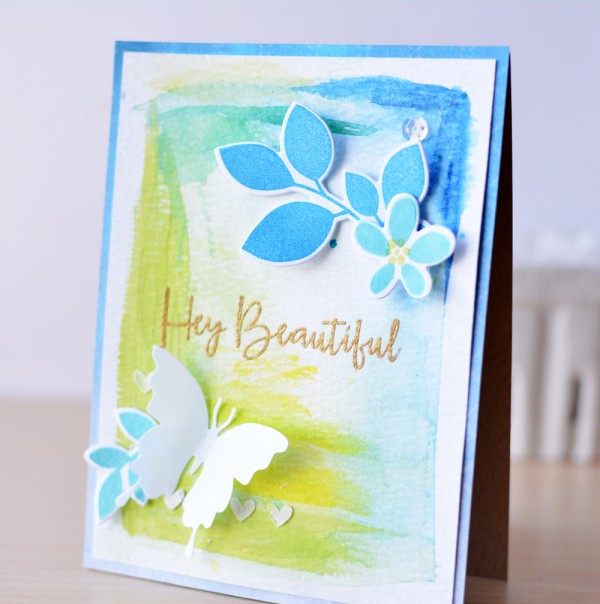
Here are the results:
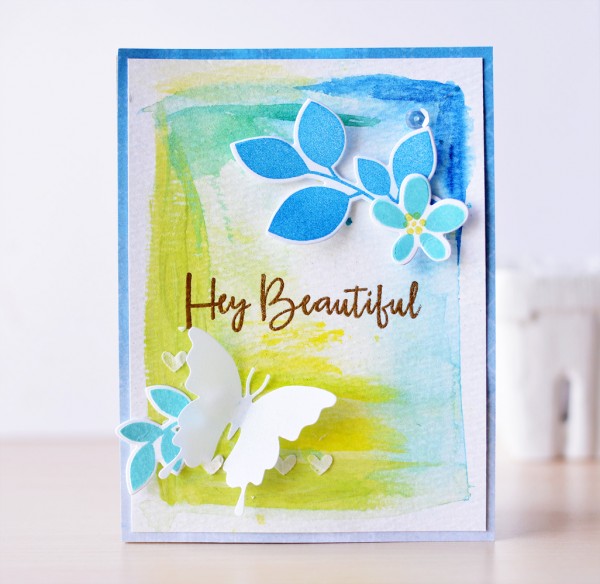
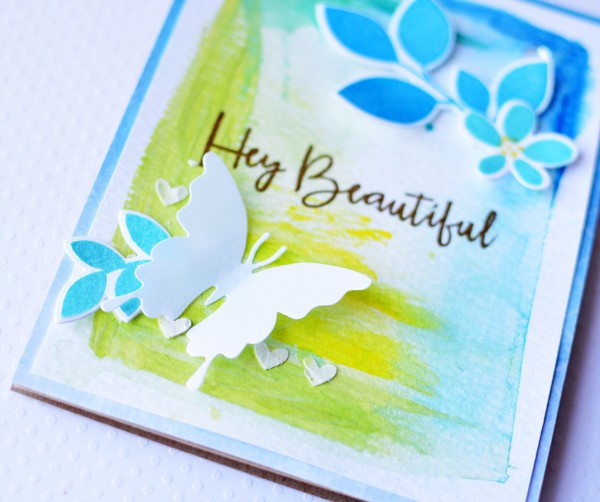
I heat embossed the beautiful sentiment from the Paper Smooches Fun and Flirty set in Ranger Gold embossing powder. Next, I stamped and die-cut leaves and a flower from the Botanicals 3 stamps and dies. This set has a great variety of leaves! I finished the card with a Butterfly Duet die-cut. To adhere the vellum butterfly, I used vellum adhesive (a must have!). Here’s a close-up:
For my next card, I went with the same stamps but a little different look:
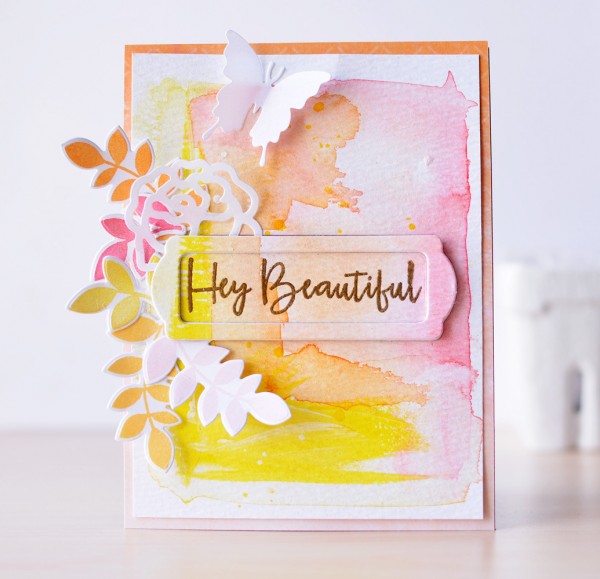
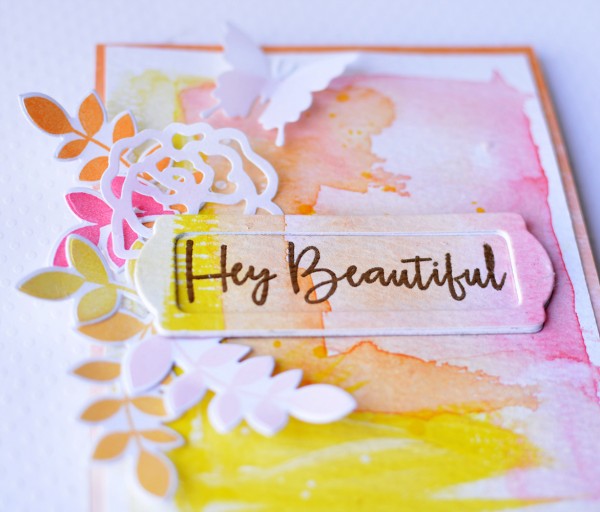
On this card, I scribbled a Lemon Gelato over the paint (under the sentiment). I used the same Fun and Flirty sentiment, but I die-cut the background using the Paper Smooches Bookplates die. I die-cut three more Bookplates to pop up the frame. In addition to the Botanicals 3 flowers, I added a smaller Roses vellum die-cut. I finished the card with the smaller butterfly from the Butterfly Duet.
SUPPLIES:
 |
 |
 |
 |
 |
 |
 |
 |
 |
 |
 |
 |
 |
 |
 |
 |
 |
 |
 |
 |
 |
 |
|
 |
Thanks for reading today, and thanks to Jocelyn for being our guest!

Blog Candy Alert!! Follow our blog via email and comment on this post for a chance to win a special blog candy!


What a simple but beautiful card background technique! Love the fresh spring-time designs
Love this technique. Will definitely have to give it a try!
Wonderful watercolor technique!
Beautiful cards. I have to try this technique.
love the technique.
Very beautiful spring cards. I shall try this technique. I’ve had these left over acrylic paints and I have no idea what to use them for. Thank you for the inspiration.
What an interesting technique! Love the background it creates! Beautiful color combinations!
Oh these are gorgeous!
Love the simple but
beautiful way to use
the watercoloring.
Carla from Utah
The colors are breathtaking, would love to get a card like those! <3
I cannot wait to try this technique out. I think it looks fabulous on these cards.
I’m always looking for new techniques with vellum. This is awesome. Also love how you went right over the bookplate with your design
Wow, these are gorgeous! Love the look and the colors are oh so yummy ♥
Love this technique.
What gorgeous cards Jocelyn! I just recently started dabbling with watercolor and love the freedom and beautiful colors it gives me!
Gorgeous cards! Love the sentiment and the colors! I can’t wait to try out the technique.
Love all the different colors.
These colors definitely say Spring to me. Beautifully done and I am going to give this technique a try. Thanks for sharing.
A fun new technique to try. Pretty cards. I already follow by email.
Oooh! I’ll have to try this!
Wow! The backgrounds of these cards are so beautiful!
Beautiful backgrounds – would never have thought of putting acrylics and watercolor together !
Love your colorful, springy cards !
How lovely, soft and bright all at once :-)
DELIGHTFUL cards Jocelyn!!!
THANK YOU for sharing this EXCITING & BEAUTIFUL technique!!!
I’m INSPIRED and added it to my techniques-to-try list, hoping to make some GORGEOUS backgrounds just like yours real soon :)
Love the colors, so springy
Gorgeous, thanks for the inspiration!!!!!!
These backgrounds look gorgeous and I’d love to try them out myself, unfortunately I will have to do an archeological type dig to find my table top under all of my craft stuff!! lol! Thanks for sharing these tips and techniques!
beautiful colors. . . interesting technique – love it!
I love the idea of mixing acrylic and watercolor. Your cards are so pretty in their spring colors, flowers, and butterflies!
Glad to have seen this.
I always wanted to try watercolor and acrylic together.
Your cards look beautiful. Thank you for the inspiration.
Pretty. This is a neat technique with lovely results.
Gorgeous cards! Fun colors! Great technique!
What a great technique – I must give it whirl
Blessings
Maxine
These are gorgeous I always feel like my watercolor background never comes out that nice
Very inspiring! Beautiful cards…I must give this a try! Thanks for sharing!!! :)
I love my acrylic paints and this is a great technique for using them. Thanks for the great tut, Jocelyn & SSS!
Great technique. ..the results are fantastic!
What a great idea to use both – fantastic results!
Love this techniques…the results are beautiful. Must try it out!
So pretty!
Wow! Such stunning cards. Cannot wait to try this technique.
Thanks so much for sharing them Jocelyn :)
WOW! lovely cards!
Cristina
thehouseoftheblackbirds.blogspot.it
These are just beautiful!
These are really beautiful :) thanks for sharing :)
Fabulous cards Joselyn!
Simply beautiful!
I love your mixed media cards! You’ve inspired me to play with these techniques! Thanks very much!
Great technique. I love the pastel colors.
What a fantastic idea! Can’t wait to try using these 2 mediums together :)
What a great idea! Can’t believe I’ve never thought to do this on a card. I usually only mix them on art journal pages.