Combining Acrylic & Watercolor Painting
Hi readers! Happy Monday! I’m so happy to welcome back blog guest Jocelyn Olson to the blog today! If you haven’t perused her blog at Red Balloon Cards, be sure to stop by! Are you loving these stylish bright cards? Be sure to read on to learn how to recreate them for yourself! Enjoy!
Hi everyone! I’m super happy to be on the Simon Says Stamp blog sharing a Paper Smooches project! We have snow on the ground where I live, but in hopes of Spring starting soon, I made a couple of cheery spring cards with a mix of Paper Smooches products.To start, I used a few techniques to make several backgrounds. I saw a post by Wilna Furstenburg using acrylic paints and watercolors together, and I thought I would try it.
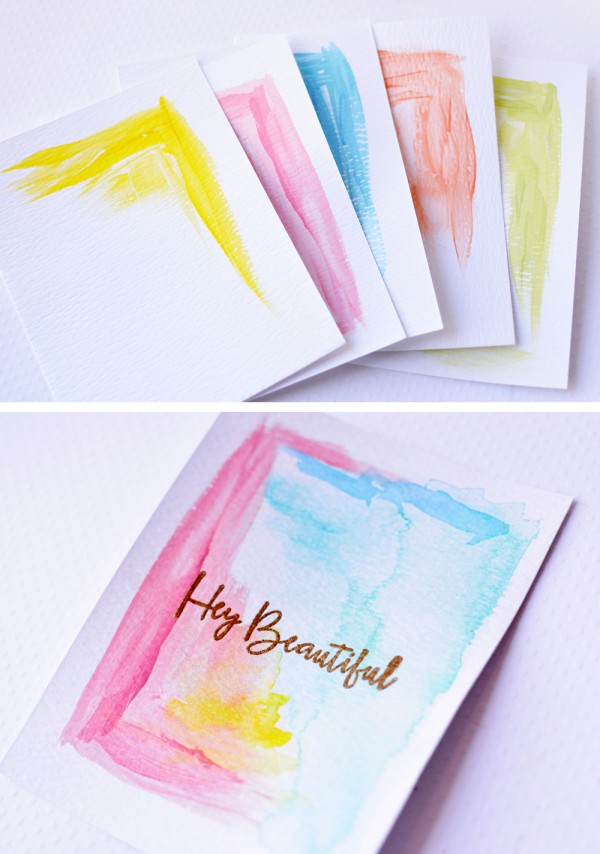
1. Using a flat brush, I painted the backgrounds with acrylic paint. I used acrylic paint to create a resist for the watercolor and to create texture.
2. After allowing the paint to dry, I did a watercolor wash in a contrasting color in the opposite corner.
3. Next, I watercolored around the acrylic paint with a similar color. I blotted the acrylic paint to wipe up the extra water.
4. Once the backgrounds were fully dry, I finished the backgrounds by splattering yellow spray mist.
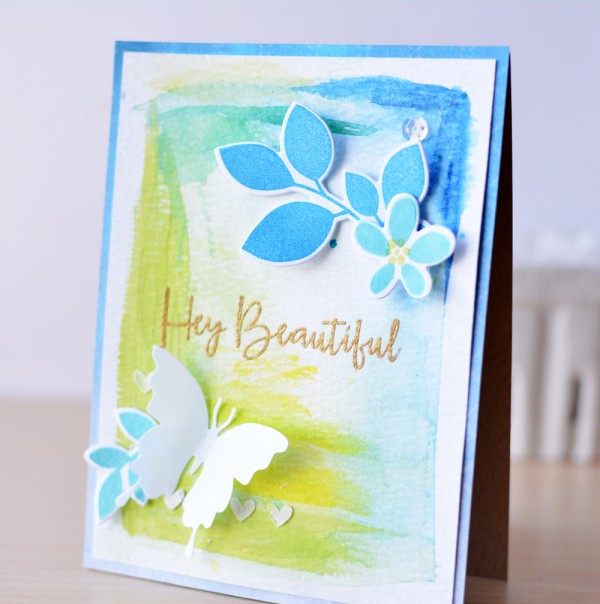
Here are the results:
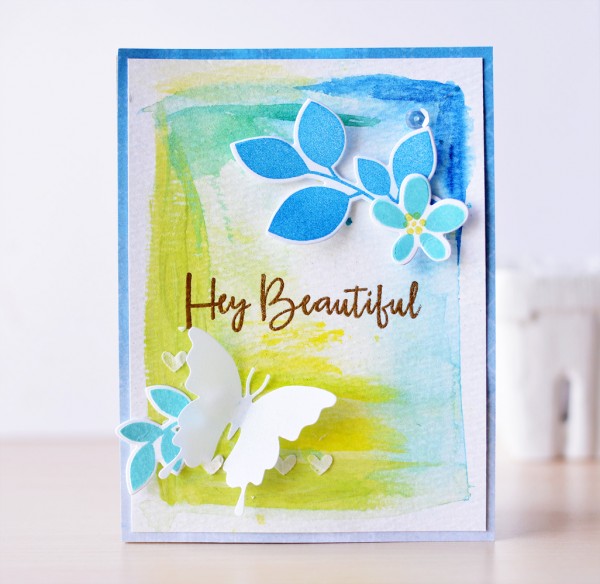
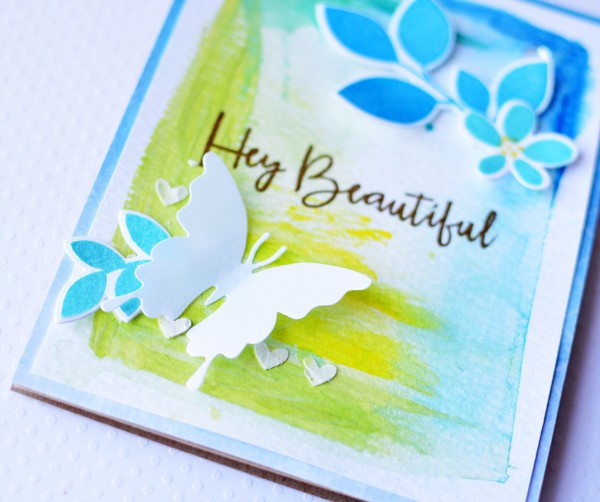
I heat embossed the beautiful sentiment from the Paper Smooches Fun and Flirty set in Ranger Gold embossing powder. Next, I stamped and die-cut leaves and a flower from the Botanicals 3 stamps and dies. This set has a great variety of leaves! I finished the card with a Butterfly Duet die-cut. To adhere the vellum butterfly, I used vellum adhesive (a must have!). Here’s a close-up:
For my next card, I went with the same stamps but a little different look:
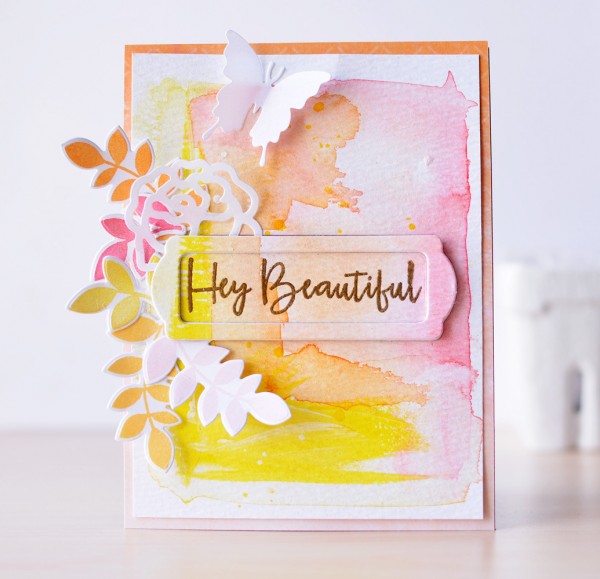
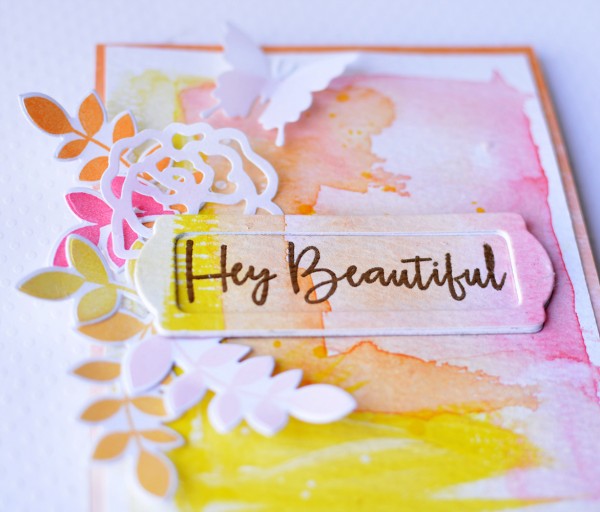
On this card, I scribbled a Lemon Gelato over the paint (under the sentiment). I used the same Fun and Flirty sentiment, but I die-cut the background using the Paper Smooches Bookplates die. I die-cut three more Bookplates to pop up the frame. In addition to the Botanicals 3 flowers, I added a smaller Roses vellum die-cut. I finished the card with the smaller butterfly from the Butterfly Duet.
SUPPLIES:
 |
 |
 |
 |
 |
 |
 |
 |
 |
 |
 |
 |
 |
 |
 |
 |
 |
 |
 |
 |
 |
 |
|
 |
Thanks for reading today, and thanks to Jocelyn for being our guest!

Blog Candy Alert!! Follow our blog via email and comment on this post for a chance to win a special blog candy!


Great cards! I love the idea of combining the two different types of paint. Thanks for the inspiration!
Wonderful technique and a beautiful card. TFS
These are beautiful. I’ve never thought of combining these two types of paint. The outcome is lovely!
Love your combined bright, cheerful acrylic and watercolored backgrounds for your colorful Spring cards. TFS
These cards are so pretty and I love the technique!
I am really loving these watercolored backgrounds!!!! They are so pretty!!
Wow! Beautiful backgrounds. I would not have thought to combine acrylics with watercolor!
Beautiful cards, love the 2 paints together and how you finished them off.
Beautiful cards, lovely colours and an interesting technique! Thanks for the inspiration!
Wow, love, love, love the color choices!
Great cards and my favorite one is the second with all the beautiful pink and yellow colors. Thanks for all the techniques.
Linda D.
Very cool technique & very pretty results!!
Interesting values created by the two mediums.
Thanks for sharing this fun technique and gorgeous cards!
Beautiful cards! Interesting technique!
This is such a great technique, thanks for sharing it. Lovely cards, such cheerful colours
I am totally caseing these, they are gorgeous!
Really beautiful cards! Very inspiring!
Beautiful backgrounds!
So pretty and colorful. Amazing how striking these cards are, and yet, the technique is so simple. Beautiful. Thanks for the post.
These are just so dainty and beautiful! Love the soft colors! TFS!
Such gorgeous cards!! I haven’t seen that technique before. It’s wonderful!!
You have created beautiful cards! I never knew you could use acrylic paint on cards! Now I am going to have to try this! Thanks for sharing your work with us today.
I love your cards Jocelyn! I’ve never thought of combining those two mediums, love the girlie details. TFS
Those are so pretty! I’m going to try this.
Beautiful cards, I love the colors and this fab technique!
These are absolutely beautiful! Love the colours and the design – hard to choose a favourite here, but I think the yellow/pink/peachy one is my fav. They’re both gorgeous though and I’m sure everyone would be delighted to get these in the post! ;-)
Gorgeous cards! The backgrounds on these are beautiful and the stamps and die cuts really add to the beauty of the cards. Thanks for sharing.
Love Jocelyn’s work. Better stock the shelves with acrylic paints SSS ;)
Amazing, looks like a fun idea to copy.
Beautiful watercolored cards!
The colors blend so beautifully.
Beautiful Cards! Love the colors.
Love the colors of these cards! Sure to brighten anyone’s day!
Gorgeous cards!! Love the artsy look!!
These are so pretty! Think I’ll get out my paints ;)
Love the look of combining acrylic paint with watercolor…so unique! Love the designs too, perfect to cheer anyone up!
This is a technique that I am going to try
Gorgeous!
Beautiful! Thanks so much for sharing!!
So pretty. My watercoloring nevers looks this nice so I will just keep trying all the tips I receive here on SSS.
SUPER JOB Joycelyn!!! I LOVE the look of BOTH of your cards!!! ;)
These are lovely! Thank you for the tips!
An interesting new technique to try, and I love the color combos on these cards!
Great technique if you want beautiful back grounds.
Very nice cards!
Gotta try this!
what a beautiful technique to make one of a kind card backgrounds!
Love these. Just want to reach out & touch that softness.
Wow, gorgeous cards, LOVE this new-to-me technique! Thanks so much for sharing.
Beautiful, indeed!