Celebrate!
Hi readers! Happy Tuesday! Please join me in a BIG Simon welcome to a first time guest designer on the Simon blog, Audrey Pettit! She’s made a lovely Birthday card full of dimension and fun, and perfect to send to someone special!
Enjoy!
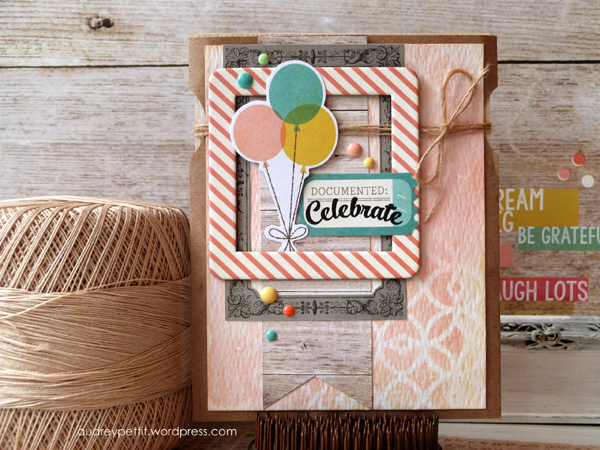
Hi everyone, it’s Audrey, and I am so excited to be here on the Simon Says Stamp blog today! I have got a fun birthday project to share with you. It’s a pocket-envelope, gift-card-holder card. Now how’s that for a bit of a tongue-twister?

I know you guys are probably like me, and are always in need of birthday cards, right? This month, I’ve got a very special birthday to celebrate, and instead of a gift, the girls and I have chipped in together to get a gift card for the birthday girl for a luxurious day at the spa. Now I know you can present a gift card in those plain little envelopes, but that seems a little boring. So I’ve come up with a fun alternative. It’s a pocket, and a card, and a gift-card holder, all in one.
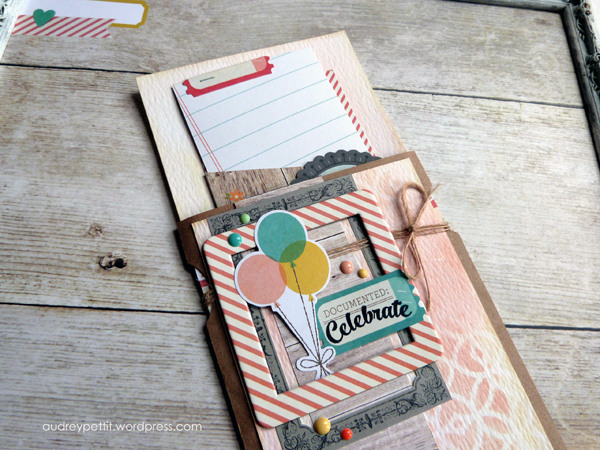
See? The pocket is made from an envelope, and the front of the pocket is dressed up like a card. Then for the inside of the pocket, there is an insert with yet another little pocket, perfectly sized for holding the gift card and a handwritten note. It looks fancy, but it’s really quite simple, thanks to lots of fabulous pre-made embellishments. And I’ve given this a touch of my own personal flair with the help of a favorite stencil and some Distress inks. Here’s a closer look at how.
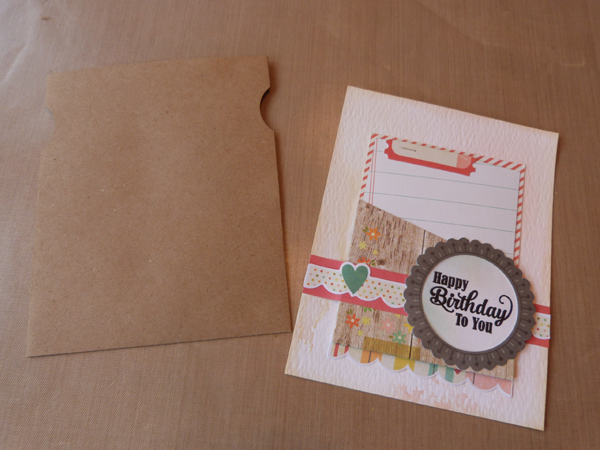
To create the pocket, seal an A2 kraft envelope, and slice off the tip of one end with your paper trimmer. Using an 1 1/4″ round paper punch, punch a slight notch on either side of the pocket, about an inch from the top. This is a small touch, but it adds a little eye catching detail, and shows your recipient there is something else inside.
The insert is made from a piece of Tim Holtz Distress Watercolor Paper, inked with Antique Linen and Tattered Rose Distress Ink. To create this light watercolor wash, dab the inks onto a non-stick craft sheet, and mist the inks liberally with water until water beads form. Then press and drag the paper through the ink mixture. Set the paper aside and allow it to dry completely.
Then take a second piece of watercolor paper and repeat the process with the remaining ink. We’ll use this piece on the cover of the pocket.
Once the watercolor paper is dry, embellish the insert with papers, die cuts, and a pre-made pocket. I used goodies from Simple Stories’ adorable Summer Vibes collection. The pocket and journaling card are from the SN@P Pages, and are all ready to go. I cut down a 3×4 journaling card slightly on one side to fit in the pocket, and added a die cut ticket stapled with a Tiny Attacher to the top for an instant handle. Dressed up the page with a strip of 6×6 patterned paper and die cut ephemera bits. A Sizzix stamped sentiment framed in a BasicGrey Barista die cut make a quick and easy greeting.
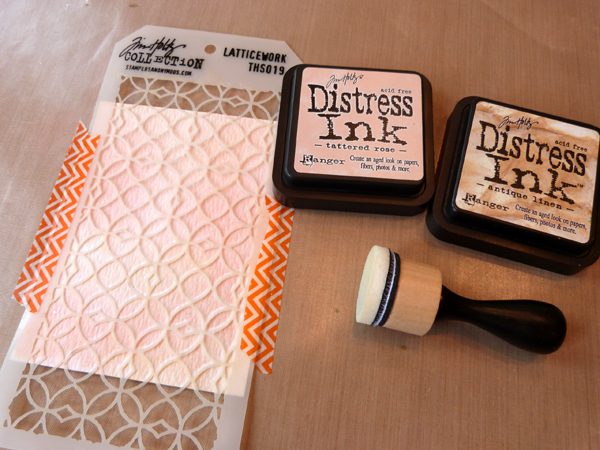
Once the cover paper is dry, trim 1/4″ off the top and one side to create a slightly smaller layer. Tape a favorite stencil onto the paper, and ink over the top using the same colors of Distress Inks and an ink blending tool. I wanted a random look, so I varied the amount of ink I used, applying some of the ink darker and heavier in some spots, and lighter in others.
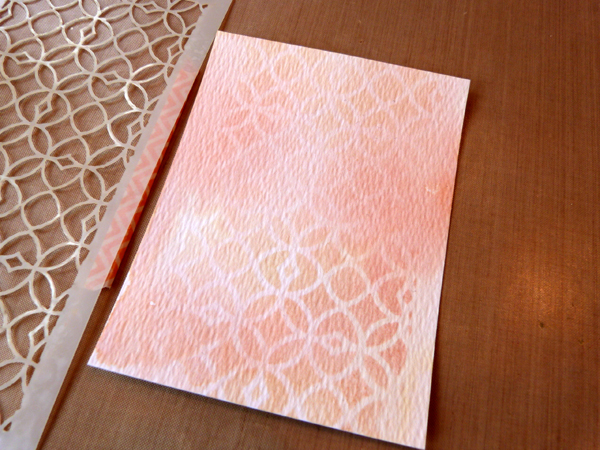
Peel back the stencil and look at the pretty background you have made!
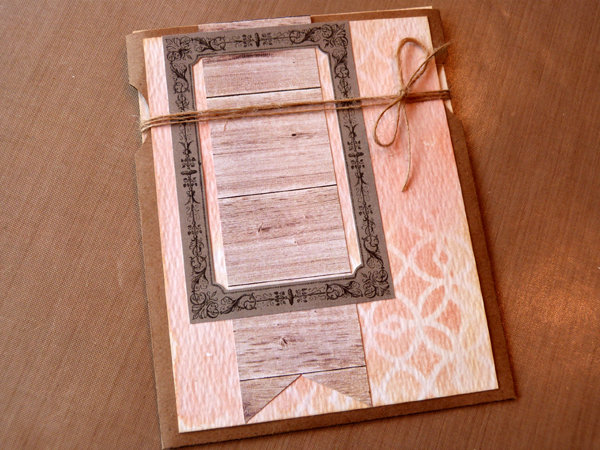
Slip the insert into the pocket, and adhere the stenciled background to the front of the pocket. I added a banner strip of Summer Vibes 6×6 woodgrain paper to the left side, topped with another BasicGrey Barista die cut frame. Then wrapped natural twine several times around the top, tied into a bow on the right side.

Then just a few final embellishments to finish things off. A Summer Vibes chipboard frame, enamel dots, and die cuts. The celebrate sentiment is from the same Sizzix stamp set used on the insert, stamped in Ranger Archival Ink in Jet Black.
I hope you’ve enjoyed my pocket card! And huge thanks to the team at Simon Says Stamp for having me today!
Supplies:
 |
 |
 |
 |
 |
 |
 |
 |
 |
 |
 |
 |
 |
 |
 |
 |
 |
 |

Blog Candy Alert!! Follow our blog via email and comment on this post for a chance to win a special blog candy!


Love this stencil with these soft colours
Lovely way to present a gift card!
this make for a very nice pocket card. like that stencil she used for the background.
stamping sue
http://stampingsueinconnecticut.blogspot.com/
I’m such a huge fan of Audrey’s…her work is always awesome! Love today’s gorgeous card and all the lovely details!
Oh, what a gorgeous birthday pocket card and so very unusual and stylish. Love the colors and how you created this card:)
Beautiful layers and detail!
Such a gorgeous card, love all the layers.
Like the style w/ pocket and dimension.
Melissa
“Sunshine HoneyBee”
Love the dimension on the card, it would be fun to relieve!
Adorable and so fun!! GREAt ideas!!!
Beautiful colors! Love the muted tones with the bright balloons!
What a great gift card holder. Really festive. Love the stencilling.
That is BEAUTIFUL! Audrey is sooo talented. :D
Great card!
Beautiful and SUPER fun! Love this idea ♥
Love the stenciling. The color is so pretty.
Great album cover.
thanks for sharing
I love the colors
Congrats and welcome Audrey! Awesome debut project and fabulous detailed instructions!
Love that background and fun slide-out!
Since my birthday is Saturday!!!! I would love to get this card in my mail box. Hahaha! It is beautifully made and well crafted!! I really love the way you used the stencil on the background paper. I have a couple that I have had for awhile and haven’t used but I think I will now! Thank you! I also never thought about using those frames for a girft card. I have so many of those left over from my wedding six and a half years ago. I love it! I will just bust out my sewing machine and get some cute little cards rolling!!! Thank you again Audrey!
Love this stunning card, wonderful layers!!!
Love the soft background!
Love the soft colors and clever use of embellishments. Great inspiration!
Wish it was my b-Day!
So many layers and wonderful texture!
Beautiful card Audrey! Love the layers and the stenciling. It’s a very cool pocket card!
Love, Love, Love this gift card holder. It has so many wonderful elements and the colors are beautiful. I know that I will make one, so thanks for the tutorial. Thanks for sharing.
Linda D.
Beautiful card, love all the elements and color.
This is a Beautiful Card. Love all the details and layering on this. Those colors are Awesome together too.
Very attractive pocket card idea! Love it.
Great gift card holder. So clever. The watercolor background is lovely, as well as the embellishments. Michelle t
Great project, Audrey! Love the concept and the stenciled watercolor background is gorgeous!
Audrey, your pocket-envelope, gift-card-holder card is such a clever idea. I’m going to save this page so I can refer to it to make my own. Also, I’ve never used antique linen and tattered rose inks together before. I like the mix so I’m going to give this a go, too. Thanks for your hard work, for teaching us and giving us inspiration to expand our creativity.
SUCH CLEVER CARDS!!!! Love her details and the way she used the products!!! SO awesome to see pre-printed materials made into a card by adding some other details to them!! What an awesome post!!
What a unique and fun way to give a gift card! This is amazing!
Beautiful pocket card! Love all the layers and the pretty stenciled background! Who wouldn’t want to receive this gorgeous pocket gift card?! Well done…love it!
Love this pocket card. Never tried making one but might have to now. Such a great design. TFS
Awesome job Audrey! I love your gift card holder! TFS
Love this project!! Thanks for sharing:)
Love this card, and all the embellishments! What a treat it would be to receive that! Thank you
YaY Audrey!!! LOVE your cards, and this card is no exception!! Absolutely gorgeous work, girl!!! xoxo
SUPER Fun Design!! THANKS for sharing and have a FABULOUS WEEK!! =)
Wow! Amazing and unique, I love it!! Thank you so much for sharing! =)
Wonderful project Audrey! Love the stenciled panel! Congratulations on Guest Designing for Simon too! :)
What a neat BD card–love all the layers!
Great card! ;-)
Great bunch of layering!
It all fits together so nicely.
What fun!
Love all the detail and how she used all these different products – so inspiring.
Beautiful card!! Love the stencil and the soft color on the background
What a cool idea
Love the peachy pinks and warm grays! Fabulous color combo and layers!