Yippee for Yana: Hot Foil Backgrounds Made Easy!
Hi friends, welcome to the latest edition of Yippee for Yana with the always amazing and creative Yana Smakula! Be sure to read on and watch the video for more info and enjoy!
Hi everyone, this is Yana Smakula! In this episode, I will show you how to create hot foil backgrounds with the help of your non-background glimmer plates. Think of this as repeat pattern stamping, but instead of using clear or red rubber stamps we are going to use hot foil plates. I have a few tips to share in this video to make the foiling process go smoothly and quickly.
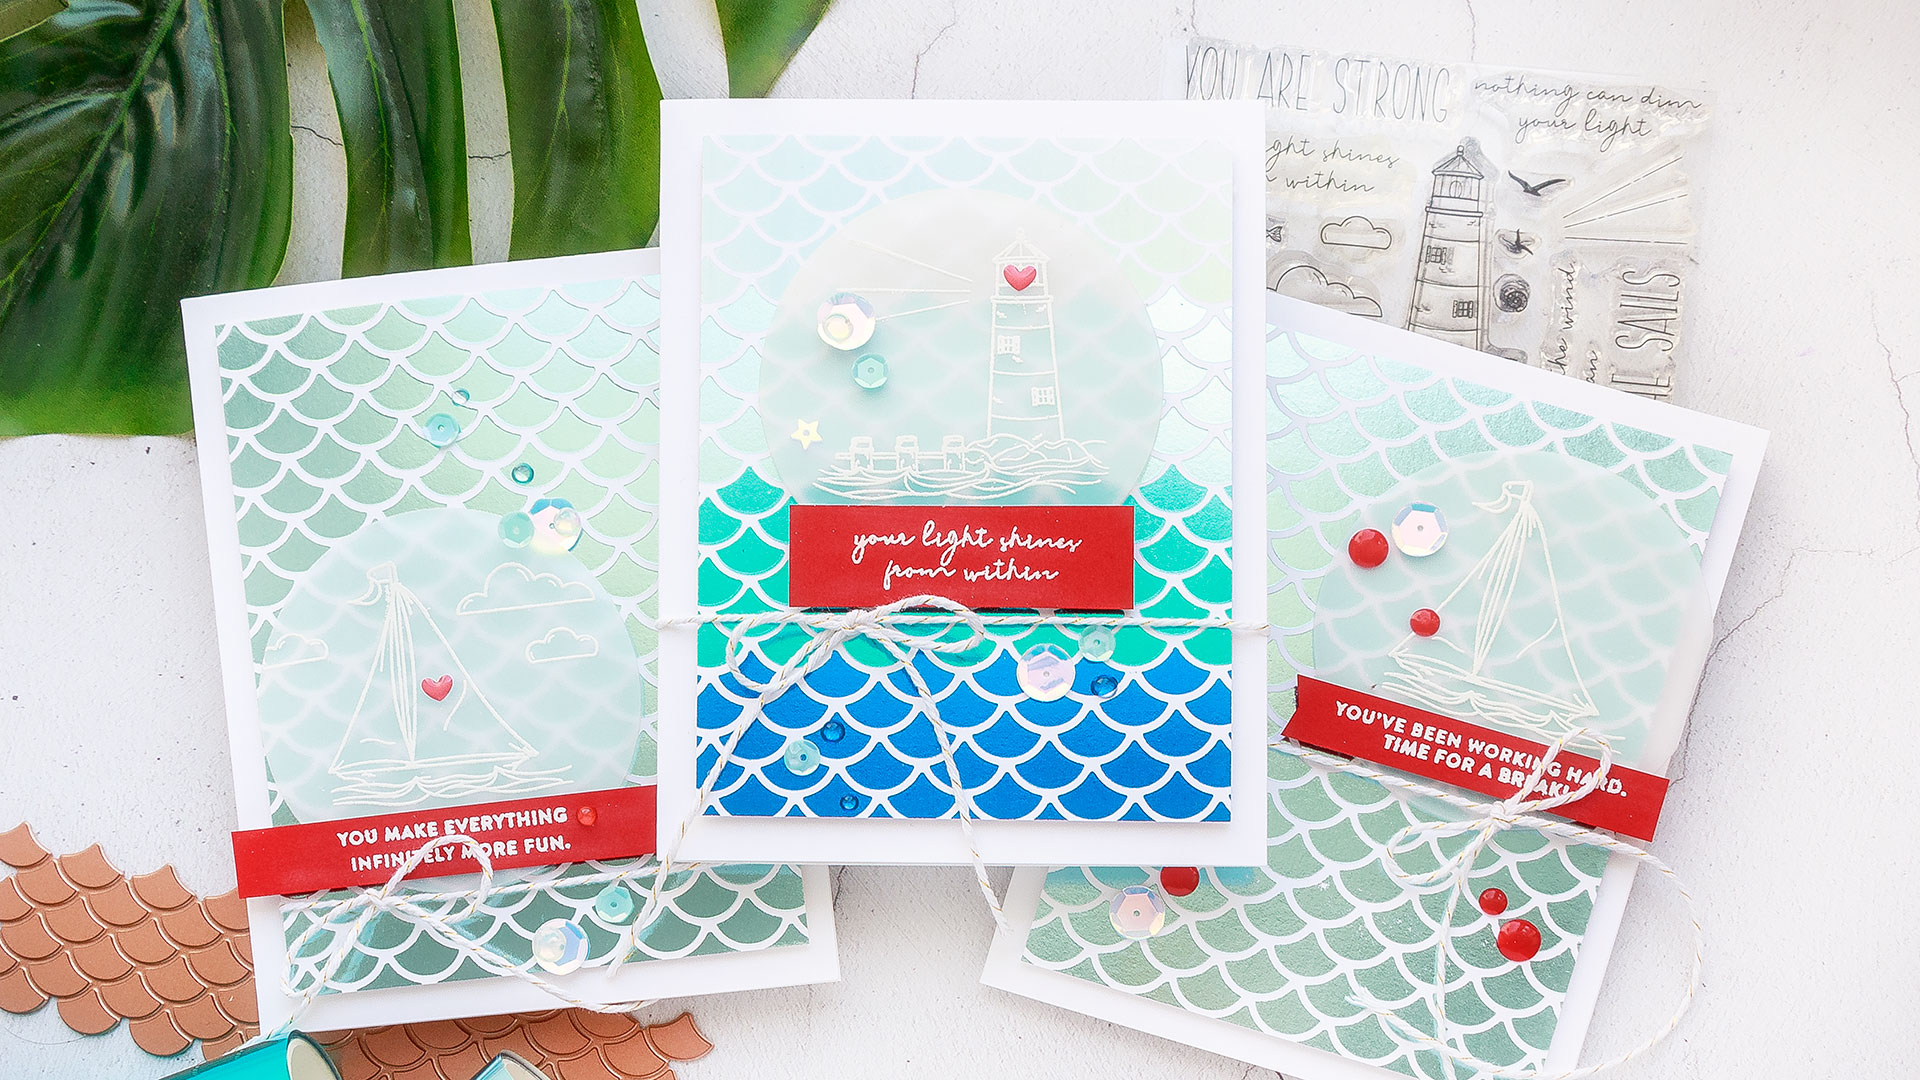
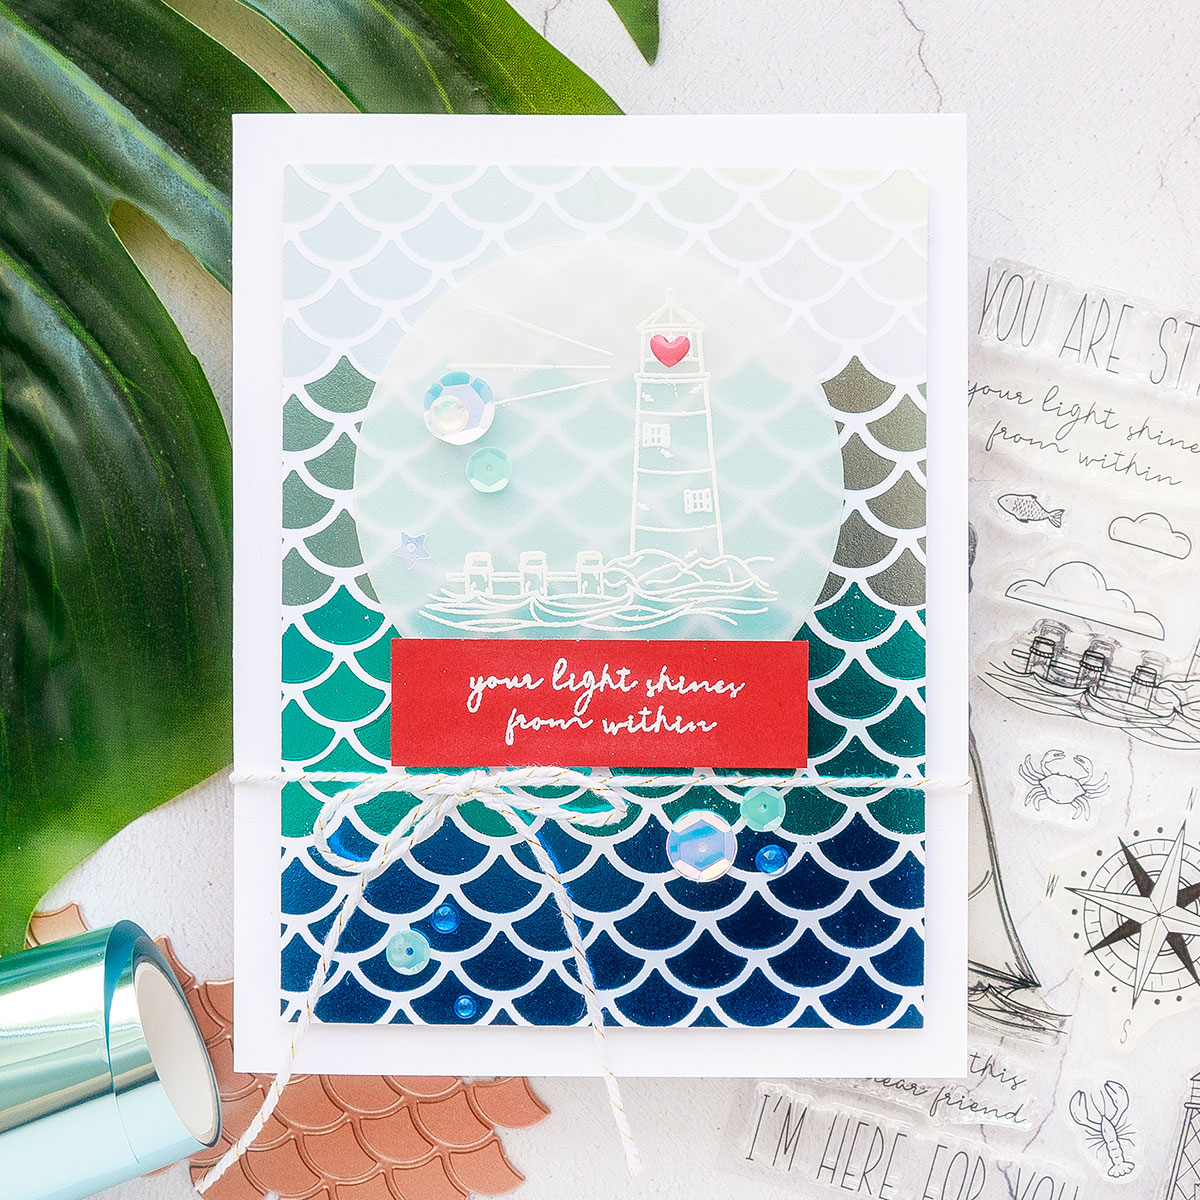
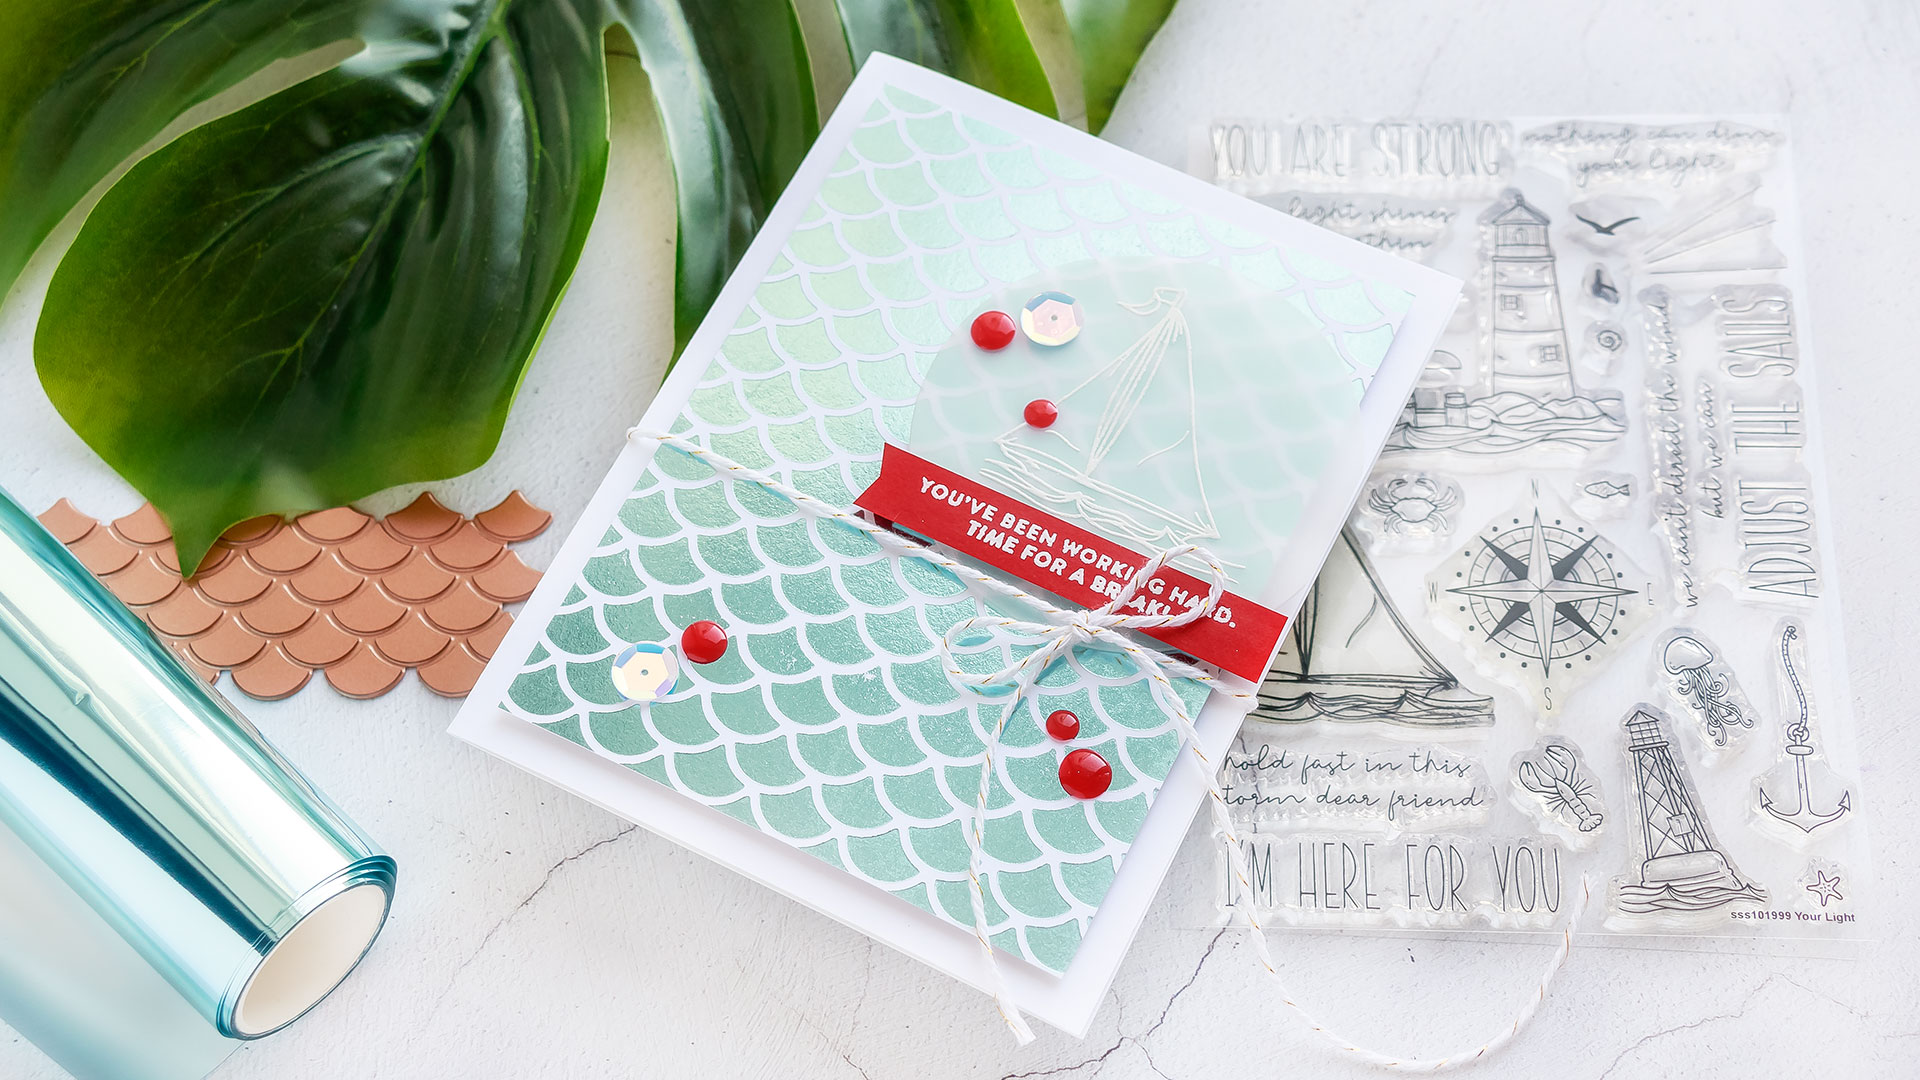
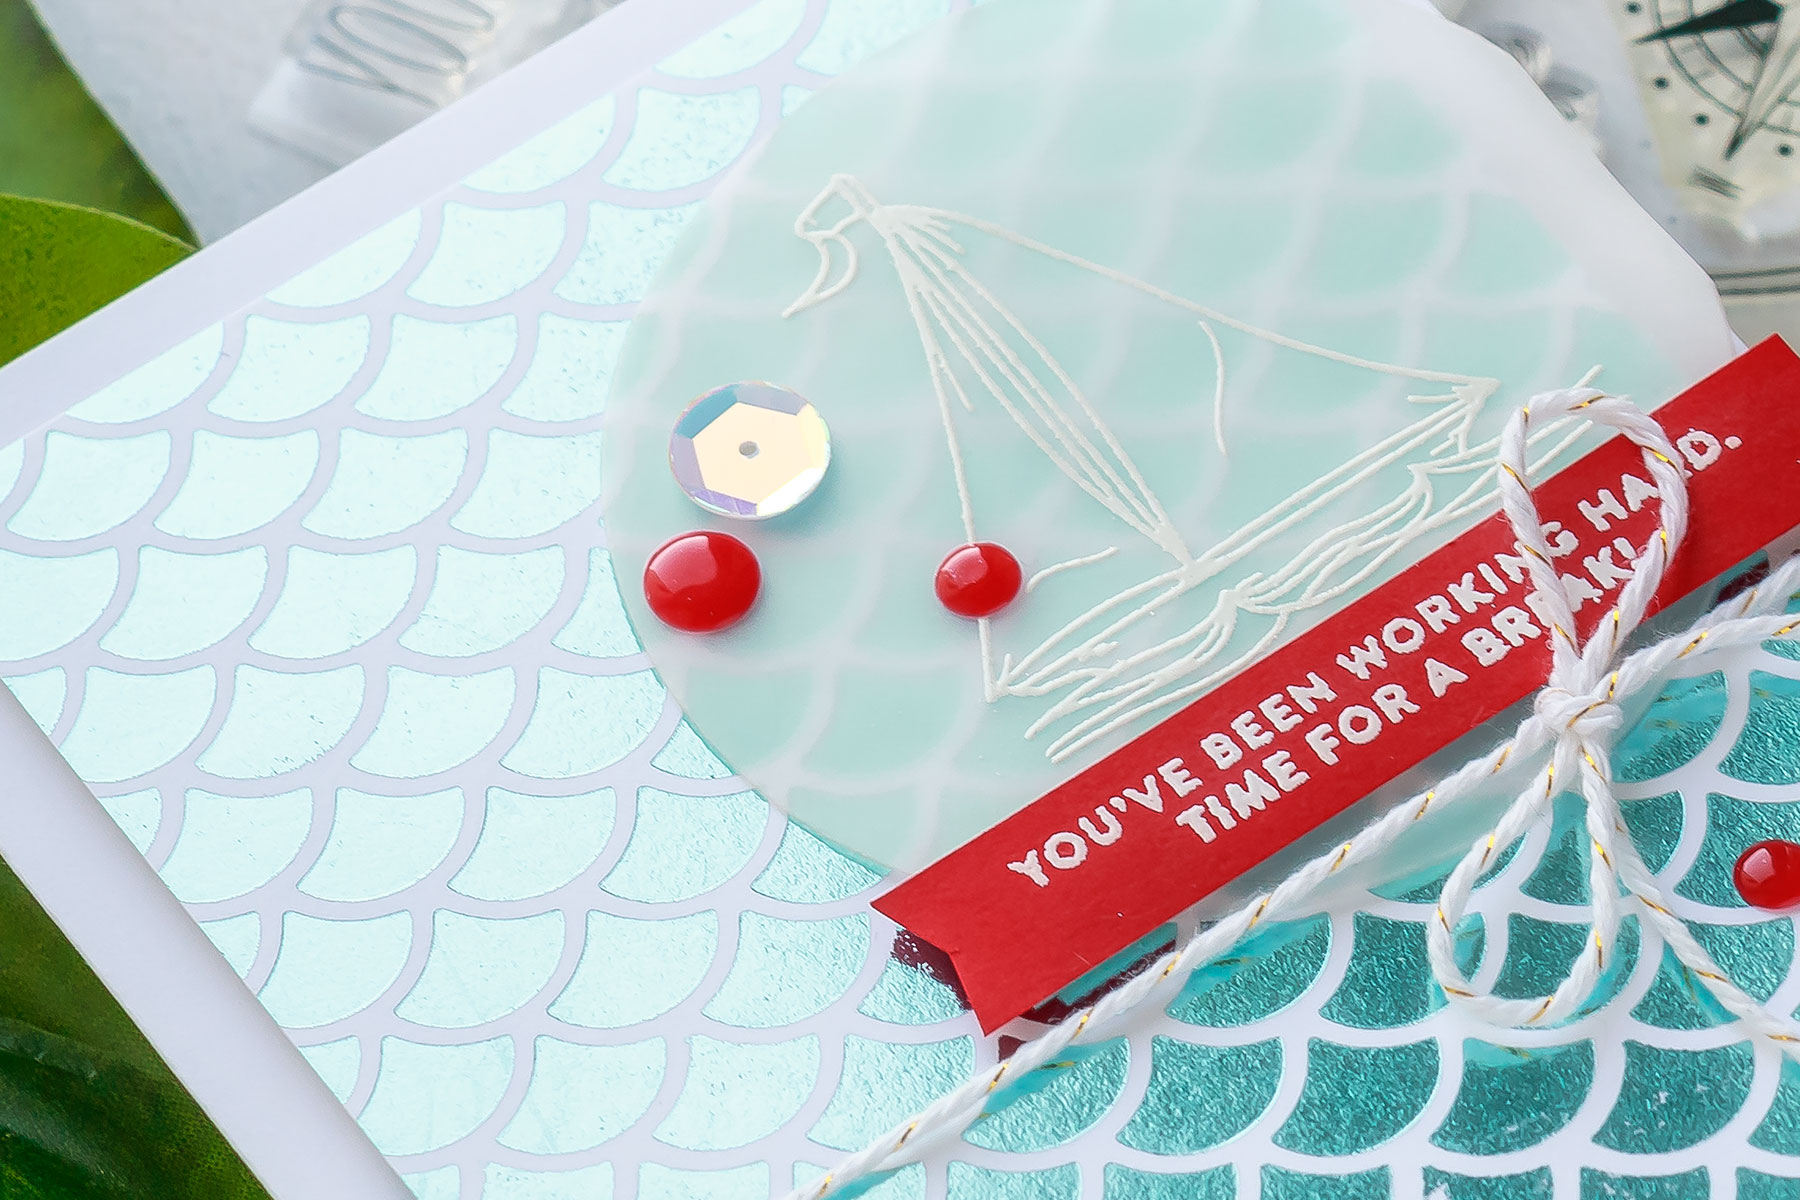
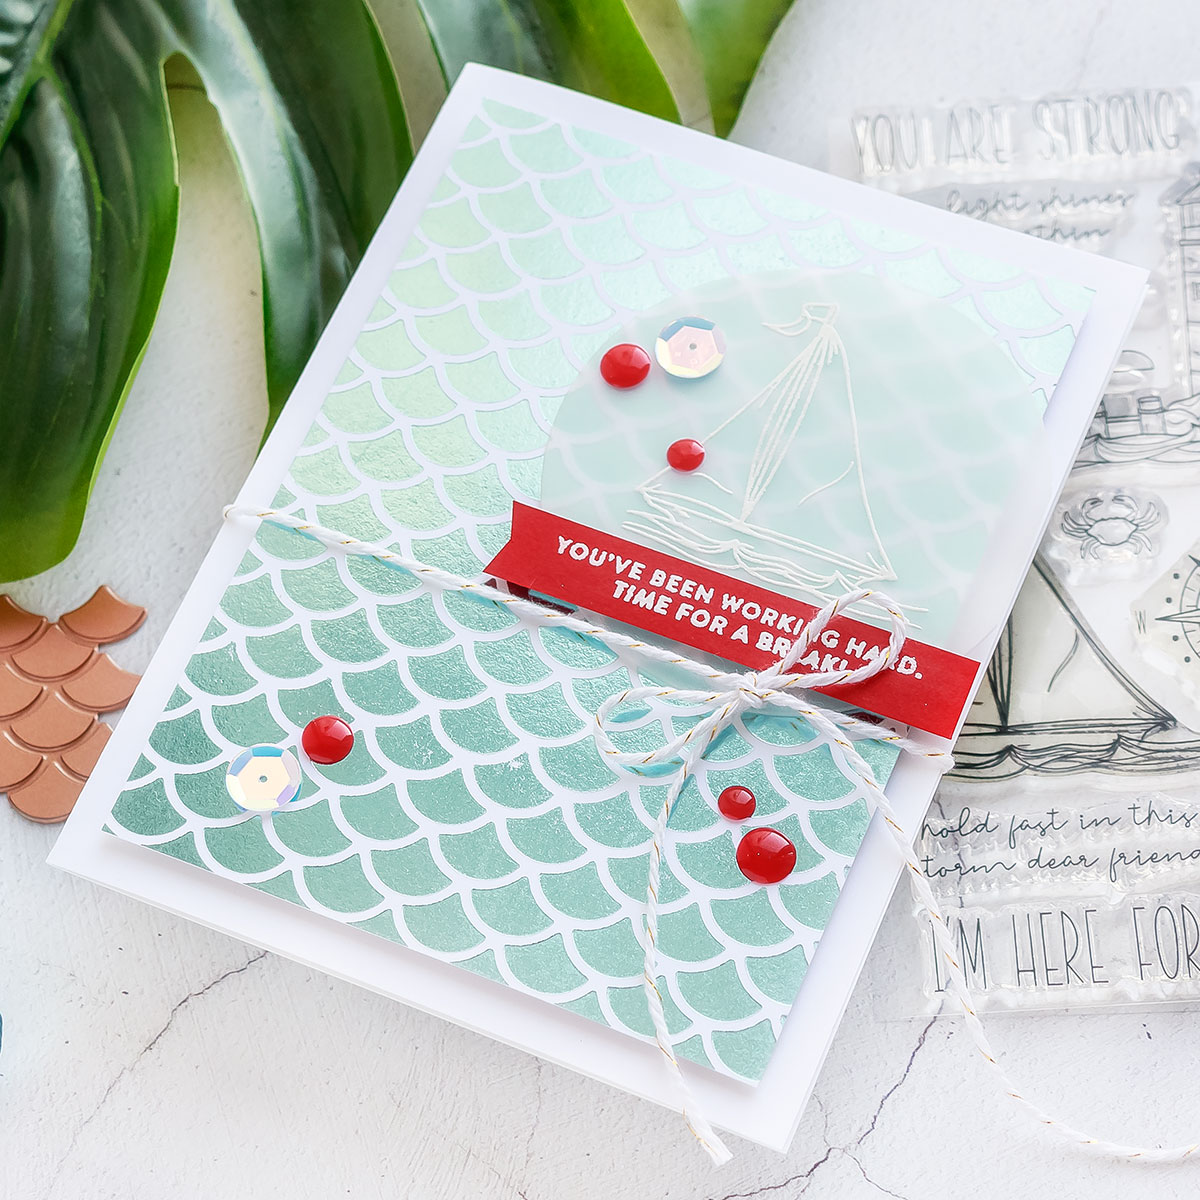
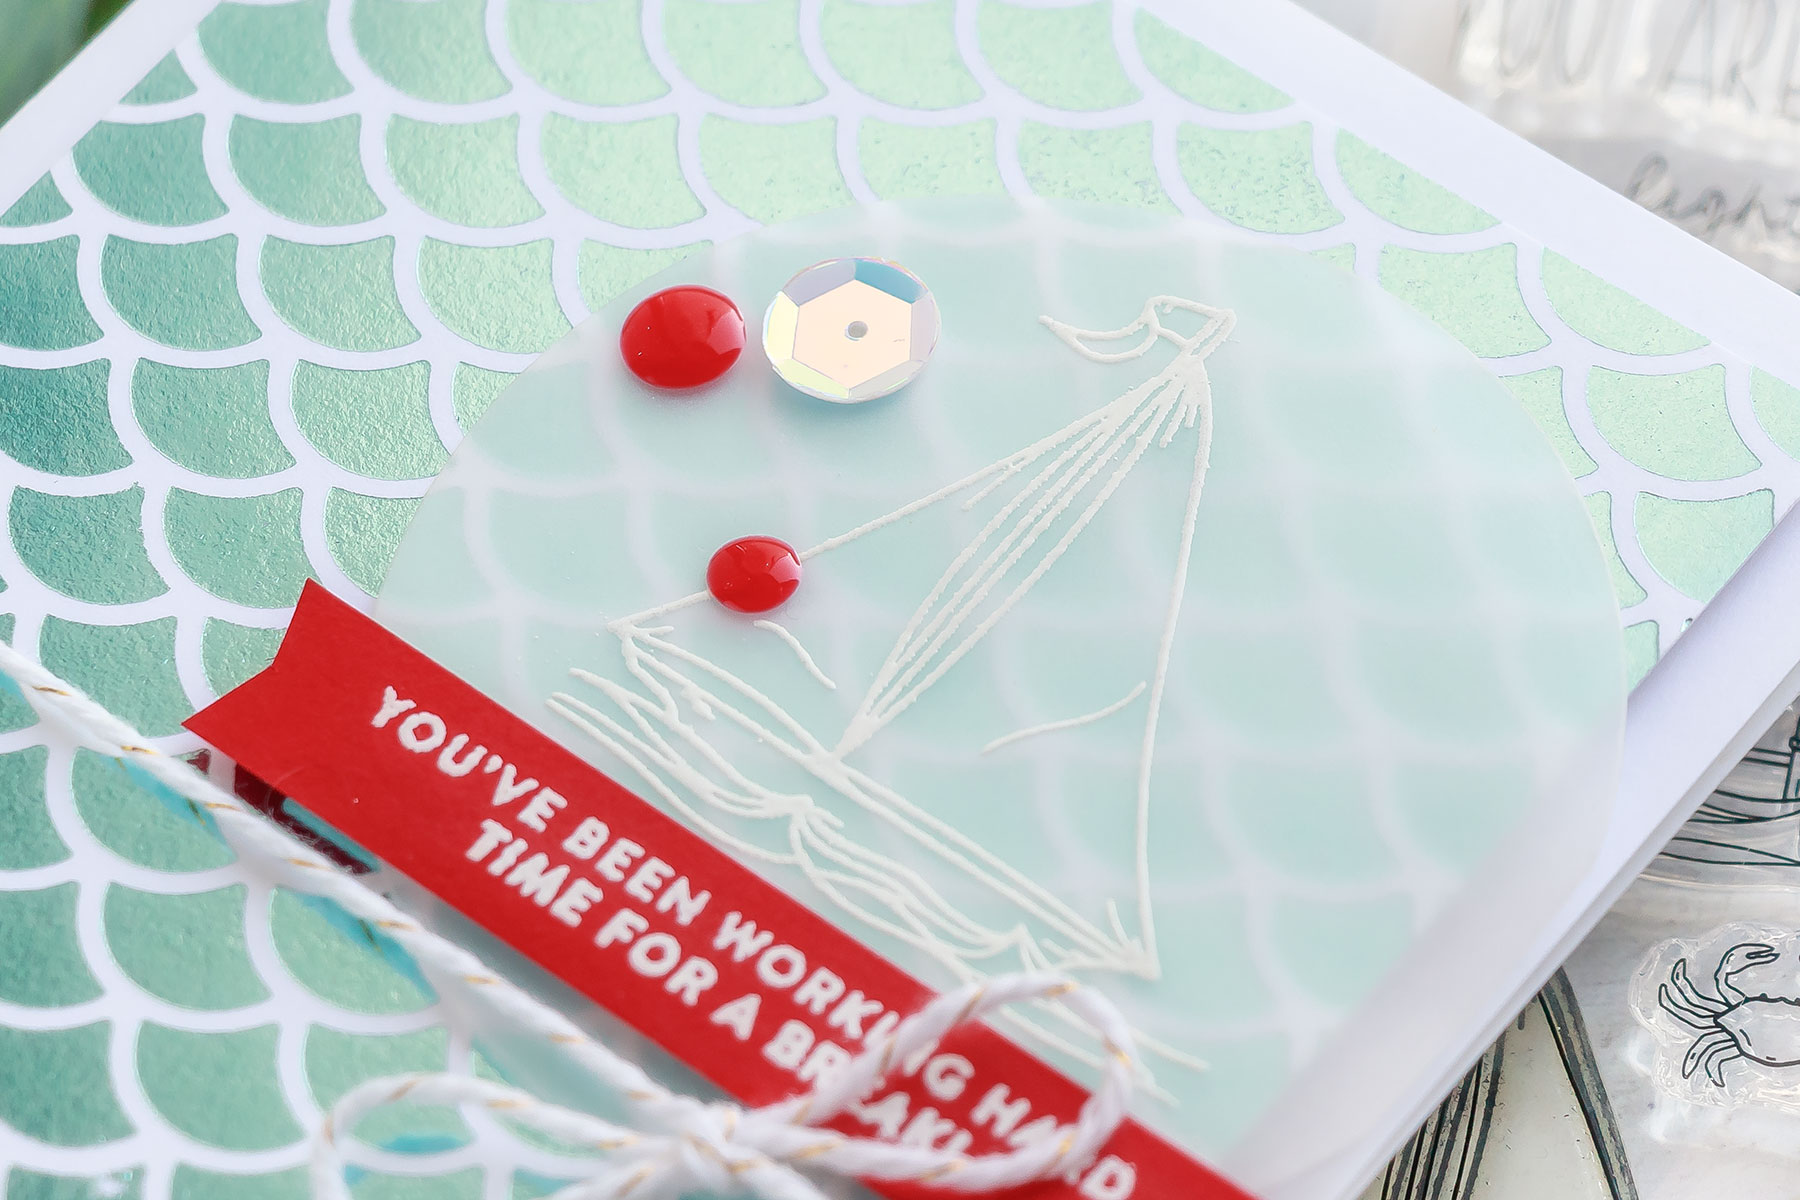
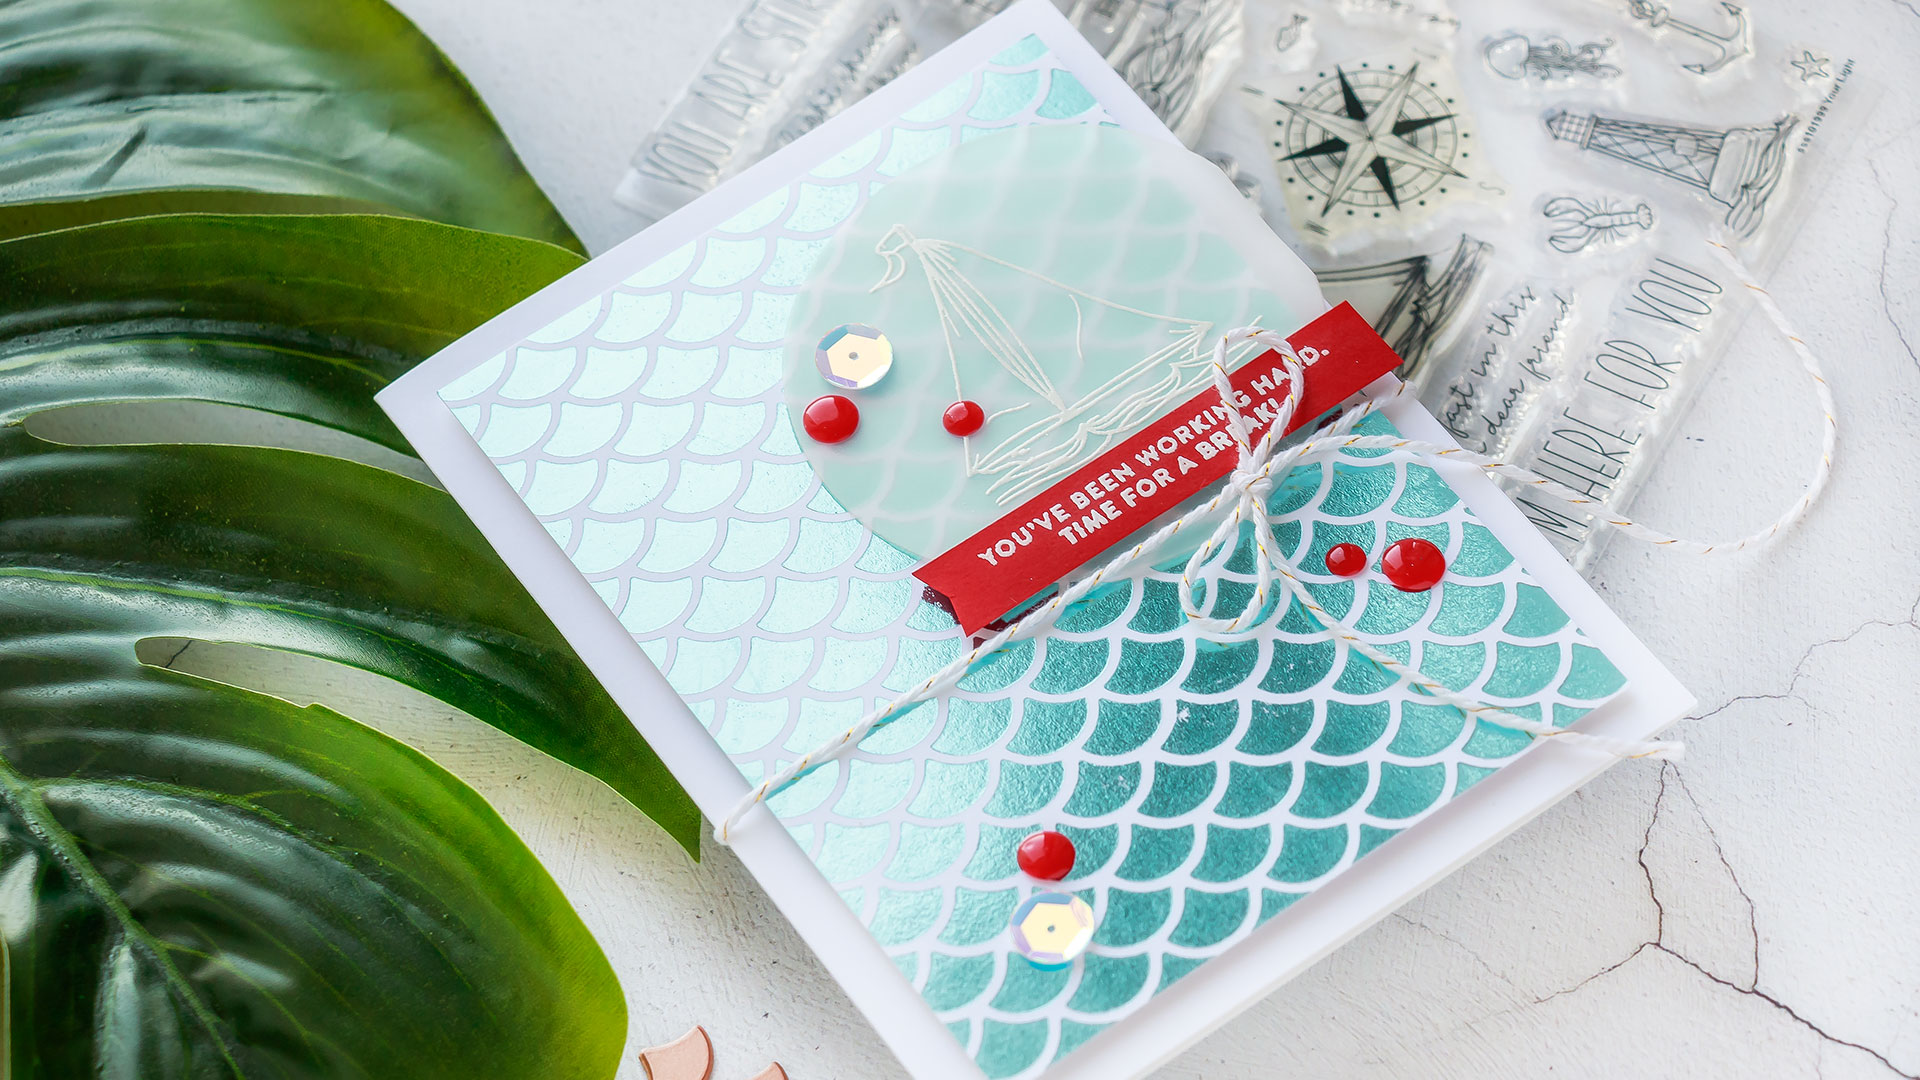
I love this Mermaids Forever Glimmer Plate by Jane Davenport and I know it will make a fabulous background for some nautical cards when paired with Simon’s “Your Light” stamp set.
The plate, of course, is smaller than an A2 card, it can be used on both portrait and landscape cards, but you’ll need to foil it several times on the background to have one continuous pattern.
This is rather easy to do with the help of low tack tape. I am foiling on Neenah Solar White 110 lb cardstock today. To foil the background I added a piece of wide low tack tape to create a hinge to attach my glimmer plate to the paper, next, using grid lines of my work surface I align the cardstock and also align the die on top of it. Also, I’m starting at the top and moving down making sure the tape will not be placed over the already foiled section.
Once aligned I press the washi tape strip in place to secure my plate on the paper. This will give me a top row of these mermaid scales or waves. I’m using Skybright foil to foil this piece and to foil the entire background – it makes up for a beautiful sea. Using a sharp pair of scissors I cut my foil to a strip, I eyeball it and try to match it in width to the width of my glimmer plate and once cut simply slide it under the plate. The only significant thing here is to try and cut the foil on a straight line. Using scissors with long blades helps.
Meanwhile, my glimmer hot foil machine has been heating up and is now hot and ready to foil. I’m sending the sandwich slowly through my die cutting machine and back and returning the platform back to the docking station so that it remains hot for the next round.
Now I need to remove the glimmer plate, peel the foil, reposition the plate and add foil all while the glimmer plate is hot. So what do you do? You can wait for the plate to cool off and that might take several minutes, or you can use this trick.
Wear a glove!
I have one of those curling irons that doesn’t have a clamp and so there’s a glove included with the iron to be able to wrap the hair strand around the curling wand and hold it in place while it curls it. The glove protects the hand from the heat. I can use it here when doing hot foiling to handle the hot glimmer plate and also protect my hand from all heat.
Holding the paper with my non-gloved hand I remove the glimmer plate with my gloved hand and re-position in on the paper aligning with the previously foiled design to have one continuous background for my card. Having the glove on this makes it very easy to move the glimmer plate and position it where I need it.
I repeat the process several times to foil the entire background.
I also have another background done in a similar way but using several colors of foil for an ombre look – Cobalt Blue, Teal, Skybright and Prism.
To turn these backgrounds into cards I trimmed them down slightly, and to create little nautical scenes I also die-cut circles from vellum and cardstock strips from red cardstock. I white heat embossed images and sentiments and using foam adhesive I assembled these cards.
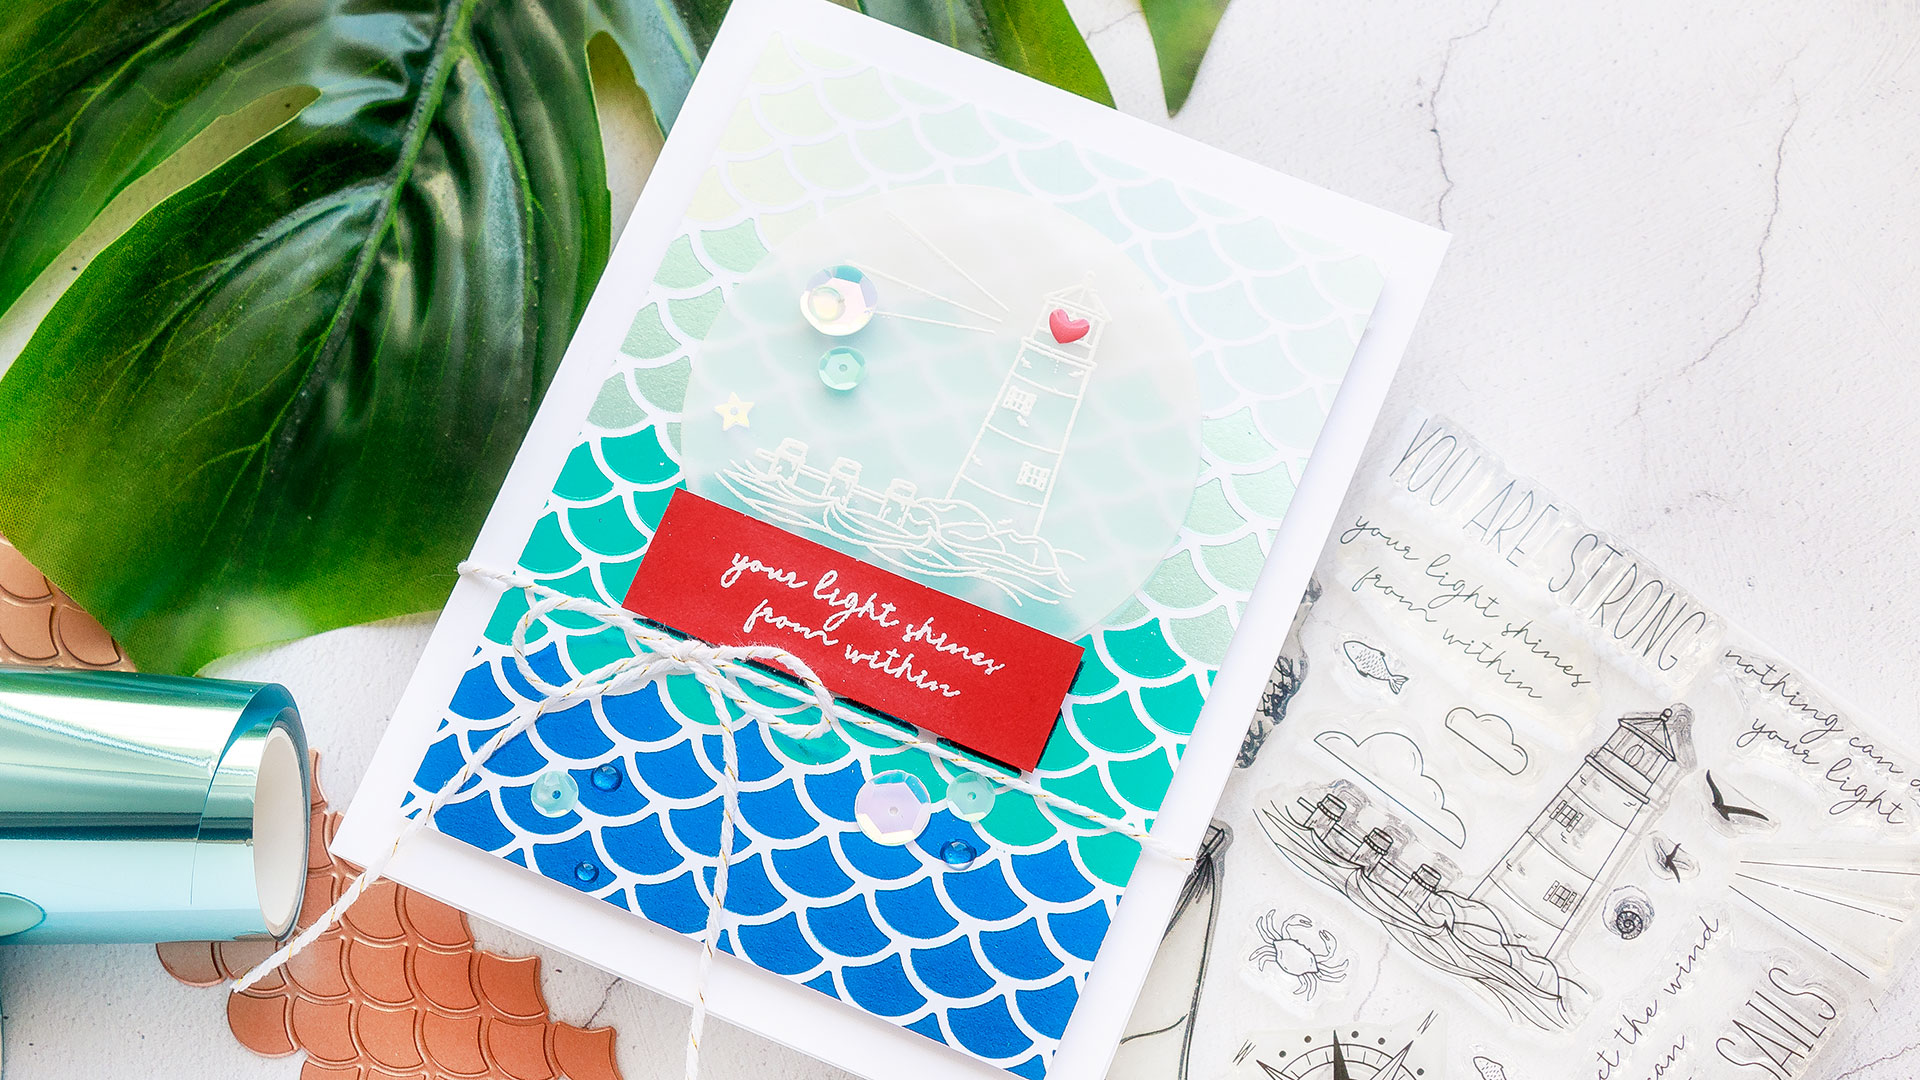
I also hid little pieces of foam adhesive squares under small sequin or enamel dot embellishments to add more support and more adhesive to the vellum circles.
Be sure to watch the video below to see how the cards were created!
WATCH THE VIDEO
SUPPLIES
|


Blog Candy Alert!! Follow our blog via email and comment on this post for a chance to win special blog candy!


Lovely card! ?
Beautiful cards, love the foil background.
Amazing! Love love your work! TFS
Gorgeous!
Anew foiling machine? Just when you think you have it all. The cards are lovely and I already follow by email.
Great cards. Thank you for the tips on foiling.
Beautiful cards! Foiling is something I have yet to try!
Thanks for sharing these gorgeous foil cards with us!
You make using a foil machine look so easy! The card is perfect for summer, especially if you have some friends who love to sail!
Wow, this is SO pretty! I have a Minc machine and am not sure if a hot foil plate works in there the same as it does in the Spellbinders system, but I’m excited to find out and perhaps recreate something like this. Love the colors!
Love how the backgrounds look! :) Lovely cards.
Wonderful technique. Love the cards. Thanks!
So lovely! Great touches of red!
Wow, the way you’ve lined up the different colours of foil is seamless – the backgrounds look so beautiful! Great tip about using a heat-protective glove.
Beautiful card!!
Fabulous tip about
the glove. Lovely
foiling on the cards.
Carla from Utah
Pretty cards! Love the look of the foil!
Great tip about using a glove to protect your hand from the heat!
Love your tips Yana! Awesome cards too. :)
Awesome cards Yana, I love them all. Great video, thank you so much for showing.
Fabulous backgrounds Yana! Thanks for the inspiration!TFS
Oh my always amazing and adorable! I think I feel the breeze from that amazing sea :)
Such lovely cards…and a very helpful video for creating foiled backgrounds. tfs
Wow! Those scallops … swoon!
Wow! Fabulous cards!
Thanks for these useful tips!!!
These cards are so beautiful! I just love how you created the foiled backgrounds. :)
First time visito…Sooo many cute ideas! I love your blog!
awesome cards
Delightful cards! Beautiful!
Beautiful cards! I love the design!
What a lovely design! These are so pretty!
The more I see foiling the more I love it. Beautiful card.
Beautiful cards! Great ideas!
These are beautiful!! I love the gradient of colors on each! Perfect for nautical cards.
Hi, This is a very Impressive and also very informative post. Outdoor lighting enhances safety and ambiance, illuminating paths and creating a welcoming atmosphere. Thoughtful placement and energy-efficient fixtures can elevate any outdoor space.
I love how this tutorial makes creating stunning hot foil backgrounds so approachable! For even more inspiration, I always check out the beautiful wallpapers at https://fondospantallahd.com/ – they’re perfect for sparking creative ideas!