Butterfly Tag by Anna-Karin Evaldsson
Hi friends! Happy Sunday! I’m so pleased to welcome back special guest Anna-Karin Evaldsson as a special guest on our blog! Be sure to stop by her blog weekly for new inspiration in our Monday Challenge! Be sure to read on to learn exactly how she made this gorgeous tag and enjoy!
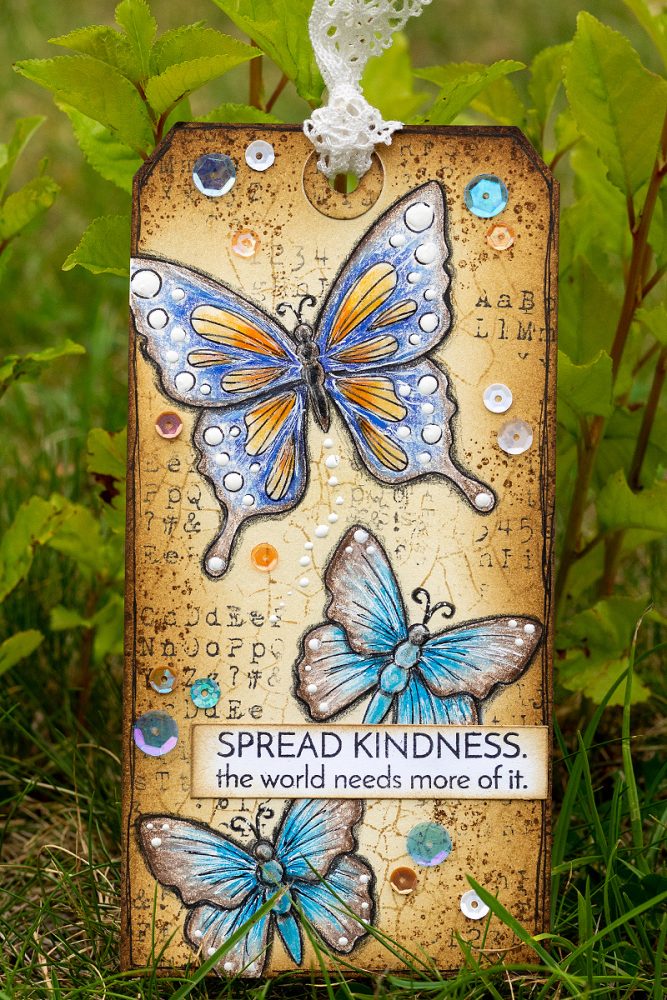
Hi everyone! I am so happy to be here today with a fun and easy tutorial. It is also great to be stamping again, after having had to do a sudden move. My supplies are now unpacked, although still in a somewhat chaotic state. There has been a lot of butterflies around our new place, which inspired me to stamp and color butterflies for this tag. You can use the techniques for any type of project.
Butterflies are always fun to color and you can make them into any colors you can think of. Or use a butterfly reference book and turn them into real butterflies. The butterflies were colored with colored pencils, adding shadows to make them look dimensional. I also did some masking, inking and background stamping.
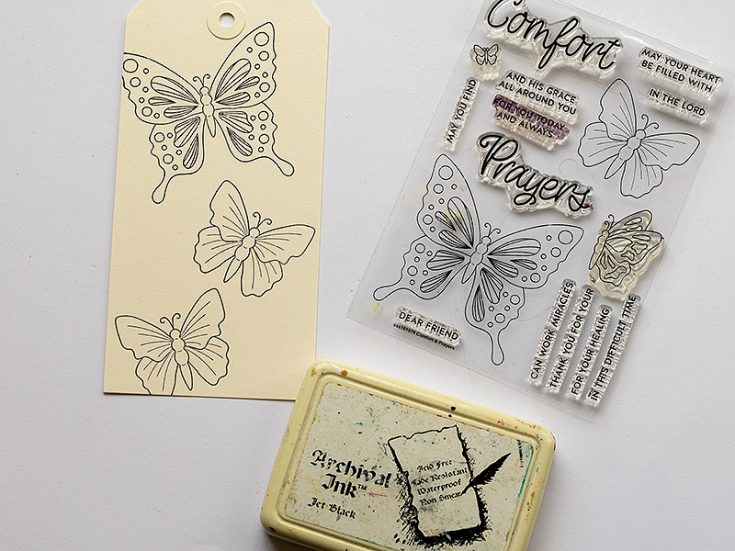
Start by stamping butterflies from the Simon Says Stamp Comfort & Prayers set on a tag, using Jet Black Archival Ink.
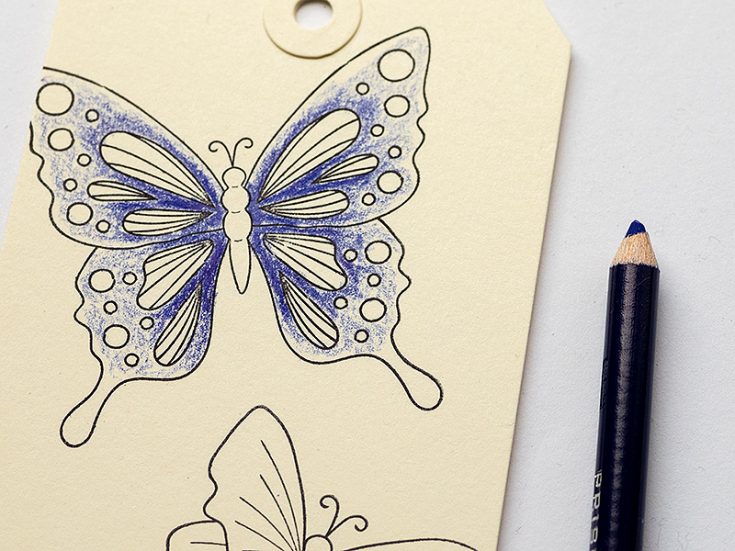
I used Prismacolor pencils to color the butterflies, and my pencil sharpener only showed up when I was almost done with the tag, which is why some of the pencils look a little blunt on the photos. Start by pressing lightly with the pencil, and then add more pressure to build up darker shades.
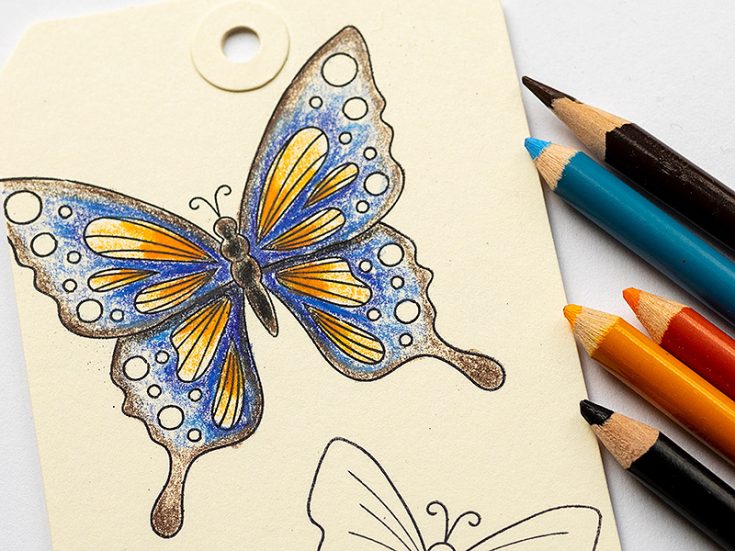
Continue adding color until you are happy with the look.
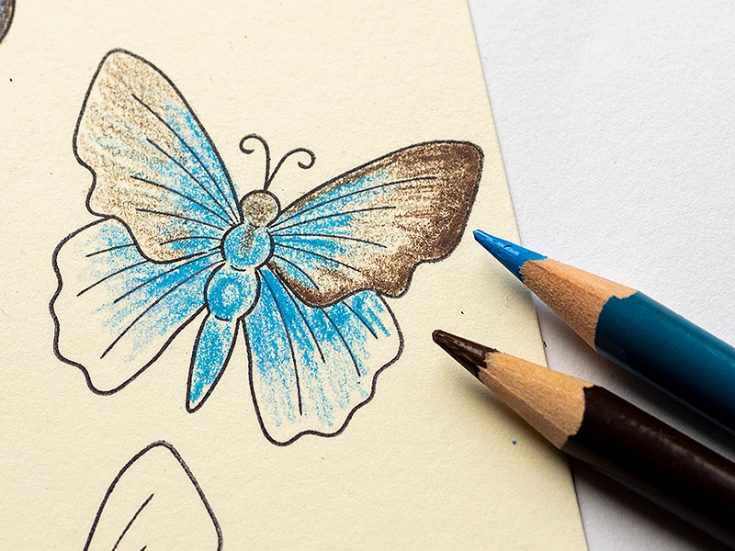
Here you can see the first lighter application to the left, and how darker shades were built up using the same pencils to the right.
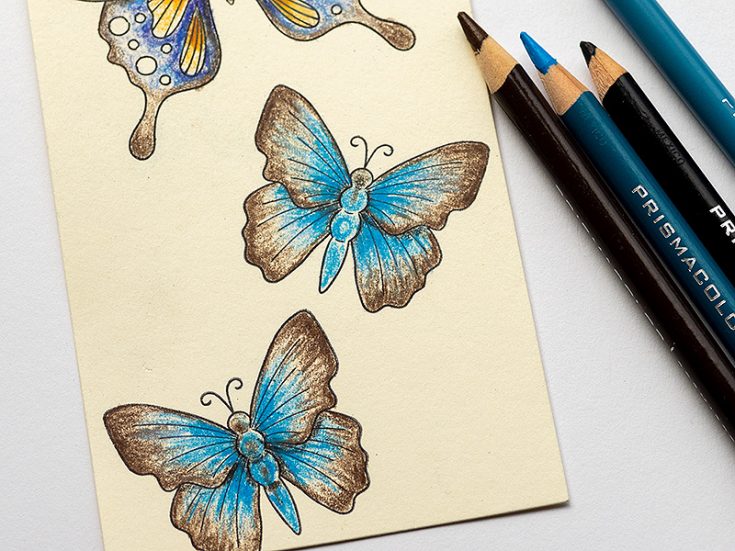
Continue in the same way as the third butterfly.
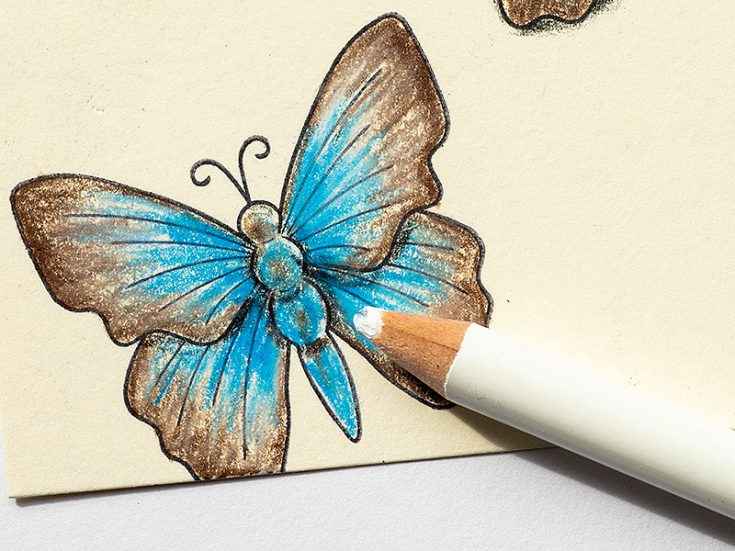
If you want to smooth out the colors, you can go over them with the white pencil.
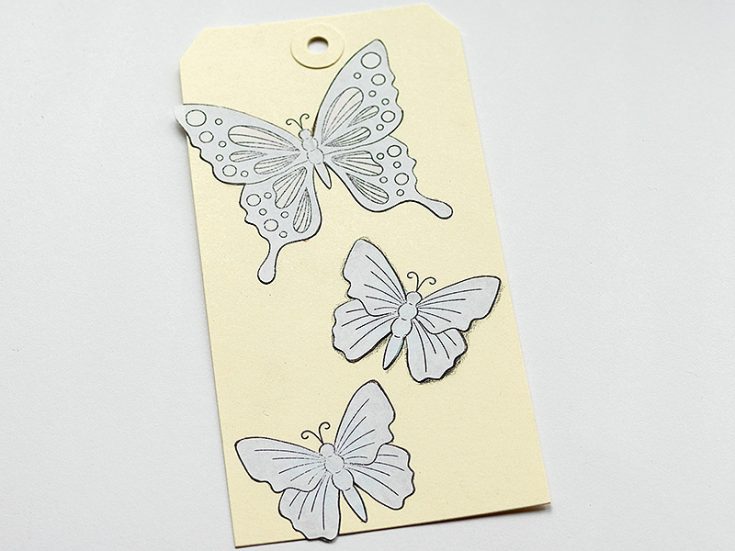
Stamp the butterflies on SSS Masking Paper and cut out. Place them on the tag.
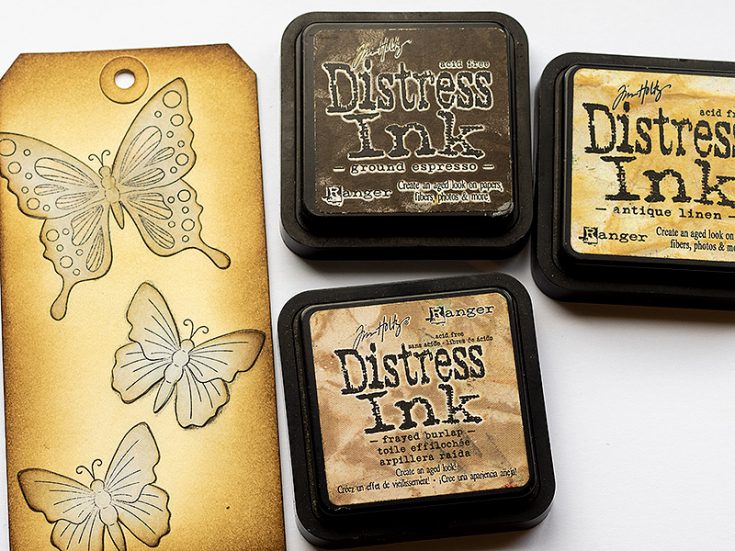
Ink the tag with Distress Inks, starting with the lighter shade. The masks stay perfectly in place.
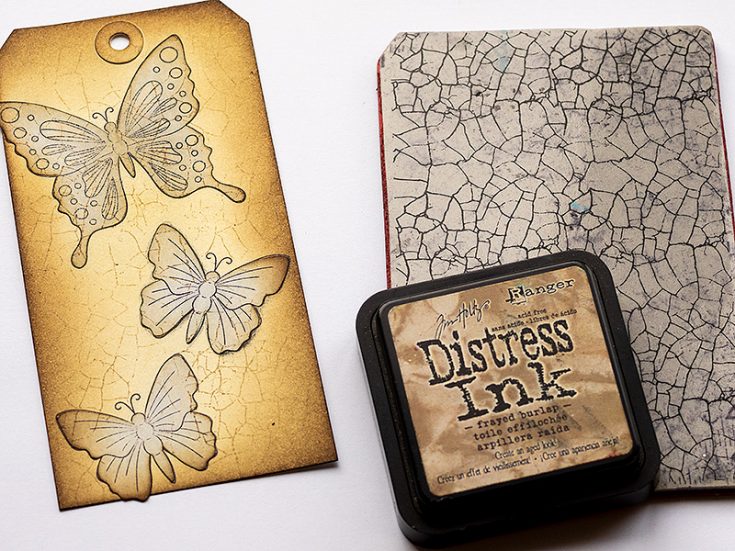
Stamp with Tim Holtz Cracks background stamp and Frayed Burlap ink.
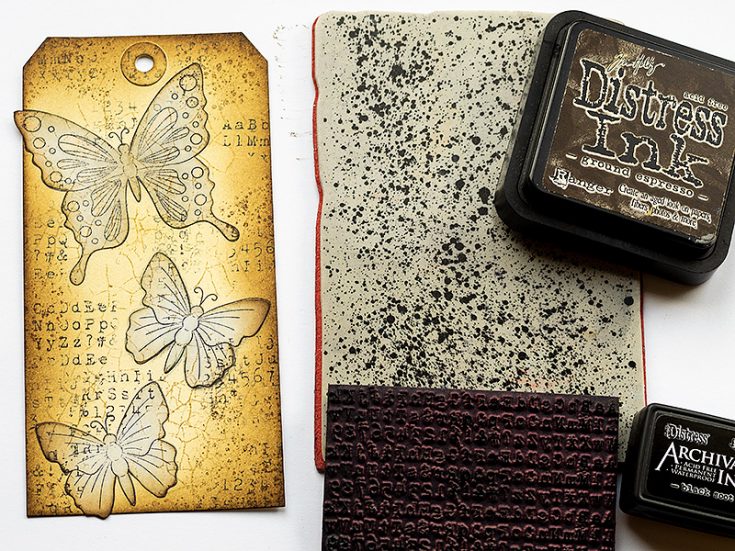
Use a darker brown together with the Specks stamp, and finally add some black stamping with Tim’s alphabet background from the School Desk set. This is one of my all-time favorite stamps.
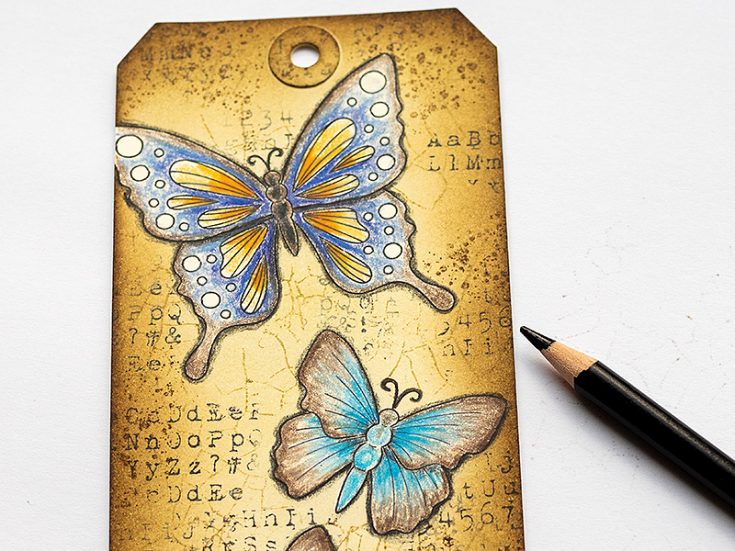
Use a black pencil and add a shadow to the butterflies. Start with a light application and then make it darker closer to the butterflies. This gives a dimensional look.
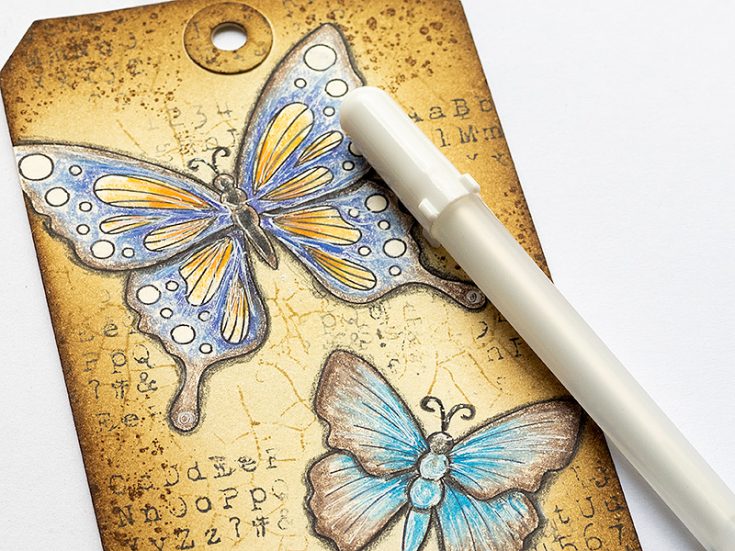
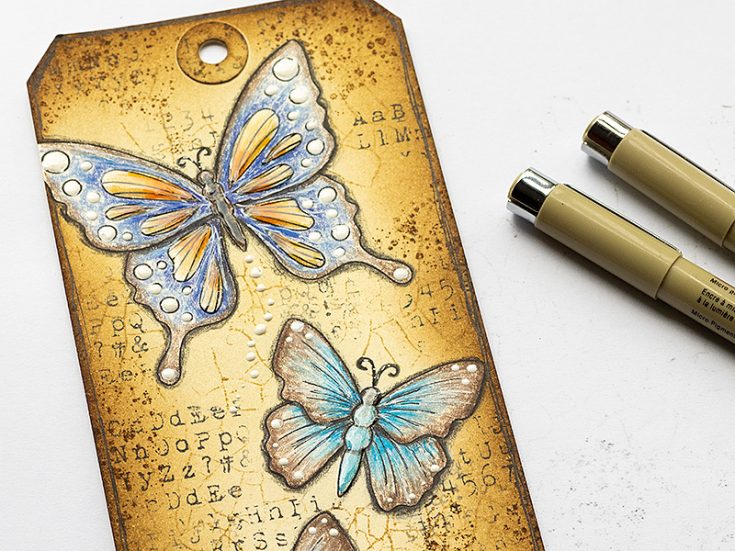
Add details and highlights with a white gel pen.
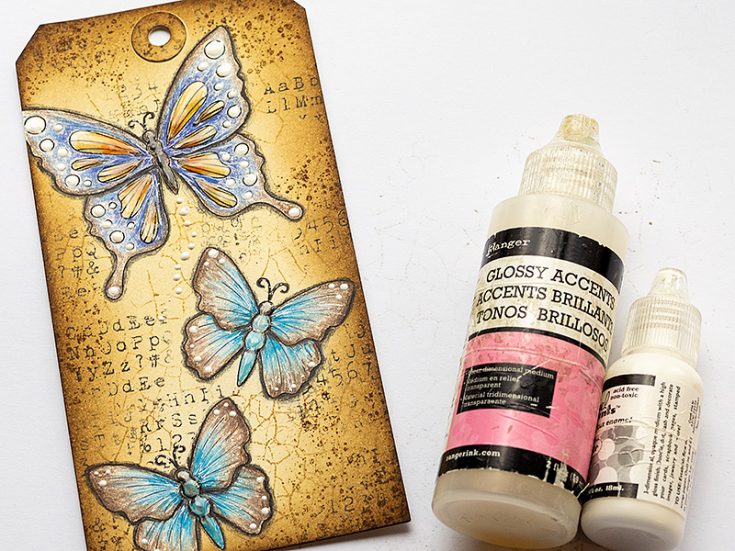
To make the butterflies even more interesting, I decided to use Glossy Accents and white Enamel Accents on some areas. Set aside to dry.
Add some details with a black pen, and doodle a border around the tag.
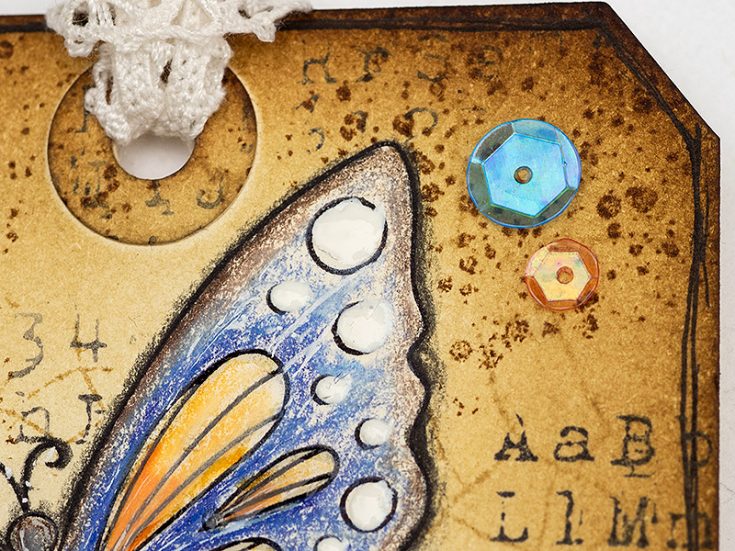
Finally, I glued sequins to the tag, for a fun playful look.

Here you can see the shiny effect of the Glossy Accents and Enamel Accents better.
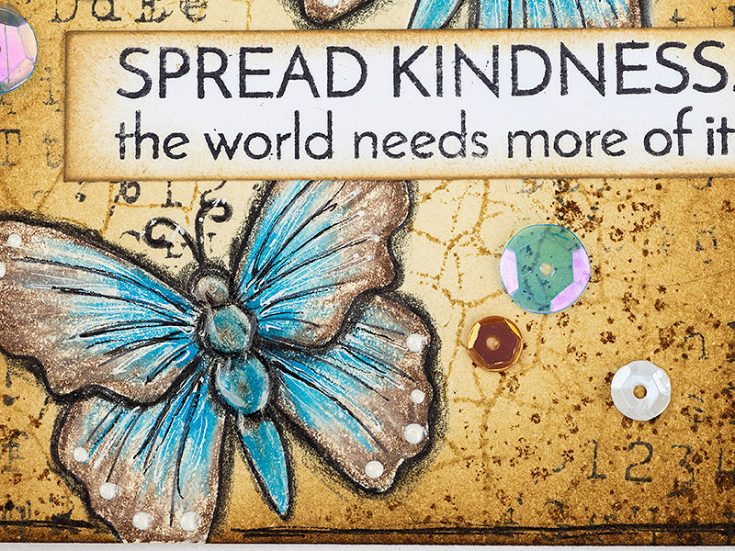
The coloring technique also works great for other images, such as flowers. The sentiment was stamped with the SSS Uplifting Thoughts set.
I hope this tutorial inspired you to color some butterflies (or something else) with colored pencils.
Thank you so much for looking! Happy crafting! – Anna-Karin
SUPPLIES:
|


Thanks so much for stopping by, and thanks to Anna-Karin for being our guest!
Blog Candy Alert!! Follow our blog via email and comment on this post for a chance to win special blog candy!


Gorgeous – I love the soft, warm feel of it and all the small details in texture. Love how well loved your archival ink pad looks too :)
Your tag is lovely, your technique is simple and very effective! I smiled when I saw the old cover of your archival ink–a testimony to the years you’ve devoted to the craft and why you are so good at it. Good luck settling in after your move (I bet things are a bit topsy-turvy right now.)
This is a gorgeous tag! :) Love how you colored the butterflies.
Those gorgeous butterflies just pop off your tag. Wonderful project! Thanks for sharing.
Awesome Anna-Karin, as always, such gorgeous idea.
Easy to do and stunning result. Thank you so much for your great inspiration and tutorial. Have a great week.
Oh wow, this is beautiful! Thanks for sharing the details on making this great tag!!
Beautiful tag. Thank you for the great tips.
I love this tag and never thought to use this butterfly set on a tag! Thank you for the inspiration to make some tags again!
This tag is beautiful with lots of wonderful detail. Thanks for the tips on how you achieved them. I, too, love the well used Archival Jet Black Ink Pad shown here and though I have a newer black pad now, I still have an old design Archival Sepia ink pad that is still going strong!
How beautiful. You are good at pencils. I like the bright butterfly with the grungy background…
Your blending looks great. What a great combo of colors. The butterflies are very nice.
BEAUTIFUL coloring and design!
I love this, I love that I didn’t have to watch a video or find out how things were done. I appreciate the photo progress. I love this tag.
I loved watching all her steps combine into this gorgeous tag! Just when I thought it was done, she adds more and more beauty. Just a knock-out!
You absolutely do the best tutorials, Anna-Karin! Your tag is a work of art–so inspiring! Hope you enjoy your new place after the stress of moving.
WOWZERS! gorgeous tag! I love how using the pencils gave a little visual texture that looks like the fuz that covers butterfly & moth wings!
The butterflies look so dimensional! Beautiful tag!
I love this stamp set and your tag is stunning!
That’s really gorgeous!
Gorgeous! Amazing layers and visual texture.
Gorgeous tag! I love the cracked, distressed look of the background!
YES! It is a Gorgeous tag!
Have a wonderful day,
Migdalia Rodriguez
Migdalia’s Crafts
Fabulous tag design. Everything about it–from the background to the final embellishments–is so well designed…and the coloring is so well done. tfs
Beautiful, just beautiful.
Gorgeous tag…love your beautifully colored butterflies. They look as if they could fly off the page.
Absolutely stunning!! Could very easily be changed into an A2 card too!! Love it!!
Beautiful tag. Those butterflies are gorgeous and that sentiment is wonderful.
Beautiful tag, love the butterflies.
Wow!!!! Really Gorgeous tag!!!
How pretty! I love how the tooth of the papered the butterflies look a bit worn/distressed to match the backgrounds!
Wow, this is so stunning! I never create gift tags but you’ve got me wanting to break out my crafting supplies right now and make some!
A beautiful tag. Love the creative background with the Tim Holtz stamps and the Prisma pencil colored butterflies. A simple technique with pretty results.
This tag is gorgeous!!!
This tag has such awesome vintage charm. Thanks for sharing this inspiration with these fun products.
Absolutely stunning! Thank you for showcasing how you created it.
So beautiful! I’ve been working on my coloring, so you’re are so timely. Especially, the white pencil to smooth our the color. Thank you so much for the inspiration!
So pretty–love how you colored the butterflies.
Wow! So perfectly done.
Beautiful tags!! I love this butterfly stamp set!!
Fabulous project!! Love the butterflies!
WOW what a stunning tag, the butterflies are gorgeous!
Beautiful tags, thanks for sharing the process!
Beautiful tag, love the coloring steps, and really appreciate the sentiment, too.
Stunning tag! And I love the blue & brown color combo.
Beautiful tag. The butterflies look gorgeous against the sepia background.
The butterflies are colored great! Wonderful idea.
Butterflies and prismas….so beautiful! Love this!
Wow! Amazing design! Love how you coloured the butterflies! They stand up so well on the sepia tones of the tag!
Pinned!
Oh Anna-Karin, you had my attention as soon as I read the word ‘tag’… THAT is absolutely gorgeous! You have done an amazing job colouring the butterflies and they look so pretty against the tag colour. WOW, I really love all that you do but I have a real soft spot for an awesome tag and this is definitely AWESOME!
Thank you for explaining each thing you did! The tag is beautiful and you used some techniques I’ve never tried before! I will definitely hold on to this post!