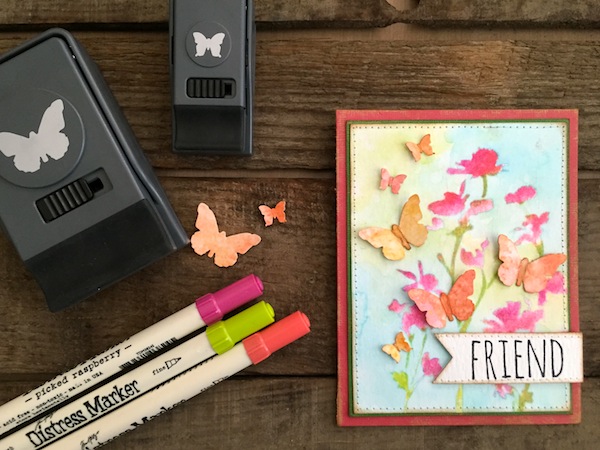
Add some PUNCH to your next project!
Hi readers! TGIF! Please join me in welcoming back the fabulous Richele Christensen back to our blog as a guest designer! She’s made a perfectly lovely friend card using some fabulous Tim Holtz and Ranger products! Read on for the full tutorial!
Hello friends! Hope you’re having a crafty day!
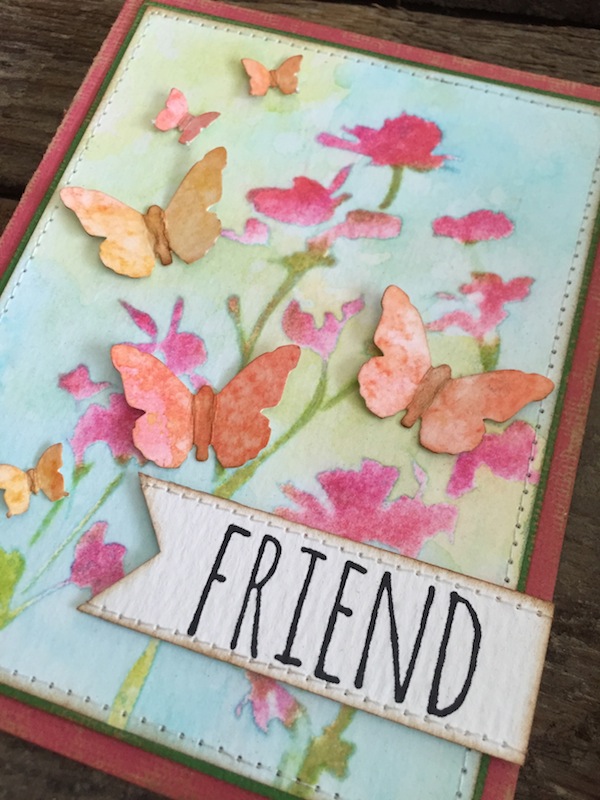
Today is all about punches and a fun background technique with the new Distress Micro Glaze. The card has a soft watercolor feel made with Layering Stencil and Distress Inks. I hope you are loving the new Distress Colors as much as I am…like Abandoned Coral, Twisted Citron, love this color combination. What is your favorite color of NEW Distress Ink?
Have you seen the new Tim Holtz Alteration Paper Punches? They’re awesome!
Punches have always been a favorite of mine, they are easy to use and you can punch several items quickly. The new Tim Holtz Alterations Paper Punches have been designed with lots of features for easy storage and great functionality.
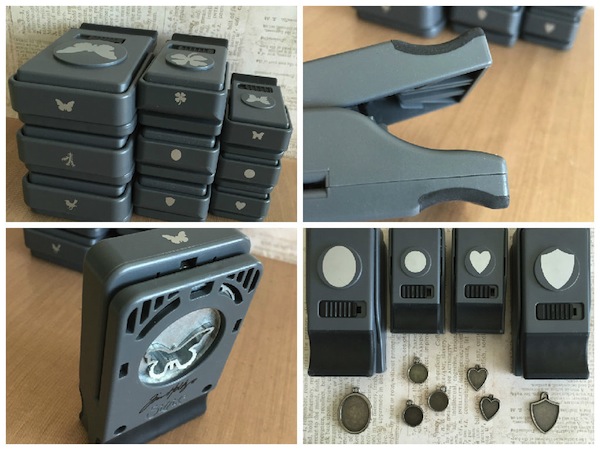
• Lockable latch for stackable storage and they’re indexed on the end for quick identification.
• Ergonomic comfort-grip design that won’t pinch your hand.
• Stacks on the end for easy storage in a drawer.
• Several of the punches fit Tim’s Idea-ology pieces so you can customize the charms. Like Cash Keys and Collage Keys, Type Charms, Heart Charms and Shield Charms.
Instructions:
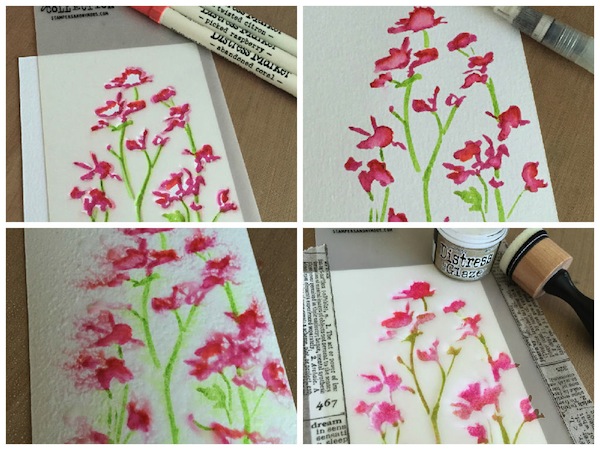
1. Place Wallflower Layering Stencil over Watercolor Cardstock and trace the flowers with Distress Markers.
2. Smooth out the flowers with a Detail Waterbrush.
3. Spray flowers with water, blot off excess with a paper towel and dry with a heat tool. Don’t worry if it blends out.
4. Apply a thin layer of Distress Glaze using a Mini Ink Blending Tool with foam. You only need a little. Distress Micro Glaze is used to create a waterproof/smudge proof finish and is ideal for sealing Distress Inks, markers and more.
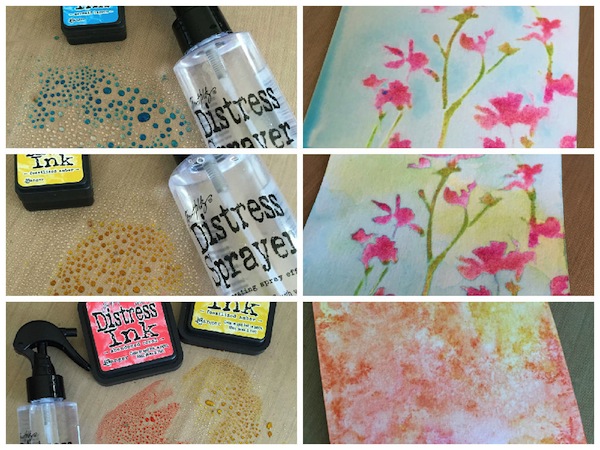
5. Apply Mermaid Lagoon Distress Ink to your Craft Sheet and spray with water.
6. Swipe card through ink and dry with a heat tool. Drying between the layer will help the colors not get muddy.
7. Apply Fossilized Amber Distress Ink to your Craft Sheet and spray with water.
8. Swipe card through ink and dry with a heat tool.
9. Apply Abandon Coral and Fossilized Amber Distress Ink directly to your Craft Sheet and spray with water.
10. Swipe Watercolor Cardstock through the ink. Repeat as desired.
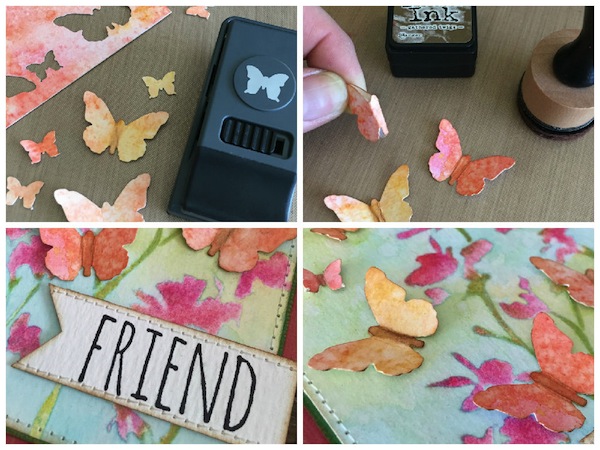
11. Punch butterflies out.
12. Bend the butterfly wings back to reveal the body and ink with Gathered Twigs Distress Ink on an Ink Blending Tool. Ink the edges of the butterflies as well.
13. Stamp a message from the Botanical Sketch Stamp Set with Jet Black Archival Ink on a strip of Watercolor Cardstock. Cut in the shape of a banner.
14. Add stitching if desired to the edge of the background and the message banner and assemble your card.
I can’t wait to make more cards with these Paper Punches!
Thanks so much for stopping in today!
Richele
SUPPLIES:
 |
 |
 |
 |
 |
 |
 |
 |
 |
 |
 |
 |
 |
 |
 |
 |
 |
 |
 |
BONUS! Don’t forget, we’re having a Sizzix Sale this week! Now is a great time to try out these punches!

Thanks for reading and thanks to Richele for being our guest!

Blog Candy Alert!! Follow our blog via email and comment on this post for a chance to win a special blog candy!
Congrats! Blog Candy Winner!
From: Sunset Blending + Video: Melissa Friedrich!
Please email Samantha ([email protected]) with your mailing address and the name of the blog you won from to claim your prize!


This is a beauty with only simple steps…love it!
Beautiful watercolor combo. Love the stacking punches.
Love the gorgeous scene you created, so pretty, and lots of dimension.
I love using punches! So much fun.
These are very well designed. Hugz
Very pretty card and the colors are awesome. I love the fact that you used a stencil instead of a stamp. And the butterflies were just the added touch. Nice work. TFS
Beautiful card. Love the technique. I am anxious to try it!
FANTASTIC card! I love the soft colors and the dimension with the butterflies!
Lots of great techniques to try.
This card is beautiful and I am going to give it a try! I love punches too – quick and easy!! Thanks so much for explaining the steps to your lovely work of art!!
Oh my gosh – those butterflies are STUNNING! Darnit, I’ve been dying to start my Distress Markers collection, and you’re making it worse! LOL ;)
I like how you used so many techniques, products to make this beautiful card.
Beautiful!!
Beautiful card, love the watercolor!
off to shop
The new punches look like lots of fun. Thanks for the tutorial on how to create this gorgeous card.
I absolutely love this card. The colors and the butterflies are perfect. Thanks for sharing this card
Gorgeous watercoloring!! WOW!!! Tim Holtz has added punches to his collection of goodies!!! I am definitely going to have to check them all out and buy some!!!
Beautiful card! I love these stacking stamps and want to say “thanks” for providing the inspiration for using them to create this lovely scene. Still learning! :)
Beautiful card! I love these stacking punches and want to say “thanks” for providing the inspiration for using them to create this lovely scene. Still learning! :)
Excuse the “stacking stamps” in the first comment, got a little ahead of myself :P
Love, love, llove this technique and card. GREAT JOB!
Beautiful!
I love your technique for the butterfly punches! Need to try that. Thank you
Beautiful card made using the butterfly punch.
Beautiful card! I just got the glaze … gotta get crackin’ on trying it out!
What a beautiful card. Love the colors. I have a lot of punches, I like them very much,
Beautiful, colorful card! I learned a new technique today, thanks!
OMG, what a gorgeous card and I love the technique! That new distressed glaze looks like an amazing product and I will have to add that to my wish list!
Love those stackable punches…Gorgeous cards!! Love it!
Really nice use of these ranger and Tim Holtz products! Those puches are super interesting, I wonder what the price point will be.
Fantastic technique! I love using punches.
i don’t often like the cards on this blog, but i love this one. I will actually try to make it. it’s lovely. Thanks for sharing the techniques.
Beautiful card. lovely soft colors. Love the butterflies and wildflower stencil combo and the fun idea for using micro glaze as a resist.
This gorgeous!
Gorgeous use of punches and distressed inks.
Beautiful! Love the dimension the butterflies add!
This is by far one of the prettiest cards I’ve seen in a long time! Love the color combination.
Love this card! I love the new punches too! They look great!
Amazing card!! LOVELOVELOVE it! TFS!
This card is gorgeous! Love the colors that were used for the flowers and the butterflies and background. Let’s just say I love everything. lol Thanks for sharing.
Thanks for the tutorial,I love your card.
This card is so soft and beautiful. Somehow it is comforting like a well-love worn comforter.
So fun and I love all the photos and the step by step instructions!! So cool and it really turned out beautifully!! Love all those butterflies!!
I forget my punches sometimes — this is an excellent reminder that they can contribute to a beautiful card!
I love punches!
Very pretty card . I love color combo on this card!!
The color scheme you used is really wonderful! Love the card!
So pretty! Love this!
Love the watercolour look! ;)
Oh phooey, can’t remember if I already commented. Sorry if this is a duplicate, LOL but this sure is one heck of a beautiful card!!!!!