5 Ways in 5 Days FREE Crafty Series: DAY 2: Sparkle 5 Ways
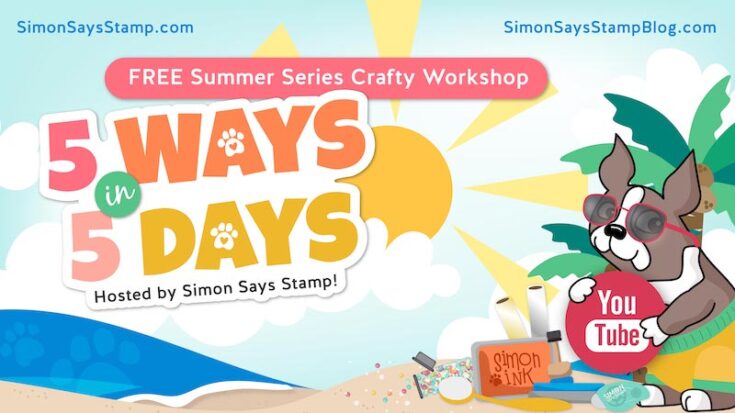
Hi friends! Welcome BACK! Today is DAY 2 of our super fun limited series called: 5 Ways in 5 Days! We are delighted to bring this series to you that includes a list of incredible designers including: Laura Bassen (yesterday), Yana Smakula (today!), Kristina Werner, Shari Carroll, Nina-Marie Trapani, Caly Person, and Cathy Zielske!
Each day, we are focusing on one topic with a designer sharing at least 2 projects with 5 tips or tricks on that topic. We hope you are very excited to have this content at your fingertips for FREE to watch at your leisure and interest!
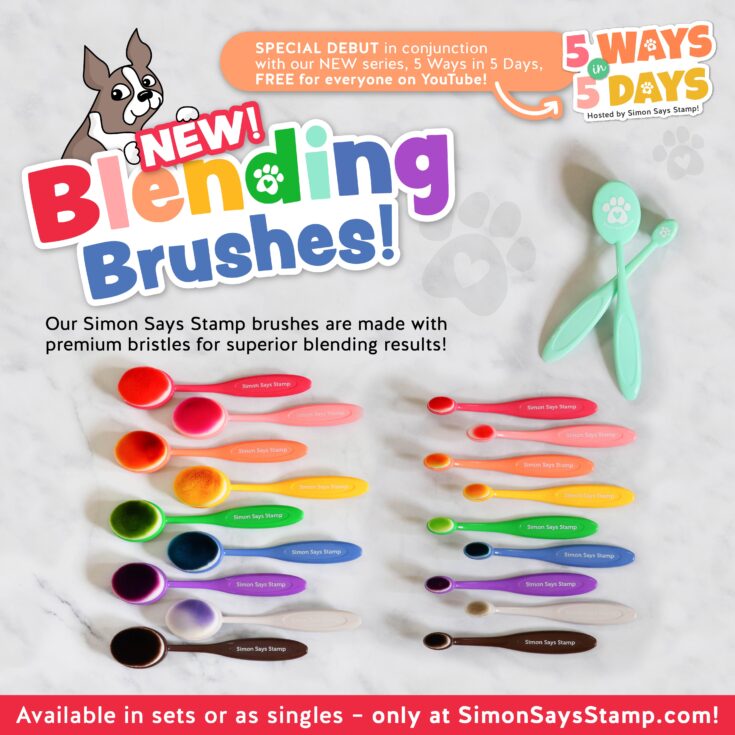
In celebration of this series, we are SO excited to share that we have our BRAND new exclusive blending brushes for sale individually and in sets!
Without further ado, please check out DAY TWO with Yana Smakula and 5 Ways to add SPARKLE!! Please enjoy!
WATCH THE VIDEO:
Hello everyone and welcome to the 5 Ways in 5 Days Free Summer Series Crafty Workshop! I am Yana Smakula and I’m excited to bring you the Sparkle 5 Ways segment of this workshop. Get ready to add beautiful sparkle and shine to your projects in 5 different ways.
One of my favorite ways to add sparkle to a card is by using glitter pastes! They are super easy to use and typically this is something you’d combine with a stencil.
Whenever you work with a stencil and paste you need to somehow attach the stencil onto your paper, and the best way to do this is by using a repositionable spray adhesive. I am using Pixie Spray – it is fabulous for spraying on the back of the stencil to add just the right amount of tack to secure your stencil in place while applying the paste.
First, spray the back of the Flora stencil with the Pixie Spray adhesive. Instructions on the bottle say:
- shake well before use and protect your work surface;
- press the nozzle and apply adhesive using a sweeping motion to lightly cover the stencil;
- let dry for one minute;
- press the stencil onto the surface
Next I applied Glitz Glitter Gel onto my panel. I used the Tim Holtz Distress palette knife and added a generous coat of the gel onto the paper.
You actually don’t have to cover the entire panel, you can cover just a section, perhaps add some gel in the center and let it fade out to the sides.
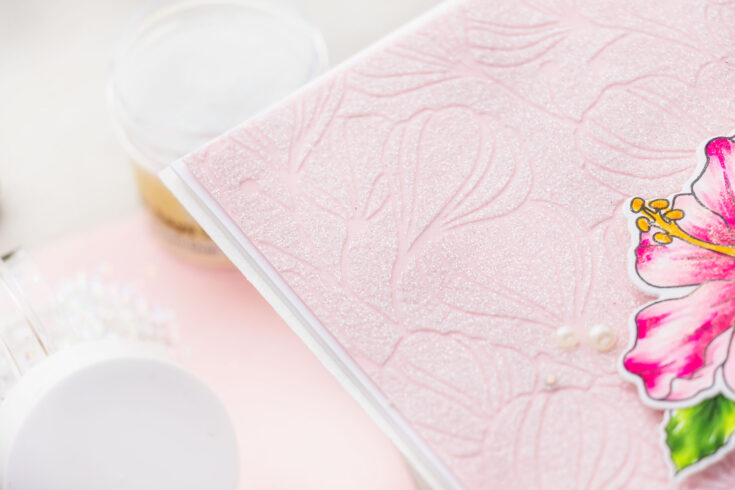
You can also use this gel with all sorts of stencils and designs and also on different colors of cardstock. I love the look of white on pink, so I used a Peony colored cardstock panel from Hero Arts for my background.
Once you are done, carefully remove the stencil and set your panel aside to dry. You also need to wash your stencil and palette knife right away to prevent the gel from hardening on your tools.
So this is one way to add sparkle to a card – you can use glitter pastes to create a sparkly background.
Shimmer/glitter pen is a fabulous way to add sparkle to the selected area of your card. You can use a glitter pen to add shimmer to just about anything. It can be a stamped and colored image, it can be a die cut, it can be a part of background; imagine you dry embossed something using an embossing folder and you want to highlight just a part of that background – this pen would be perfect for that.

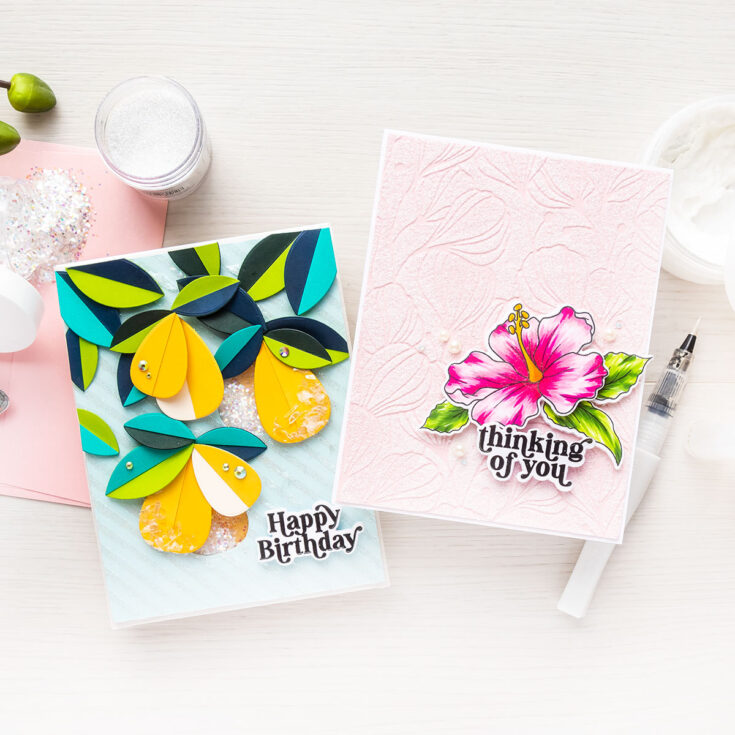
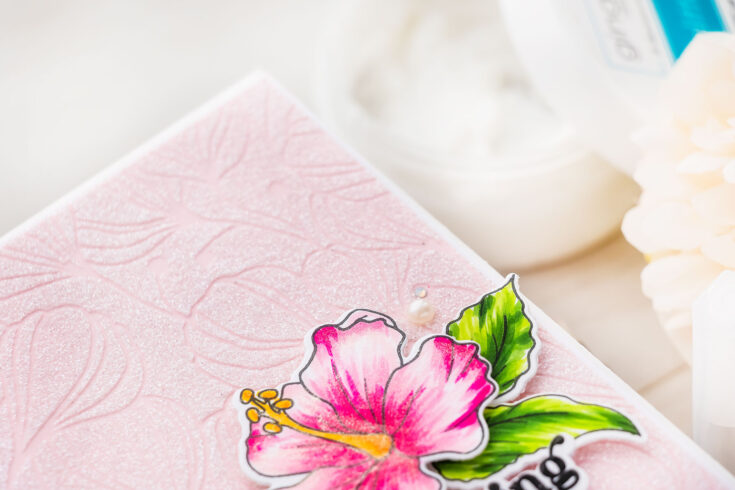
I stamped a hibiscus flower and several leaves from the new Hibiscus Blooms stamp set from Simon, colored it with Copic markers and coated with Wink of Stella Glitter pen.
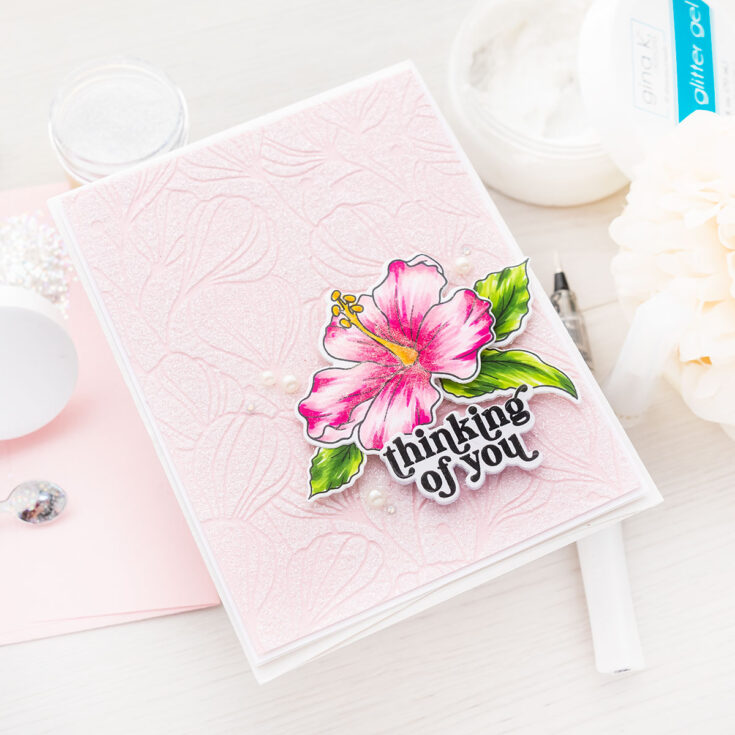
I combined the glittery background and shimmery hibiscus and made a simple Thinking of You card. My background was trimmed down slightly and adhered onto the A2 white top folding card base. I also embellished the card with white pearls and jewels.
Sticky When Dry Paste and Glitter
I love to use glitter to accent my cards and glitter is a fantastic way to add sparkle to any project. I wanted to create a glittery background using Simon’s Unicorn Dust glitter. It is a very pretty glitter, very fine and it looks almost clear once applied.
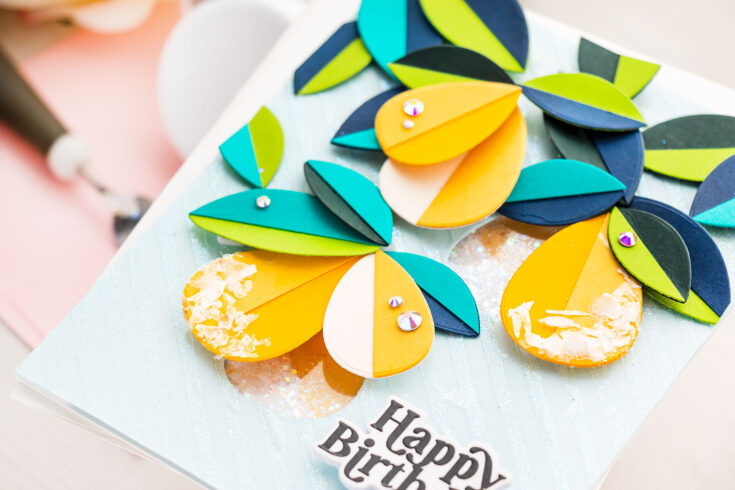
I picked a Diagonal Stripe stencil from Simon and attached it onto a Sea Glass cardstock panel using the Pixie Spray adhesive. Next, I applied Tacky When Dry Gel medium. This is exactly that – once dry, this product is tacky to the touch meaning you can add other products on top.
This gel dries clear, so once it turns clear, you know it is dry and ready for the next step. Once dry, I added Simon’s Unicorn Dust glitter on top to make the glittery background.
I like to use a dry brush to sweep any loose or extra glitter away. The Tacky When Dry Gel is such a fantastic product as it allows you to easily add glitter or other loose things, like flocking, or even foil onto your card.
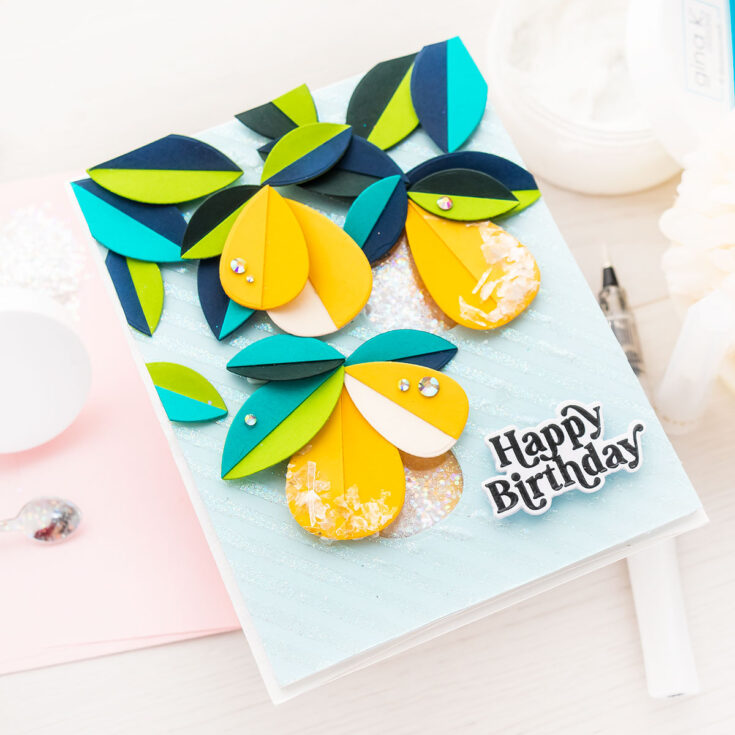
Another way to add sparkle is to make a shaker filled with sparkly elements! I die-cut two petal-shaped openings in my background and turned those into shakers. The shaker wells were filled with Simon’s Unicorn Dust and Unicorn Confetti – these are fabulous products to add beautiful sparkle to your cards. One is super fine and the other a bit bigger, chunkier in size.
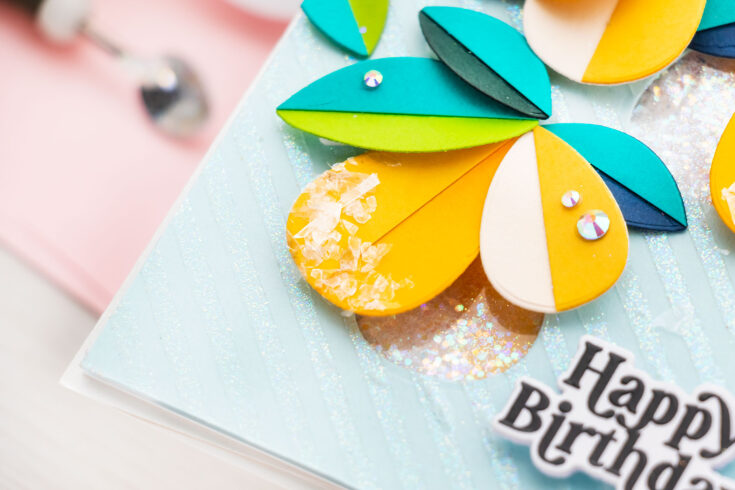
I added half a spoon of Unicorn Confetti and half a spoon of Unicorn Dust onto each shaker. These die cut openings will create the look of faux lemons on my card, so I used a yellow cardstock for the background.
Here I incorporated a shaker into the background and made it part of my design. You can also create bigger, focal foil shakers for your cards filled with glitter and sparkle!
Mica Flakes for Less Intense Sparkle
If you want to add sparkle to your card, but you’d rather it wasn’t as intense as the glitter sparkle, you can use Mica Flakes. They provide a much less intense sparkle while still adding some sparkle to your card.
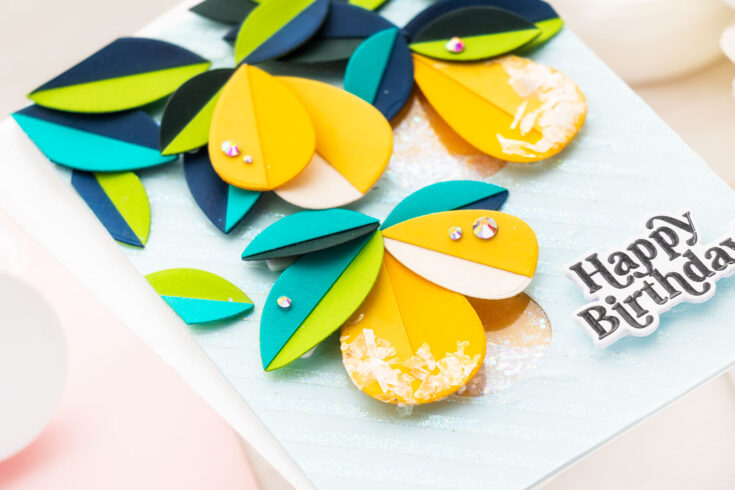
I added a bit of Simon’s Tacky glue onto the die cut, spread the glue with my finger and then just dipped the die cut into the jar with the mica flakes. Super easy! This created the look of sugar dipped lemons for my card.
So that’s yet another way you can add sparkly goodness to your handmade projects!
I combined the diagonal stripe glitter background, the glitter shakers and the abstract die cut lemon leaves and lemons into this sparkly birthday card. I also embellished it with a few colorful gems.
So there you have it – 5 different ways to add sparkle to your card! I hope you’ve found this post and video useful and I hope you feel inspired to create! Thanks so much for joining us today, be sure to check out the other videos in the 5 Ways in 5 Days Free Summer Series Crafty Workshop hosted by Simon Says Stamp.
SUPPLIES:
|


ANNOUNCING….


Gorgeous cards! Love all the glitter…
Thanks for sharing.
Awesome cards! Looking forward to trying some of these ideas to add sparkle.
Thanks for the how-to and how-not-to tips you used in creating these beautiful cards. This is a great series…so thanks to you and to SSS!
Lovely cards! Who would have thought there were so many different mediums and ways to put some bling on your projects? Loved this.
Thanks Yana and Simon! I am really enjoying these crafting education videos!
Beautiful cards today…thanks SSS this series really does answer questions along with new techniques. You’re the best!
I LOVE me some Sparkle!!!! Your cards are Beautiful!!!!!
So sparkly! Great variety of options to add sparkle to a project. Thank you for the inspiration.
Really beautiful cards … thanks for all the great tips on how to add sparkle. Especially on how to open a glitter pen … I think I’ve thrown away one in the past because I couldn’t get it to work!!
I just wanted to express my sincere thanks for your wonderful content.
Your eloquent and thought-provoking insights always inspire and resonate with me.
Keep up the great work – I eagerly await your next piece! By the way, I would be very happy if you get a chance to check out my page!
Professional steel foreign trader, lowest price, highest quality!