Just my luck with Andrea Ockey Parr
Since March is the month in which we celebrate all things lucky, I, Andrea, wanted to dedicate this post to household items that will bring you great crafting luck even if they weren’t necessarily made for artistic purposes.
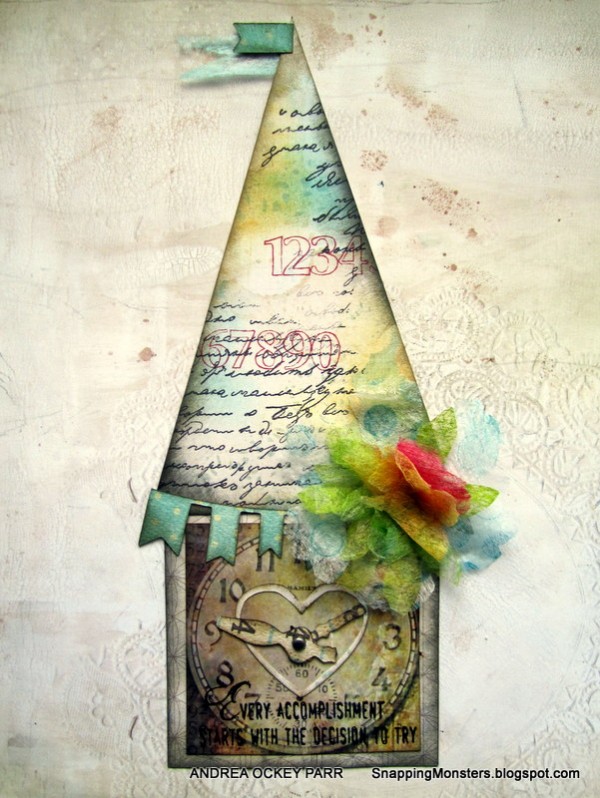
Need a unique floral embellishment like the one I used on this house project? You’re in luck if you have some used dryer sheets.
You can easily run used dryer sheets through your Sizzix Big Shot machine to create gorgeous fabric-like shapes. To make the proper “sandwich” width that will cut through dryer sheets, stack your materials on your Sizzix as follows: put your base plate on the bottom, then the die (I’m using Tim Holtz’s Tattered Florals), then your dryer sheet folded in half (to get twice as many shapes), then a piece of card stock or thick patterned paper, then the top plate. Here’s a picture of my sandwich stack after I ran it through the machine and opened it:

Next, color your dryer sheet flowers. You can use several mediums to add color, but I love the bold look of Dylusions ink sprays. For this flower, I colored the different layers with Dylusions inks in the shades of Fresh Lime, Cut Grass, Pure Sunshine, Lemon Zest, Cherry Pie, Bubblegum Pink and Squeezed Orange. You can also stamp onto your dryer sheets, which is what I did with StazOn Teal Blue ink and Hero Arts’ Life of the Party Dots stamp. To form the flower, fold the dryer sheet shapes and sew or glue them in place.

And that’s all there is to it! The possibilities are endless and used dryer sheets give you an excellent reason to do the wash once in a while.
I built the background of this piece with a clock from Tim Holtz’s Lost and Found paper stack and I made the house from Crate Paper’s Maggie Holmes and The Pier collections. I used an Impression Obsession house die, but cut out my own elongated roof triangle for the top. I also used Tim Holtz’s Weathered Clock die for the clock hands. I added some text to the roof using Ranger Jet Black Archival ink and the IndigoBlu Script stamp mounted on an acrylic block. I also added a happy banner that I made with the Simon Says Stamp Ribbon Banner die. And how could I not include this great quote at the bottom from Wendy Vecchi’s A Form of Art stamp set? I also used her Busy Making Art stamp set for those great red numbers on the roof.

But dryer sheets aren’t the only household item that you can create great art with. Have you ever wanted to flip one of your stamps the other direction? You’re in luck if you have some foam sheets and some Saran wrap. Here’s how it works:
Cut three or four squares of craft foam that are the same size as an acrylic block that will accommodate the stamp you want to “flip.”

Stack the foam squares on top of the acrylic block and wrap the whole thing in Saran wrap (like a sandwich). Be sure to pull the Saran wrap tight so that your surface is smooth and wrinkle-free.

I chose to use Tim Holtz’s bicycle stamp from his Purely Random set. Let’s say that I wanted the bike to be traveling in the opposite direction of the way it’s going on the stamp. In essence, I want to flip the image the other way. Using Ranger Jet Black Archival ink, I stamped the bicycle onto my Saran-wrapped block, like so:

Working quickly, use your Saran-wrapped block as your new stamp. Press it firmly onto your surface and your image will be flipped from the original. Here’s a comparison between the original and the flipped image. The flipped image will never be as crisp as the original since it’s a stamp of a stamp, but I like the effect all the same.

This trick comes in especially handy if you want to flip an image like an arrow or a sign that’s pointing a certain direction and you want it to point the other way. It’s also interesting to flip silhouette stamps for a new look.
Last but not least, have you ever needed a great reversed polka dot stamp? You are in luck if you have the sheet that surrounds those pop-up dots that you used up. It’s always fun to make new stamps from recycled materials and this is my all-time favorite non-stamp to stamp with. Once your pop-up dots are gone, simply ink the leftover sheet and use it as a stamp. Here it is, covered in Tim Holtz Peacock Feathers Distress ink, along with an example of what the pattern looks like when stamped on a collage piece.

I wish you all the best luck during this month of March and I hope that these tips will come in handy as you craft your way to more wonderful projects.

Household items are super useful – and I love these ideas from Andrea! I’m super inspired to go hunting around my house now. Oh yes, and now it is your turn – join us this week in the challenge! For the full rules, read the “challenge rules” posted in the side-bar here on our blog, and be sure to enter the challenge in the post below this one.
Challenge Badge

Spotlight Badge


Great techniques Andrea, love your flower using recycled dryer sheets and I love doing the technique with the stamp to reverse the image. Lovely piece of art. Tracy x
GREAT tip about the cling wrap! TFS!
thanks for These great tipps!!!
CU hellerlittle
AMAZING tips !! I never even thought to use the used dryer sheets .. that is a fantastic idea !! I love the project .. the colors are perfect !
Gorgeous project Andrea! Thanks for sharing your creative process!
FaAntastic project and great tutorial! BArbarayaya
greats tips, is a fantastic project!
Love the stamp technique …. fabulous!!!
Great tips Andrea! Must say that I have used my babywipes that I used to clean my stamps with to make a dress and the flip-technique I do that with a mounted bold stamp… I have one ready on my desk all the time… Love your project! It’s a fun and beautiful house you made! Inky greetings, Gerrina
Great tips Andrea, very clever! Cathy x
Ingenious! Thanks for fab tips Andrea. Nicola x
Thank you so much, Andrea! It was very kind and generous of you to share these awesome tips!! Hugs, Darnell
Great tips! Love your dryer sheet flowers!
Fab project, Andrea! I love that you used a household items like laundry sheets! That’s really thinking outside of the box :)
*mwah*
Steph
Simon Says Stamp!
Fabulous tips – love the clingfilm (wrap!) stamping, and the pretty laundry sheet flower. And I love the yummy inky background on the roof of your little clock tower!
Alison x
Oh.. so many clever tips and a beautiful project too! Love the soft effect of the dryer sheet flower and the reverse stamp on the saran wrap I have never tried!
This is such a beautiful creation, Andrea. Thank you so much for sharing these great inspirations. :)
Love the technique for flipping the stamp! Your project is gorgeous too! Your flower is so pretty and happy! :)
Like the reverse technique. I have one of those rubber reverse stamps and cannot get it to work so I’ll give this a try.
Melissa
“Sunshine HoneyBee”
I always cut up my leftover pop dot sheets but I am going to save one and use it as a stamp. Love your creations…thank you!
Great tips…love the reversed image one with the saran wrap. Thanks for sharing.
Andrea…loved your tutorial using the dryer sheets and all of your other techniques. This look is so vintage YOU! I love the bright but soft colors! Such a cute project! Thanks for sharing! <3 Candy
Thought it odd that no winner posted as of 7:05pm CT for Ch D is for Distress.
Melissa
“Sunshine HoneyBee”
Fabulous mirror technique. Thanks for sharing
This post is SOOOO full of awesome and useful tips!!! Pinned and can’t wait to try! :)
A wonderful, wonderful project crammed full of so many great tips and techniques. I just love this piece and thank you for sharing it… :) x
Oh wow, Andrea! What a fab tutorial! Love the reflect stamping and I need to use those dryer sheets! Hugs, Sandra
Such fun techniques Andrea!! A stamping friend of mine sent me some dryer sheets (we don’t get them here), now I want to take them out and play. Great reversed stamping and pop-dot sheet stamping too!! Very clever!
Brilliant! We can never look at things now with old eyes, there is always another use!
Thanks for the great tips! Love love them!