EZ with CZ: Stenciled Shape Backgrounds

Hi friends! Check out this bright and pretty card by Cathy Zielske in the latest edition of EZ with CZ showcasing our NEW Oblique Spheres stencil set, and the Spring in My Step stamp and die set along with some of our Pawsitively Saturated ink! Be sure to watch the video for more details, and enjoy!
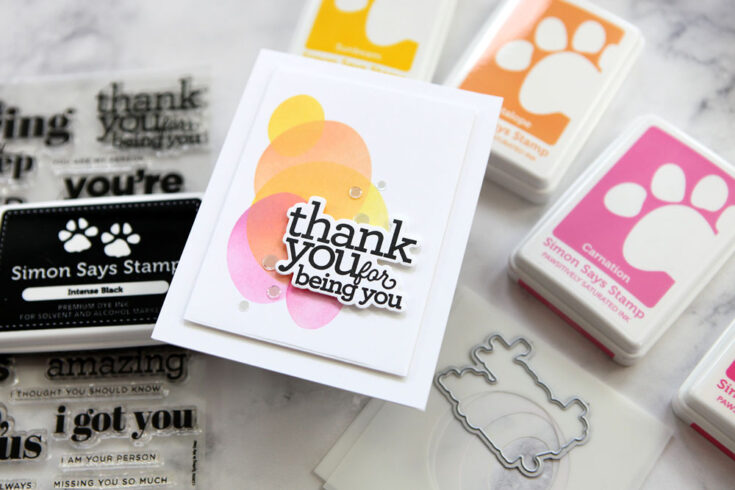
Hello crafty friends! It’ Cathy Z. here, back with another installment of EZ with CZ! Today I’m sharing a fun way to use a stencil set to create a random patterned background for a simple thank you card.
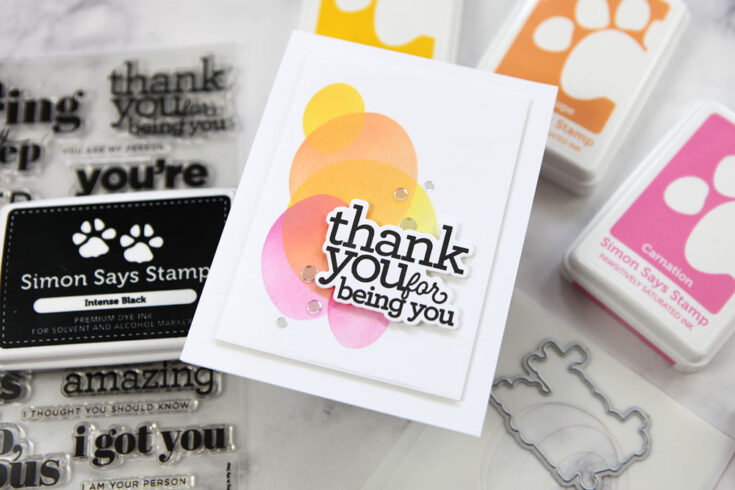
The Oblique Spheres Stencil Set can be used to layer in perfect order, or you can use them randomly like I did, for a fun, graphic pattern.
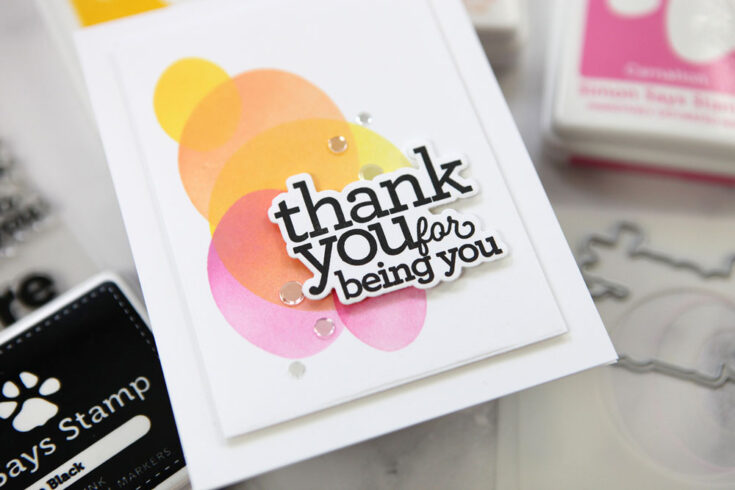
I added a very simply stamped greeting from my Spring in My Step stamp set, and used the coordinating die to cut it out. Sometimes, just stamping black ink on white, and popping the greeting over a colorful image is all you need for a lovely, clean and simple card.
Here is the video walking you through the project
WATCH THE VIDEO:
Thanks so much for stopping by and I’ll see you back here soon!
SUPPLIES:
|


Thanks so much for stopping by, and thanks to Cathy for being our guest!
Did You Know: April 2022 Edition

Hello crafters, it’s Shari Carroll here with you! Today I have a new edition of our popular Did You Know series! I’m focusing on items that you can make yourself, or adorn the way you would like.
If it’s your first time seeing this feature, each month we bring you fun facts, creative tips, and even crafty hacks about your favorite supplies and brands; you can then use these awesome tips that you learn in your next crafting projects! Are you ready to learn some fun tricks? Keep on reading!
Silicone Moulds with Hot Glue, and Soft Clay
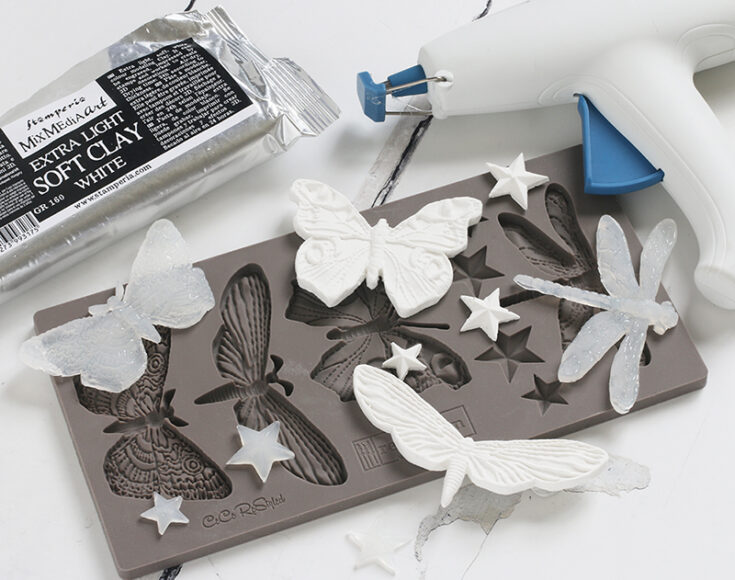
Have you ever tried using molds to create dimensional items for your projects? They are really easy to use with either soft clay or hot glue. I haven’t tried it yet, but the Prima molds are food safe, meaning you can make chocolate shapes! Yum!
I’ve worked with soft clay and hot glue for my samples. I’ll explain a little about the difference.
The soft clay is playable and you push it into the mold until it’s filled. You can use a brayer to apply pressure and to get a smooth backside of the object. You will remove the object before it dries. The mold is very flexible. When the clay has dried (about 24 hours) it is very lightweight and feels like plaster.
Hot glue can be used by filling the mold (small areas first) until the well of your item is filled. If you have rough areas on the back, heat it with your heat tool to smooth it out. Allow the hot glue to cool before removing it from the mold. Once it’s cooled, you can remove it. The hot glue is durable, strong, and waterproof if you’re making something for the outdoors.
Tim Holtz Media Grip Mat

This Media Grip Mat is a double-sided grip mat that has so many uses! I found it to be super handy when working with mixed media pieces. I get really messy when I’m painting items for my projects, the grip mat holds them in place so I can paint and even get around the edges without having to hold it.
Other uses include: holding papers in place for stenciling and ink blending. Using with your Misti or stamp platform to hold the paper in place especially if you need to stamp more than once.
To store the grip mat and to keep it from attracting dust and pet hair, we suggest using the Media Grip Mat Bundle which includes folders.
Tim Holtz Foundry Wax
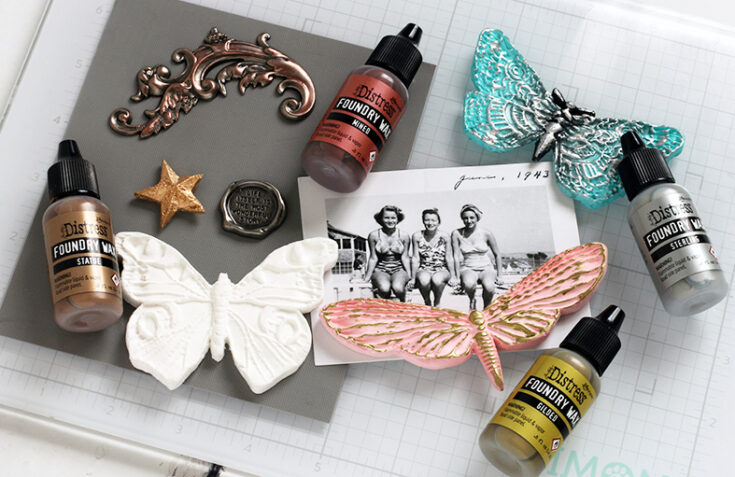
I love these foundry waxes!! If you want to add gilding to your projects or change the color of metal, these are amazing. The wax is a liquid to start with and can be applied using a brush to highlight areas of your items. They are permanent and supper shiny once heat set with a heat gun.
Some of the surfaces they work on include: Wood, plastic, metal, paper, clay, painted surfaces, and more.
Note: I did use it on a hot glue molded piece with just short bursts of heat at a time to set it. If you hold your heat gun too long on your piece, you’ll melt it. Be careful!
Simon Hurley Stamping Foam
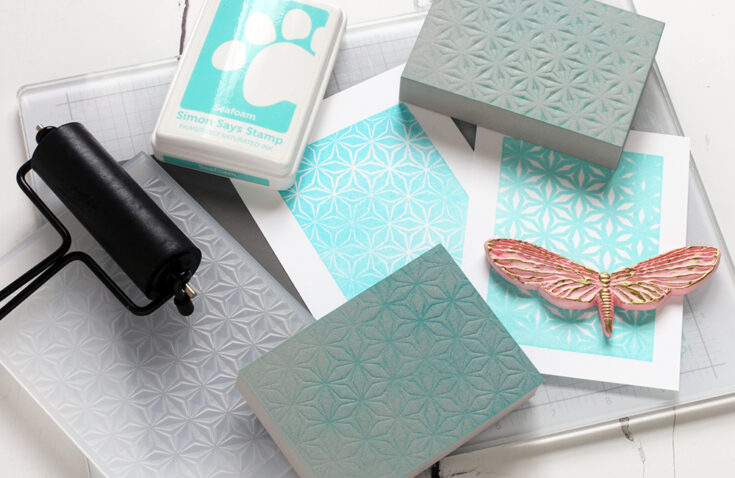
Ok, this is just plain fun! I tried the foam with the Simon Says Stamp Kaleidoscope embossing folder. Since the embossing folder has a positive and a negative design, I was able to get two different impressions. These would look great on an embossed background using the same folder.
Easy to use: with low heat, heat the foam for about 15 seconds, make sure you move your heat tool around the foam for even heating. Press the foam onto the open embossing folder with firm and even pressure. Hold it in place for about 5-10 seconds.
You can apply ink directly onto the foam or use a brayer. Press the inked foam onto the paper, again using even pressure. When you’re done, clean the foam and reheat it to remove the design. Voila!
I hope these tips have helped you learn a few tricks for your upcoming crafting projects… Thanks for tuning in today and spending some time with me!
SUPPLIES:
|


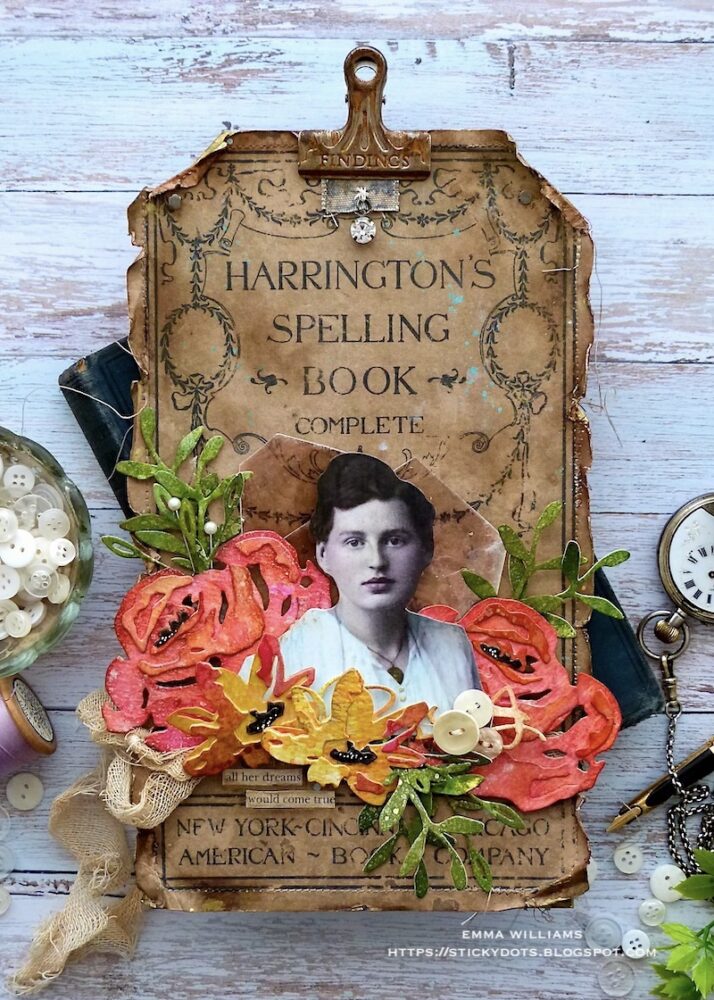
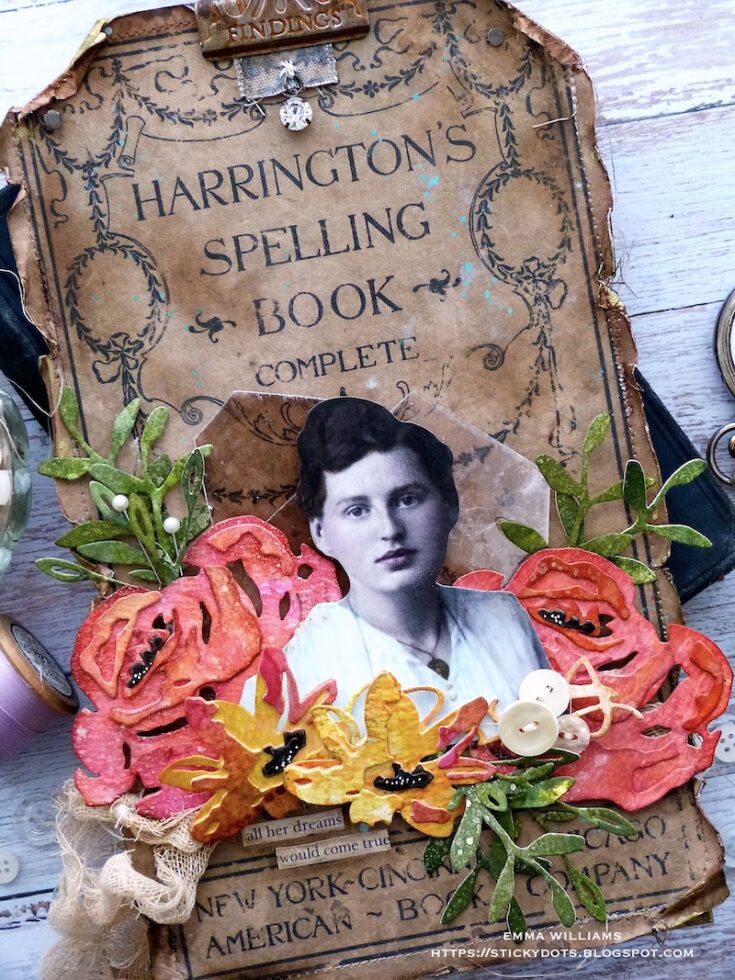
All Her Dreams Would Come True Etcetera Tag by Emma
Hi friends! Happy Sunday! We are always delighted to welcome back special guest Emma Williams! Be sure to read through her tutorial so you don’t miss any of the fabulous details! Enjoy!
Hello everyone! I’m so happy to be back on the SSS blog today and really excited to share my latest make with you all.
As many of you will know, I simply adore all things vintage and I also love all things Tim Holtz! So when it comes to vintage makes, these are always my go-to products and I had so much fun creating this Etcetera Tag project, which I hope transports you to a bygone era, full of vintage beauty and elegance.
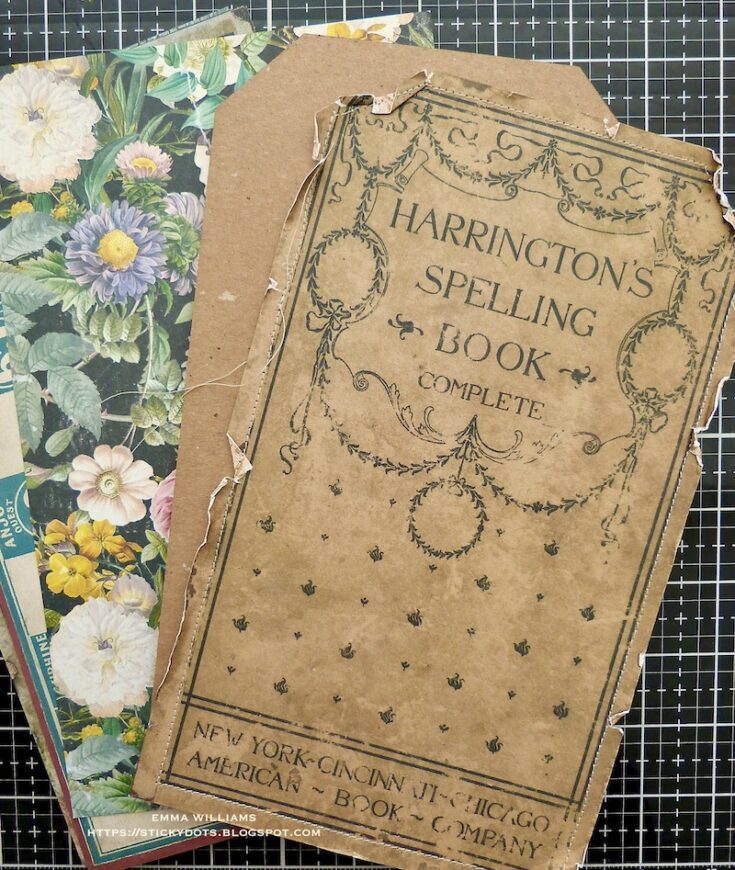
So, let’s get started and for this project you will need a Stampers Anonymous Small Etcetera Tag by Tim Holtz. I covered the tag using the gorgeous book cover paper from the Backdrops Volume 2 paper stash. The paper is slightly larger in size than the tags, but because I wanted to keep the paper design complete, I used the entire sheet and allowed it to overhang each side.
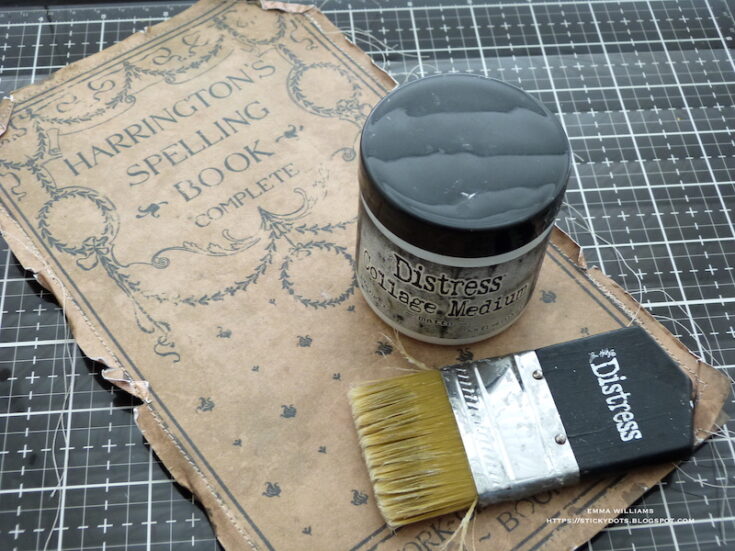
After making small rips and tears around the edge of the paper, I machine stitched a border. Using Matte Collage Medium, I attached the torn sheet to the tag and also added a coat of the medium over the surface of the paper to seal it.
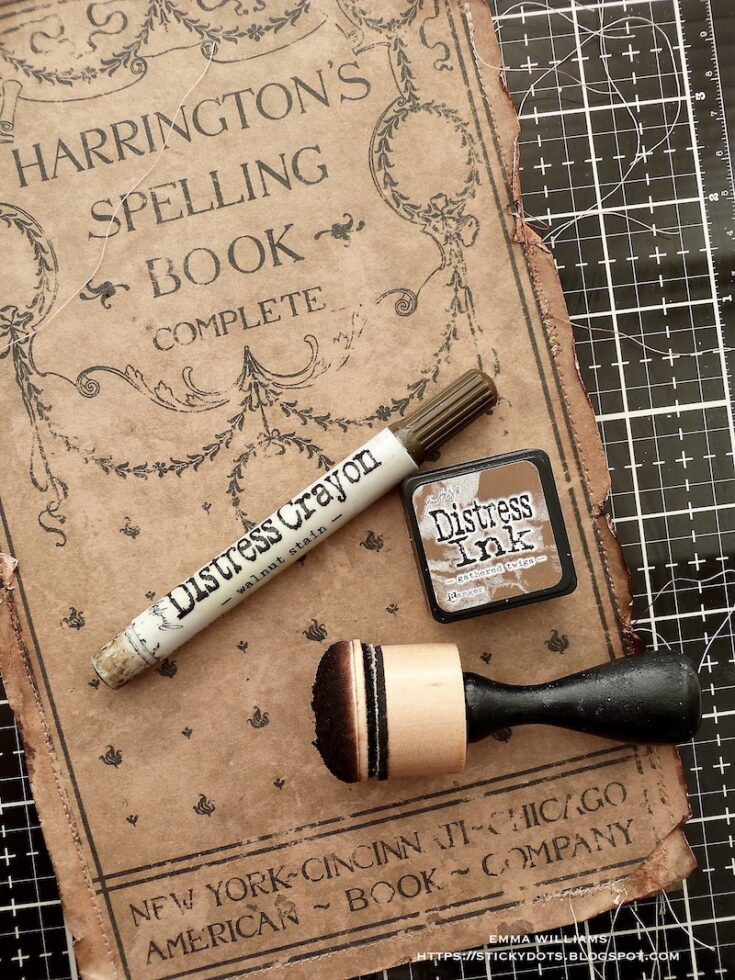
Once the medium was dry, I inked the torn edges with Gathered Twigs Distress Ink, and also ran Gathered Twigs Distress Crayon around the edges, blending out the color with my fingertip.
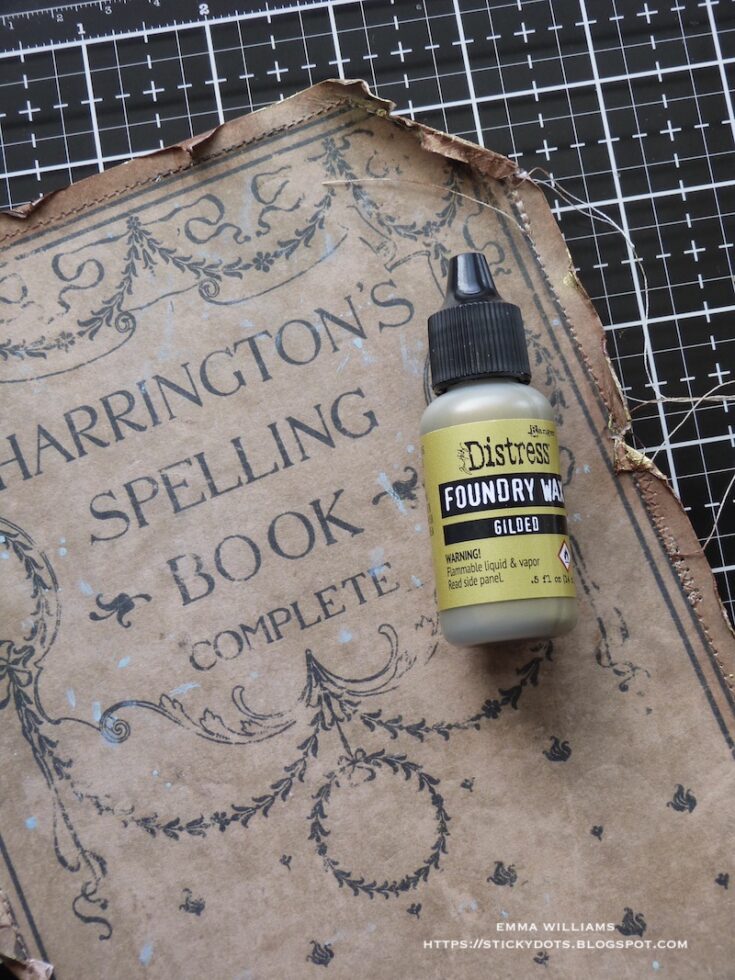
I then applied a small amount of Gilded Foundry Wax to the ripped edges of the paper. I only wanted just a hint of the wax, and applied it using a brush before heat setting with a heat gun.
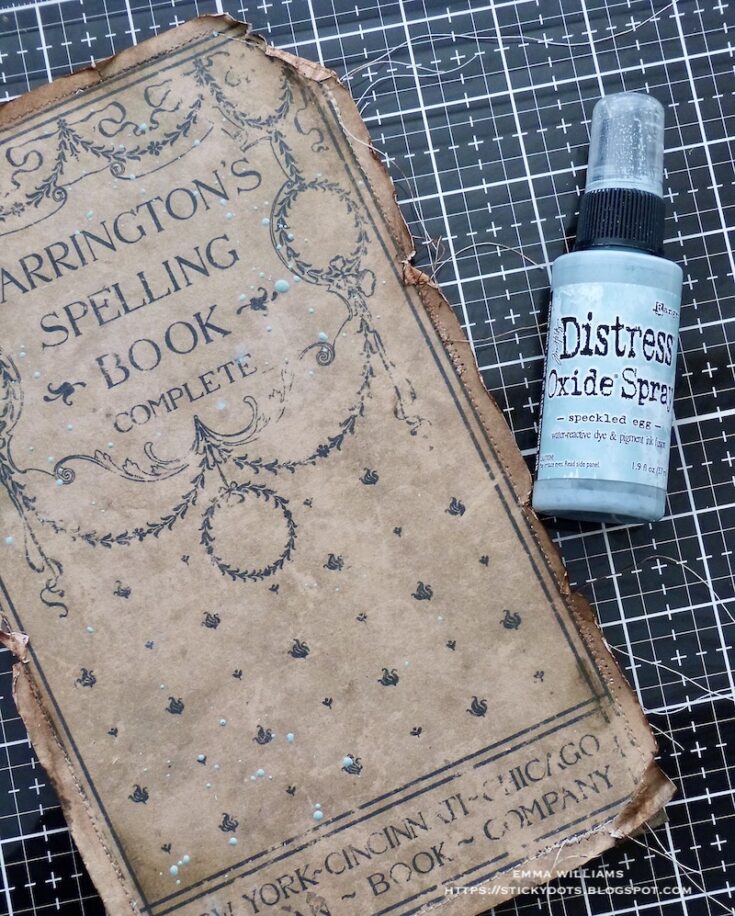
Splatter a small amount of Speckled Egg Oxide Spray across the tag surface and either heat dry or allow to dry naturally.
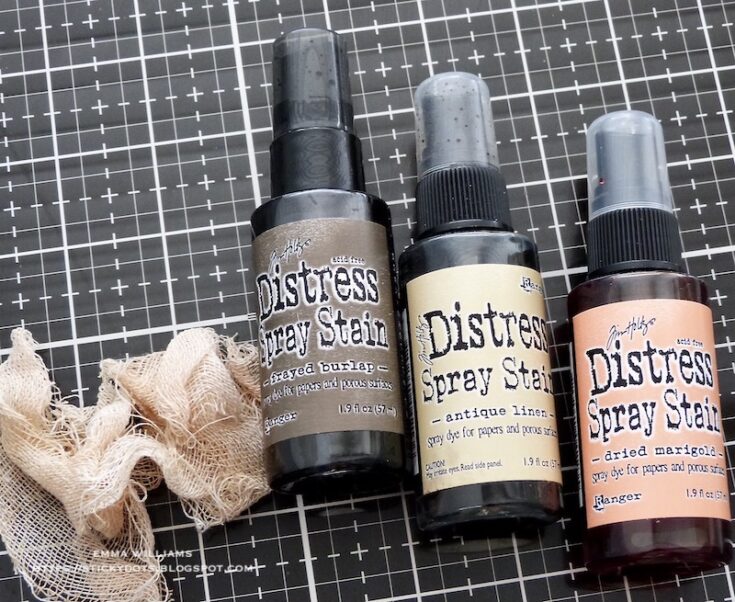
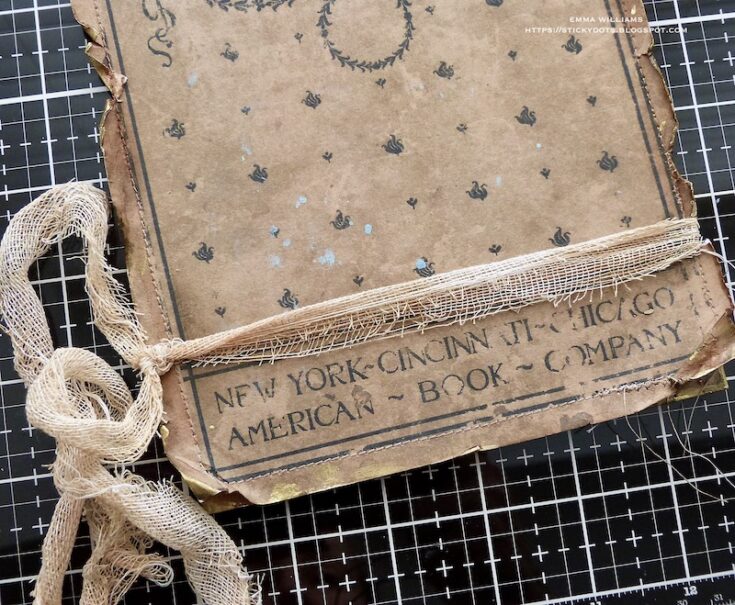
I dyed a strip of Mummy Cloth with Dried Marigold, Frayed Burlap and Antique Linen Distress Spray Stains. Heat dry and then wrap the cloth around the bottom section of the tag, tying it in knot to secure it into place.
Now to create the flowers, and I used the Sizzix Brushstroke 4 Die Set by Tim Holtz.
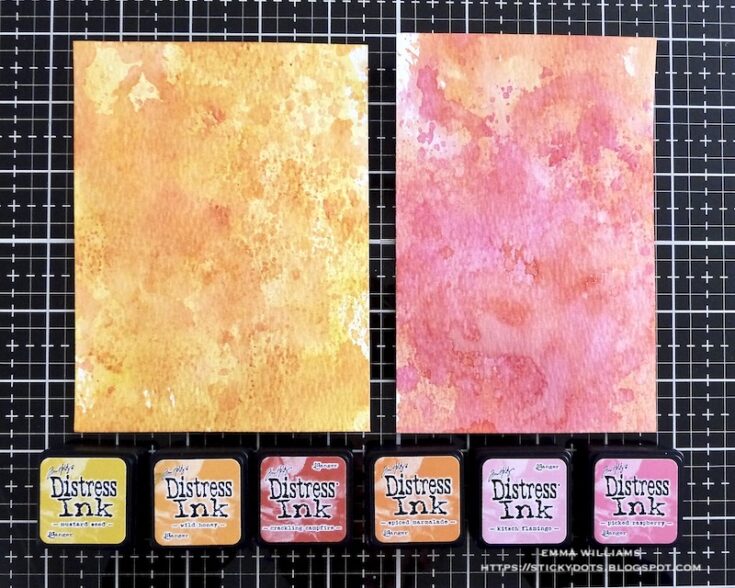
To color the card, I inked two separate panels of Distress Watercolor Card using the following Distress Inks ~ PANEL 1; Mustard Seed, Wild Honey, Crackling Campfire. PANEL 2; Crackling Campfire, Spiced Marmalade, Kitsch Flamingo and Picked Raspberry. For each panel, I applied the ink to the non-stick portion of my glass media mat and then spritzed the inks with water until they bead. I also lightly misted the card panel with water. Dip the card into the inks to pick up the color and then heat dry. If there are areas that you want more color, dip the card again, but always remember to heat dry between layers.
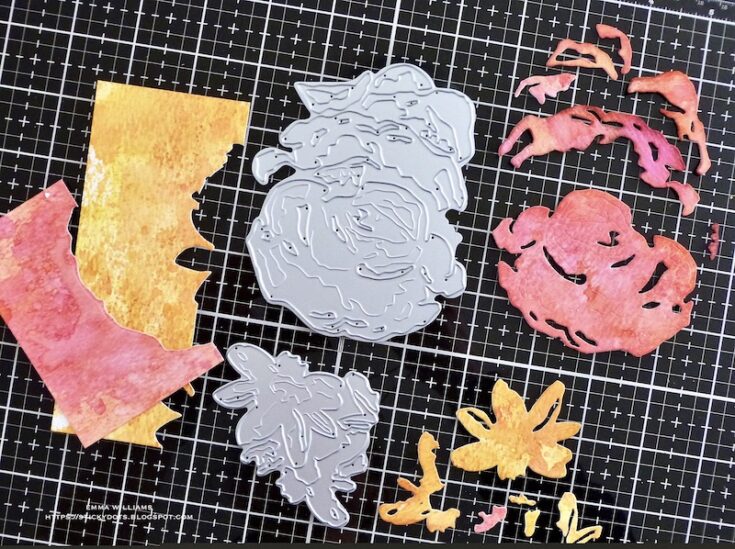
Once I was happy with my colors, I placed Sizzix Adhesive Sheets to the back of each card panel before using the card to die cut my flowers.
I cut two of each size and assembled the four flowers, inking the edges of each die cut piece as I layered them before I then splattered each flower with a light coverage of Tarnished Brass Mica Spray. You can see the finished flowers and all those gorgeous layers in the photos below.
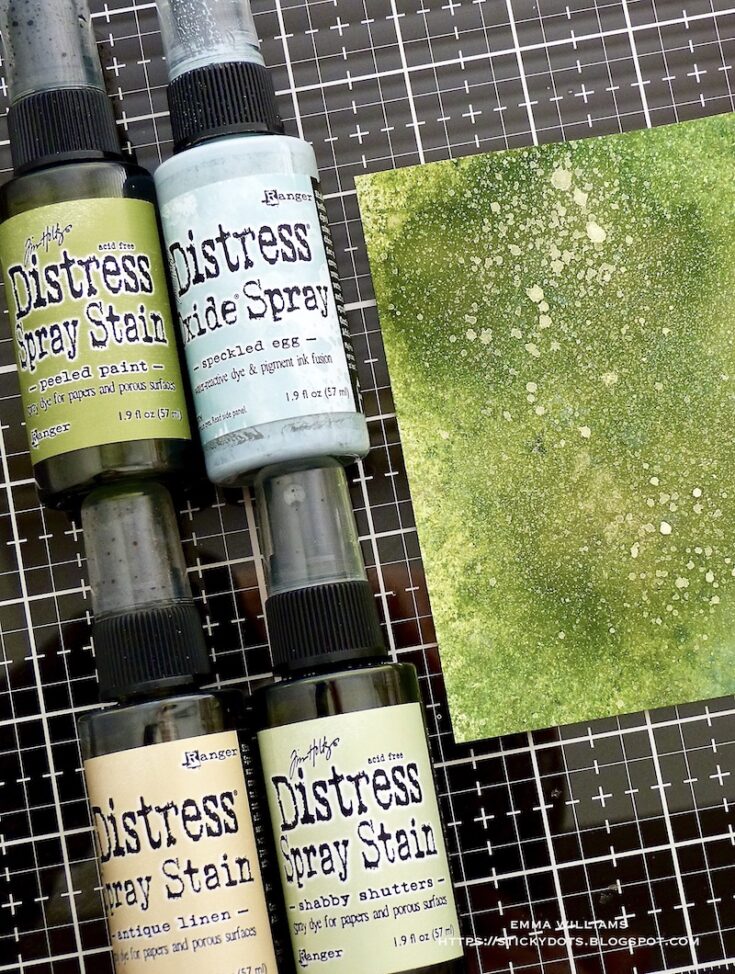
For the foliage and leaves, I used Peeled Paint, Antique Linen and Bundled Sage Distress Spray Stains and Speckled Egg Oxide Spray and after applying a light misting of water over the card surface, I then spritzed the stains directly onto the cardstock.
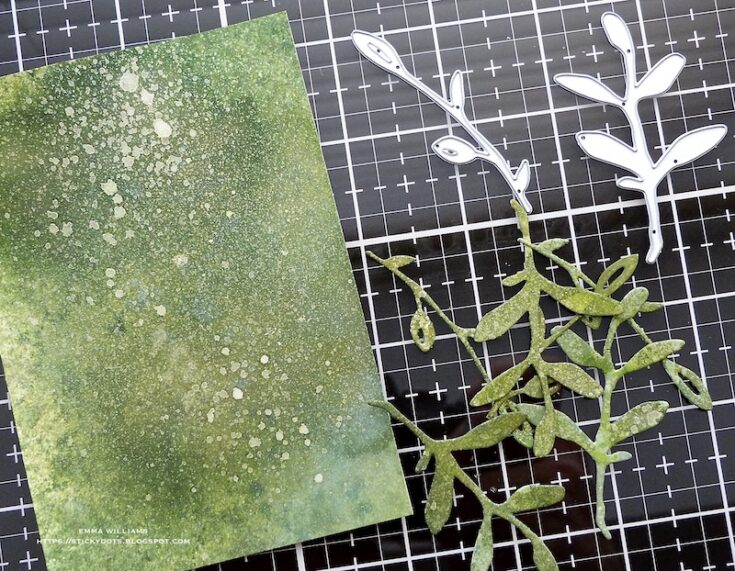
I heat dried the panel before I cut my foliage from the green card.

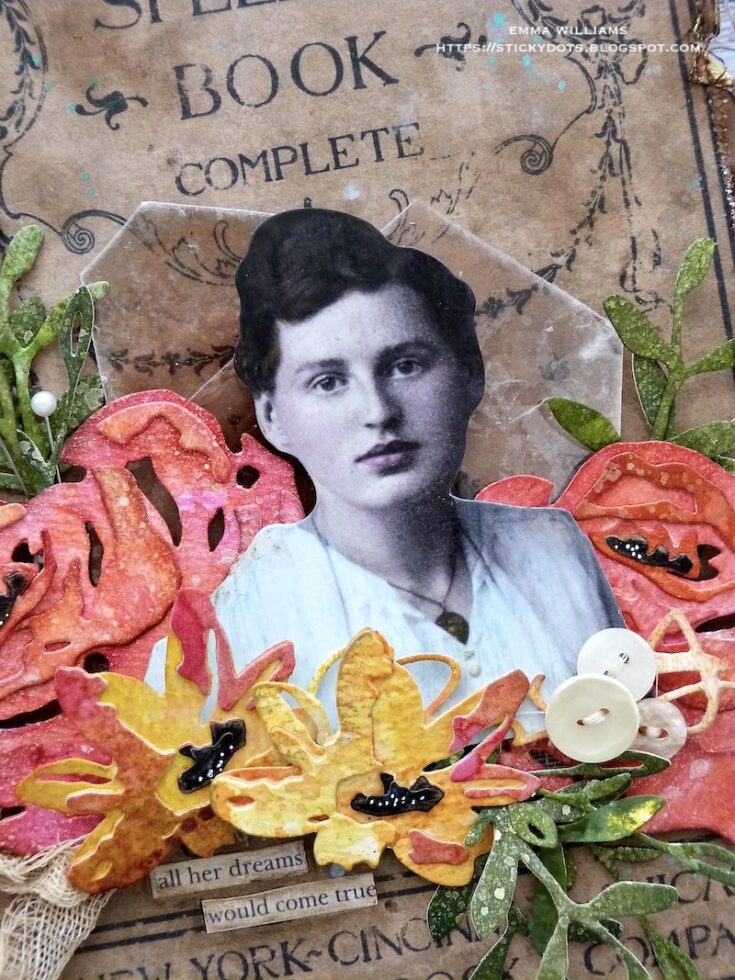
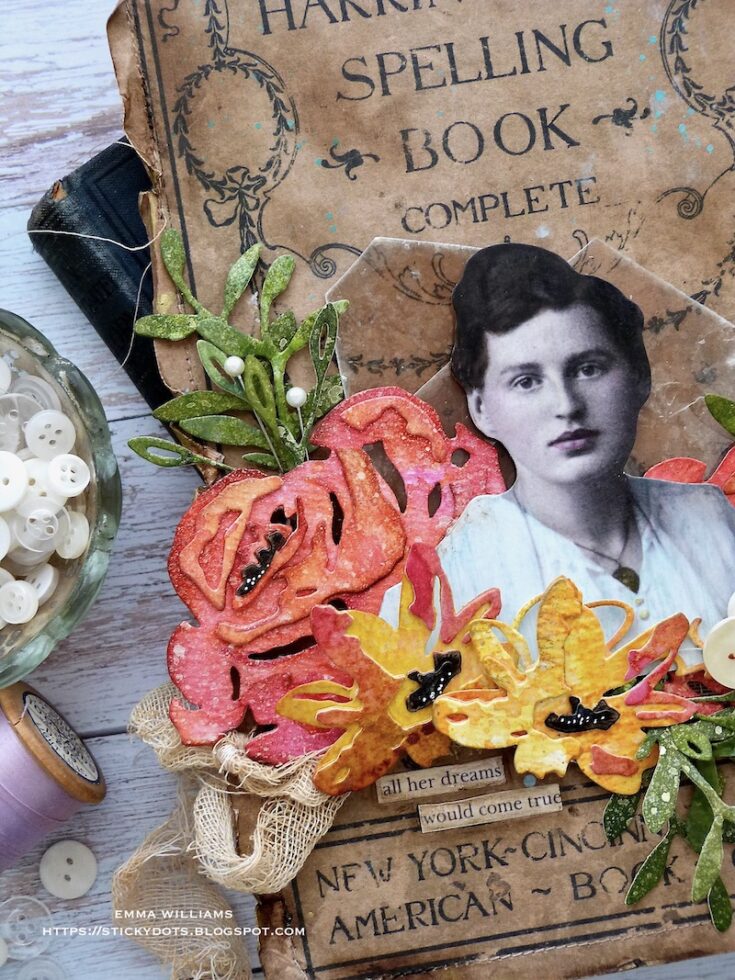
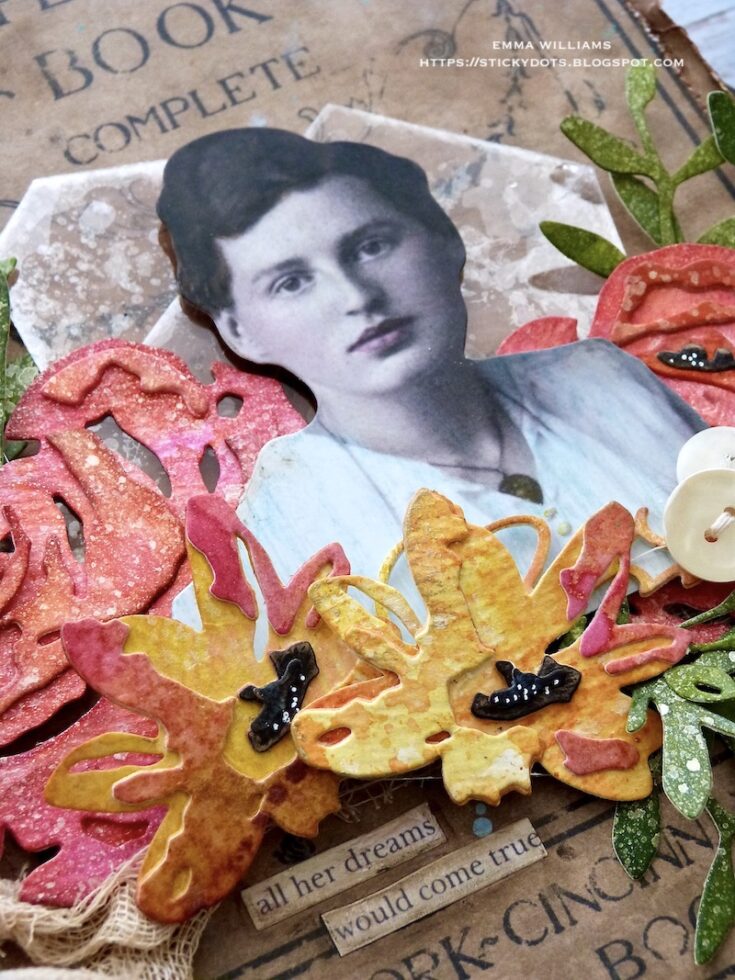
For the main focal point of my tag, I used one of the new Tim Holtz idea-ology Paper Doll Portraits and applied a color tint to this photo. To prime the surface of the photo, I applied a layer of clear gesso.

Color tint the photo using a water brush to add colors of Distress Crayon ~ Aged Mahogany, Peacock Feathers, Wild Honey and Gathered Twigs.
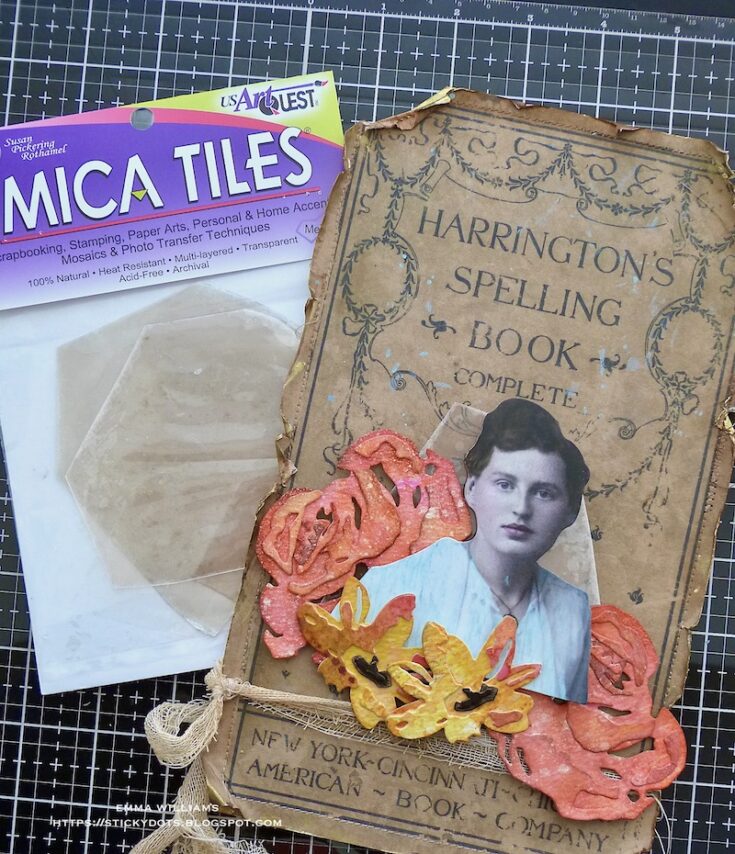
Mount the color tinted photo onto foam pads and then attach over the top of two layers of Mica Tiles. If you haven’t got these, then you can also use acetate, inked with Mushroom Alcohol Ink which will create a similar effect to the mica.
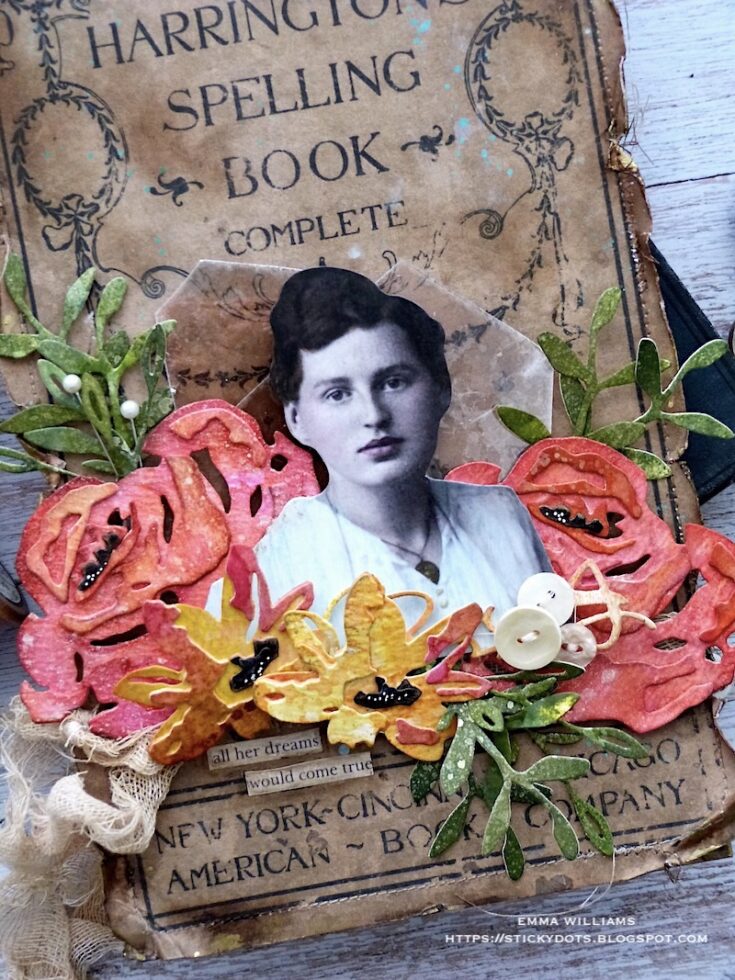
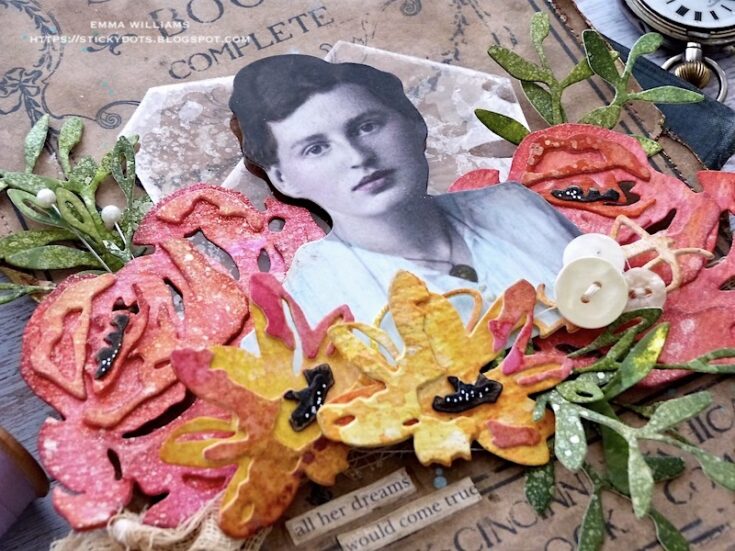
Arrange and attach the photo, together with the flowers.
I used various depths of foam pads to attach each piece onto my tag before adding the foliage using either hot glue or matte collage medium.
I also used some of the remaining inked cardstock to die cut a “squiggle” from the Abstract Faces and placed this into the arrangement.
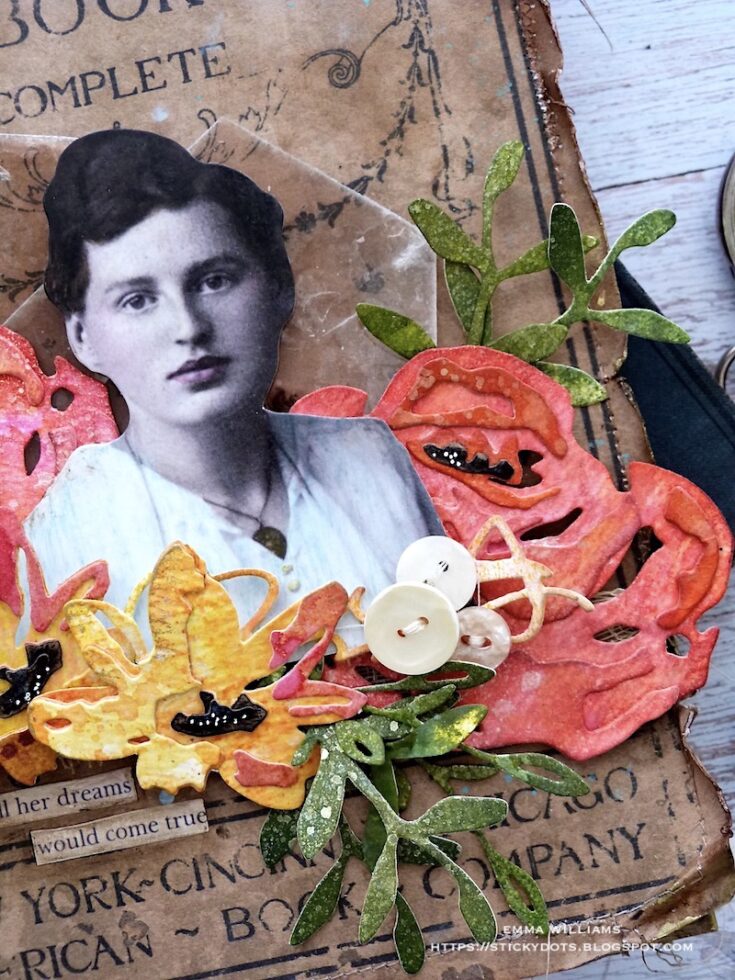
Thread three buttons with cotton thread and attach in a cluster to the right hand side of the Paper Doll portrait, placing them over the top of the die cut squiggle.
I added two pearl headed dress pins from my stash to complete the floral arrangement.
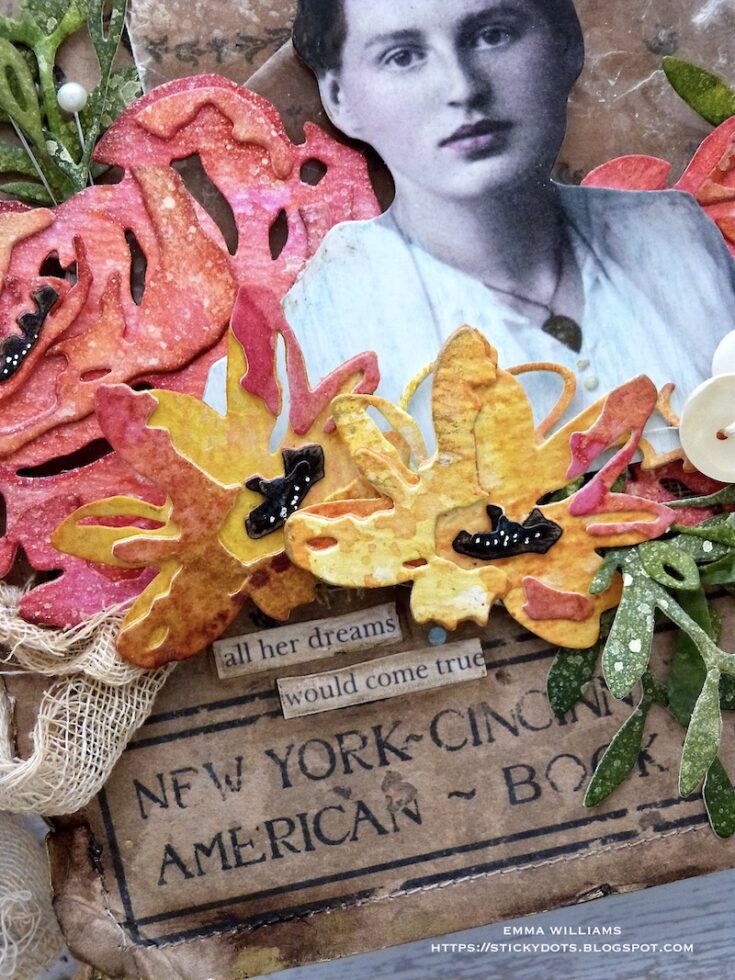
For the finishing touches, I added Clippings Stickers “all her dreams, would come true” and placed these beneath the flowers before rubbing the Walnut Stain Distress Crayon over the top to age the surface of the stickers.
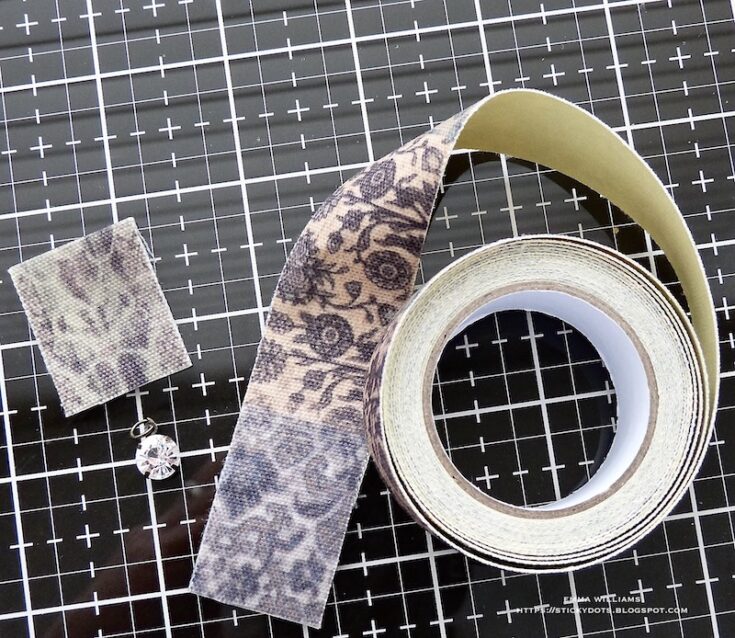
At the top of the tag, I cut a piece of adhesive Linen Tape, approx 1.5” and folded the tape in half before fraying the edges.
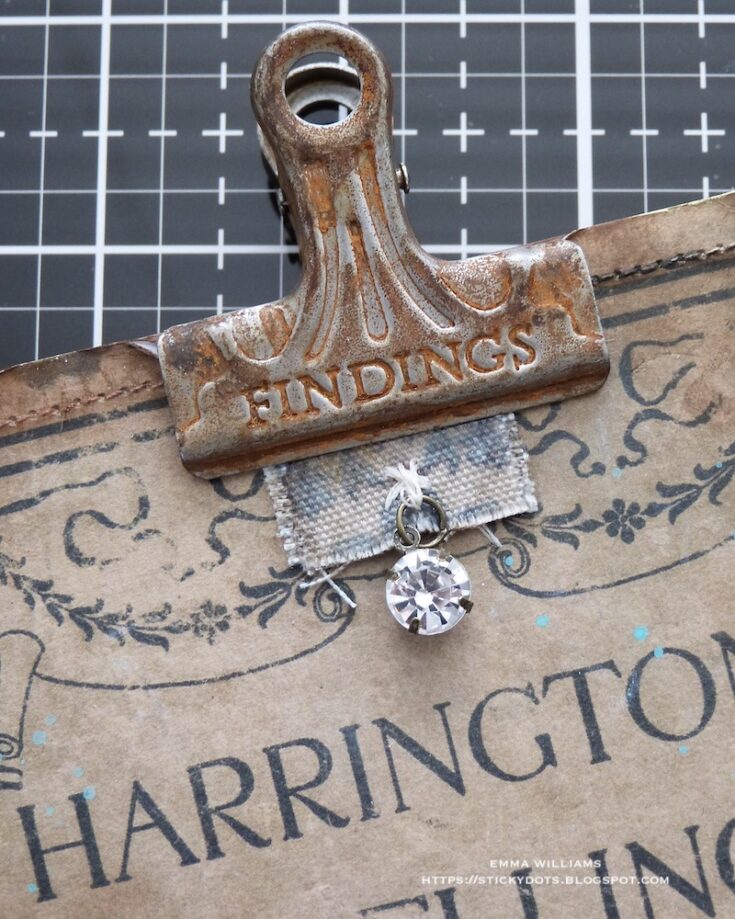
Using cotton thread, I threaded an Antiqued Gem onto the linen and then attached the completed piece to my tag, using Matte Collage Medium.

Finally, I clipped a Rusty Metal Clip to the top of the tag.
I hope you’ve been inspired by my project and loved the techniques I used, which I think could also be applied to scrapbook layouts or framed panels and if you have a special photo of a family member, then it would be wonderful to showcase those.
See you all again very soon and Happy Crafting everyone…Emma x
SUPPLIES:
|


Thanks so much for stopping by, and thanks to Emma for being our guest!


