Studio Monday with Nina-Marie: Watercolored Embossing Folder and No Line Coloring

Hello there friends, it’s Nina-Marie Trapani here with you! I hope you love watercoloring, because I am sharing a card that features multiple techniques, including watercoloring an embossing folder.
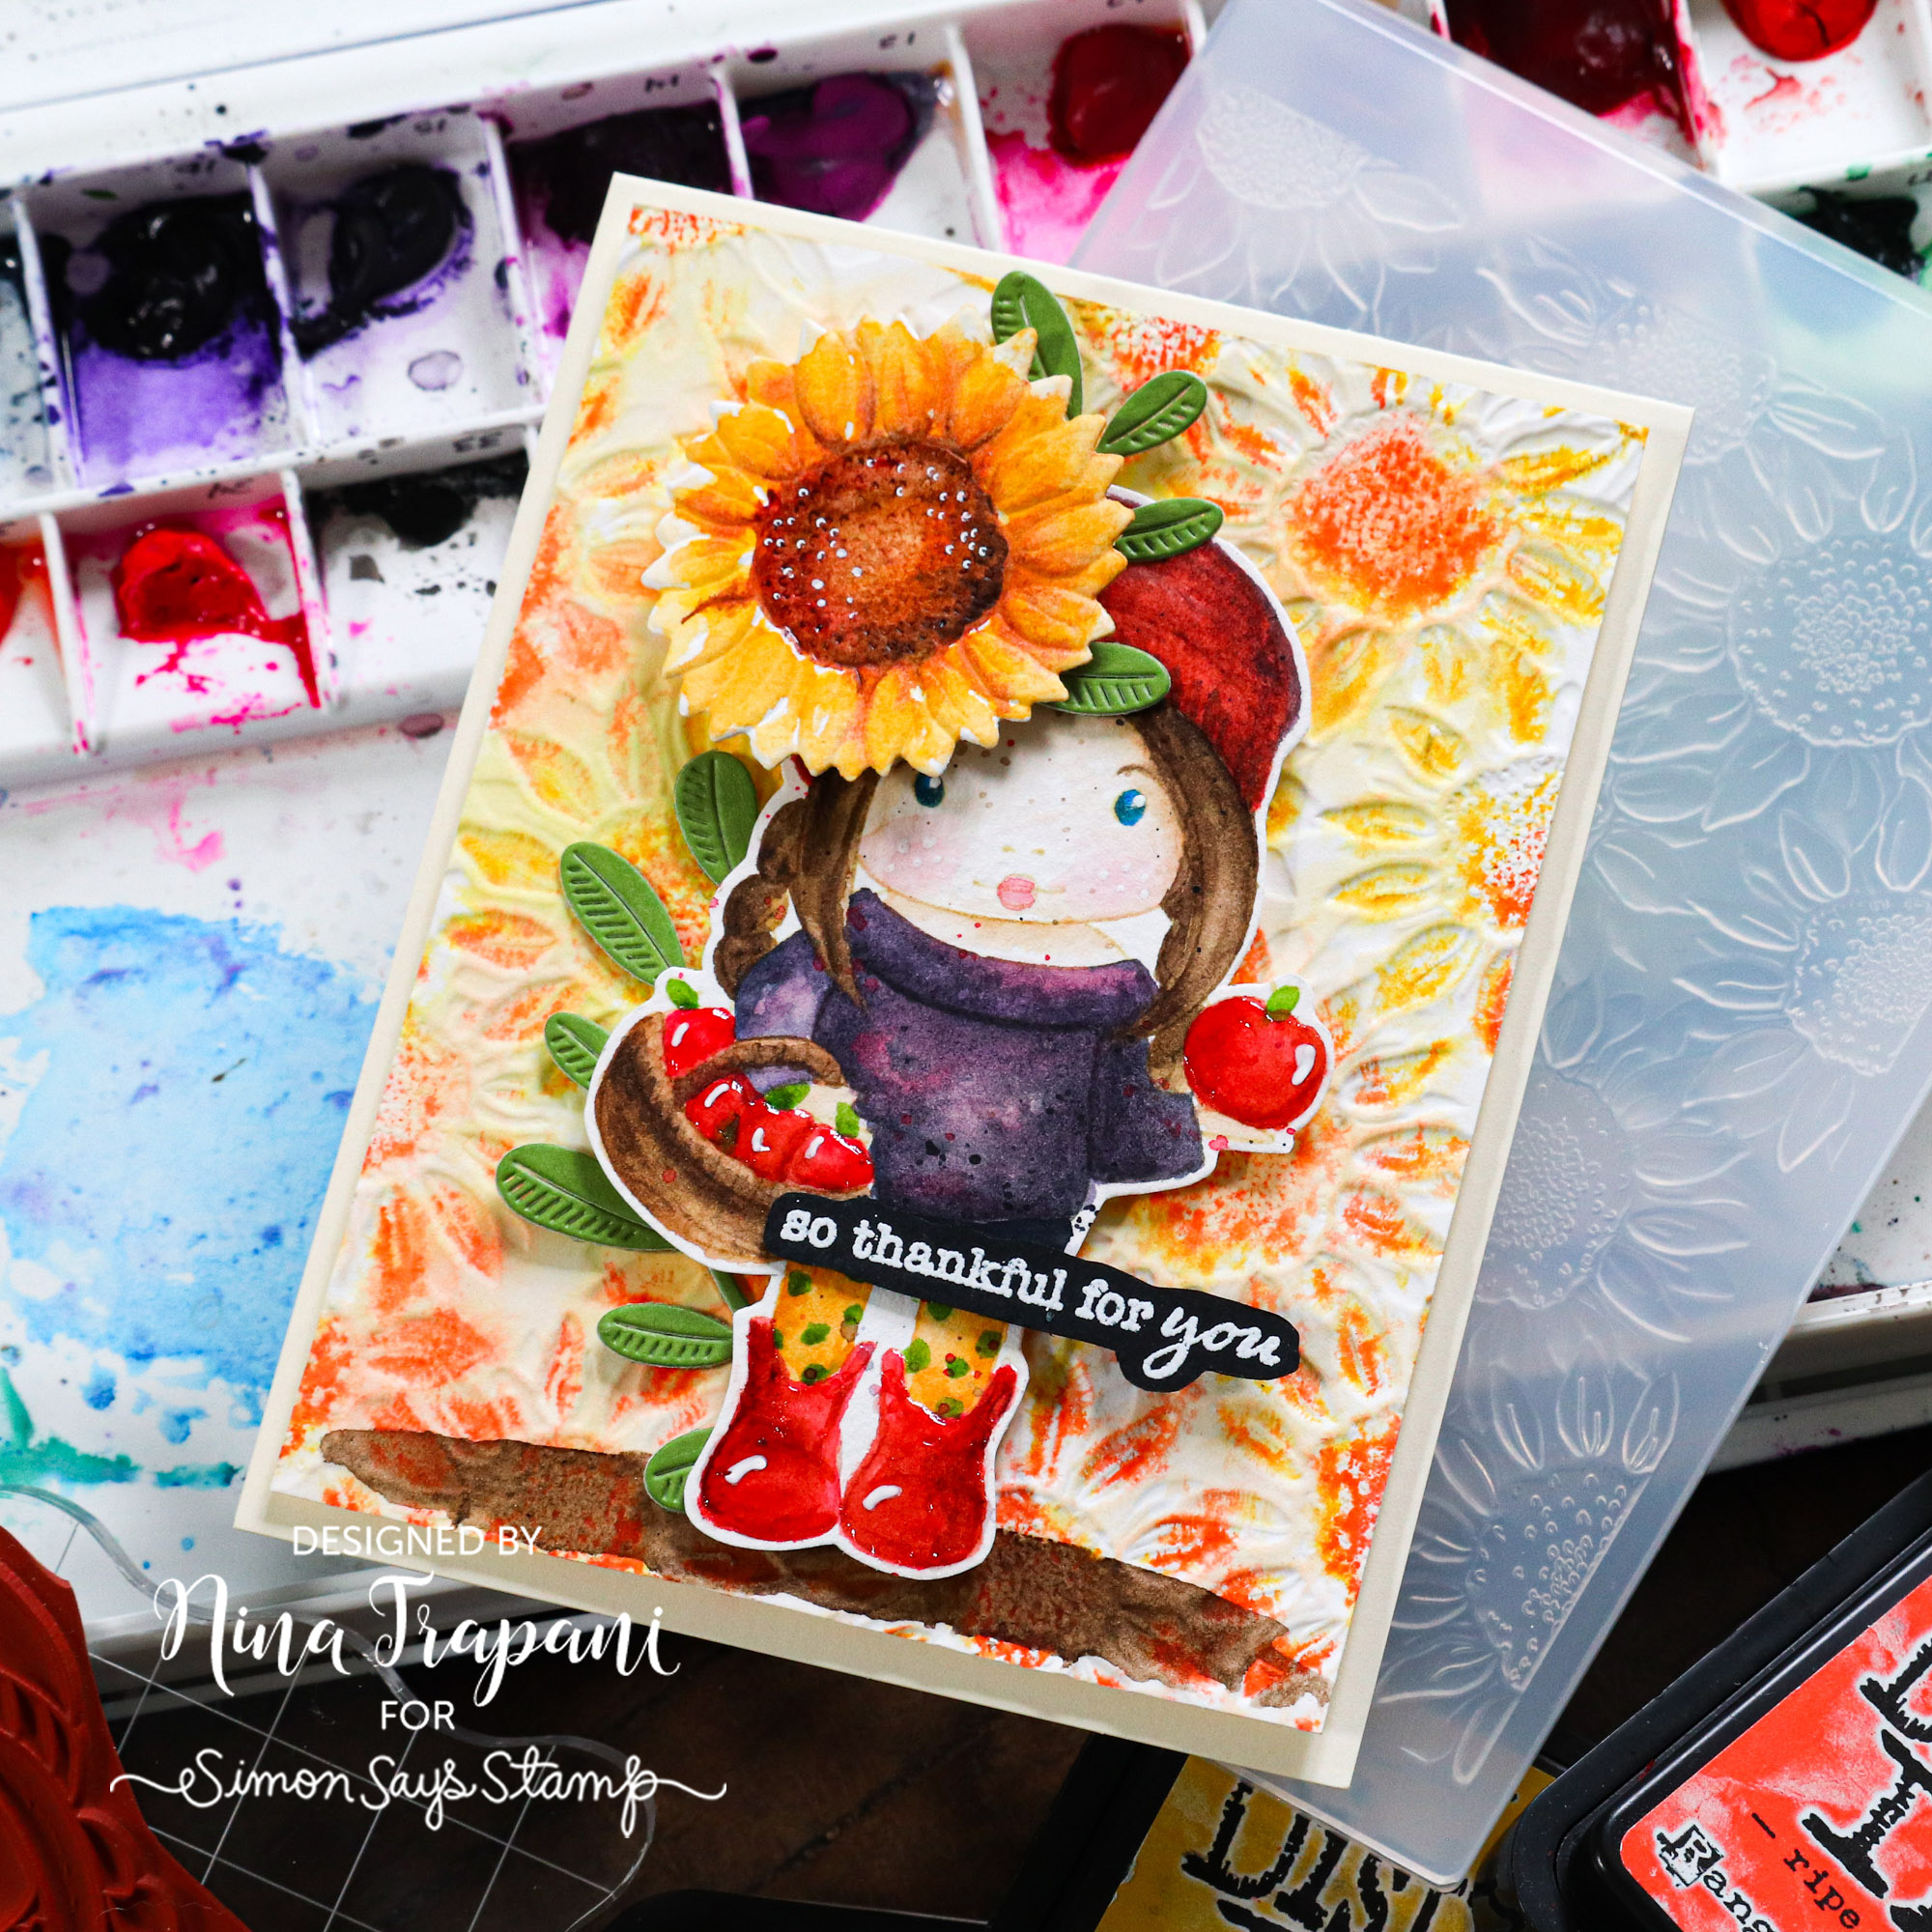
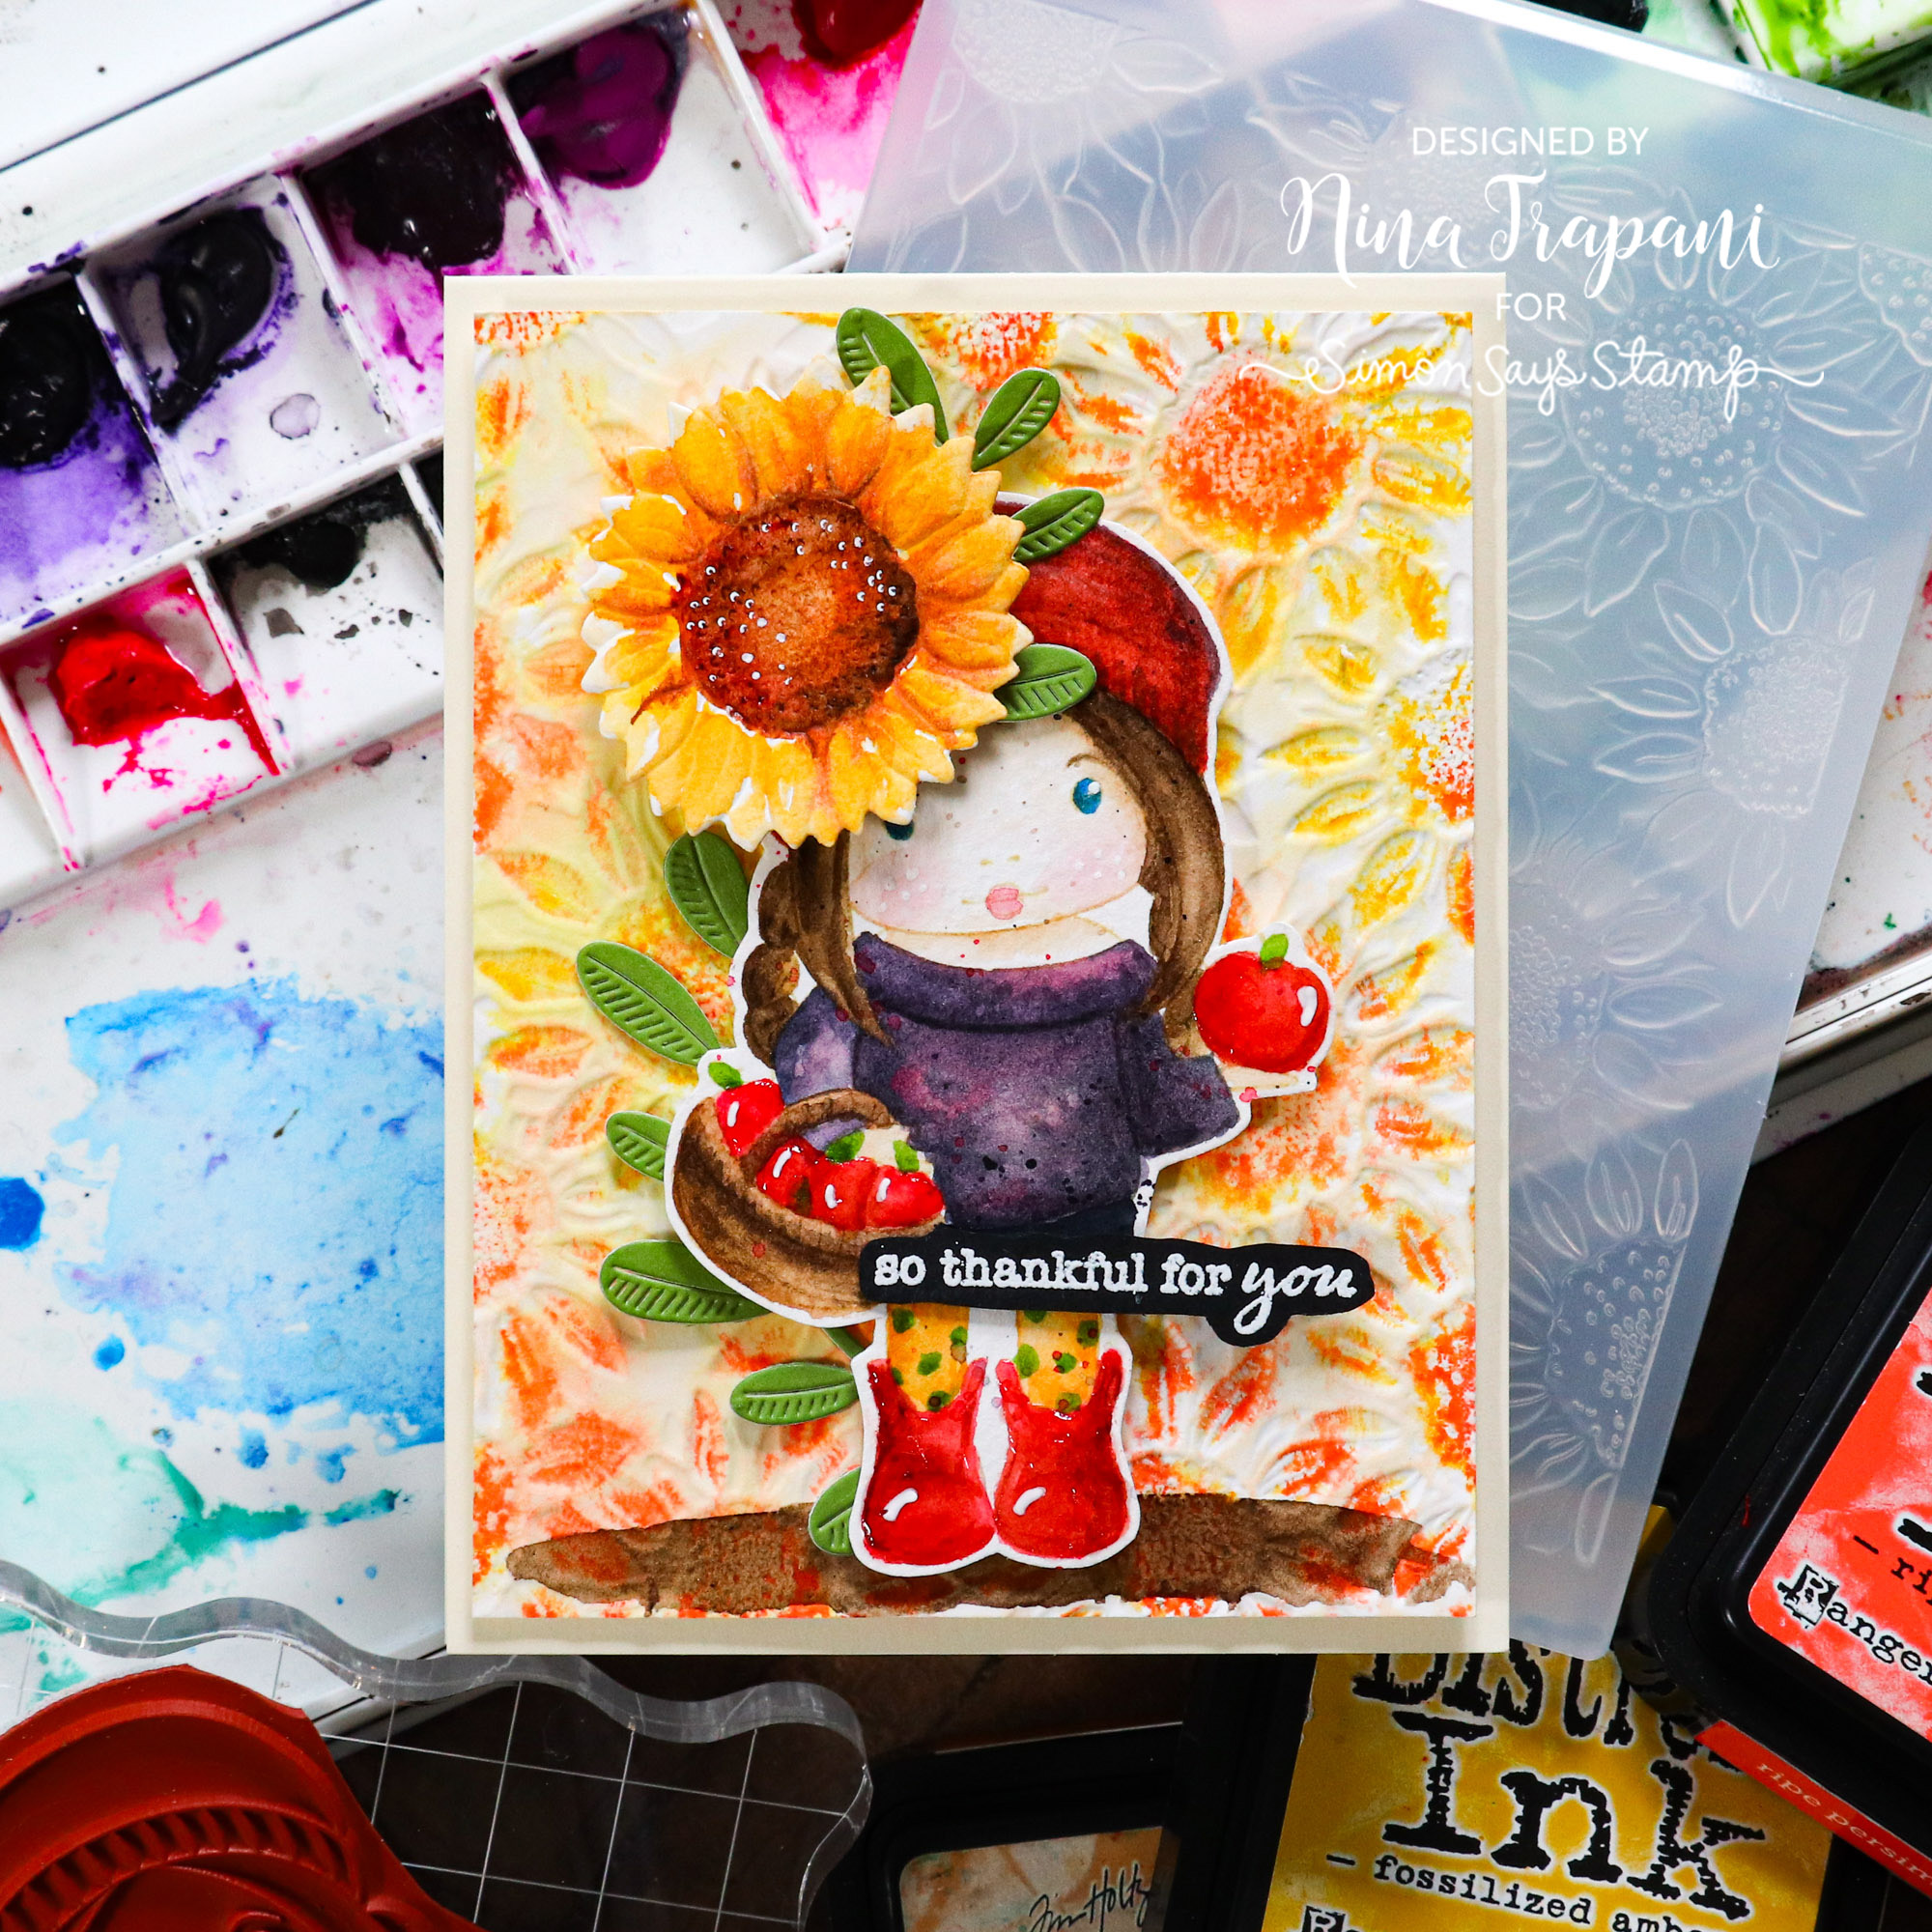
I paired La-La Land’s Marci with Apples stamp set with Simon’s Sunflower Field embossing folder and die. These created such a sweet scene, and I especially love how the die cut sunflower looks on Marci’s hat!
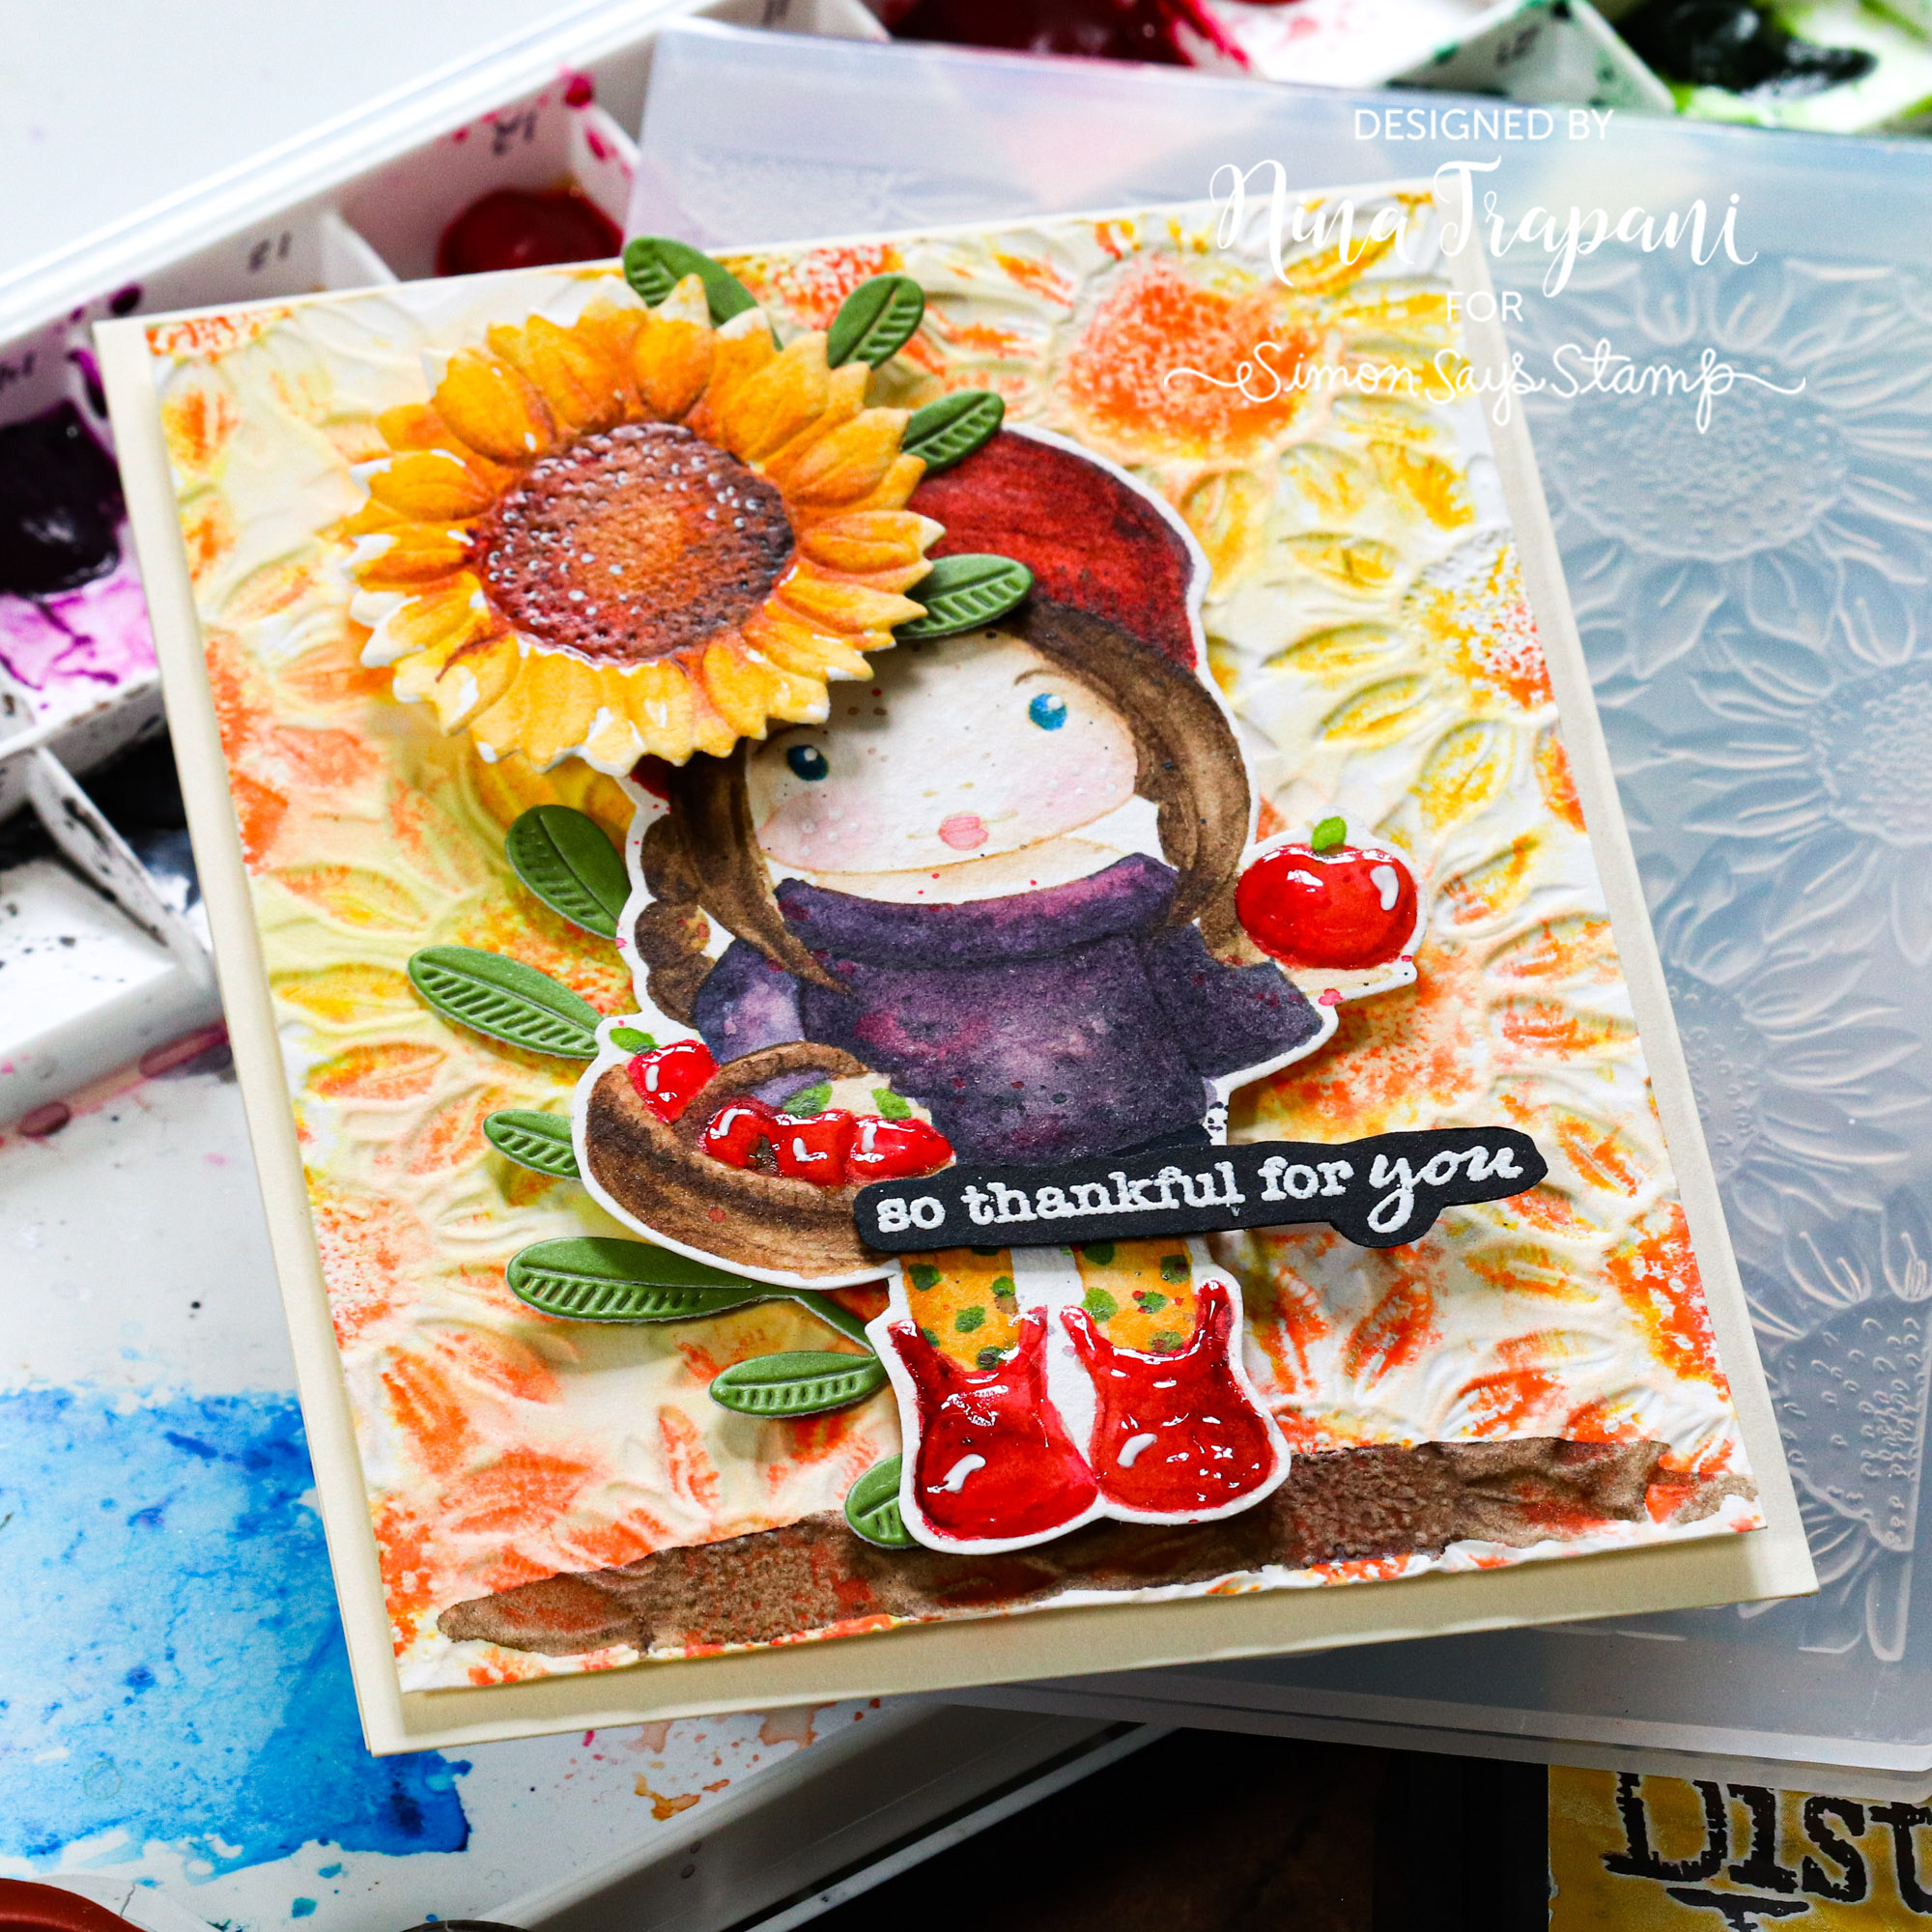
I also added a few Olive Leaves from Simon Says Stamp around Marci for a pop of green and to add some separation between her and the background.
Want to learn how I made this card? Be sure to watch the video below for all the details!
WATCH THE VIDEO
SUPPLIES
|


Yippee for Yana: Colored Cardstock Scene Setting

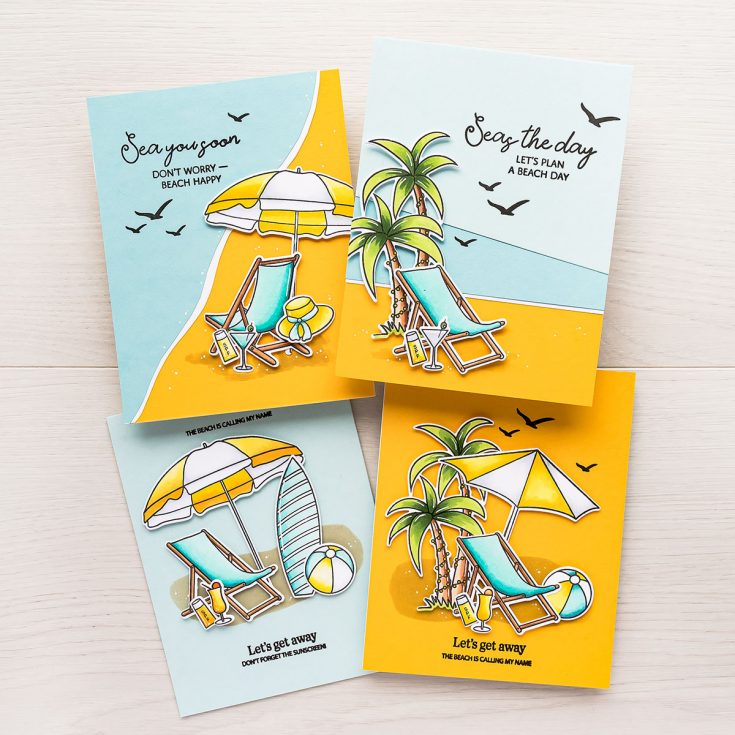
Hi friends! Happy Sunday! As we settle into the Summer season, these cards and colors are a total MOOD right now… loving this set so much! What is your favorite season? Be sure to watch the video for all the details! (Please note; our dear friend Yana is Ukrainian, to show support to our brothers and sisters in Ukraine, please see Yana’s post HERE.)
Hello, crafters, this is Yana Smakula for Simon Says Stamp! Welcome back for another Yippee For Yana video!
In this video, I have simple tips for you to set the scene / create that scenic background for your cards with no specialty tools. I am a fan of using colored cardstock for my cards, I love how colored cardstock instantly adds that pop of color, and I love how bright and vivid it is. Of course, you can always use specialty tools to create the backgrounds, like background stamps, dies or even stencils, but I wanted to go back to basics today and show you how you can use just plain paper, and a little bit of tweaking to create fabulous scenic backgrounds for your cards.

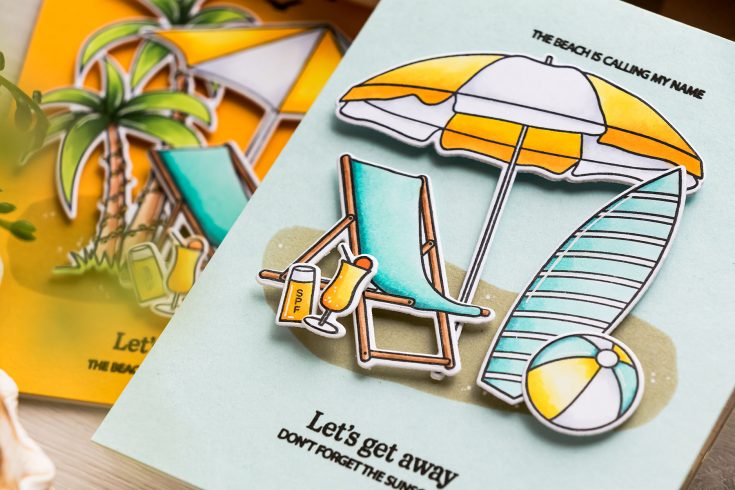
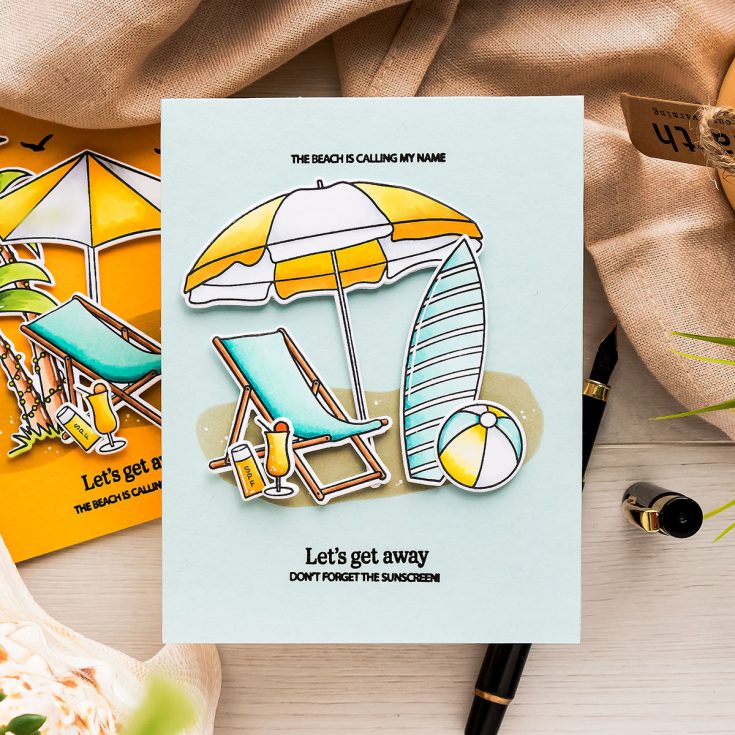
I’m making summer beach cards as an example in this video, but this technique can be adapted to other occasion cards, all you need to do, is switch up the colors of cardstock.
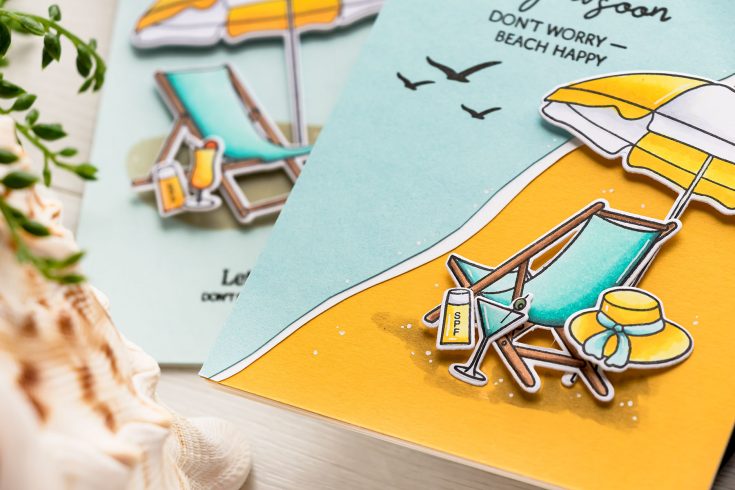
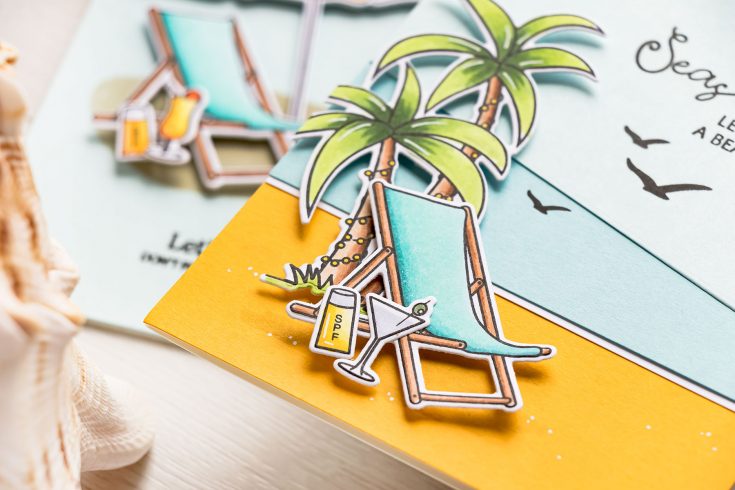
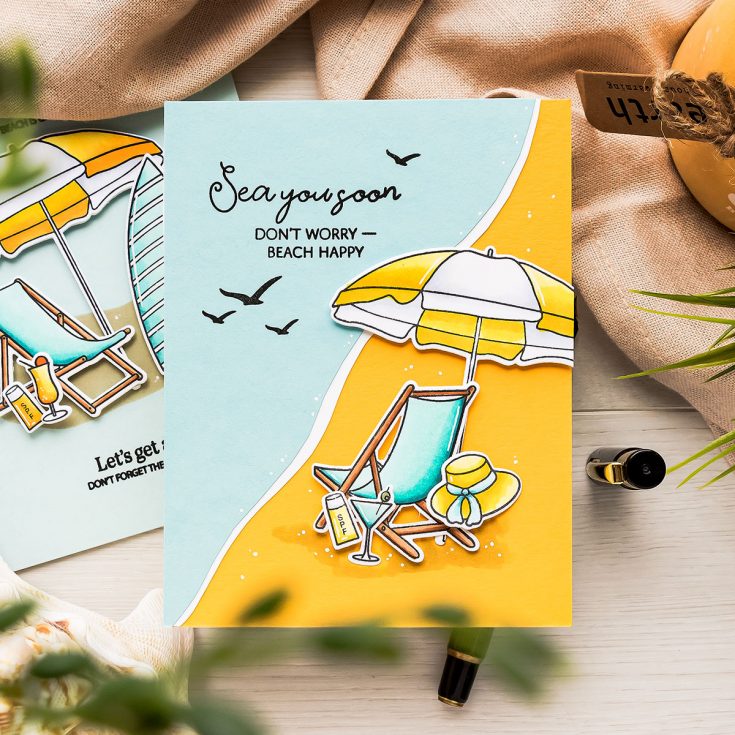
I’m using 3 stamp sets from Simon for my cards to do all of my stamping: Let’s Get Away, Seas and Greetings set, and Warm Christmas Wishes.
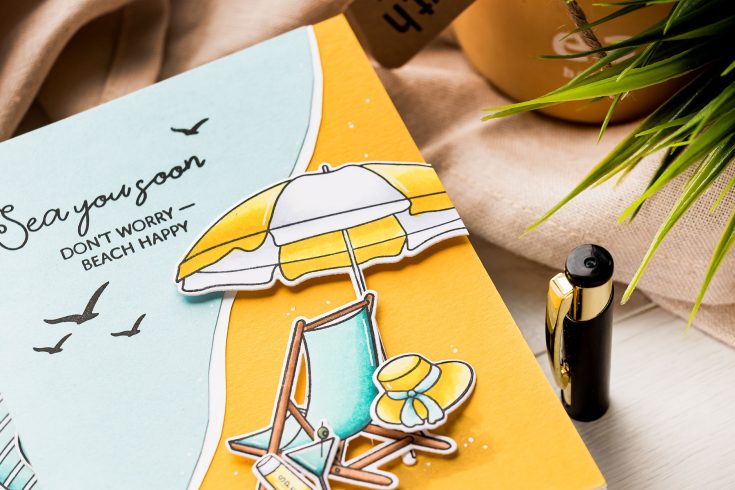
The color scheme I picked is yellow and teal. I used the same color of markers to color all of the images: E31, E33, E37, BG11, BG13, BG18, C3, C1, Y19, Y08, Y13, Y11, YG03, YG17, YG67.
I used a solid color cardstock for the first 2 samples and to ground my scenes, I created a DIY stencil to ink blend a blob shape to mimic ground/shadow. I looked through my stencils and I didn’t have a shape that worked for me, so I made one instead. I used a piece of scrap paper and drew a blob using a pencil. Anyone can do this, you don’t need any skills for this, just draw a simple blob shape. It doesn’t have to be perfect, it doesn’t have to be symmetrical, it just has to fit on an A2 card.

Next, use scissors or a craft knife and cut the inner part out. Better to use a craft knife as you can start in the center and simply free-hand it, Again doesn’t have to be perfect, doesn’t even have to follow the pencil line exactly, you can go outside the line, you are just making a simple imperfect blob. And there we have it.
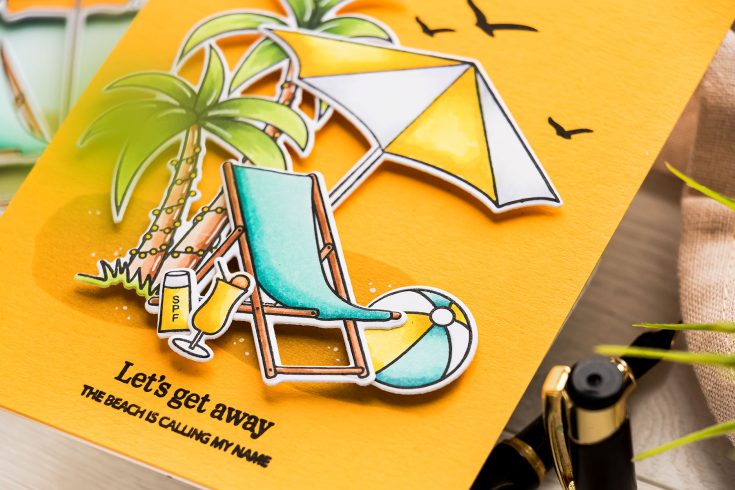
Next, treat this as a stencil, and position it on your background, you can take it to the light to see if the placement works for you and just tape it in place with low-tack tape. Grab your ink blending tool and ink and blend the ground or the shadow on your paper. I used the color Latte from Simon and a large ink blending brush to add the ground to my piece.
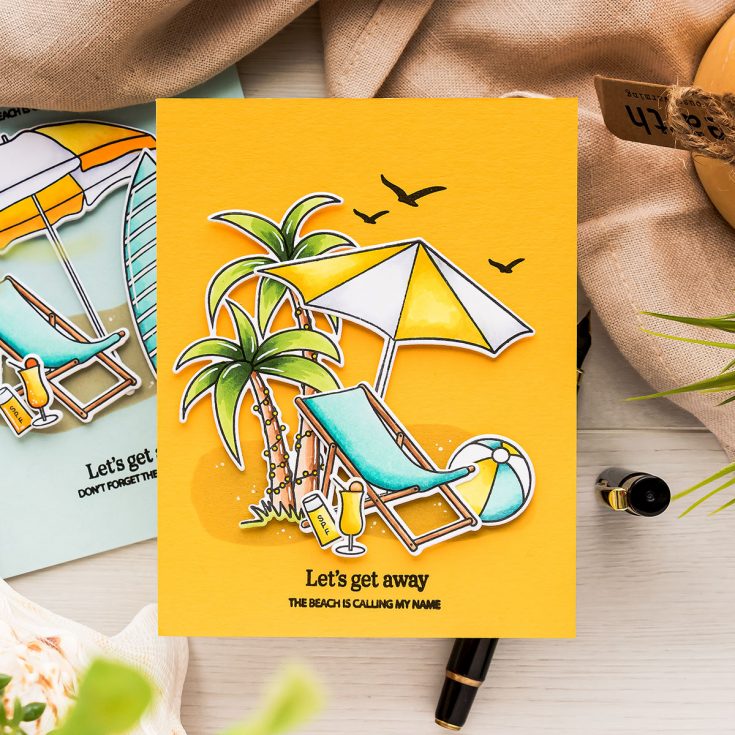
I foam mounted my scene over the ink blending and it fit right in! I also used a white pen and I used it a lot when making these cards – I added white dots onto the ground to help mimic the look of sand. You can also spot some dots on the drink – the dots look a bit like little air bubbles in there.
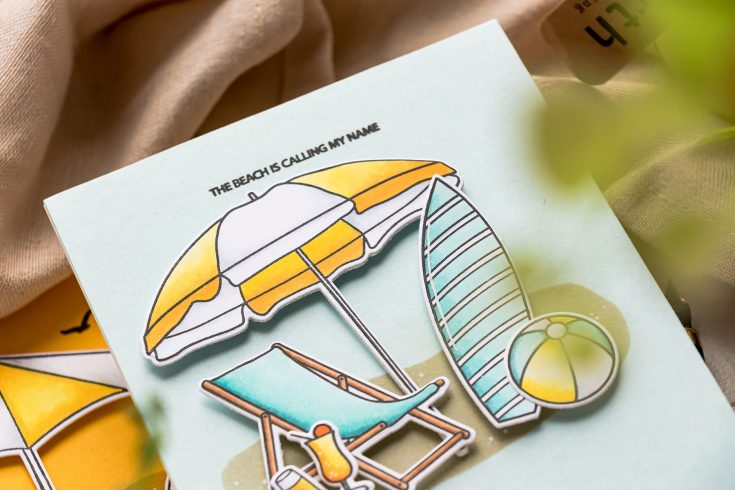
We can also combine several colors of cardstock to create backgrounds. Here, I used colored cardstock to create a color-blocked landscape. I have yellow sand in the foreground, next, there’s a narrow area that signifies the ocean with a skinny white stripe in front of it, that looks like sea foam, and finally, a large light blue panel at the top that looks like the sky.
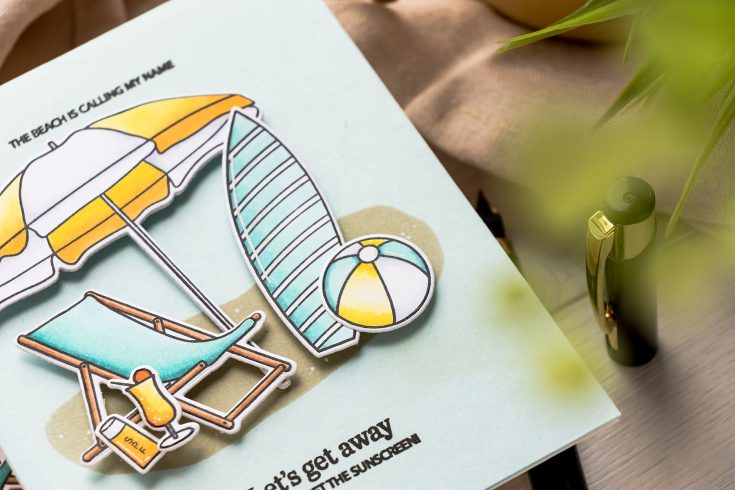
No specialty dies were used to make this background, all I did was cut my paper and an angle using a paper trimmer. I then glued everything onto the background, the yellow panel, and build my scene on top. I didn’t do any ink blending here as I didn’t need it, I already had my ground to hold my scene. But I did use a C1 Copic marker, which is a cool gray color, and added some shadow under the beach chair.
So we used a paper trimmer to make straight or diagonal paper cuts for this card, for my next example I free-hand cut the paper to create an organic-looking shoreline. I used scissors and just free-hand the diagonal cut. I wanted it wavy. Next, I use a sheet of white paper, and I tried and mimic the same shape so that I have a bit of that sea foam on my card.
So you can use your colored cardstock to create fabulous and unique backgrounds for your cards without any other specialty tools. I hope you’ve found this video useful and I hope you are going to dive into your colored cardstock stash! Have fun crafting!
WATCH THE VIDEO:
SUPPLIES:
|


Ways to support Ukraine:
If you are looking for ways to support Ukraine, we encourage you to visit this page on Yana’s blog:

Thanks so much for stopping by, and thanks to Yana for being our guest!
Tim Holtz Halloween Distress Inspiration: Fall Vignette with Lights
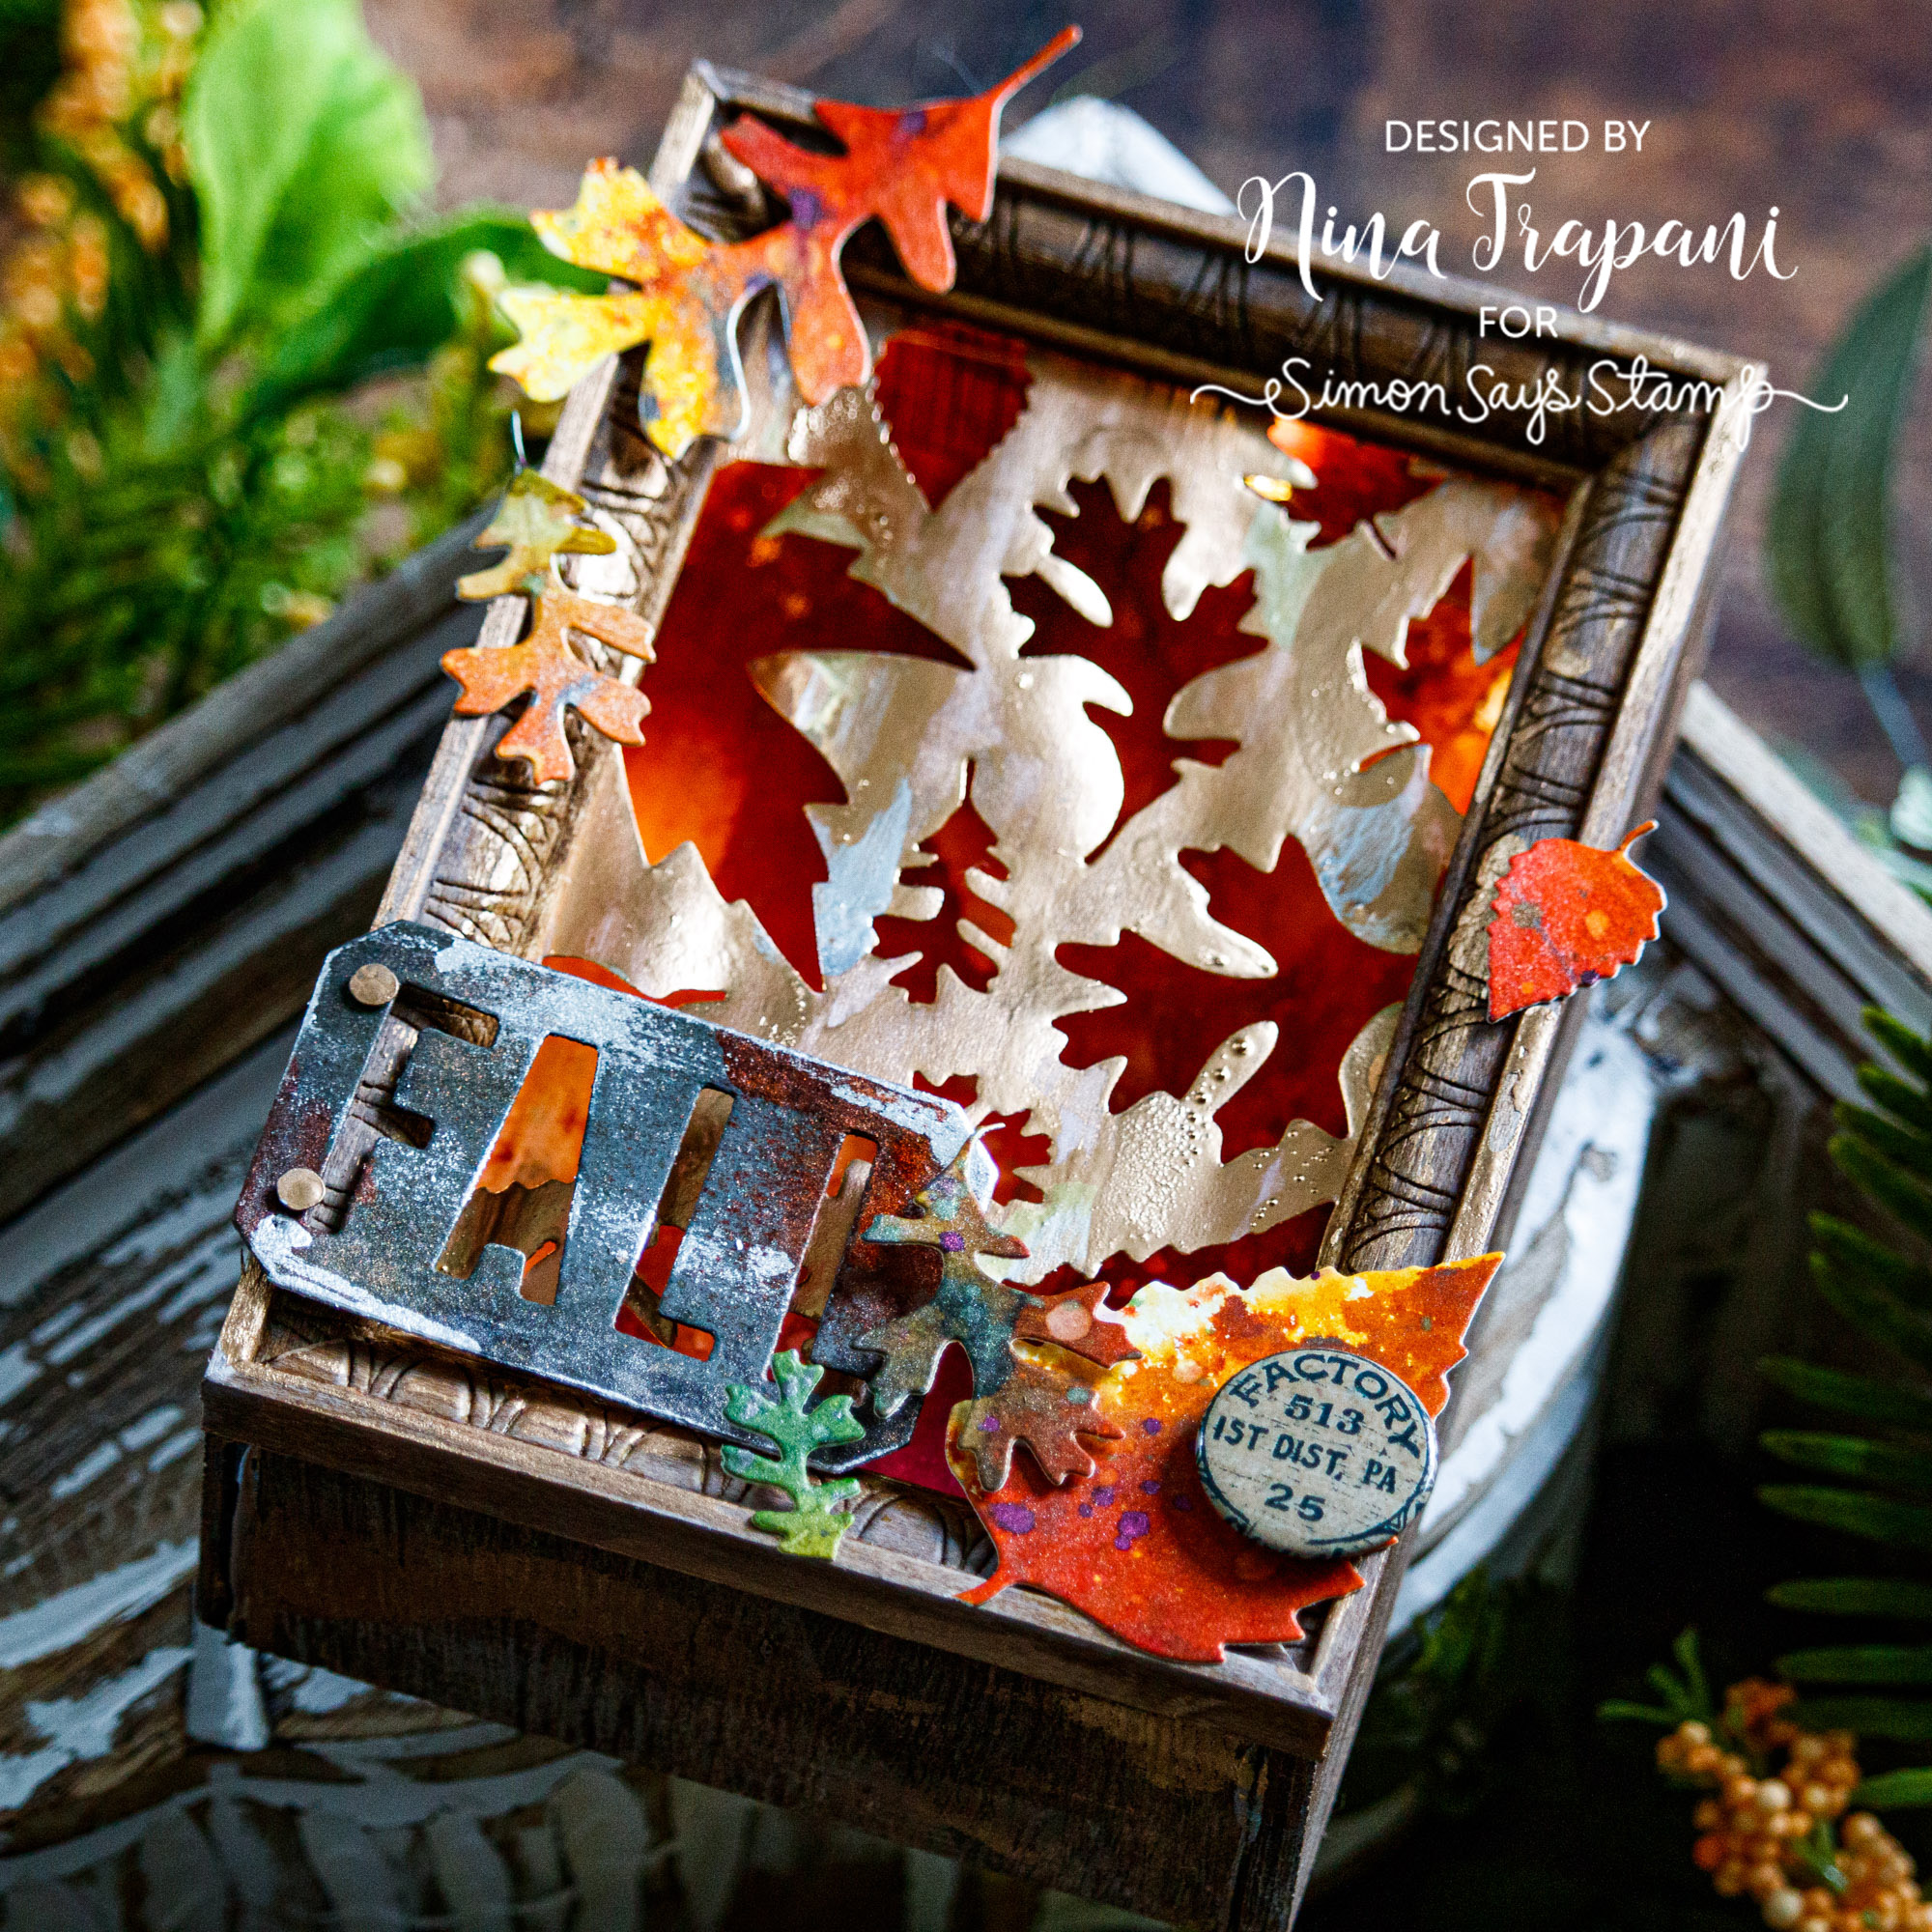
Hello there, friends, it’s Nina-Marie Trapani here with you today sharing a project featuring Tim Holtz’s newest Halloween Distress release! I love fall and I thought this would be the perfect opportunity to use the new Mica Stains to create a warm vignette that also lights up!
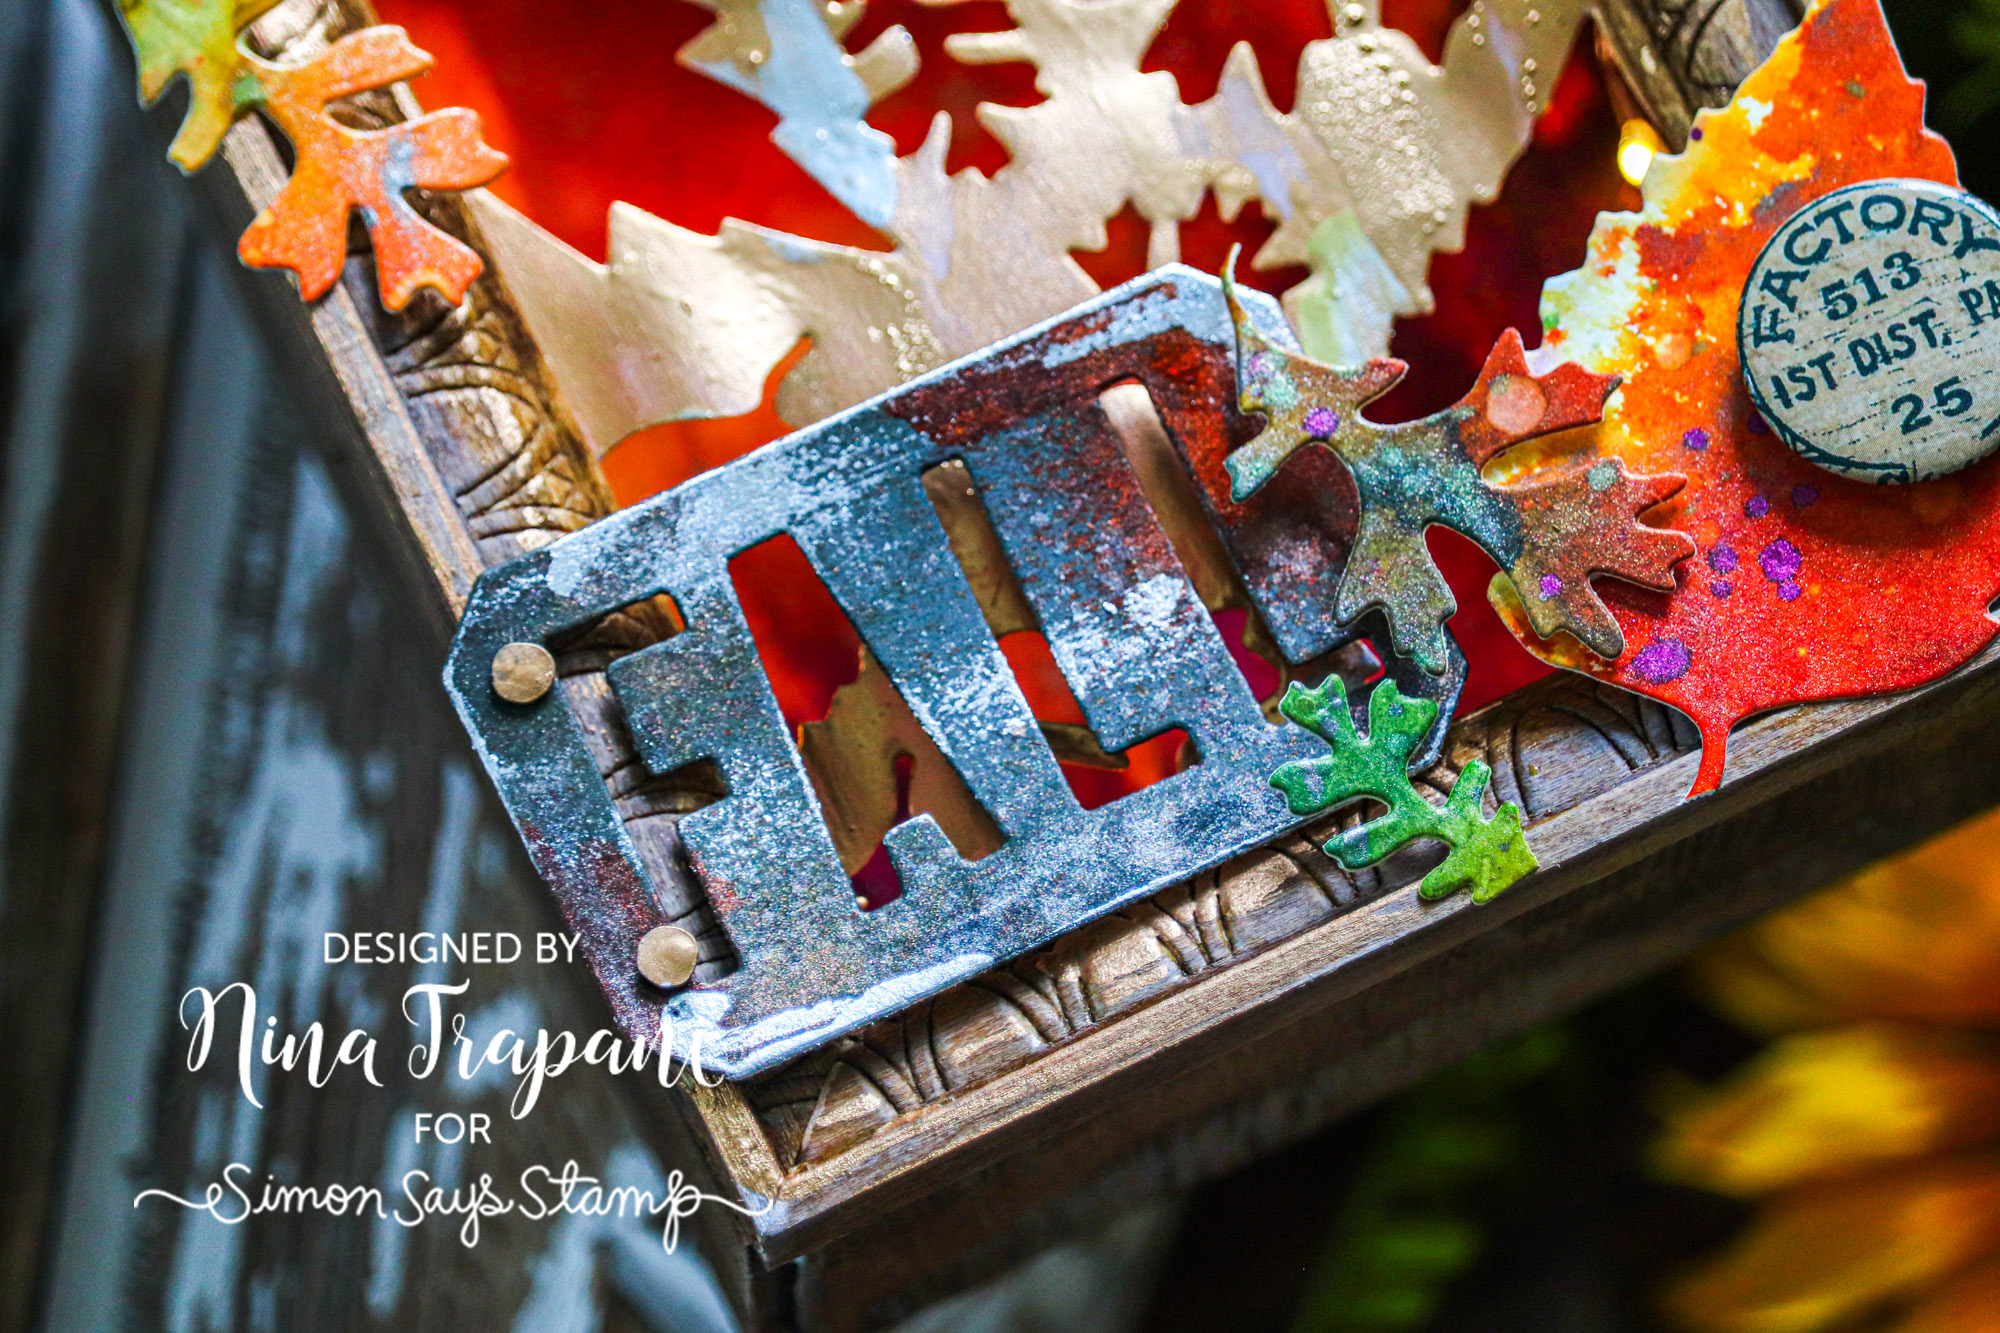
The leaves that are scattered around are from Tim’s Foliage die set, which I colored with the new Distress Mica Stains. The background inside of my vignette is also sprayed with the new Micas. I also used new Tim Holtz Chapter 3 Foundation dies for this vignette, including Collector and Alphanumeric. The pieces I made from those sets are colored with Mica Stains and Foundry Wax for a super vintage effect.
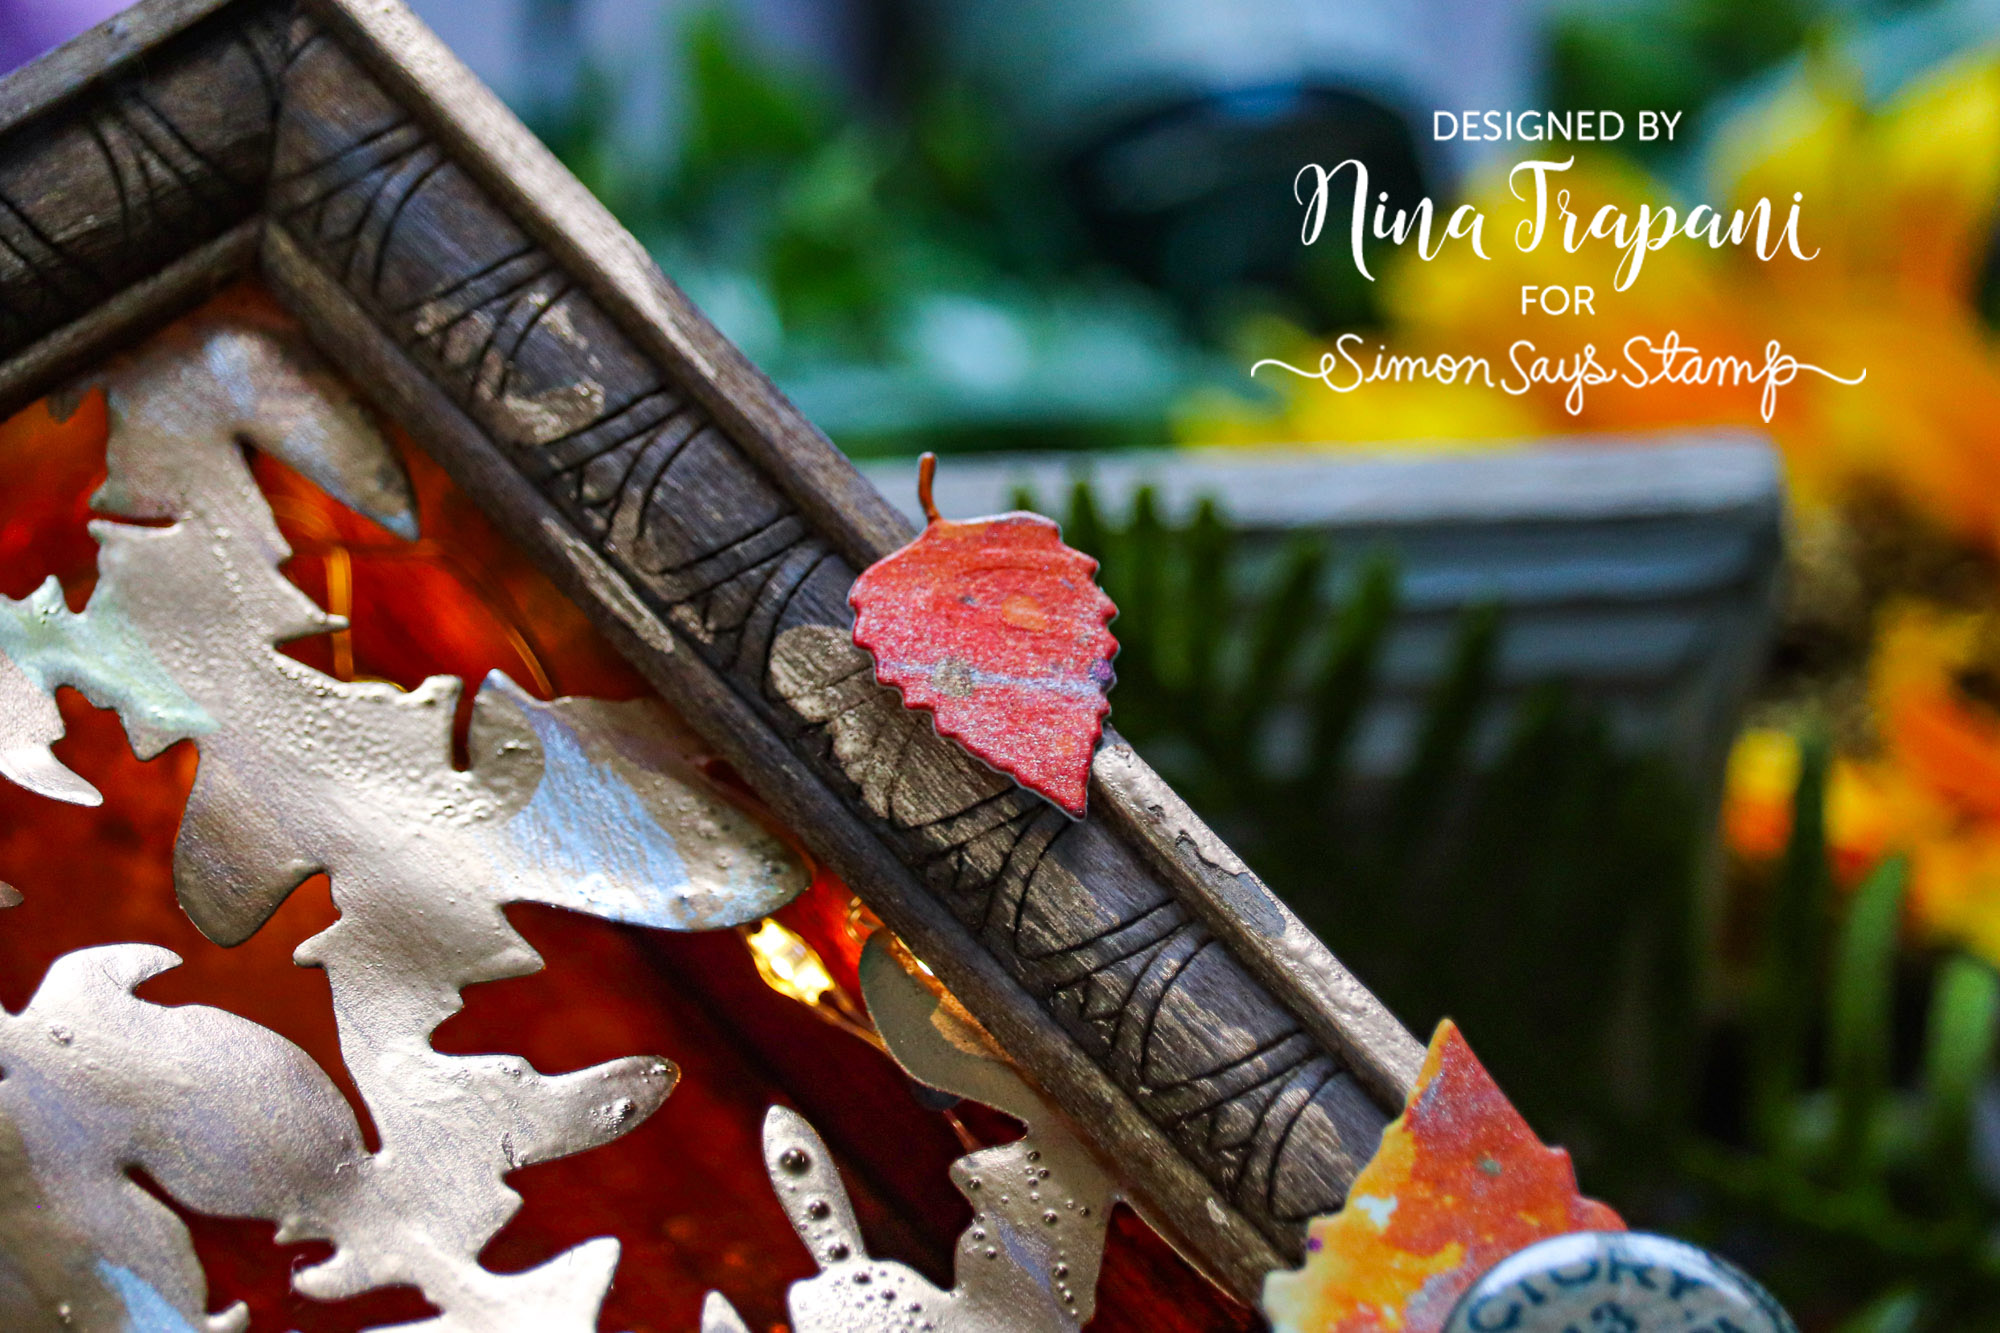
To turn this into a light-up box, I mounted Tiny Lights inside with hardware. Then I covered the opening of the vignette with an overlay that I made by die cutting vellum with the Foliage dies, colored with Foundry Wax, and attached to the backside of a vignette frame. The cutout leaves provide a look into the colorful Mica Stain background that literally glows when the box is lit!
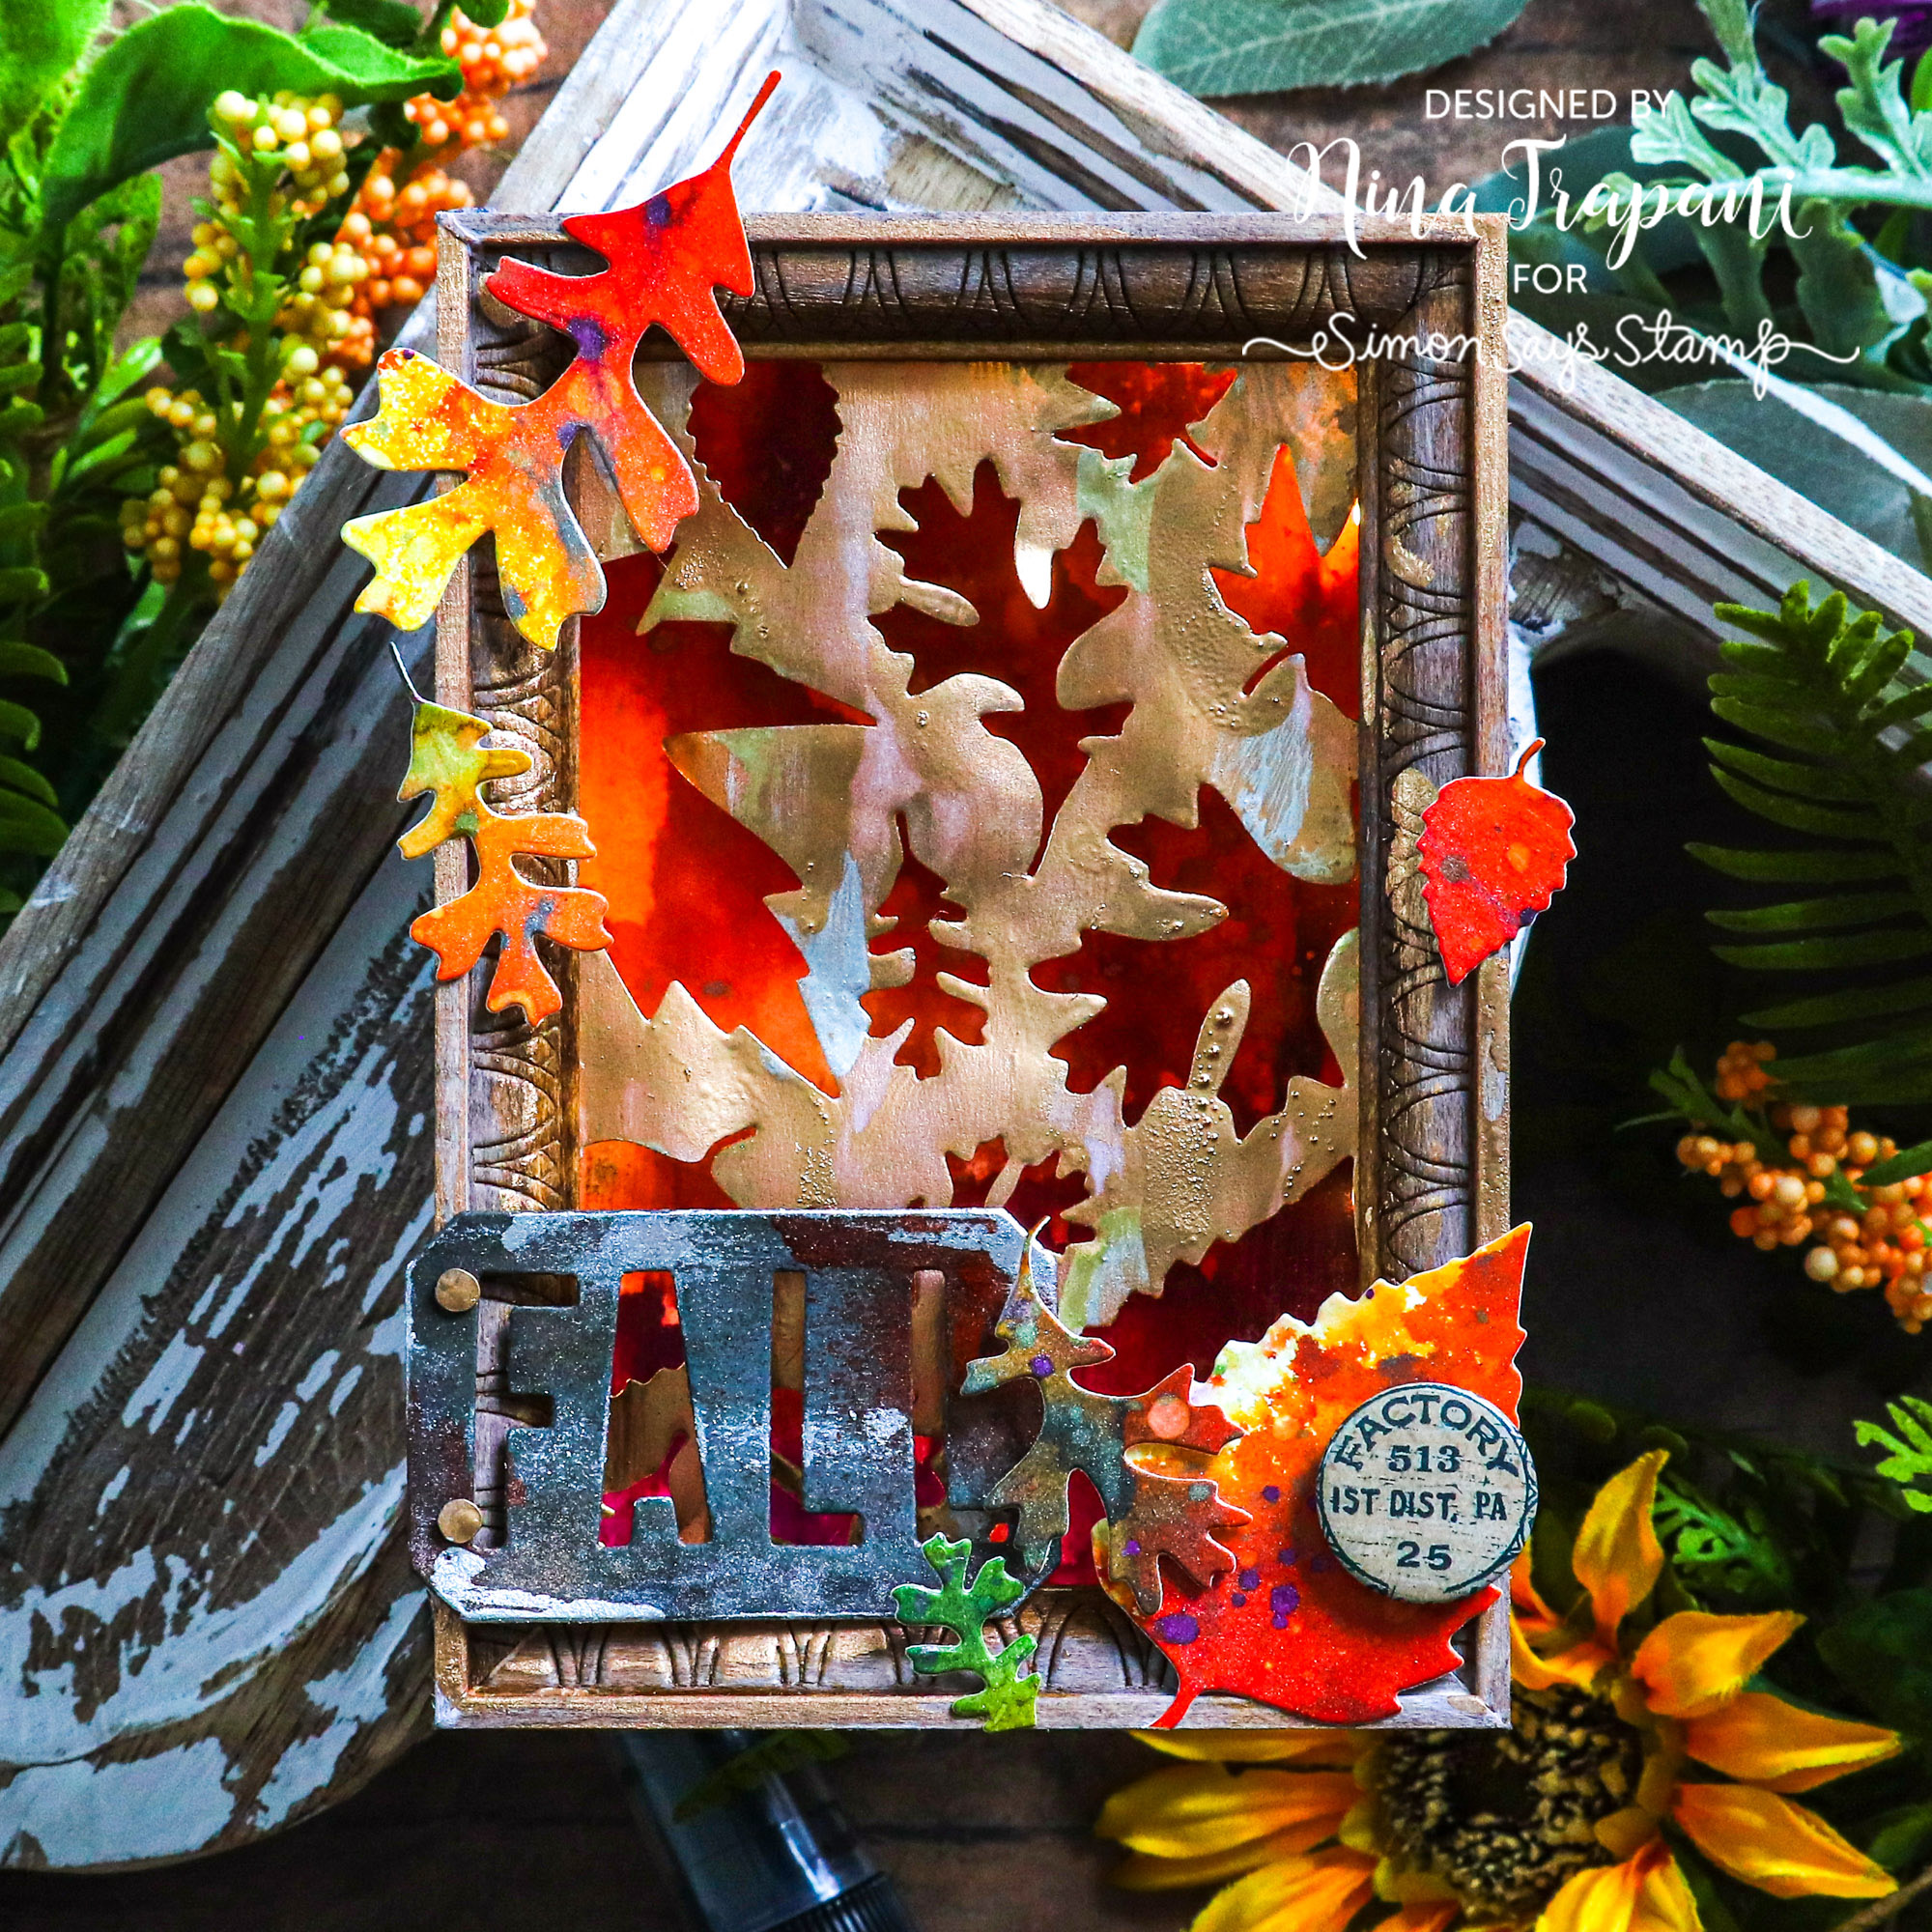
I also added small details to the box to tie everything together, including some Mini Flair embellishments, hardware to attach my “fall” sign, and even a bit of Foundry Wax layered across the outside of the vignette. This project has so much texture and color, thanks to those amazing, new Mica Stains! The colors are just simply divine!
I hope you enjoyed this project and are inspired to create something with this new release from Tim Holtz. Thanks for stopping by!
SUPPLIES
|