Watercoloring with Colored Pencils
Hi readers! Happy Leap Day! I hope your week is starting off GREAT! We are honored to have the fabulous Peet Roeven on our blog as a guest today! She has whipped up a floral masterpiece that doesn’t lose any luster on the inside! Read on and enjoy!
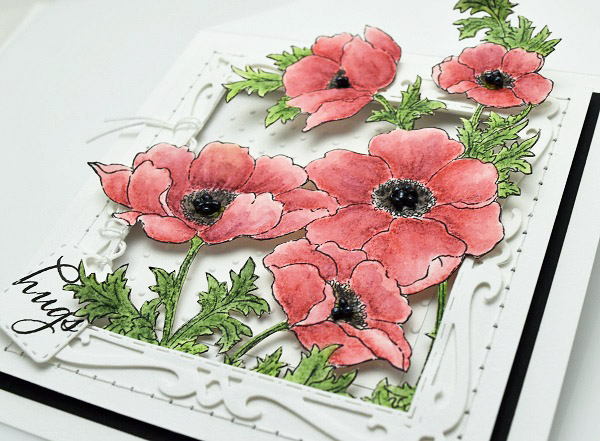
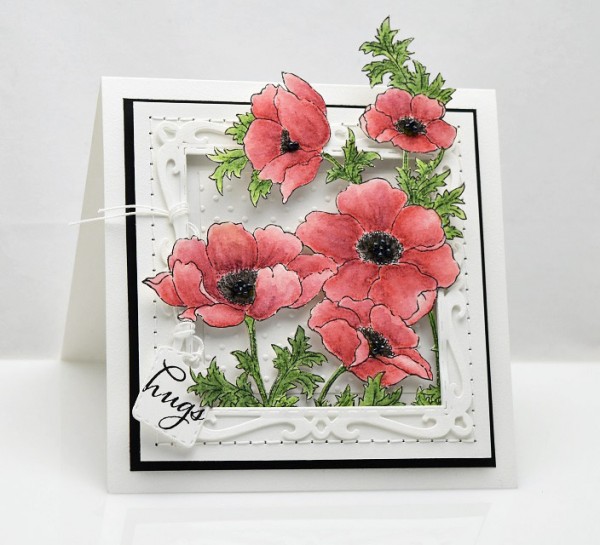
1. Adhere black cardstock to a square cardbase.
2. On top of the black cardstock, layer the stitched and die cut frames as well as white cardstock panel embossed with the Polka Dots embossing folder. When adhering the frames, use dimensional adhesive/foam dots.
3. Stamp Penny Black 40-447 Poppy Gems onto watercolor paper using Ranger Archival Ink. Paint with Derwent Inktense Pencils. Fussy cut the flowers, stems, and leaves. Embellish the centers of the flowers with Glossy Accents and small beads. Adhere to card using dimensional adhesive. Tuck some portions of the flowers inside of the frames and allow some to extend outside of the frames.
4. Die cut small tag using Penny Black 51-191 Gift Card Pocket. Stamp “hugs” sentiment, Penny Black 30-324 Love & Hugs, using black ink. Add to card using thread.
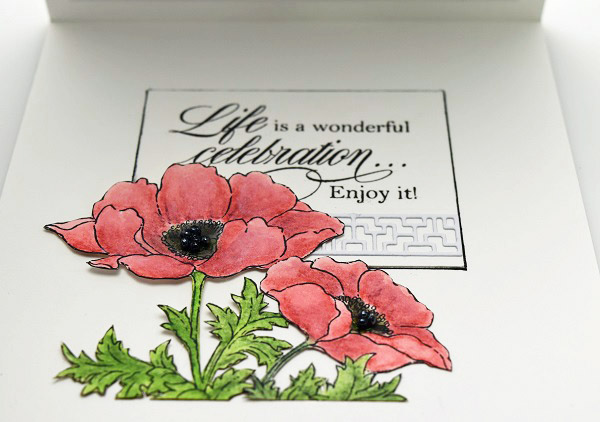
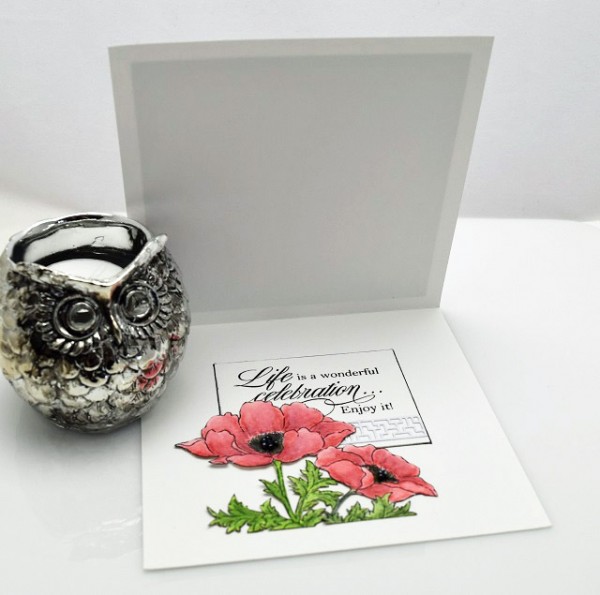
Inside the card
1. Stamp sentiment, Penny Black 30-350 Sentiment Collection, onto white cardstock using black ink. Mount onto small piece of black cardstock and adhere to inside of card.
2. Embellish the sentiment panel with Penny Black 51-196 Geometric Borders, die cut from white cardstock.
3. Stamp Penny Black 40-447 Poppy Gems onto watercolor paper using Ranger Archival Ink. Paint with Derwent Inktense Pencils. Fussy cut a portion of the image and adhere to interior of card. Embellish flower centers with Glossy Accents and small beads.
SUPPLIES:
 |
 |
 |
 |
 |
 |
 |
 |
 |
 |
 |
 |
 |
 |
 |
 |
 |

Blog Candy Alert!! Follow our blog via email and comment on this post for a chance to win a special blog candy!
Congrats! Blog Candy Winners!
From: Be Inspired by a Song: Sharon Rosner!
From: Emboss Resist Ink Blended Floral Card Using Spring Flowers: Helen Gullet!
From: Sparkly Peeps Card Using March 2016 Card Kit by Nichol Magouirk!: Debbie Siddle
From: Watercolor Leaves for Spring!: Paulette Still
From: Creative Uses with Debby Hughes Combining Stamp Sets: Christine Kosmak!
From: Weekender with Wanda – Ideaology Charm Bracelet!: Jan Elmore!
From: Lucy’s Sequins… made with love!: Arianna Barbara!
Please email [email protected] with your mailing address (if applicable), the name of the blog you won from, and the prize you won to claim your prize!
Lucy’s Sequins…. made with love!
Hi readers! Happy Sunday! I hope you’re enjoying your weekend! Please join me in welcoming the fabulous Lucy Abrams back to our blog as a guest designer! I jut love this sweet card she made with a soft palette that would be great to give just because just about any time of the year. Read on and enjoy!
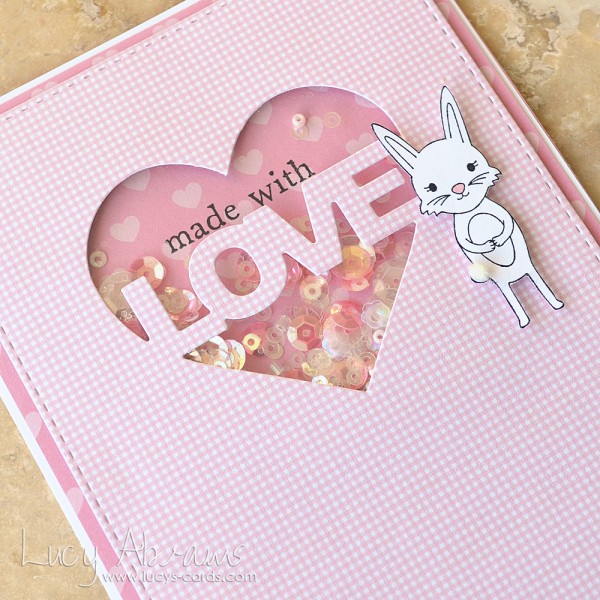
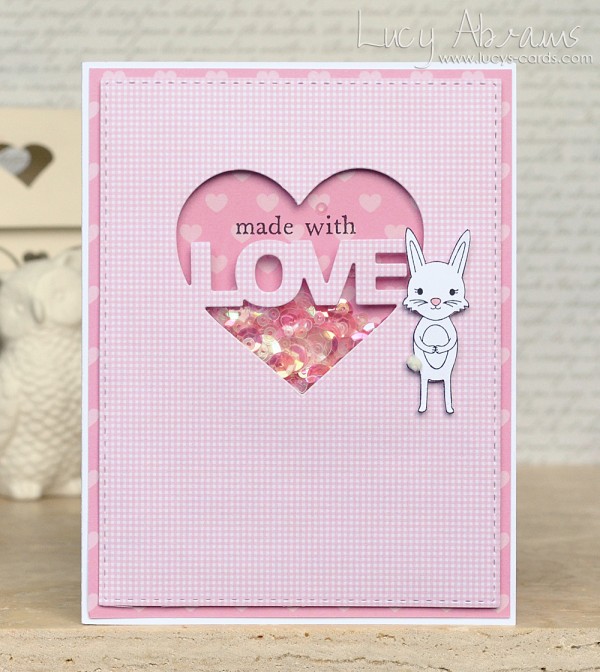
Hi! Today I have a shaker card to share that I created with fun products from lots of my favourite companies. To start, I cut the heart window from some Pebbles Inc. Special Delivery paper with the Heart Shaker Shapes die from Clearly Besotted, then die cut it again with a Simon Says Stamp Stitched Rectangle frame.
Next, I trimmed a panel of pink patterned paper and adhered to a white notecard. I stamped the sentiment from Hero Arts Many Everyday Messages set, using the die cut heart panel as a guide, then backed the heart panel with acetate and foam tape. I created a pile of my own Princess Sparkly Shaker Selection on the notecard, then adhered the heart panel on top, sealing all the sequins into the window.
Finally, I stamped the bunny from Hero Arts’ Bunny, Fox and Bear set onto white card and cut him out. I added a cotton wool tail and pink nose for detail and adhered him to the card with foam tape. The combination of a cute critter stamp, sequins and pink makes me pretty happy. Thanks so much for visiting, I hope you have a wonderful day.
Supplies:
 |
 |
 |
|
 |
 |
 |
 |
 |
 |
 |
 |
 |
 |
Thanks for reading today, and thanks to Lucy for being our guest!!
Blog Candy Alert!! Follow our blog via email and comment on this post for a chance to win a special blog candy!
Weekender with Wanda – Ideaology Charm Bracelet!

Happy Saturday! It’s time for the latest edition of “Weekender with Wanda” here on the Simon Says Stamp blog! I could not be happier to see you today…because that means I finally get to share this project! It’s been driving me crazy – wanting to show you all! Today I’m featuring awesome items from Tim Holtz via his Ideaology and Ranger Alcohol Ink product lines. Remember last year when I was doing my monthly “Tim Holtz Color Pop” feature? I was sorry to see that come to an end, so we decided that I will continue to do a monthly feature with Tim Holtz and Ranger products. Today is the first one!
I really wanted to think of something new and different. This entire project was inspired by the new Charmed Findings. I saw these at CHA and they go with one of my favorite Ideaology products! So an idea was born. Inspiration is like a thread for me sometimes…you pull one little string and it unravels a whole sweater! So, this one product led me to think of one possible idea, which led to a big idea! Today I’m sharing my personalized Ideaology Charm Bracelet!
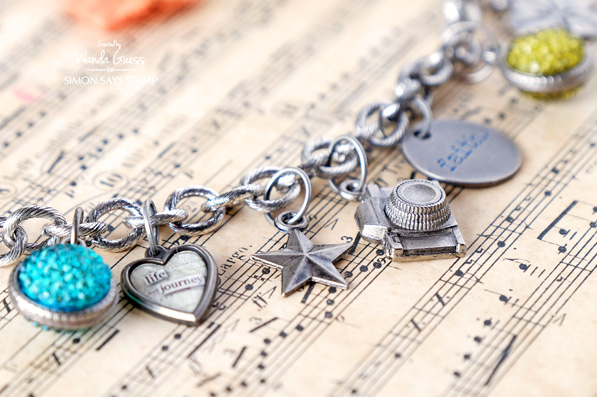
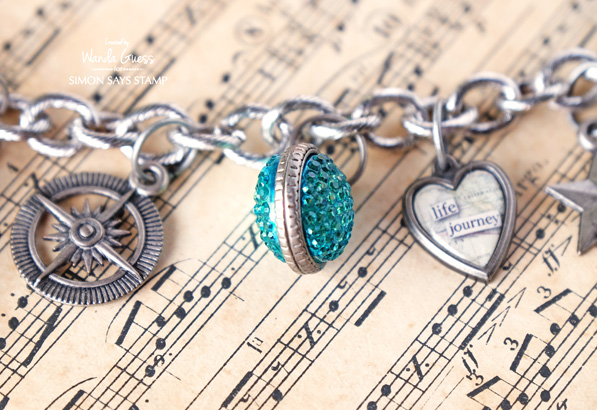
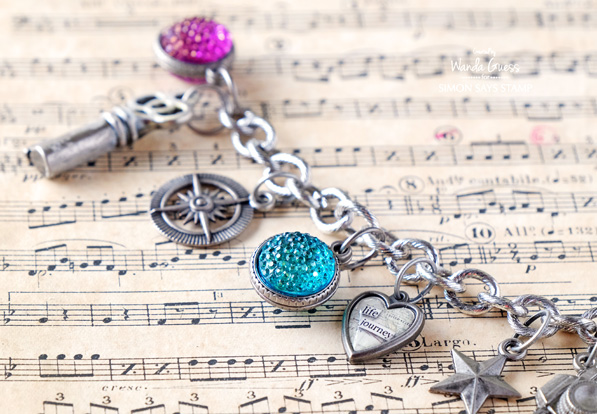
Here is a photo of the completed bracelet. This was really fun to make, and I hope you will try this. It is so easy to customize it for a friend, your mom, sister… I made this one for me, but I am already thinking of making (lots) more.
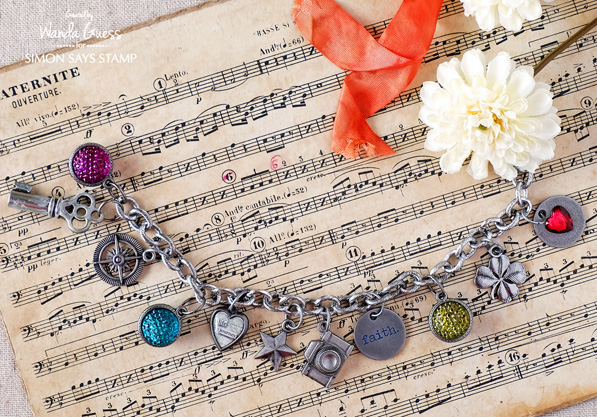
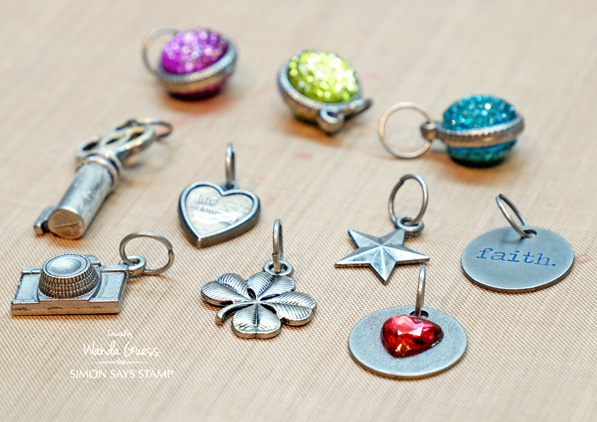
The Charmed Findings that started this idea are holders for the gorgeous Gumdrops gems (in green). The gumdrops are clear, and then you can dye them with Ranger Alcohol Inks. Alcohol Inks come in lots of beautiful colors. For my bracelet I made two of each color and then glued them back to back with Glossy Accents. Now they look like pretty spheres! The Mirrored Hearts are a new product also from CHA (in red). I dyed one with Cranberry Alcohol Ink and glued it to a Typed Token Charm.
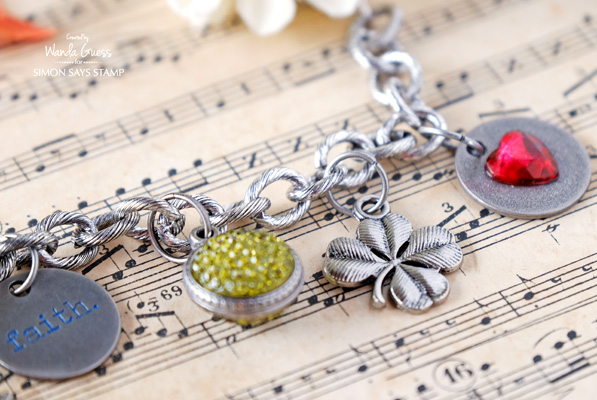
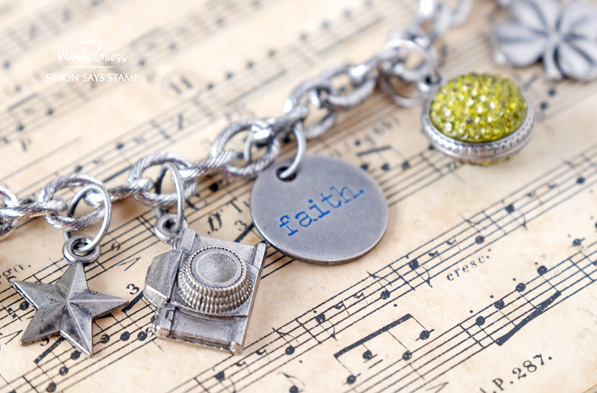
Here is another gumdrop sphere dyed with Pool Alcohol Ink. The Heart Charms come with a package of different stickers so you can choose your own saying. I love the camera from the Souvenir Charms package!
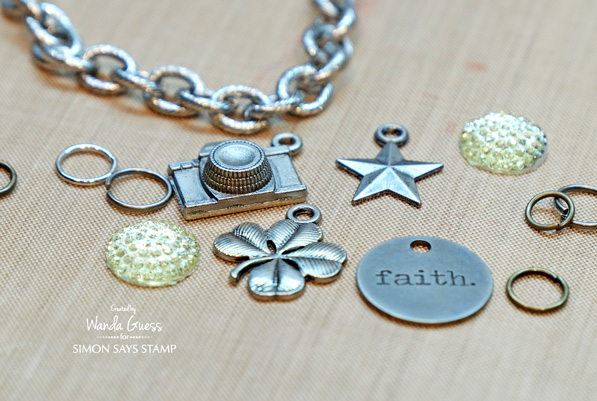
Here’s how I started…. I bought the bracelet part at my local chain craft store. Everything else is from our Simon Says Stamp Store.
It’s so super simple to dye your own embellishments: Gumdrops, Mirrored Stars and Mirrored Hearts. I used my Ranger craft mat so that I didn’t get ink all over my table. Alcohol inks will stick to almost anything! Simply drop 1-2 tiny drops of the ink onto the gems. Then set them aside for 10 minutes or so to let the ink dry. Yes, that’s all! After the color was dry, I used Glossy Accents to glue the gumdrops into the findings and then glued the two sides together. 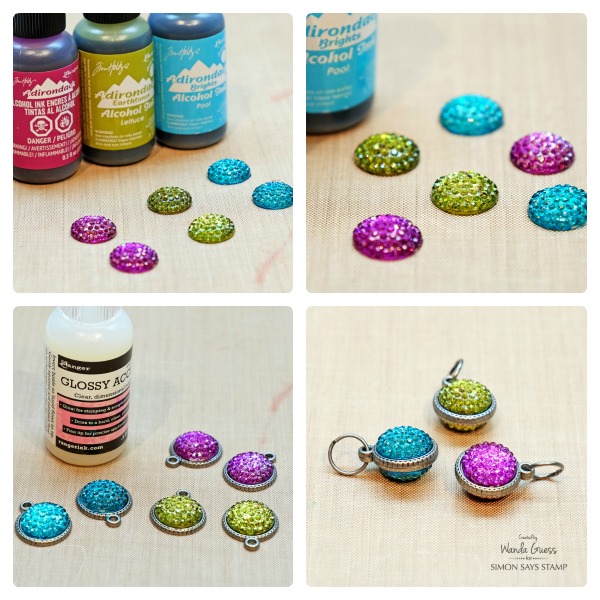
Here are all my finished charms ready to go. I used a Distress Crayon to get into the letters on the Faith charm. I put some Picket Fence paint onto the key to soften it.
Thanks so very much for spending part of your weekend here with me! I hope this project has inspired you to make something fun and different! Any of these ideas would make a neat necklace, or unique charms for your cards and altered books. Most of all have fun! Have a great day and I’ll see you next weekend!
SUPPLIES FOR TODAY’S PROJECT:
 |
 |
 |
 |
 |
 |
 |
 |
 |
 |
|
 |
 |
 |
 |
 |
 |
Blog Candy Alert!! Follow our blog via email and comment on this post for a chance to win a grab bags and blog candy! Remember to tag your awesome projects with #simonsaysstamp on social media so we can see what you are creating! See you next weekend!


