Studio Monday with Nina-Marie: Last Minute Gift Tags (That Still Look Gorgeous!)
Hello crafty friends, it’s Nina-Marie here with you today for a new Studio Monday video!
This week I want to share a last minute gift tag idea that features both Hero Arts & Simon Says Stamp products! When you think of making something last minute, you usually envision something basic and simple right? We think there isn’t enough time to make it have a “wow” factor.
Not so! Just because something is made during crunch time, doesn’t mean it can’t look like a work of art. The tags I have created today feature a VERY simple Distress Ink and stencil technique that does all the hard work for you in just a couple short minutes… keep reading (and watch the video!) and I will show you just how quickly these came together.
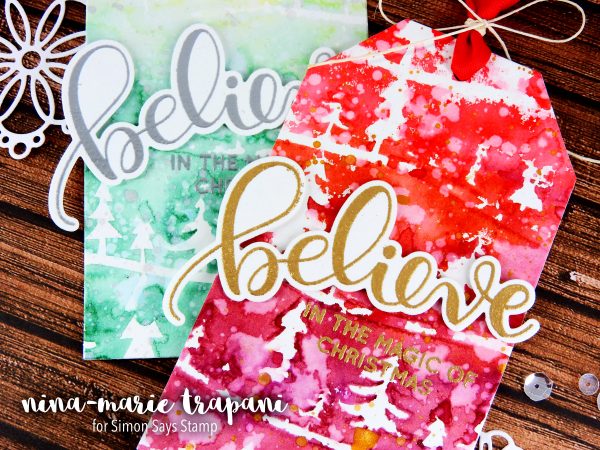
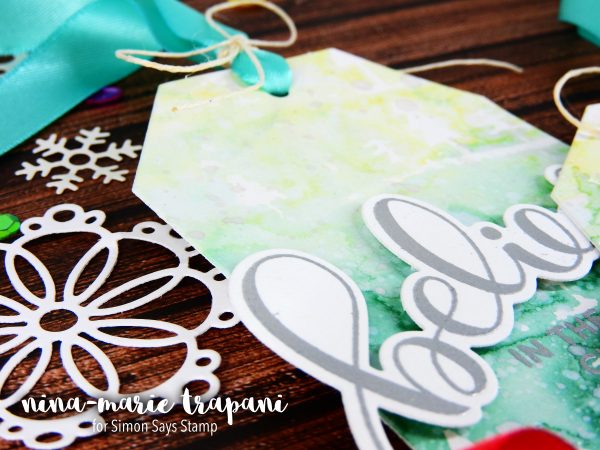
I used the Hero Arts Forest Scene stencil paired with Distress Inks to create the backgrounds for my tags; by applying three different shades of inks through the stencil, I was able to create a variegated color palette that adds instant interest to the tag (the tags are die cut using the Nesting Tags dies from Hero Arts). To further texturize the tags, I added water splatters and flicks of the Finetec gold watercolors.
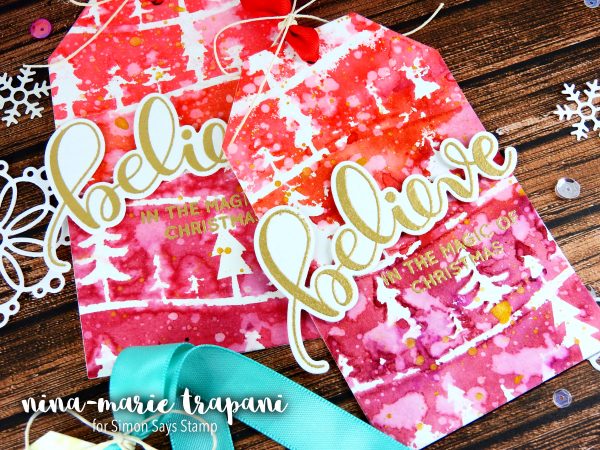
The sentiments are created using the Simon Says Stamp Believe stamp and die sets. I LOVE that script believe, it is just gorgeous! I heat embossed the believe sentiment with embossing powder and die cut it with the coordinating outline die; I then popped it up off of the tag, above where the rest of the sentiment is heat embossed directly onto the tag.
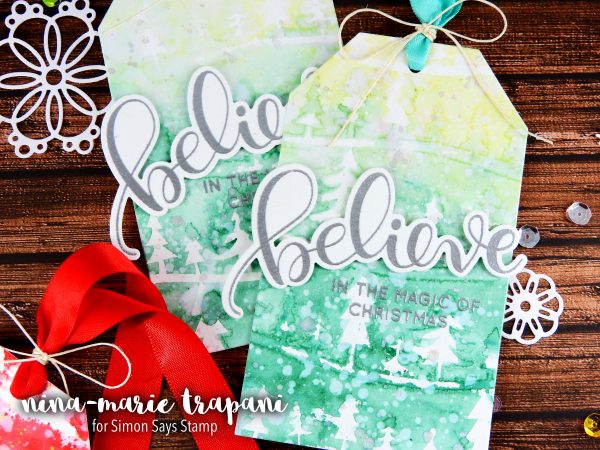
Color palettes are so much fun to come up with… for these tags I chose Festive Berries, Fired Brick and Seedless Preserves for the red tags; and then I used Shabby Shutters, Evergreen Bough and Pine Needles for the green tags. I find that because this stencil is so delicate, it is best to dab onto the stencil instead of brushing over it as you might normally do with a stencil (unless you were to use a temporary adhesive on the back of the stencil to adhere it down to the paper).
The brush I used to apply the Distress Inks was an inexpensive craft foam brush (mine was about 2 inches wide, found at my local craft store). I dampened the brush and squeezed out any excess water before bringing it over to the stencil-covered paper; remember that the more water you use with stencils, the more it will run… so if you want a less defined image, use more water. If you want something more crisp, use less.
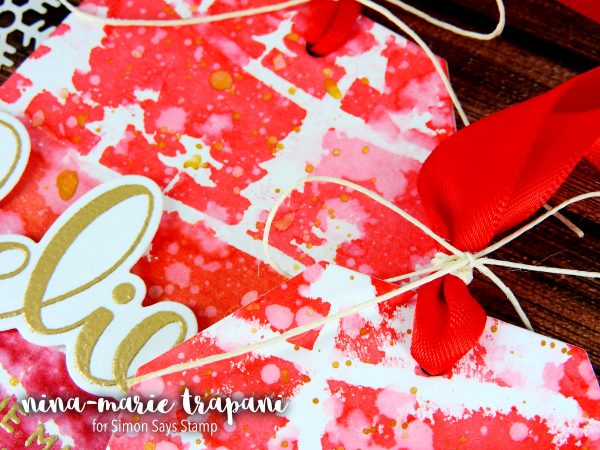
To finish things off, I tied a bit of ribbon and hemp around the tops of tags; to prevent the ribbons from fraying, I used the We R Memory Keepers Ribbon Cutter to seal the ends. This tool is so handy for giving your ribbons a nice, professional look! I’ll show you in the video how I used this tool to trim the ribbons down, so make sure to check that out if you are interested!

In all, these tags took very little time to put together; all four took me less than an hour and I could have made a bunch more in that same amount of time, because I was working in assembly-line style. So I hope this has given you ideas and encouraged you to think that just because something might be last minute, does not mean you have to sacrifice on beauty!
WATCH THE VIDEO
SUPPLIES


Spring Card from Christmas Stamps
Hi friends! Happy Sunday! The fabulous and talented Debby Hughes is back for the last time in 2016 and showing us some fun ways to make the most of our Christmas stamps all year long! Read on!
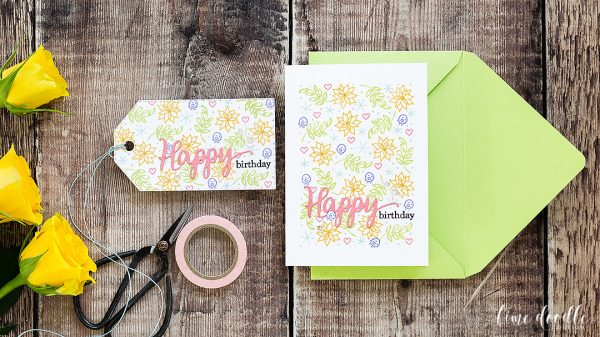
Hello it’s Debby here today with a Spring birthday card made with Christmas stamps to stretch my Holiday supplies into the New Year. Often among the Santa’s and reindeer of Christmas stamp sets are a lot of small images that can be used all year round. Today I pulled out a poinsettia from Advent Holiday Icons, a leaf sprig from Christmas Essentials, a berry from Winter Flowers and a heart + star burst images from the Merry & Bright set. I combined these with a ‘Happy’ die from Happy Holidays and ‘birthday’ from the You Matter stamp set.
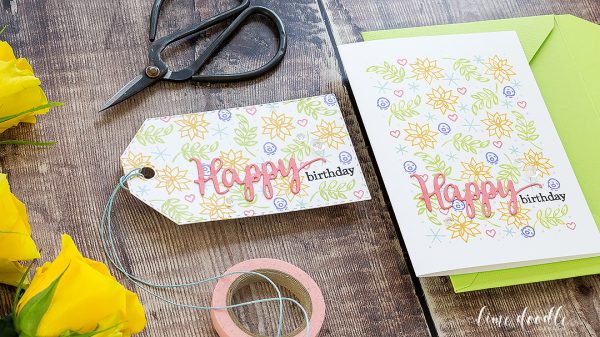
I started out by scoring a side folding white card base and then used a Stitched Rectangle die to draw a pencil rectangle of the front of the card. I then stamped the ‘birthday’ in Onyx Black ink against the pencil line and proceeded to stamp the rest of the images around the word and contained within the pencil rectangle. To make sure this card resembled nothing like a Holiday card I used a bright mix of inks: Teeny Bikini, Hydrangea, Lake Shores, Jelly Bean and Sunshine. When all the stamping was complete I erased the pencil lines and then added the ‘Happy’ die cut from card inked in Teeny Bikini. This ensured the pink matched perfectly with the hearts I’d already stamped. I added dots with a glitter pen to fill in any larger areas and a couple of clear sequins to embellish.
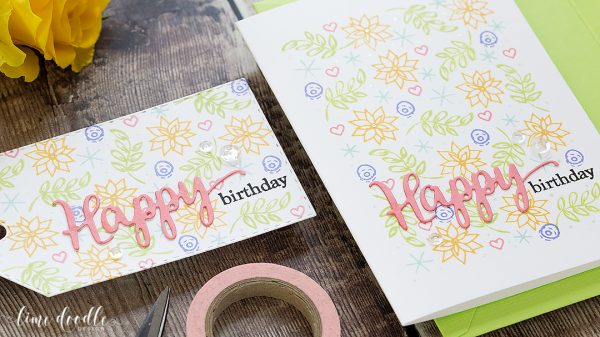
While all my supplies were still out I quickly repeated the design on another piece of card and cut with the Stitched Dress Up Tag to create a matching tag.
This is my last post on the Simon blog for 2016 I want to wish everyone the happiest of Holidays and a creative New Year and I will see you all again in 2017!
Watch the video:
Supplies:
 |
 |
 |
 |
 |
 |
 |
 |
 |
 |
 |
 |
 |
 |
 |
 |
 |
 |
 |
 |
 |
 |
 |
 |
 |
Thanks so much for reading today, and thanks to Debby for being our guest!

Blog Candy Alert!! Follow our blog via email and comment on this post for a chance to win a special blog candy!
Weekender with Wanda – Christmas Thank You Cards with Tim Holtz Products!

Hi everyone! Happy weekend! And happy week before Christmas! Welcome back to the latest edition of Weekender with Wanda here on the Simon Says Stamp Blog! Is your shopping all done? Cards mailed? I still have a few things left to do and still need to go to the post office (I have been procrastinating on that) but otherwise I’m ready! I’ve been enjoying the season, drinking hot chocolate and driving around looking at Christmas lights. Christmas light hunting is one of my fav things to do this time of year. People are so creative and festive! My husband is such a good sport driving me all around. He even installed battery operated Christmas lights on my car!
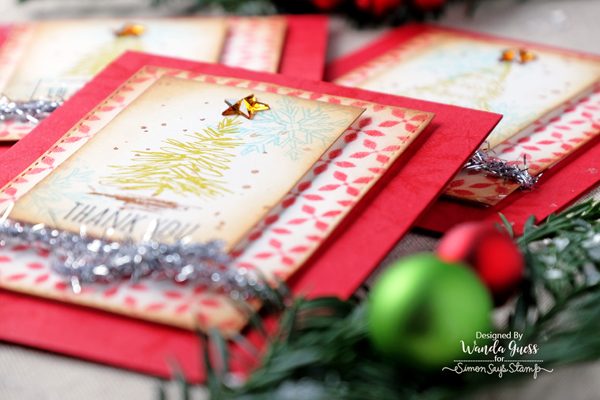
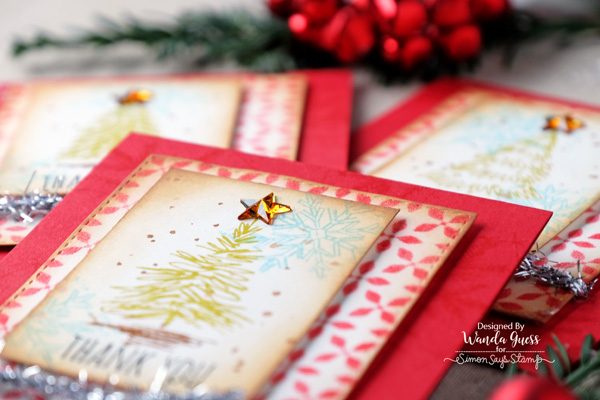
I think it’s safe to say that we are winding down on our holiday crafting and maybe looking ahead to the new year. One of the things I like to do every year before I put away all of my Christmas stamps and supplies is make Thank You cards! It’s so nice to have some holiday themed Thank You notes on hand to give out if someone invites me over or gives me a present. I am always glad that I made some. Today is my monthly post in which I use supplies from Tim Holtz and Ranger. I used lots of my favorite Tim Holtz stamps and Distress inks and a lovely new stencil to create a set of three cards to share today.
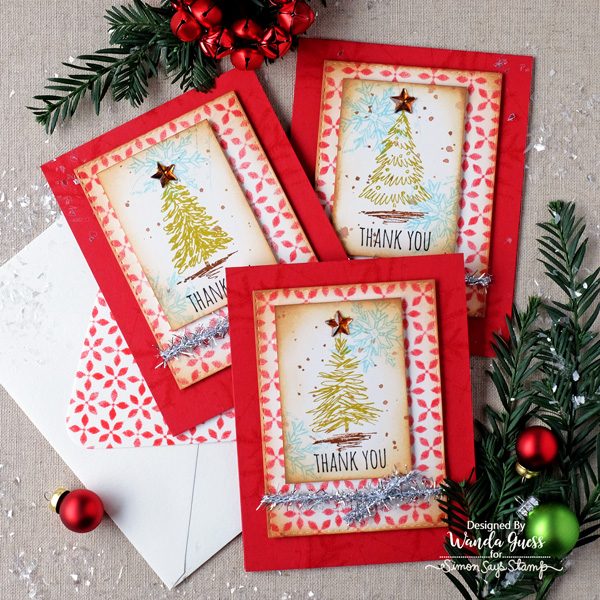
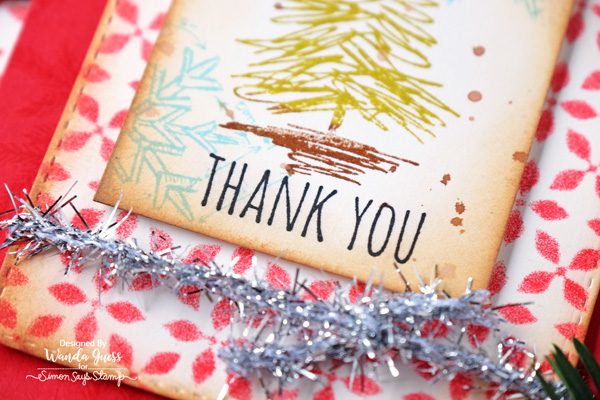
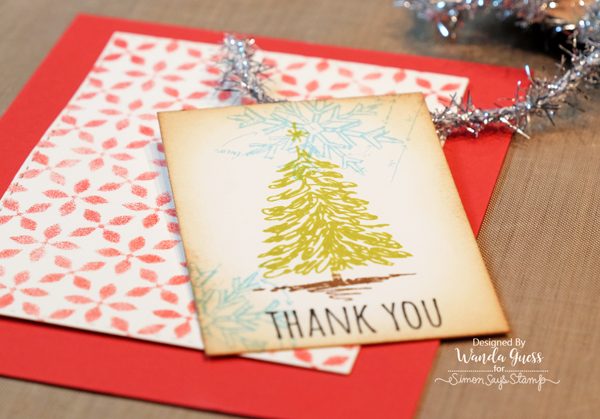
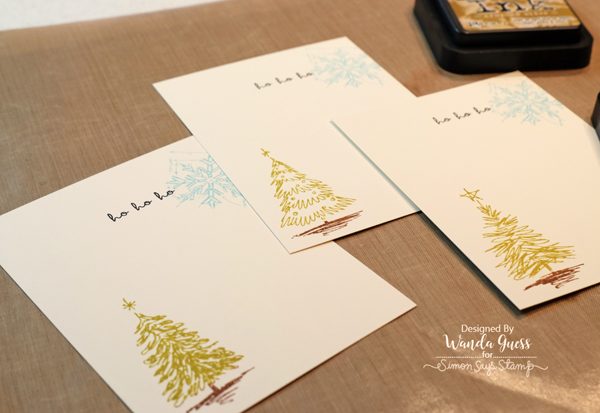
The Tim Holtz Scribbly ChristmasTrees stamp set has beautiful tree stamps that are the perfect size for cards! I used three different trees for my card set. All the other supplies are the same on each card. For the sentiment I used Thank You from the Crazy Talk stamp set. Here is a close up of my stamping layers. The snowflakes are from the Tim Holtz Mini Blueprints stamp set.
The cards have a few layers, but are basically flat for easy mailing. This card layout is a good one for many occasions and a nice way to use your stencils to create background paper layers.
Here is a close up of the layers. I started with a vivid red A2 card base. My stamped and stenciled layers are with cream cardstock for more of a vintage feeling. I’ve inked the edges of the two top layers using Antique Linen and Vintage Photo Distress Inks and a sponge.
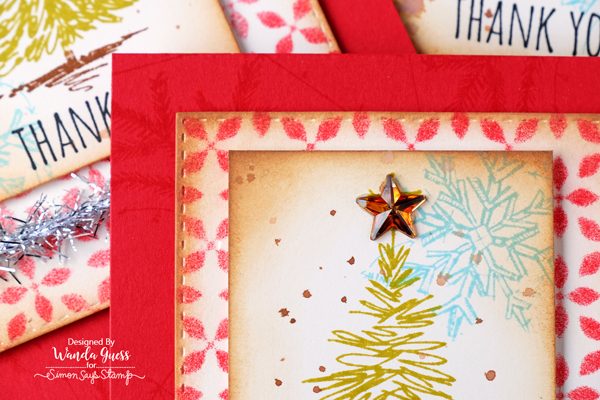
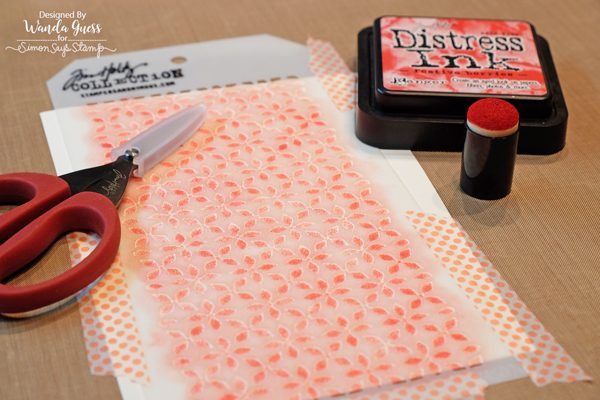
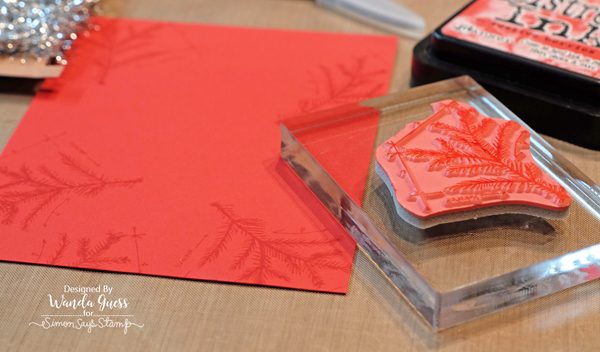
I used a mini sponge dauber and Festive Berries Distress Ink with the gorgeous Nordic Stencil! I used a light touch so that the images would not be completely solid red. I always use washi tape to tape my stencils onto my craft sheet. Makes it a lot easier to get a clean impression.
I stamped the Blueprint Mini Snowflake in Tumbled Glass Distress Ink. My stenciled layer was die cut into a rectangle using the Simon Says Stamp Stitched Rectangles Dies. A strand of shiny tinsel trim completed the vintage notes!
When I was putting my card together, I thought that the red layer seemed like it needed a little something. One trick I use a lot is tone on tone stamping. I did that here by using Festive Berries (red) ink on red cardstock. It gives just that little pop of interest and texture to the card base. I used the pine bough image from Mini Blueprints 7.
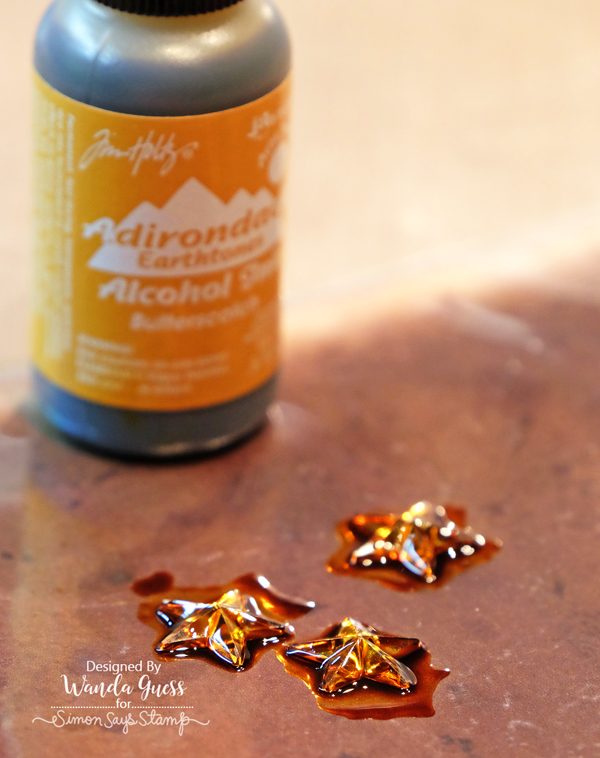
I colored the pretty mirrored stars with Alcohol Ink in Butterscotch. This color is a beautiful vintage-y gold!
These are the insides of the three cards. I matched the trees on the front to the ones inside to tie it all together. Clean and simple, with room to write a greeting or message.
Then I had an idea! Why not stencil the envelopes! Another nice touch to make your project look polished and pretty. This just took a minute – but what a great impact!
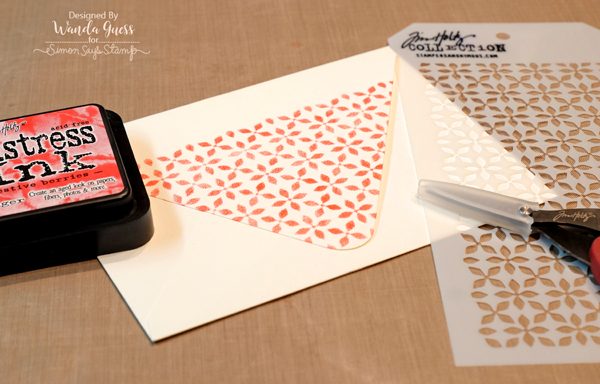
I love that the envelope matches the card! The top two layers are attached to the card base using foam tape. I wrapped the silver tinsel around the stenciled layer before attaching it.

The gold stars are the perfect touch with all that red!

Thanks for stopping by the Simon Says Stamp Blog today! Have a great week! I’ll see you one more time before Christmas is here!
SUPPLIES:
 |
 |
 |
 |
 |
 |
 |
 |
 |
 |
 |
 |
 |
 |
 |
 |
 |
 |
 |
 |
 |
 |
 |
 |
 |
 |
 |
 |
|
|


