Petals & Pallets by Concord & 9th
Hi friends! Happy Thursday! Please welcome back special guest Angie Backman of Concord & 9th! She made this adorable card pictured below with some newer releases from Concord & 9th! Please read on for more information and enjoy!
We have had such fun with our new Petals & Pallets stamp set and dies! We had the trendy pallet art and farmers-market-type crates in mind when we designed the products! We envisioned crates full of beautiful blooms, pallets with words stamped on top and wanted a way to create a little 3D crate to hold gift cards too!
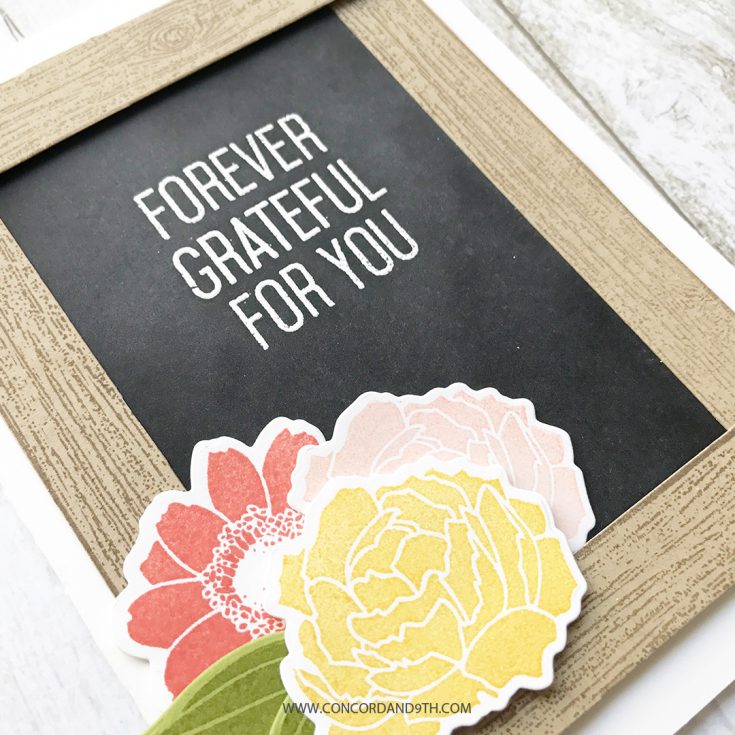
Today we decided to ‘think outside the crate-box’ and we created a chalkboard frame with the wood slats instead.
Here are the steps to create this fun card:
1. Create a card base with your white card stock.
2. Cut black cardstock to 3 3/4” x 4 3/4”.
3. Stamp and die cut the 3 flowers and leaves in your favorite colors.
4. Die cut 2 pallets, and stamp on 4 of the slats with your woodgrain stamps.
5. Trim off 4 of the slats, clipping the little connectors in-between the slats off. Leave two at full size for the sides of the frame. Cut 1” off two of the slats for the top and bottom of the frame.
6. Use your embossing powder tool on the black cardstock before embossing. Rather than wipe away the chalk residue, we left it on to give it more of a used chalkboard feel. Build your sentiment of choice (there are many to mix & match), stamp with white pigment ink, sprinkle with white embossing powder and heat set.
7. Adhere the black card stock to the front of the card base.
8. Adhere the side frames with tape adhesive. Attach the top and bottom frame pieces, and the flowers/leaves by using some foam tape to give it a little dimension.
It was pretty quick & easy to create!
Check out all the different samples on Simon Says Stamp HERE to see how to use the flowers in bunches, single flowers, pallets & crates too! We also have two videos you can watch. THIS VIDEO is instructional showing how to use the pallet dies with stamps. THIS VIDEO shows how to make a 3D crate & tissue paper flower and include a tasty treat for someone special!
We hope this has inspired you and given you even more ideas for Petals & Pallets stamps and dies! We love seeing what you create so be sure to #concordand9th. We also love working with Simon Says Stamp and really appreciate being highlighted on their blog today!
HAPPY CRAFTING!
❤️ Angie

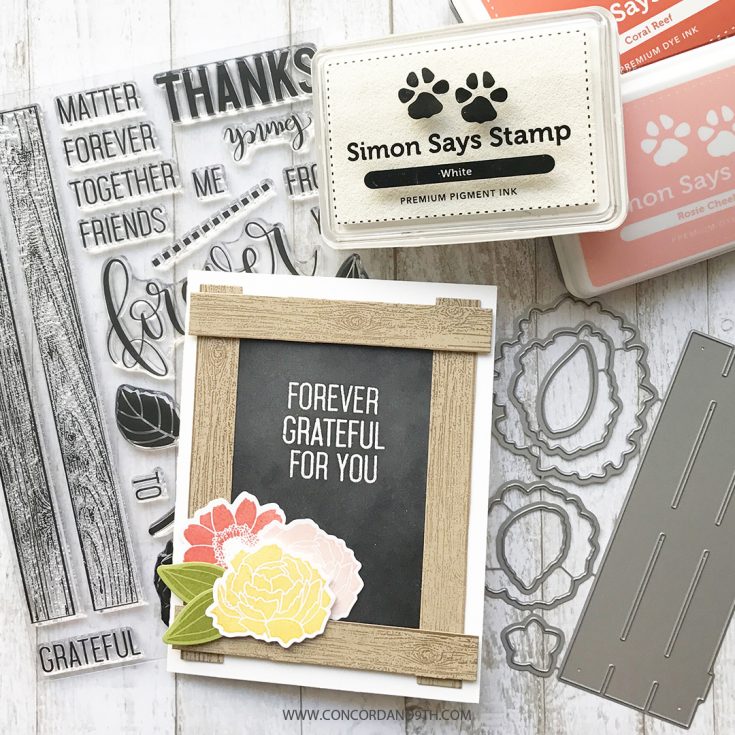
SUPPLIES:
 |
 |
 |
 |
 |
 |
 |
 |
 |
 |
 |
 |
 |
 |
 |
 |
 |
 |
 |
 |
Thanks for reading today and thanks to Angie for being our guest!

Blog Candy Alert!! Follow our blog via email and comment on this post for a chance to win a special blog candy!
Rejoice with Yoonsun: Sending Warm Hugs
Hi friends! Happy Wednesday! Please welcome back Yoonsun Hur for our special monthly series titled “Rejoice with Yoonsun“. We’re back this July for a delightfully Summer card. Please read on for more information and enjoy!
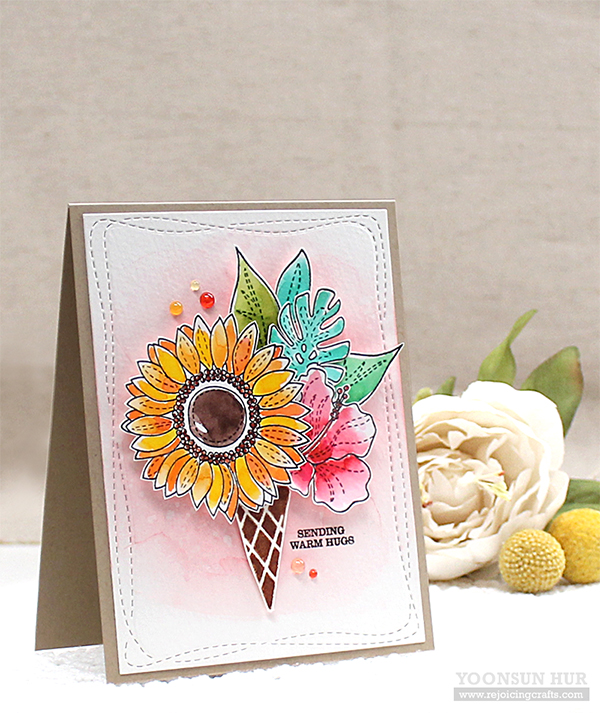
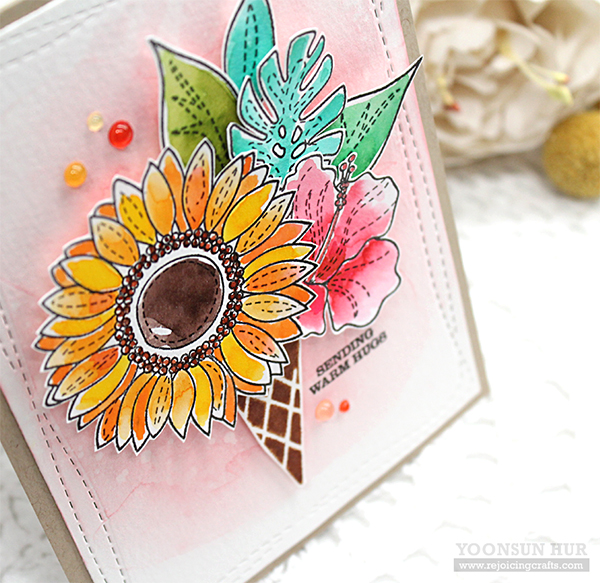
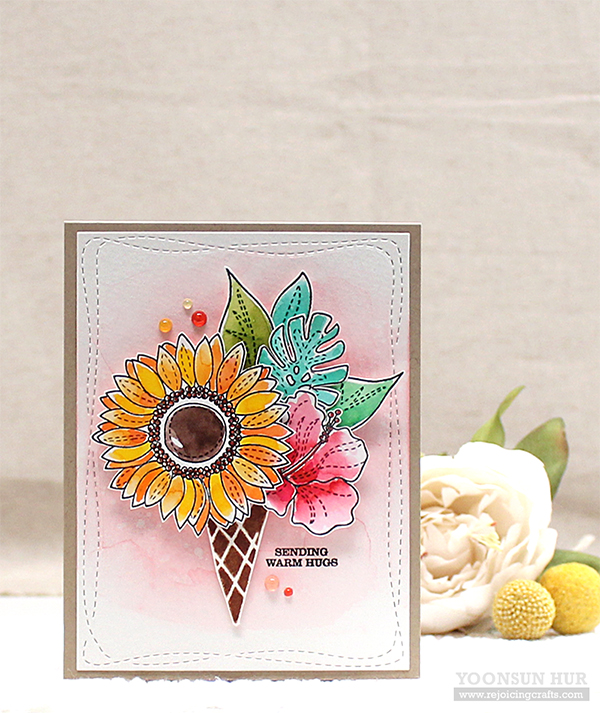
Hello crafty friends, it’s Yoonsun here with the third “Rejoice with Yoonsun” series!! Today I will be sharing with you flower ice cream cone card with recently released Summer Flower Stamp Set.
I started by stamping flowers and leaves from the Summer Flower set on watercolor paper using VersaFine Onyx Black, watercolored them with Peerless watercolors and water brush, and then fussy cut them. Next, I stamped ice cream cone from the Cone Building set with Vintage Photo Distress ink, then fussy cut it as well. For the background, I ink blended on wonky stitched rectangle watercolor panel with Tattered Rose Distress ink and mini ink blending tool, added water droplets. Once the panel was dry, I stamped the sentiment from the Oh Happy Day set on the bottom right corner of the inked panel in black pigment ink. I mounted all elements as shown to top-folded kraft card base using foam tape first, and then added some Nuvo Jewel Drops.
Supplies:
 |
 |
 |
 |
 |
 |
 |
 |
 |
 |
 |
 |
 |
|
|
|
 |
 |
|
Thanks for reading today, and thanks to Yoonsun for being our guest!
Blog Candy Alert!! Follow our blog via email and comment on this post for a chance to win a special blog candy!
Congrats! Blog Candy Winners!
From: Flora & Fauna New Summer Release!: Marcia Scantlin!
From: Studio Monday with Nina-Marie: Zig Marker Comparison: Cindy Aguirre!
From: Take Chances Journal Page: Becky Hazen!
From: Art Journal: Alcohol Inks with Shari Carroll: Elena Laskari!
From: Color Coordinates: Soft Colors for Year Round Cardmaking: Lynne Jardine!
From: Yippee for Yana: Dry Embossing with a Stencil: Berina Febin!
From: What Would Kelly Make: 9th in the series!: Sabrina Radican!
From: Pop of Background Color: Sandra Merritt!
Please email [email protected] with your mailing address (if applicable), the name of the blog you won from, and the prize you won to claim your prize!
Flora & Fauna New Summer Release!
Hi friends! Happy Tuesday, and Happy 4th of July! We have some awesome Summer themed inspiration from Flora & Fauna today! Read on and enjoy!
This is Lara from Flora & Fauna and I’m so excited to be here guest blogging again for Simon Says Stamp! We have a new line of summer images out so we wanted to show everyone some fun techniques we’ve been playing with lately.
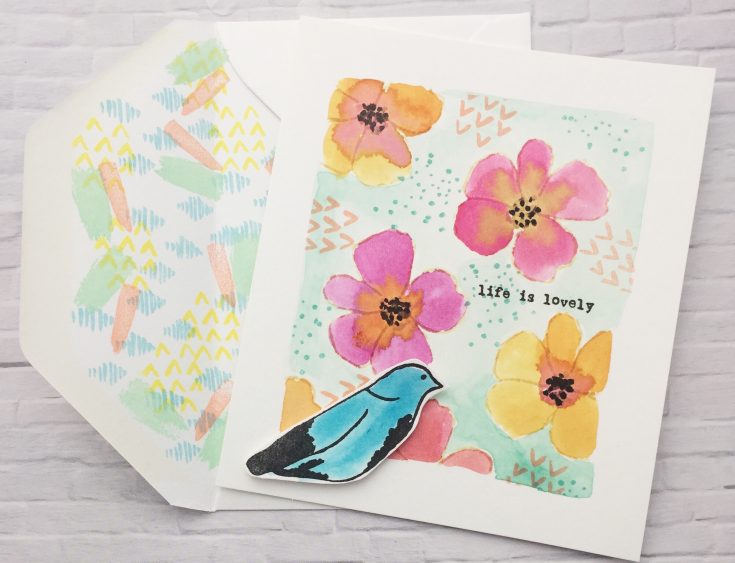
The first card is using watercolor with our Life is Lovely clear set. For this card we first created a masked frame and then stamped the flowers using Distress Ink in Antique Linen for a light outline. We love this technique because it allows you to use a stamp but since the ink is so light it looks like you are watercoloring on your own. We then watercolored the flowers using Distress Ink Spiced Marmalade, Picked Raspberry, and Mustard Seed. Next we stamped the bird in Black and colored it in with Mermaid Lagoon and cut it out and attached it to the card. We then used Distressed Oxide Peacock Feathers to color in the background behind the flowers. Finally to complete the card we stamped background images from our Texture and Texture 2 Clear set to add more interest.
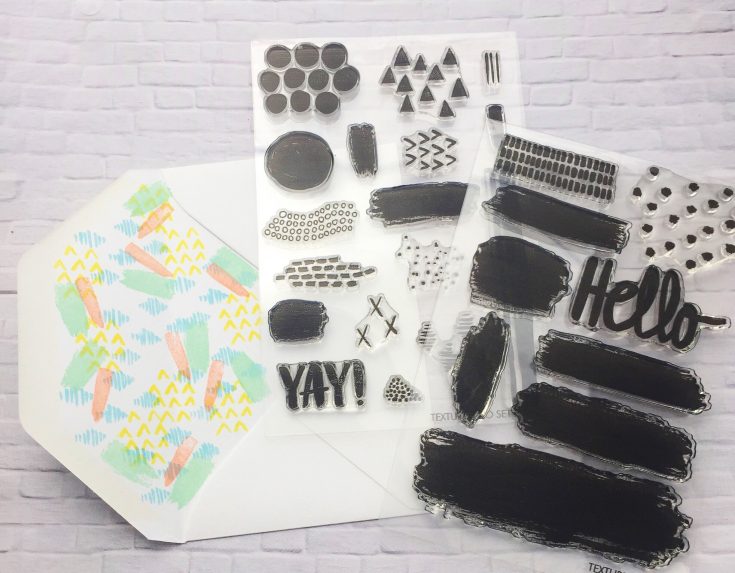
Another favorite technique we have is using our texture sets to create backgrounds that mimic watercolor. We showed this concept on the envelope for this card. To create this look we just stamped the different watercolor looking blocks and patterns for an easy fun background look. Check out our Instagram at florafaunaclear for more examples where we’ve used this technique as we like to do it a lot!
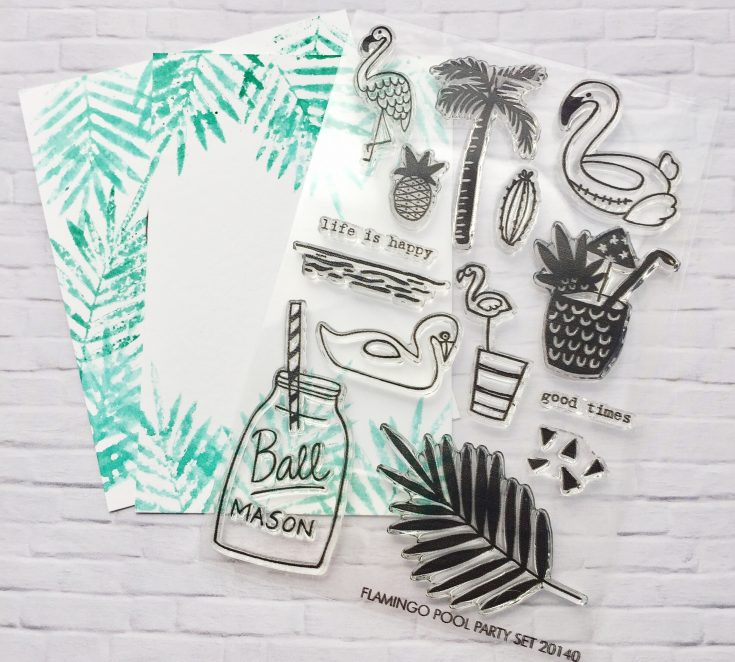
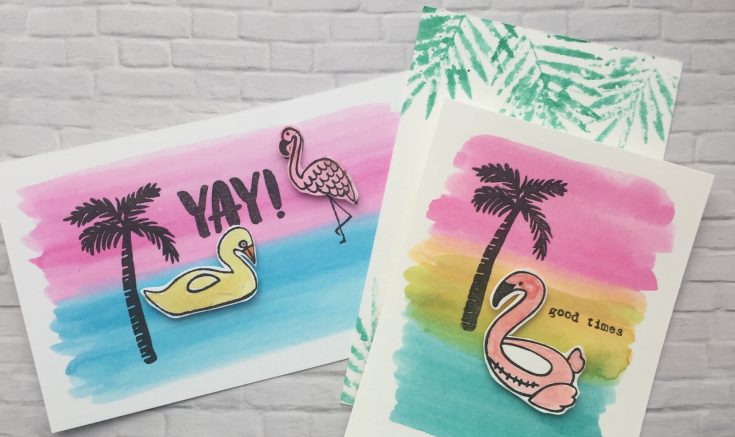
The other cards we are showing using watercolor are perfect for summer and showcase our new Flamingo Pool Party set. For these cards we stamped the flamingo using Distress Oxide ink in Black and cut it out for a 3-D effect. We then watercolored the background using Distress Ink Picked Raspberry, Mustard Seed, and Peacock Feathers. To finish we stamped the palm tree and good times sentiment on top.
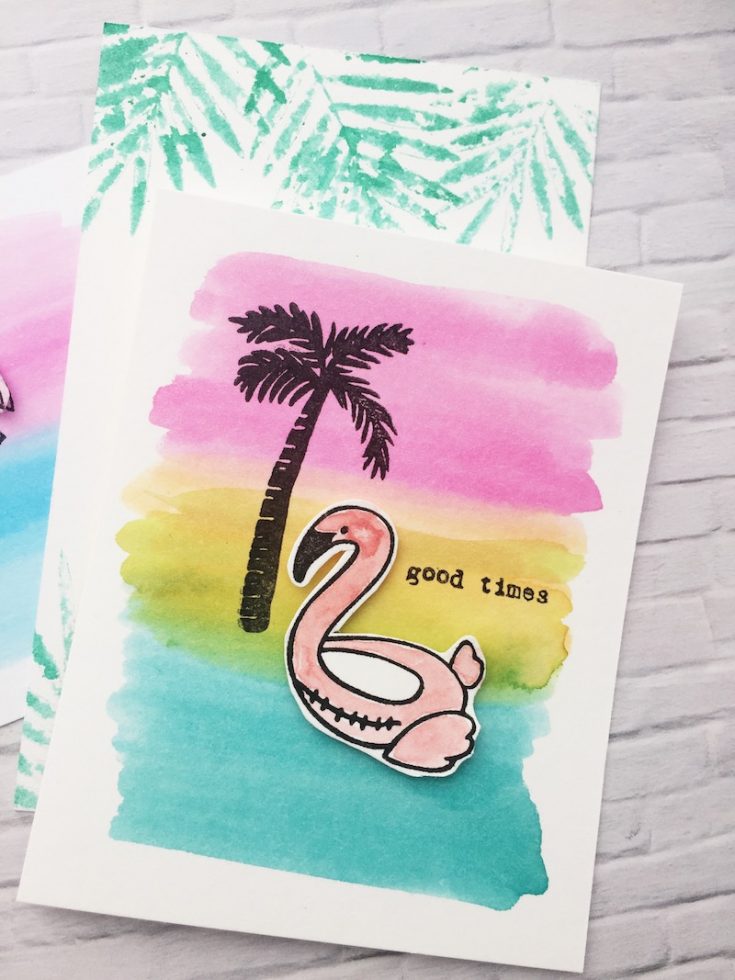
For the envelope on this one we used the Palm Branch and stamped it in Distress Ink Lucky Clover and then misted the back with water before stamping it on the envelope for another take on watercolor. We love watercolor and there are so many ways to incorporate that look into your summer cards.
SUPPLIES:
 |
 |
 |
 |
 |
 |
 |
 |
 |
 |
 |
 |
 |
 |
Thanks for reading today, and thanks to Lara for being our guest!
Blog Candy Alert!! Follow our blog via email and comment on this post for a chance to win a special blog candy!


