Challenge: We Can See Clearly

Hi all and welcome to another week on the Simon Says Stamp Monday Challenge
Thank you for joining us for the Food And Drink Challenge and we hope you will all join us again this week too.
This week the theme is
WE CAN SEE CLEARLY
Use acetate, vellum, or anything you can think of that is a little transparent or you can use your imagination and think of a different meaning!
As always Simon Says Stamp will be giving away $50 voucher to shop at the fabulous Simon Says Stamp Store

Remember to click on the person’s name to see all of the details of how we made these creations and leave these wonderful girls some comment love

This is Amber’s last week with us in the Spotlight. It has been a pleasure having you along with us and we would like to thank you for all of your fabulous creations over the past few weeks!
Amber decided to make a masculine shaker card for her son’s birthday.
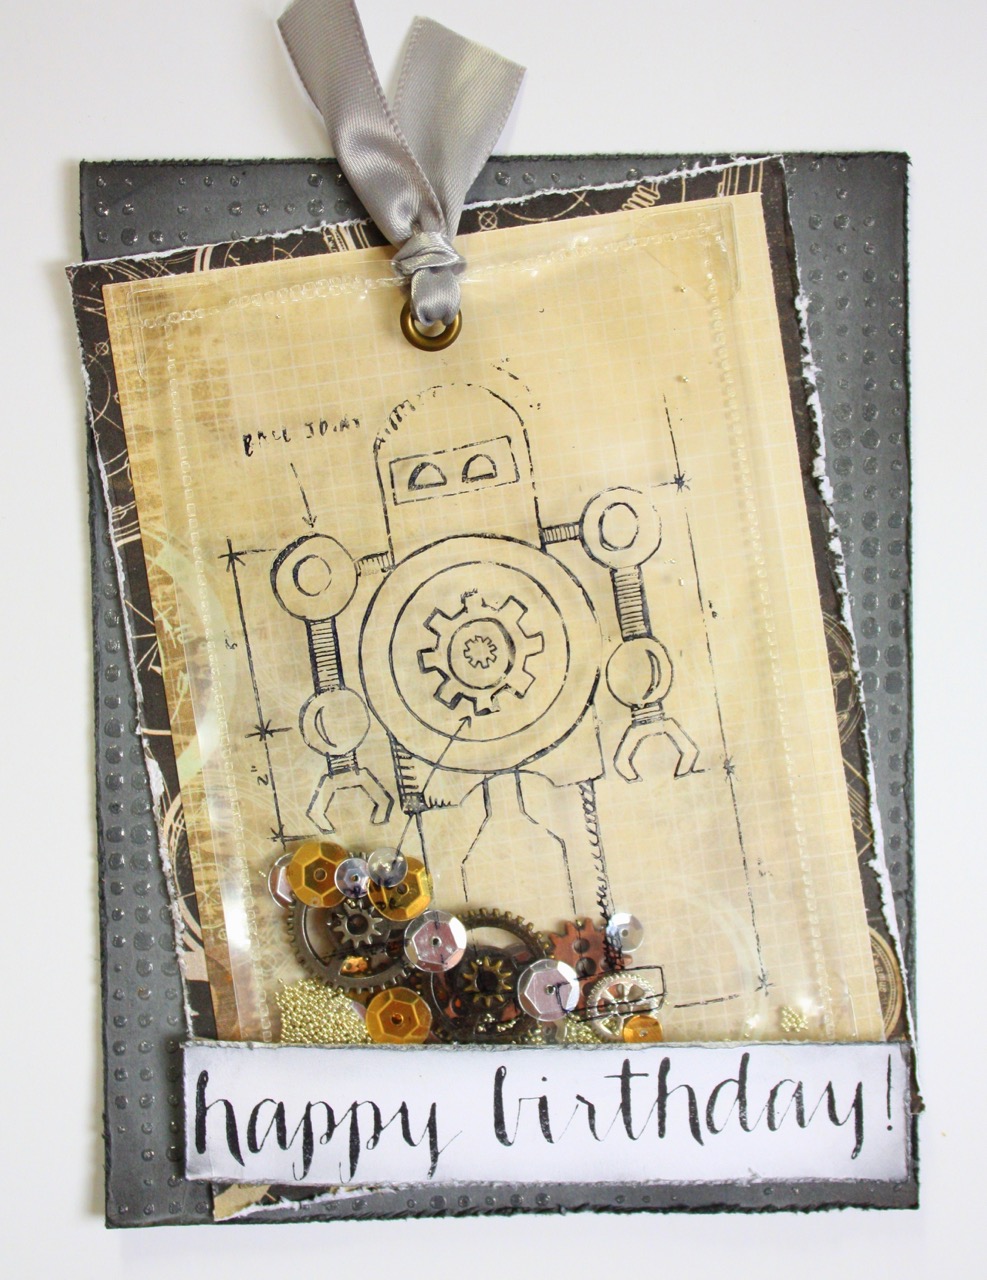
To give my card base some texture, I applied translucent embossing paste through the Dot Fade stencil. I layered a couple papers from the Time Machine 6×6 paper pad. I made a pocket using a page protector and the Fuse tool, stamped a robot from Robots Blueprints on it, stuffed it with mini gears, sequins, and mini beads. I wanted the shaker portion to be used as a bookmark, so I added an eyelet and ribbon to the top. And then to make it easy to remove from the card, I attached the shaker using clear photo corners. And finally, the sentiment is from Friendship Messages.
Andrea added some Spring-ready vellum butterflies to her happy-colored card.
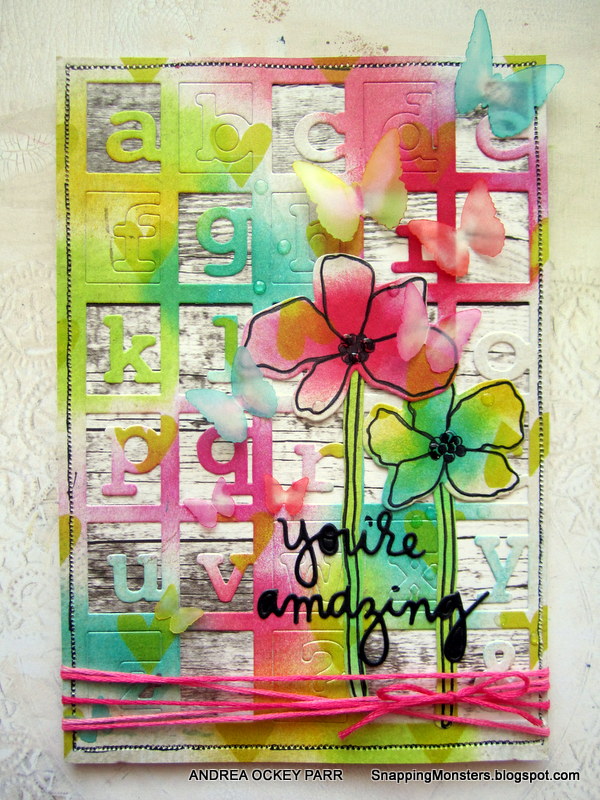
One die set that I absolutely adore is Alpha Blocks from our very own Simon Says Stamp. The great thing about it is that all of the letters come together on one die, so it also works fabulously well as a card background, which is how I used it here. To keep the Simon Says Stamp roll going, I used the You’re Amazing die for the sentiment. I used Simon’s Watercolor Friendly Flowers (stamps and dies) for the main flower image.
Anna-Karin started out planning to make a tag, and ended up with a necklace instead.
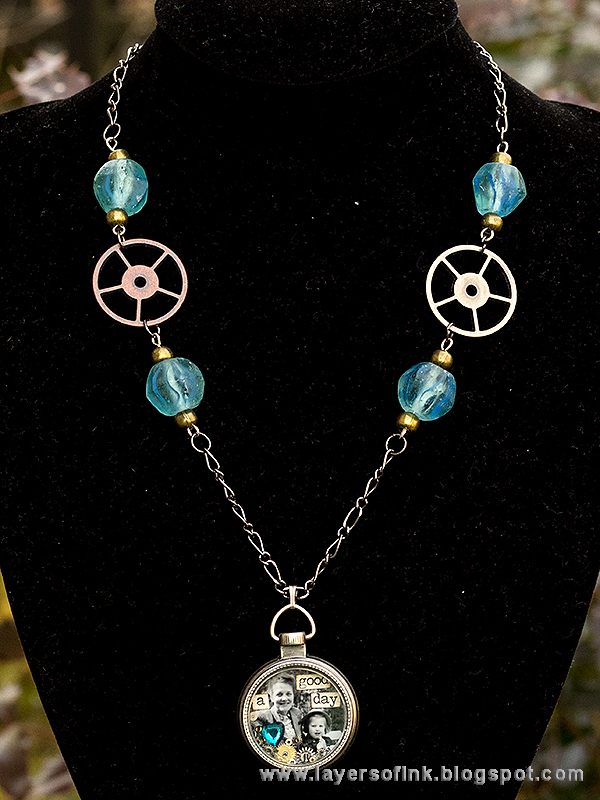
I was planning a totally different project when I came upon Tim Holtz Mini Pocket Watches, and changed my mind. The front of the watches are glass, which is my clear element. An photo of my grandmother and my mom was glued inside the watch, as well as a Mirrored Heart and a Small Talk sentiment. I also added two Sprocket Gears to the necklace, to fit with the watch theme.
Barbara thinks that it’s the perfect occasion for her to try for the first time a new stuff: ICE RESIN!
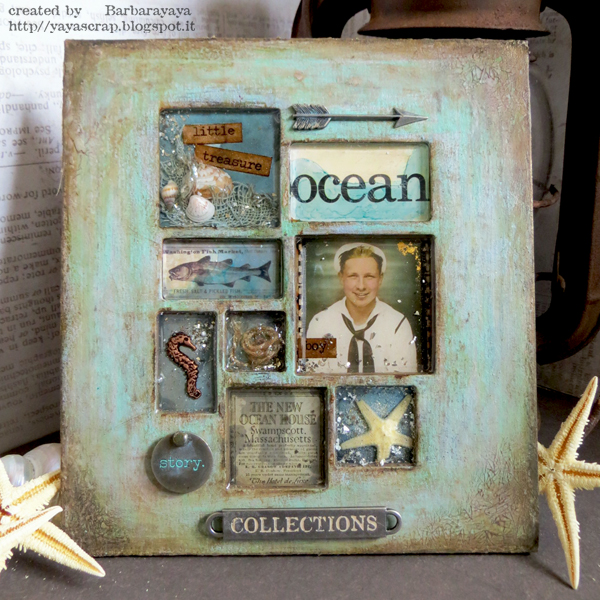
When I read the theme of this challenge, immediately I thought to try for the first time my new ICE RESIN! Now that I tried it I fell in love! My creative world is made of paper and colors and that’s why I decided to use Ice Resin creating a composition that should seem just emerged from the ocean ! I cut my frame with new Tim Holtz Sizzix MOSAIC Bigz Die and I tried to give to my project a worn look, using some Distress paints and the new Distress Crayons to highlight the corners. A touch of Crackle Paint ROCK CANDY and Ice Resin to make it seem suspended the little treasures found in the sea!
With wedding season fast approaching Cathie decided to make these elegant favor bags
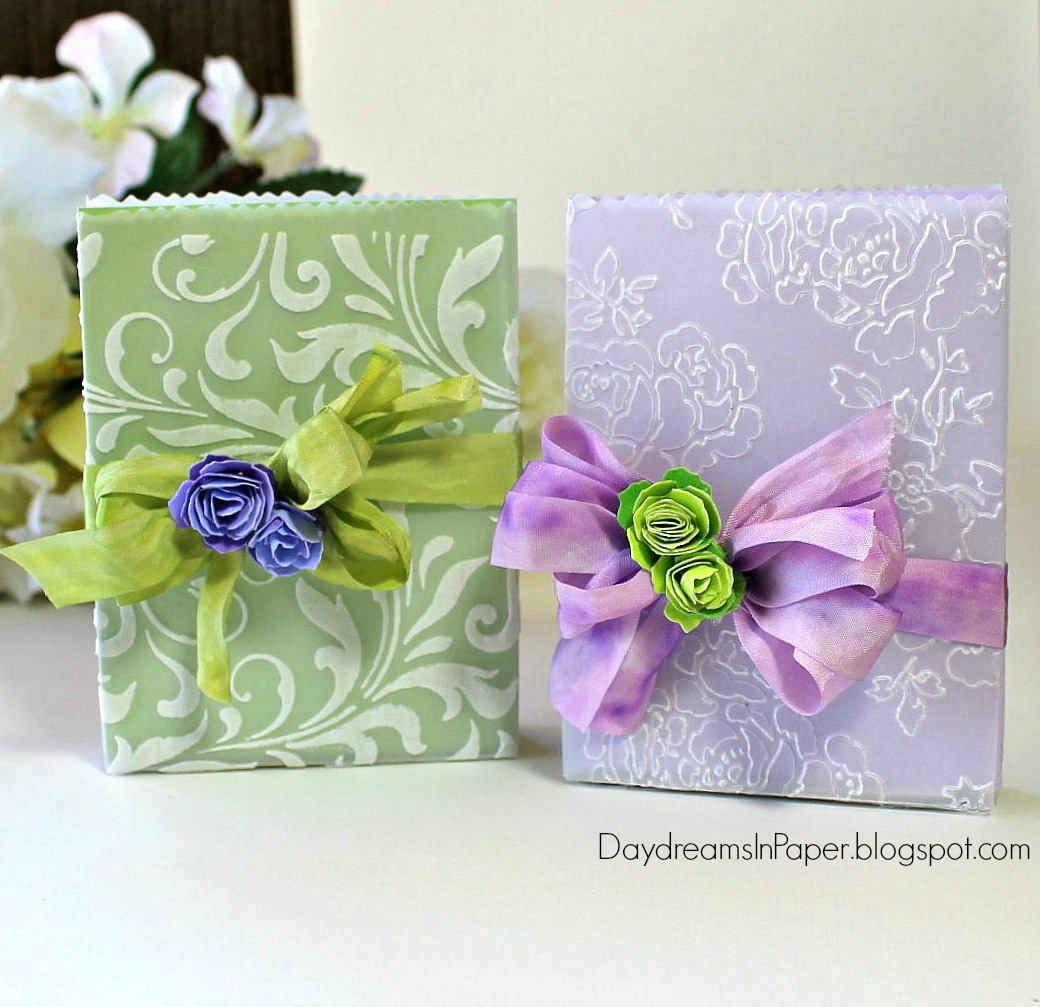
I decided to make these elegant favor bags with the Sizzix In The Bag die using vellum. I used the Tim Holtz Flourish stencil and beautiful embossing folder called Rosa from Cuttlebug to give my bags the texture and elegance they needed for the special occasion. I then added some seam binding tinted with distress markers and topped off the bows with a couple roses made from the Tiny Tattered Florals die cut set.
Cheiron added some clear idea-ology pieces to her mosaic…
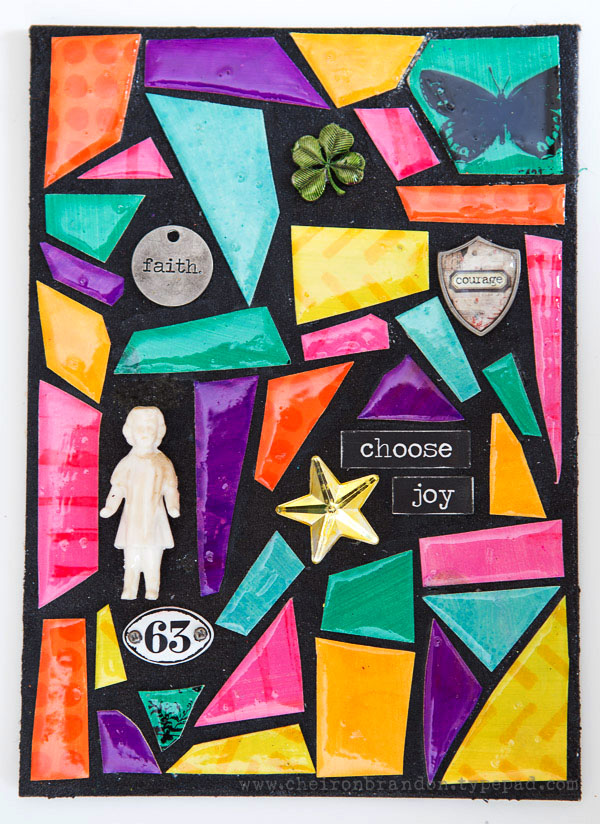
I have been wanting to play with the Tim Holtz Paper Mosaic kit for a while now. I decided to make my grout black with the help of some Black Soot Distress Paint and add painted tag pieces that I painted with Distress Paints and cut out. I added a some clear Mirrored Stars (colored with alcohol ink), a shield charm, a mini plaquette, salvaged doll and a charm from the Souvenir adornments.
Emma clearly knew what she wanted to create this week!
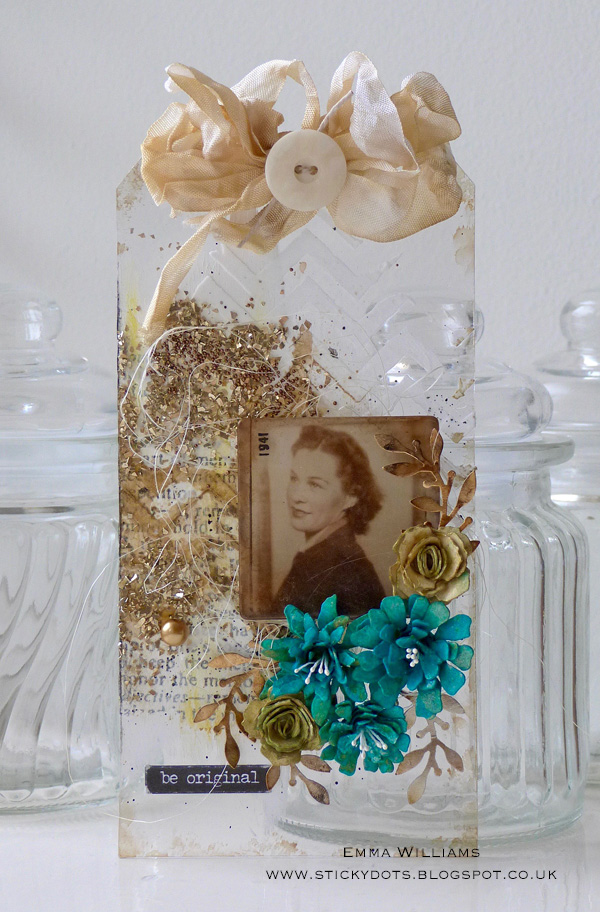
I really don’t use acetate enough in my crafting and when I do, I usually use it for embellishments of wings but with this challenge, I decided to use it as my base and die cut a tag from a thick piece of acetate. I added texture with Ranger Texture Paste and glass glitter before attaching a vintage PhotoBooth image behind a fragment finding and layering it onto the tag, together with some tiny tattered florals.
Kath made a journal/planner for a friend who is a keen gardener
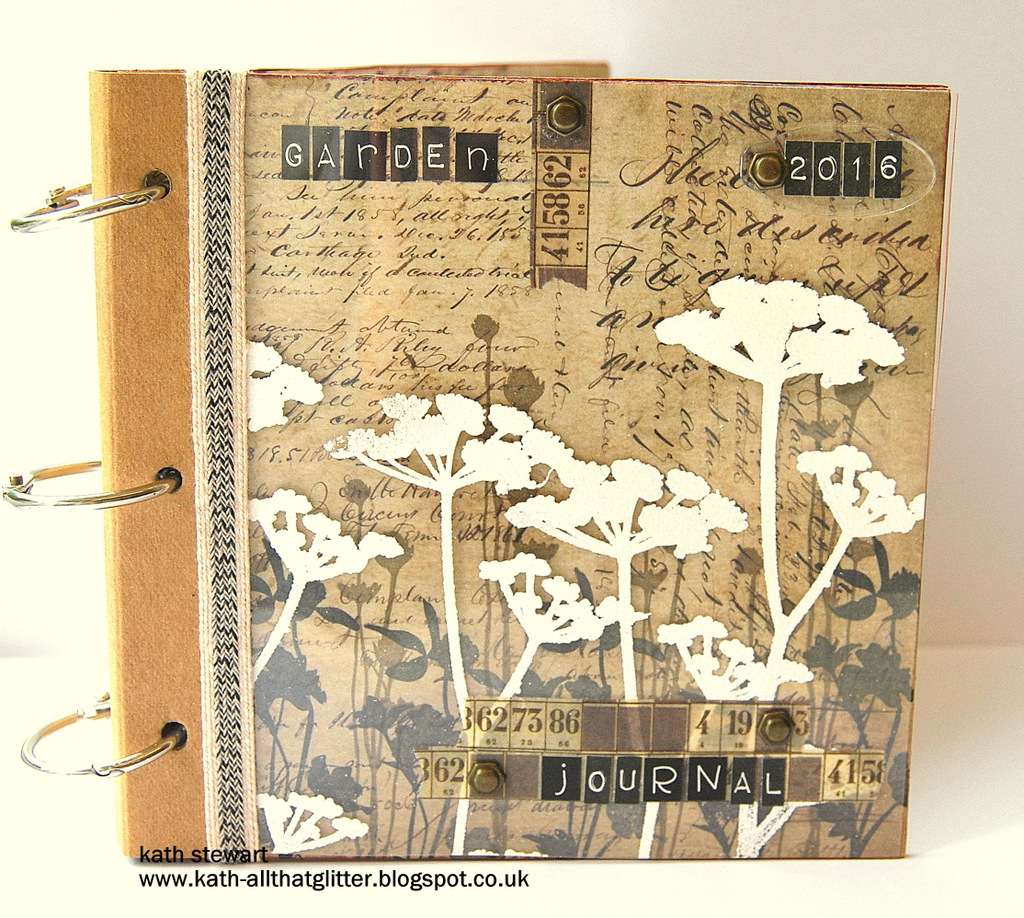
I used the Tim Holtz Idea-ology12x12 Dapper Stash Pad to decorate my journal stamping the background with Stampers Anonymous Wildflowers inked with Black Archival and Hero Arts Cup O’ Joe ink pads and then made a wipeable cover for those mucky green fingers from Heat Resistant Acetate. I stamped the Wildflower image with Versamark Embossing Ink on to the acetate, sprinkled with Simon Says Stamp White Embossing Powder and heat set, adding Dapper Design Tape, Label Letters and Hex Fasteners. I made a spine for the journal from Idea-ology Substrate Sheets and added Naturals Black and Cream Trimmings.
Lols took the ‘We Can See Clearly’ quite literally!
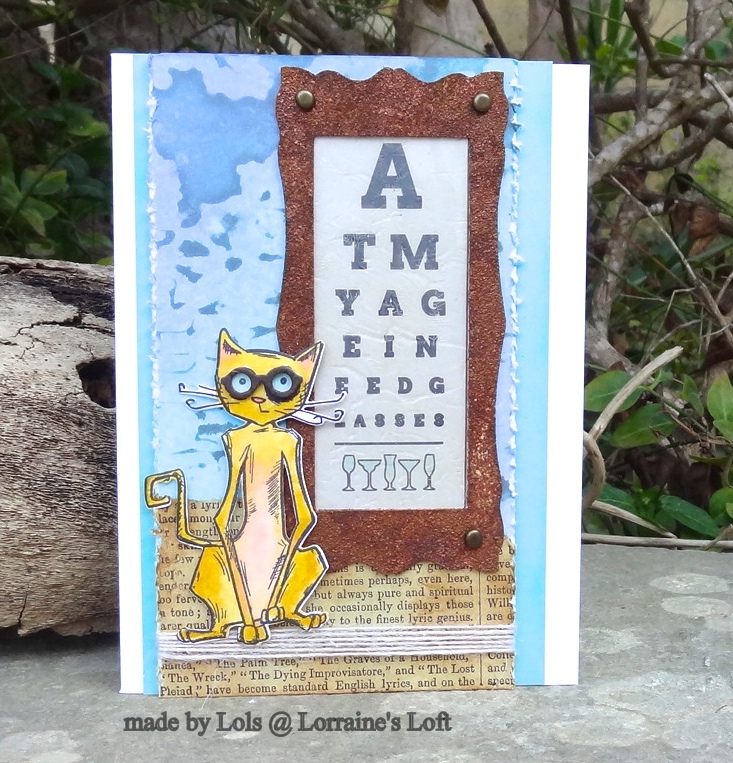
I have recently been for an eye test and I have a cat who is blind in one eye, these things combined gave me the inspiration for this card. As you have probably gathered that I love the Crazy Cats and I made his glasses using a Mini Bird Crazy and Things Die Set. The eye test and frame were printed and cut on a Silhouette Cameo. I distress the frame using Vintage Photo Ink and Powder to create a rusty look and texture.
Macarena found her inspiration in the Artful Flowers stamp set.

I stamped and cut lots of the flowers to create a cascade of delicate vellum blooms. The background was stamped with some elements from Bo Bunny stamps set and covered with white Gesso and treated wiht a thin layer of it throught the Woodgrain Stencil randomly. Then colored very smoothly with light distress inks and covered with another thin layer of gesso. I wanted the bacground to be very light and pastel.After that I put all the flowers with 3D foam and stamped some words with Flights of Fancy stamp.
Maura thinks it’s all about a clear fashion sense.
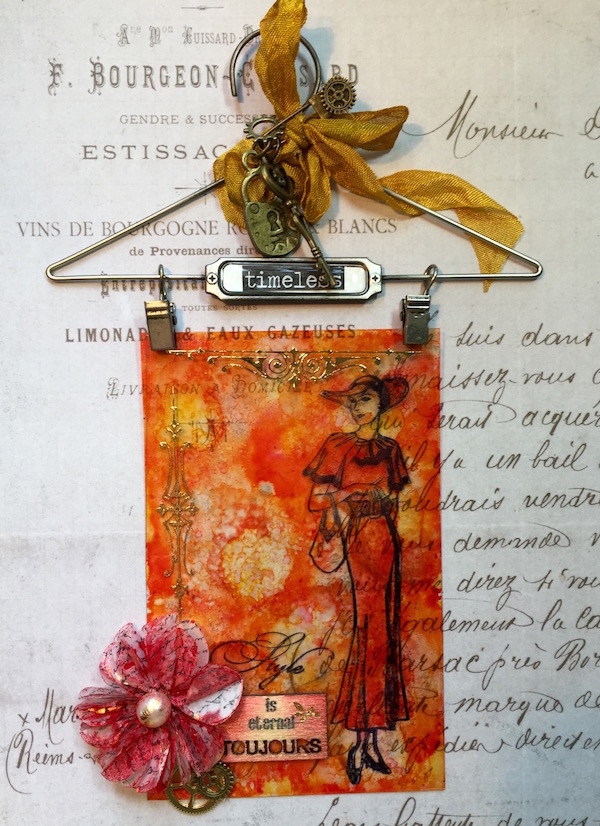
First of all, let me say I am more likely to buy art supplies than clothes, and now that I think about it, maybe that is why I am drawn to timeless fashions. The 1920’s Chic stamp set by Darkroom Door inspired my project, and I thought the new Tim Holtz Display Hanger was perfect to hang up my fashion statement! Tim’s Gilded Accent Remnant Rubs added a touch of elegance, along with the Juno Dice vellum flower by Prima.
Meihsia created an art journal page with a beautiful spring scene.

Spring is officially here! It’s time to go out and play. On my art journal page, I colored the background with Distress Paints, and created patterns ColorBox Inkpads. The bicycle image was stamped on the transparency film with Tim Holtz Rubber Stamp. Some Prima Prima Flowers embellishment and sentiment stickers were added to decorate the page.
Sandra played around with some heat resistant acetate
I can’t get enough of the Blue-Gold Opal Magic Paint from Prima and the Silicone brush, and used the paint as a base so I could work with some Distress Crayons. I think it’s a bit too smooth, but love the subtle effect. I had some fun with Heat Resistant Acetate and White Embossing powder to embellish my card.
Zoey used Acetate to create wings for her stacked hearts
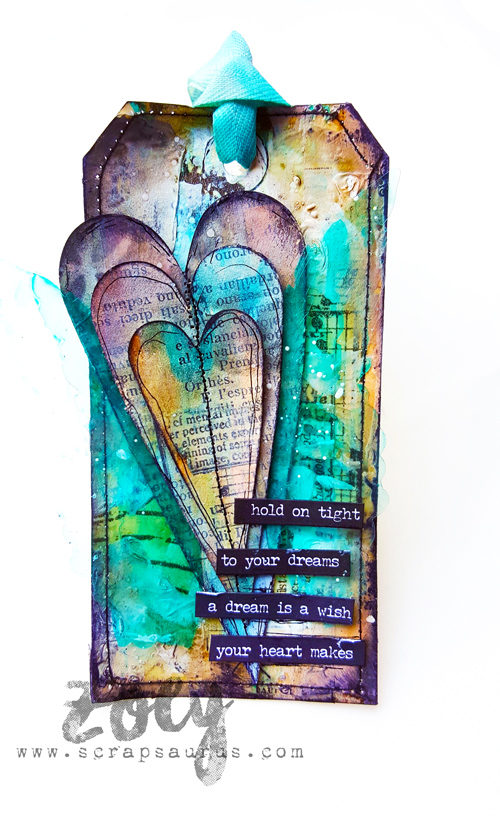
I used the beautiful Tim Holtz Layered Angel Wings to cut through Crafter’s Companion Heat Resistand Acetate that I colored using Alcohol Ink . I covered a Manila tag with Tim Holtz Postale Tissue Wrap and added color and textures. I love how the alcohol ink makes the wings pop! And of course I used Stickers by Tim Holtz to add my sentiment ! They are always perfect!
So now it’s YOUR turn to get out your inks, paints and all things arty and start creating! We are looking forward to seeing what you make!
Follow Simon Says Stamp on Instagram

Do you use Instagram ? If so please add #sssmchallenge so we can see your entries there too!
There are fabulous Give Aways and inspiration from fabulous designers on a daily basis over on the Simon Says Stamp Blog , if you haven’t subscribed by email you may want to so you don’t miss out

You have until Monday 8am Ohio time. 1pm UK time, 2 pm CET to join in
We will also be choosing 3 of our entries to put in the spotlight – a special honor where we talk about why we loved that entry in particular and award a special badge too! For the full rules, read the “challenge rules” posted in the side-bar here on our blog.
Challenge Badge

Spotlight Badge


I love all of the gorgeous spring time colors everyone used!
GREAT creations….super FUN Challenge! :)
AWESOME inspiration ladies, If I don’t make it to each of your blogs, please know that I am impressed by each one!!!!!
I can see clearly the DT did a fabulous job on their creations – thanks for sharing!
Girls, thank you very much for this сhallenge! I have long wanted to make acrylic page, I will join you!
LOVE this challenge!
Thanks for another fabulous challenge and huge thanks to the DT for the awesome inspirations – just beautiful! Karen x
What a fun theme. Hugz