Yippee for Yana: Fave Copic Combos + Bonus Card Idea!
Hi friends! Happy Saturday! I don’t know about you, but I ADORE the Autumn season and this duo of cards by Yana Smakula made me smile big time! Be sure to read on and watch the video for all the details and enjoy!!

Hello, crafters, this is Yana Smakula for Simon Says stamp.com! Welcome back for another Yippee For Yana video!
In today’s video, I am sharing some of my favorite Copic marker colors while making a Fall Thank You card. I also have a bonus project for you, too!
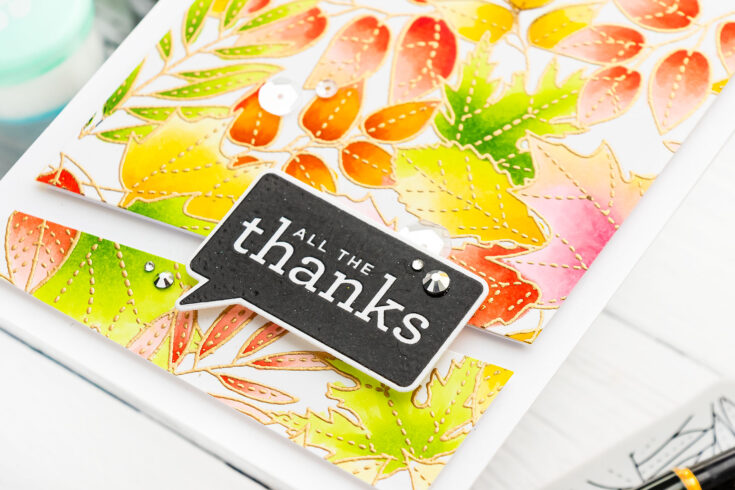
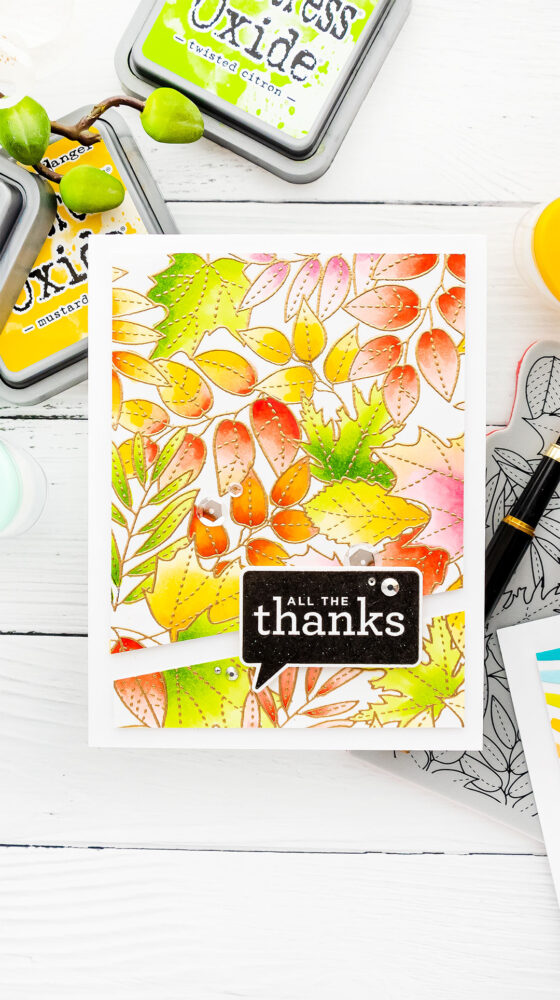
I picked the “All Leaves” background stamp and it features a plethora of Fall leaves. These can all be colored in different colors, so they are perfect to illustrate some of my favorite Copic Marker color combos.
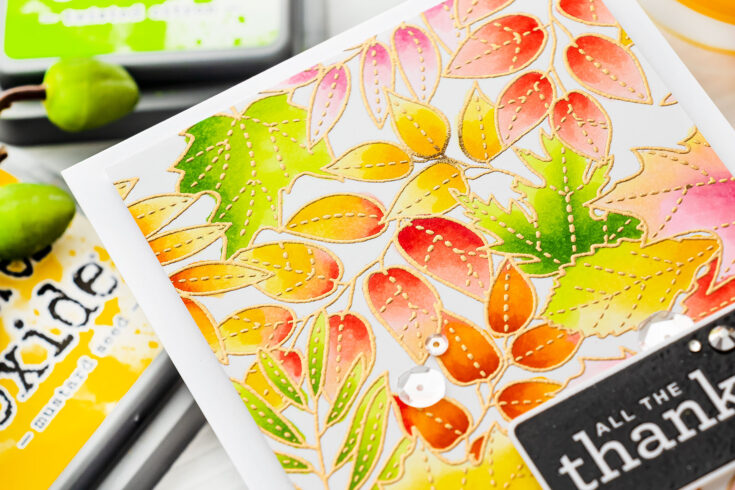
I am using Simon’s #120 LB cardstock for all of my stamping and ink blending. I love using this paper lately for nearly all of my crafting. I used MISTI stamping tool and stamped the All Leaves background in Memento Tuxedo Black ink. I have picked several Fall colors for this card – red, pink, yellow, orange, and green. And I have 3 to 4 markers in each color family.
These are my go-to colors and also colors that blend well and work well together.
Green: My lightest color is YG01, although I also like to use YG00 for even lighter green. Next, I add my medium color – YG03. This is another one that I use nearly every time I color with Copics. In this case, this is a medium color, but if I aim for a darker green, I then use this as my lightest color and proceed with YG17 as the medium. Here I am using the YG17 as the darkest color. Again, if I wanted this green to be darker, I would add YG67 on top to intensify the shadows. Here, I am aiming for lighter, softer versions of these colors.

Final color combo: YG01, YG03, YG17.
Lighter and darker variations: YG00, YG01, YG03; YG03, YG17, YG67.
Red: R20 is the lightest color I like to use when coloring something red. It is a very soft pale color and it is one that works well for blush. Next, I add R22, which is a slightly darker red, yet still very pale, compared to other reds. To deepen the color I bring in R24 – this is a very beautiful bright red and one I use very often. Here, it is one of the darkest colors, but I also often use it as the lightest color for my coloring followed by R27 and R39 or even R89 for very deep dark red.
Final color combo: R20, R22, R24
Darker variations: R24, R27, R39, R89
Pink: As for the pinks – I do have several favorite combos. Here I am using R10 as the lightest color although R00 is also another pale pink that makes a beautiful base.
Next, I use R11, this one is called Pink and I find it to be just an overall pretty, somewhat muted pink. I am finishing this combo with R85 – Rose red color, and this one is a very rich deep pink color. I also like to use R34, it is a little bit more intense compared to R85.
You don’t really see pink leaves in nature, but I wanted to include hints of pink in my project today, so I colored some leaves pink.
Final color combo: R10, R11, R85
Alternative combinations: R00, R11, R34; R00, R10, R11
Yellow: I start with Y11 – this is a pretty Pale Yellow color, it makes a nice base. It is somewhat muted, very soft and calm yellow. Next, I add Y08, this is Acid Yellow and it is a very bright vibrant color. And I top it off with Y17, this is called Golden Yellow and it is exactly that – very rich, warm yellow color.
Final color combo: Y11, Y08, Y17
Orange: When it comes to Orange color – this is not something I use very often, I probably only reach for my orange markers during fall as I am making fall cards. I like to use YR18 as the darkest orange, this is a vibrant color, next I add YR15 as the medium orange and I like to use the Golden Yellow, Y17 as the lightest orange – it works really well with the other 2 colors.
Final color combo: Y17, YR15, YR18
So there you have it – a quick run through of some of my favorite Copic marker color combinations. There are a lot more, of course, Copic markers are fantastic because they work so well and blend so well together and allow you to color your heart out.
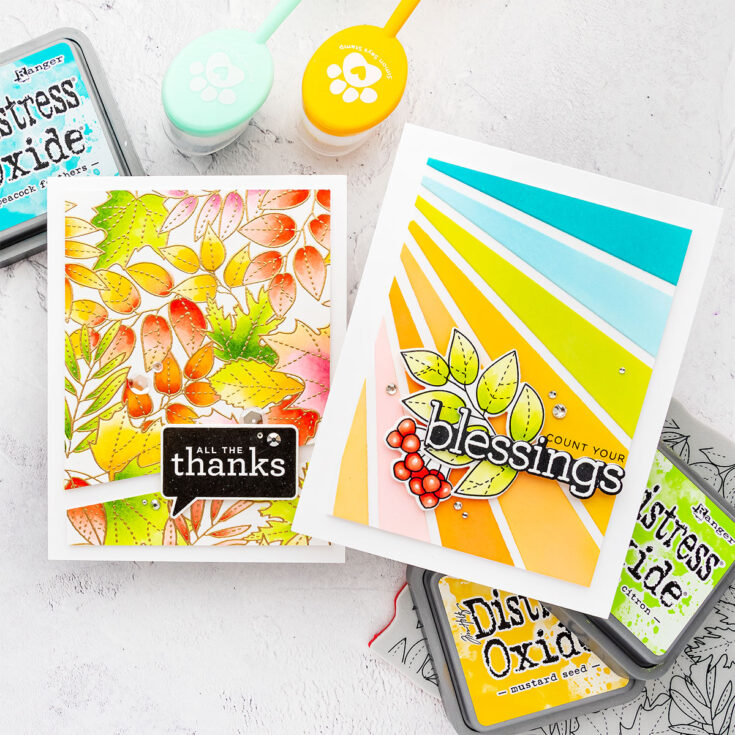
I trimmed this panel to 3 3/4 x 5” and heat embossed sentiment that reads “All The Thanks” – from Cathy Zielske All The Thanks stamp set. I stamped it in Versafine Onyx Black ink and heat embossed in clear embossing powder. I also used a coordinating die and cut the sentiment out.
I wanted to add some interest to this background, so I decided to cut it diagonally and split into 2 backgrounds. Once cut, it was foam mounted onto the card and added the sentiment overtop.
I used Pretty Pink Posh Sparkling Clear Sequins and Spellbinders Silver mix gems to embellish this card.

Bonus Card Idea!
As I was going through my stamp sets I came across the Autumn Leaves set from Simon that features the same leaves as on the background I used for the previous card.
I stamped the leaves in the same way and colored using my Copic markers. I used reds for the berries and here I added a darker R27 color to deepen the shadows a bit further. The for leaves I started with the lighter green, YG00, used YG01 as medium color and YG03 as the darkest color for much lighter green leaves. I didn’t do heat embossing in gold this time, but I did re-stamp the image outlines in VersaFine Only Black ink for have a darker black outline to these and coated them with clear embossing powder. Versainfe takes a little longer to dry, so to help speed it along I like to heat set it with clear embossing ink.
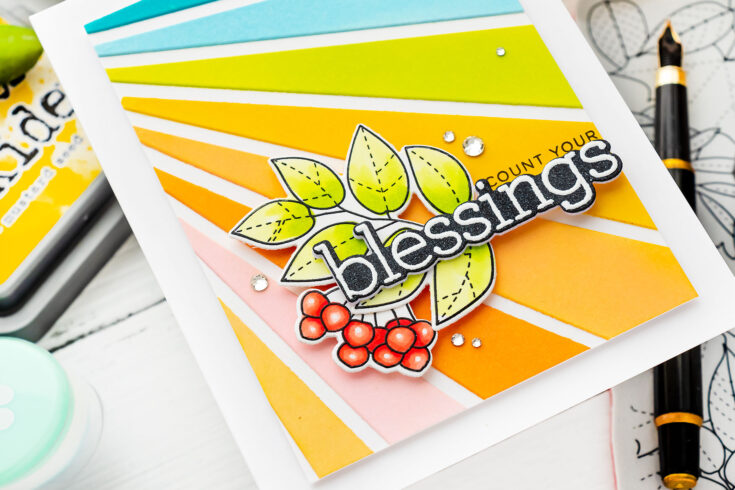
I also created a sentiment for this card using the same All The Thanks Stamp set from CZ, but this time I heat embossed the word Blessings in white embossing powder onto black pearlescent cardstock and cut it out using a coordinating die.
To make a background for this card, I wanted to do something edgy, and colorful, used Spellbinders Color Block Slices die and I cut it 8 times from Simon’s 120lb cardstock. I picked several colors of Distress Oxide inks to add color to each slice.
I used Simon’s new ink blending brushes and blended one color onto each of the slices coloring them in. I used: Tumbled Glass, Peacock Feathers, Scattered Straw, Mustard Seed, Spiced Marmalade, Spun Sugar.
I positioned the slices onto a 4 1/4 x 5 1/2” white cardstock panel leaving small white gaps in between the slices. You can cluster them all together, but this way the background ends up looking a bit too intense, so I often like to space them out and leave white gaps between the colors.
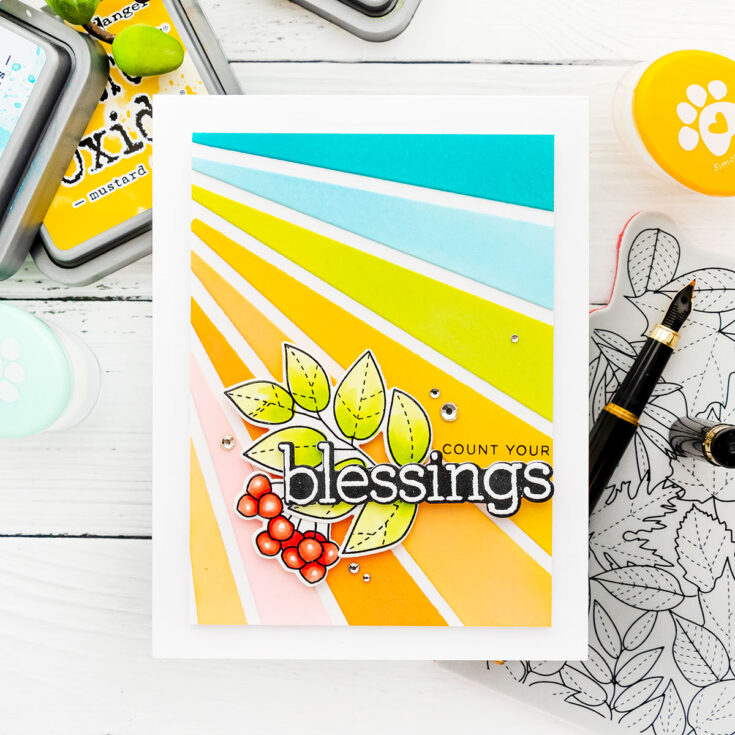
I trimmed this panel to 3 1/2 x 4 3/4” and I foam mounted it onto the A2 white top folding card base. I stamped “count your” above the word “blessing” directly onto one of the slices. And adhered the rest of the pieces in place.
Lastly, I added some Silver gems from Spellbinders and used a white gel pen to add white dot highlights onto the red berries.
So that’s it from me for today. I hope you’ve found this blog post and video useful and feel inspired to create. Have fun crafting!
WATCH THE VIDEO:
SUPPLIES:
|


Thanks so much for stopping by, and thank to Yana for being our guest!


Always enjoy Yana’s videos so much. Great inspiration for the fast approaching fall season. Beautiful copic coloring and I love that you share your combo’s. TFS
These cards are gorgeous–thanks Yana!
Really Beautiful and colorful!!!
Really gorgeous cards
GORGEOUS cards! Fabulous coloring (as always!) Your bonus card is magnificent! LOVE!
Really lovely and vibrant!!!