Travel the World Vignette Tray by Emma
Hi friends! It’s always such a treat to get to enjoy the creative mind of Emma Williams, and this special project is of no exception! Every single detail is pure perfection! Read on to learn more and enjoy!
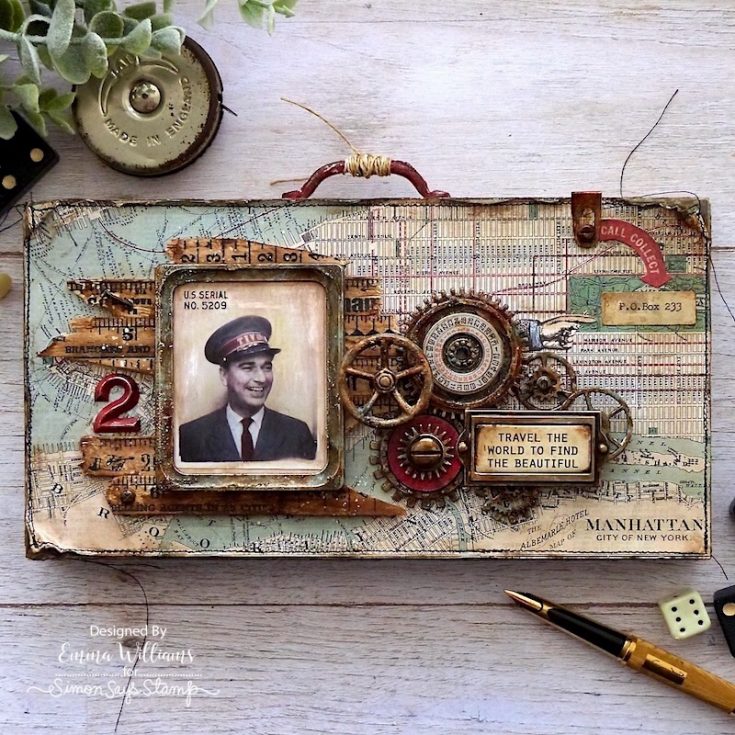
Hello everyone! I’m so happy to be back on the SSS blog today and can’t wait to share all the details of my latest project where I’ll be showing you how you can use Tim Holtz and Ranger Ink products to create weathered wood effects, rusted metal and also add colour tints to black and white photos ~ all of which will help create that perfect vintage look to any project.

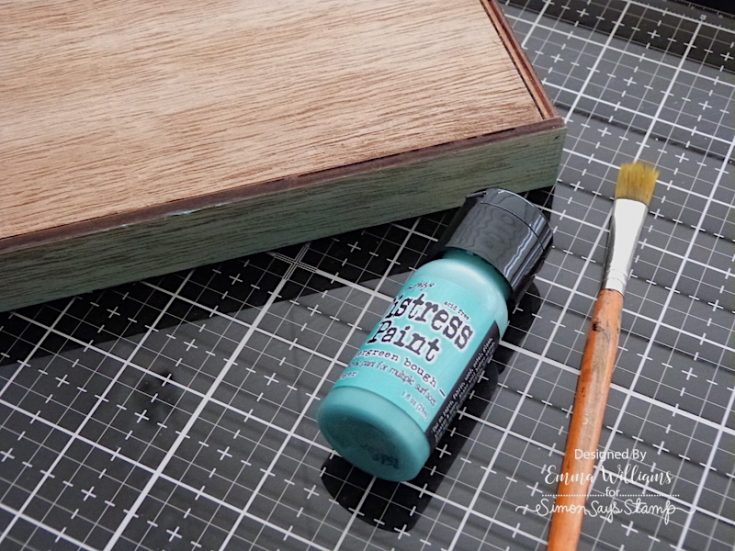
So, let’s get started and using the tray with the solid side uppermost, I began by applying a wash of Evergreen Bough Distress Paint to each of the four sides of a Tim Holtz Vignette Tray.
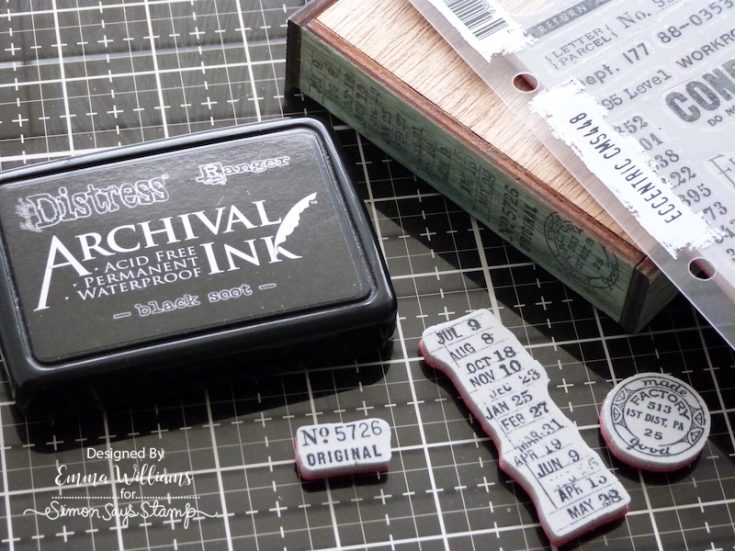
After drying the paint thoroughly, I inked up stamps from the Eccentric Stamp Set with Black Soot Archival Ink and stamped directly onto the two shorter sides of the tray.
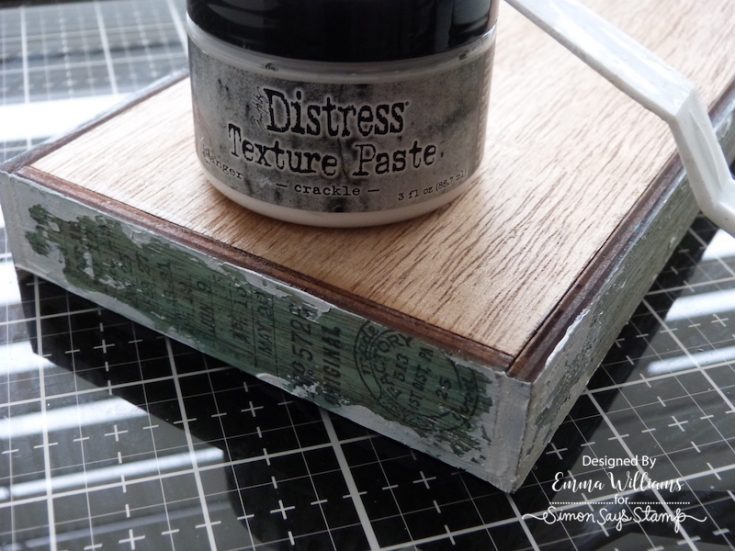
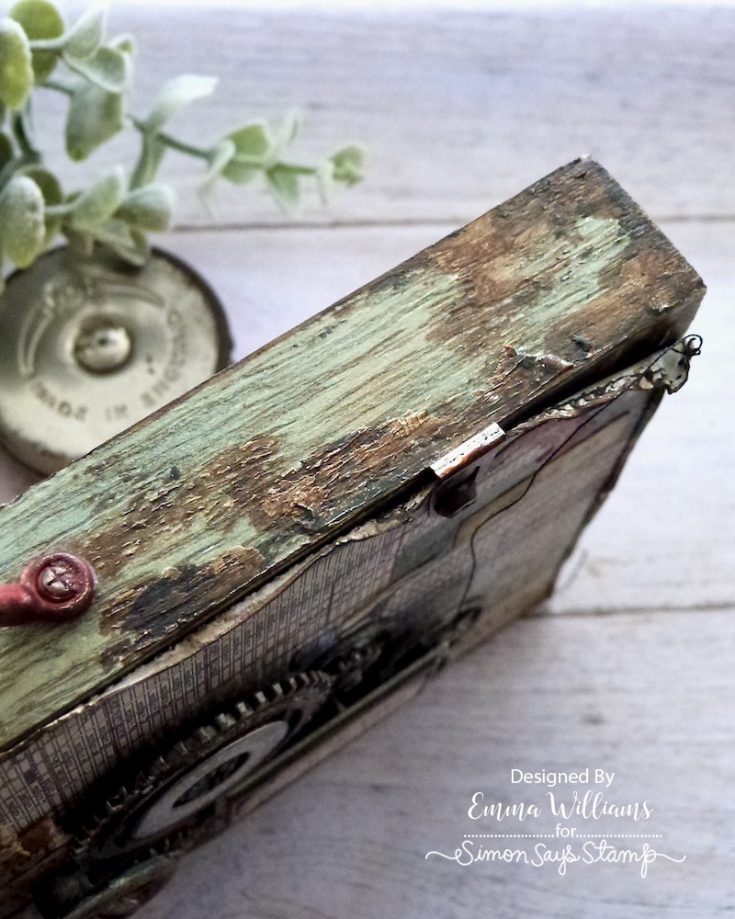
Use a palette knife to apply Crackle Paste around the edges of the tray and allow for the cracks to appear and for the paste to dry.
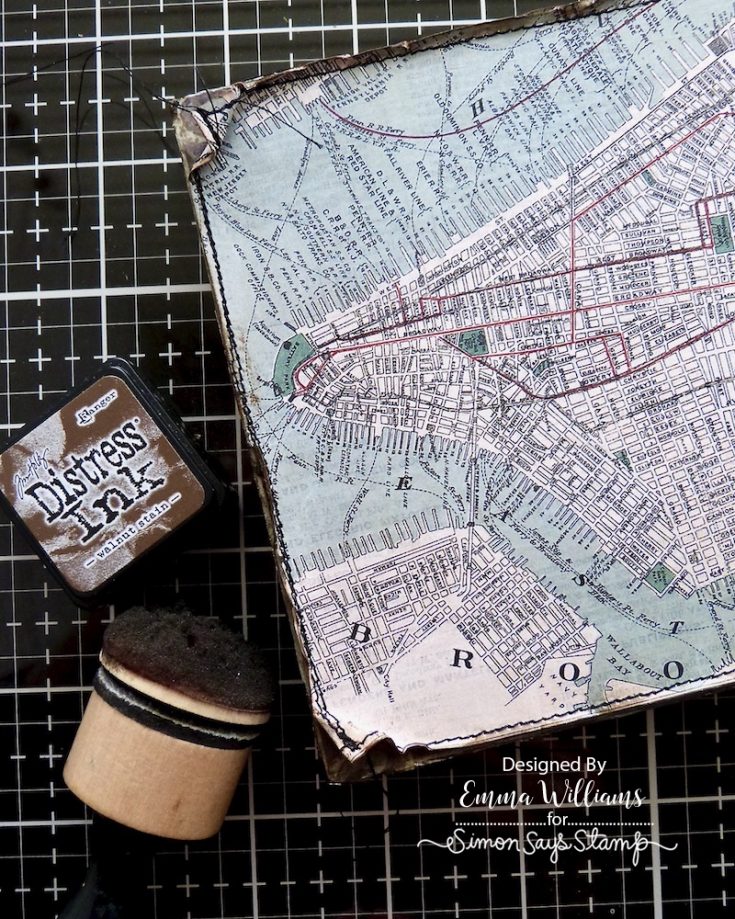
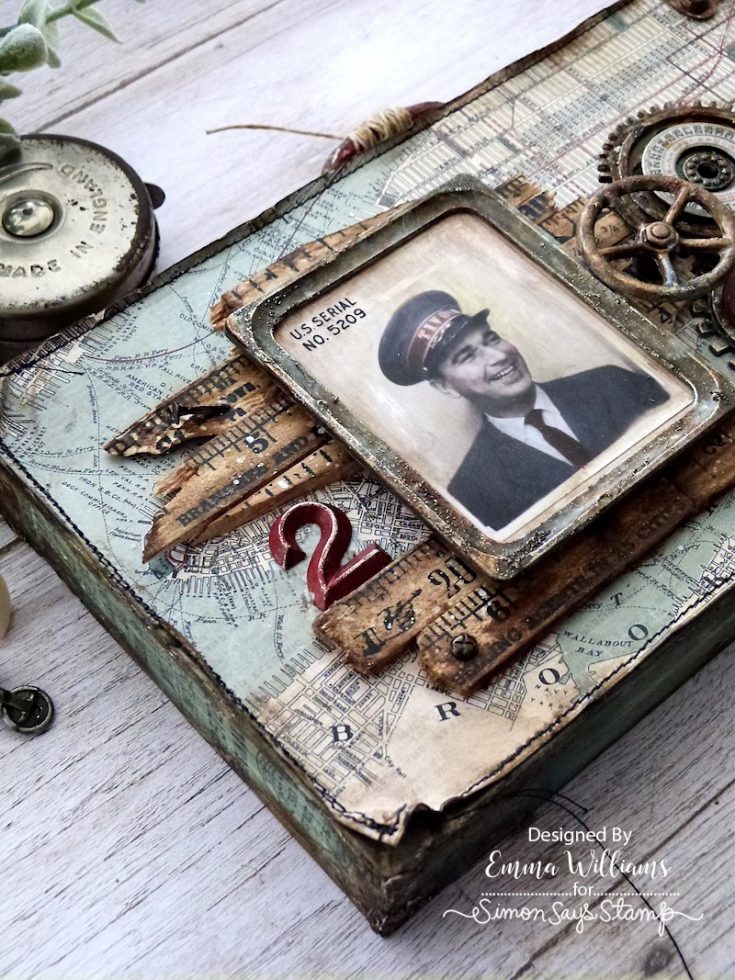
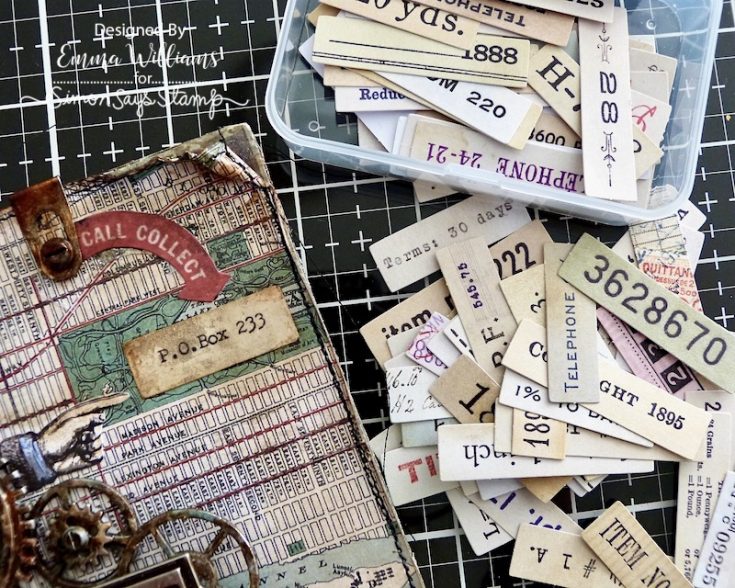
Cut a panel of the map paper from the Backdrops Vol.5 set and machine stitch a border around the outside edge of the paper. Adhere the panel to the top of the tray using Matte Collage Medium and add a coat of the medium over the surface of the paper itself with a Collage Brush.

Curl back the corners of the paper and create small rips and tears along the edges before using a blending tool to ink the edges with Walnut Stain Distress Ink.
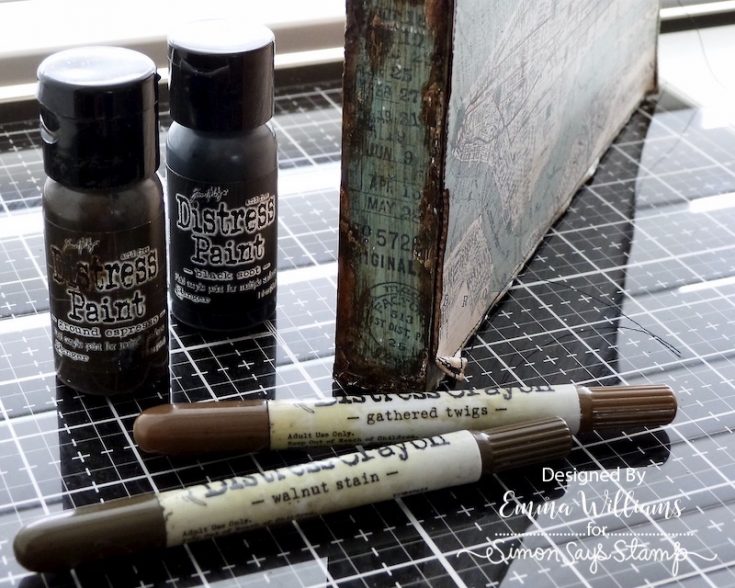
To create the weathered wood effect to the sides of the tray, apply a watered down solution of Ground Espresso and Black Soot Distress Paint to the pasted areas, allowing the paint to sink into the cracks. At this stage, less is more and you need to build up the paint gradually, but if you add too much, you can wipe away the excess with a damp cloth. Once happy, scribble Walnut Stain and Gathered Twigs Crayons along the edges of the tray, blending out any harsh lines with your fingertip.
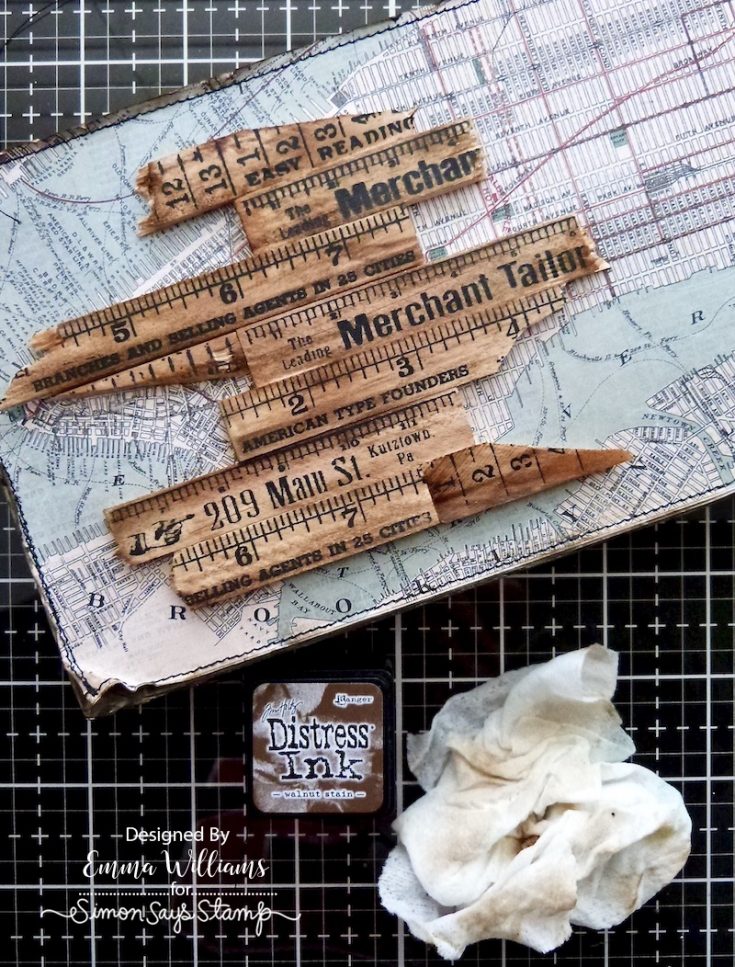
Very carefully, snap the wooden ruler pieces to create different lengths and adhere the various pieces to the left hand side of the tray.
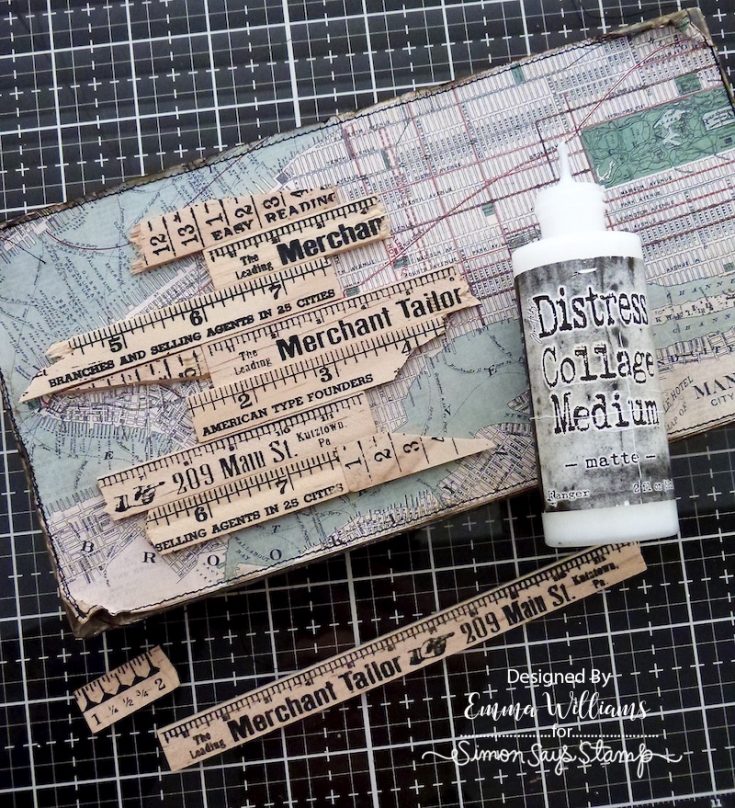
Swipe the Walnut Stain Distress Ink Pad across the surface of the wooden pieces before using a baby wipe to blend the ink and disperse the colour. Splatter Picket Fence Distress Paint across the surface of the rulers and then set the tray to one side.
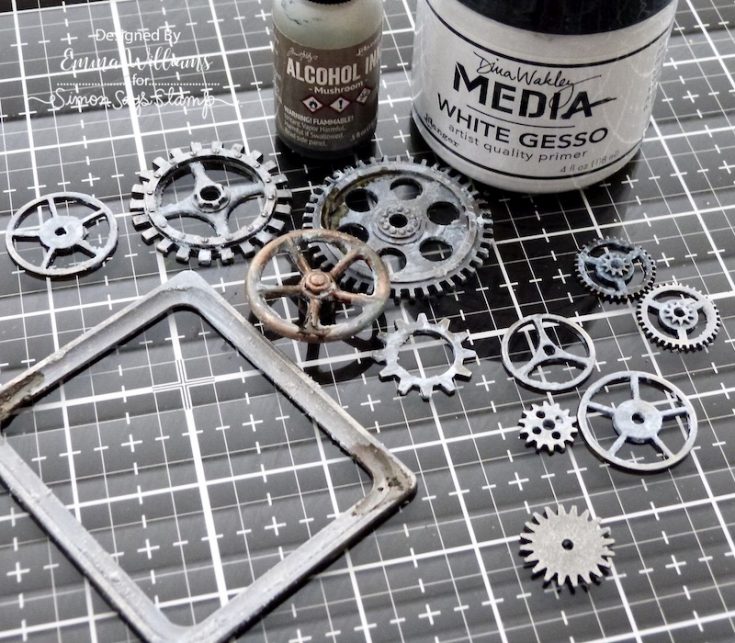
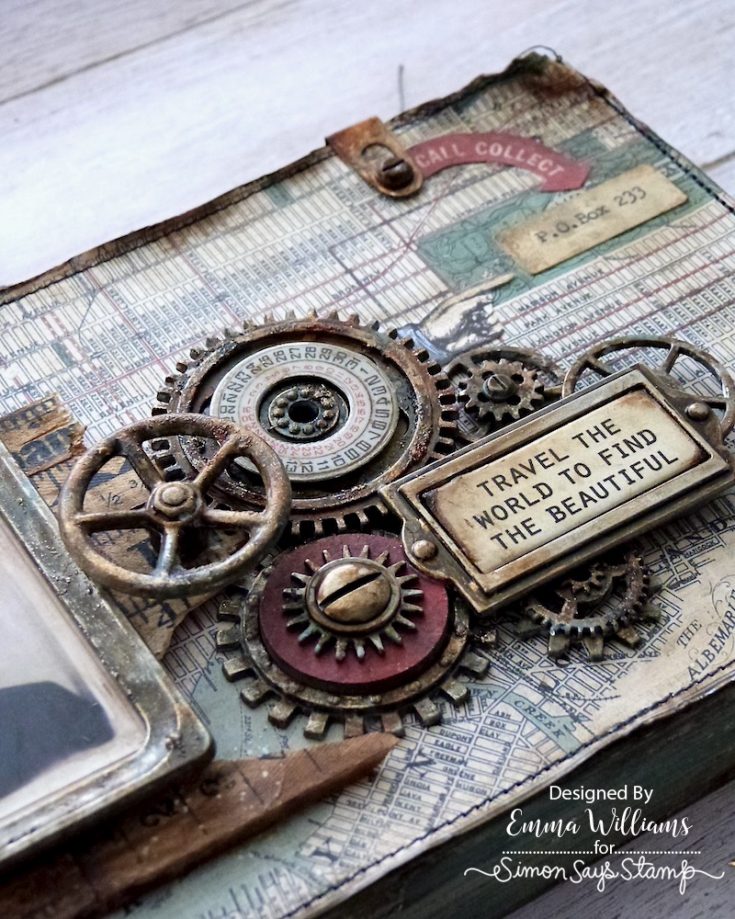
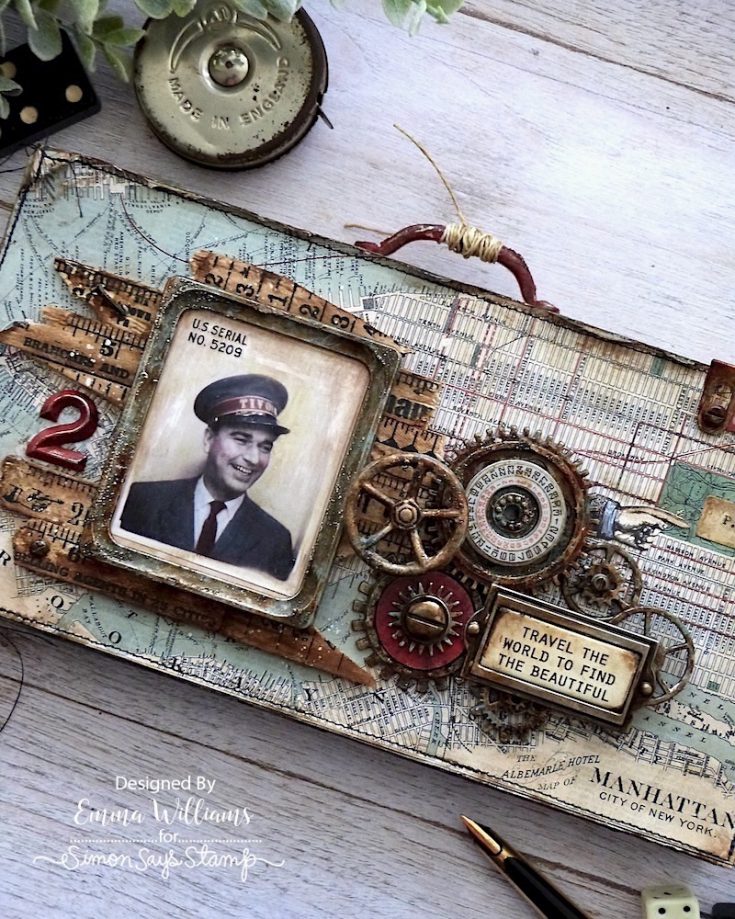
Now for the fun part, adding the rust effect to all the metal embellishments. You can use however many pieces you choose but as a guide, I chose to use a selection of idea-ology pieces, including 2 Industrial Gears, 8 Sprocket Gears and Mini Sprocket Gears, one Label Frame, the wheel from the Odds and Ends set, a Machinery Head, 3 Hardware Heads and one of the larger Photo Frames. Begin by applying Translucent Grit Paste to each of the pieces. You don’t need a lot, just use your fingertip to smear the paste randomly. Once the paste has set and become hard, use a brush to apply a light touch of White Gesso over the surface and once again allow to dry. Dribble small amounts of Mushroom Alcohol ink over the painted surface.
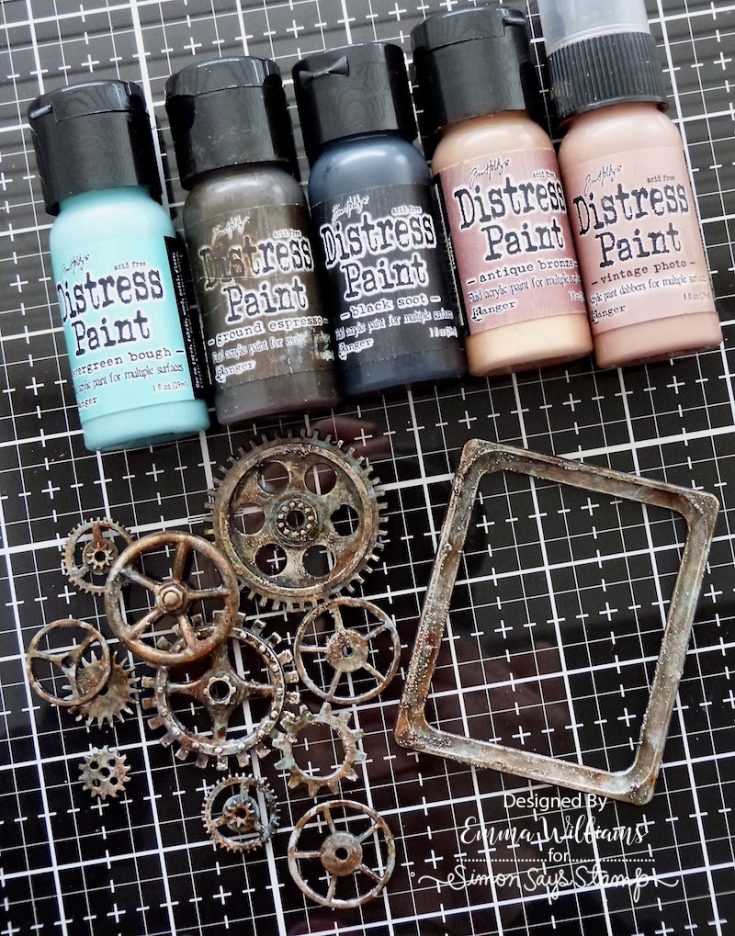
To apply colour, use a selection of Distress Paints ~ Evergreen Bough, Ground Espresso, Black Soot, Antique Bronze and Vintage Photo. Starting with Ground Espresso, apply a layer of paint over the metal. Then start building up the layers by adding the remaining colours, applying each colour using a brush and a dabbing motion and drying the paint between each layer. If you add too much of any colour, don’t worry because you can wipe it away and re-apply. For the final layer, I used my finger to smear Antique Bronze over the surface to accentuate the grit paste and set aside.
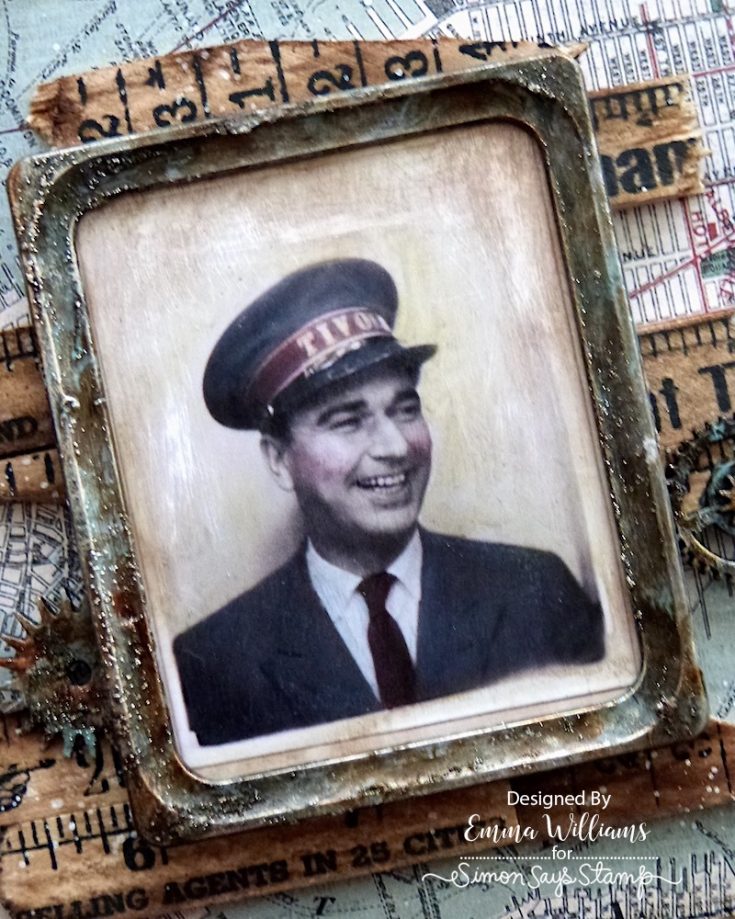
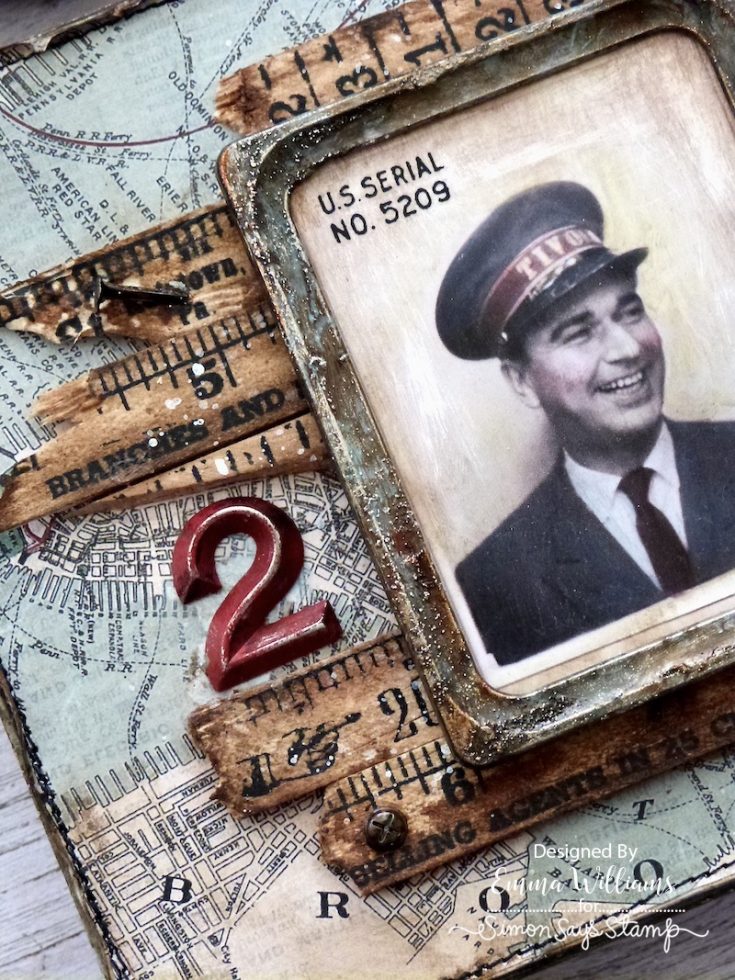
Apply a coat of clear gesso over the surface of one of the images from the fabulous new Photomatic set by Tim Holtz. Once the gesso is dry, colour tint the photo using Distress Crayons and a Detailed Waterbrush, building up the intensity of the colour in layers.
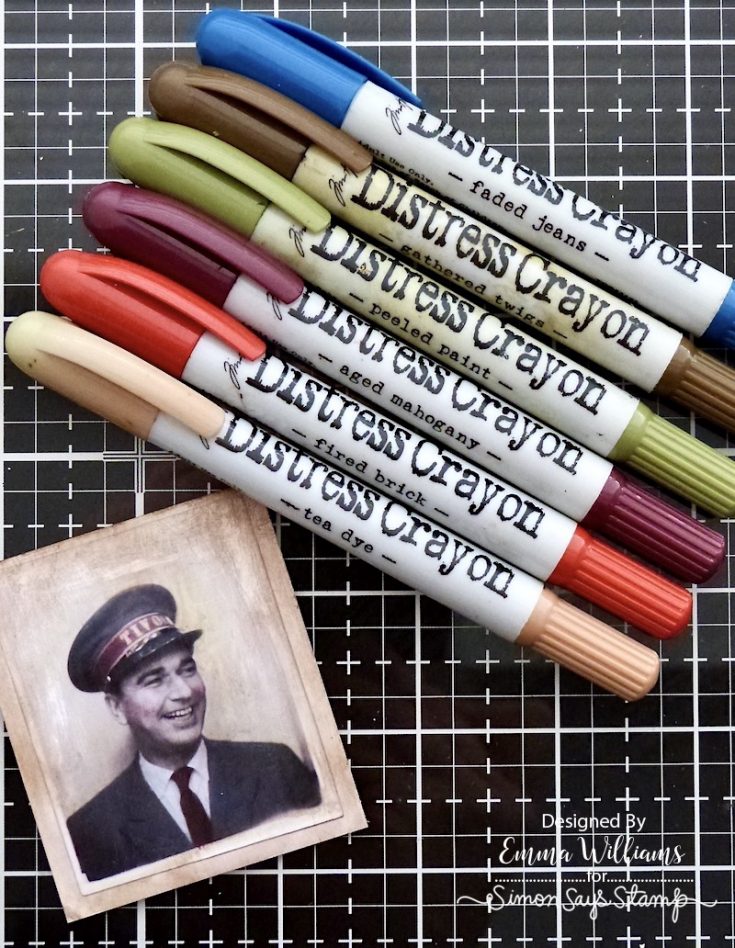
Add a Labeled Remnant Rub to the top left hand corner of the photo.
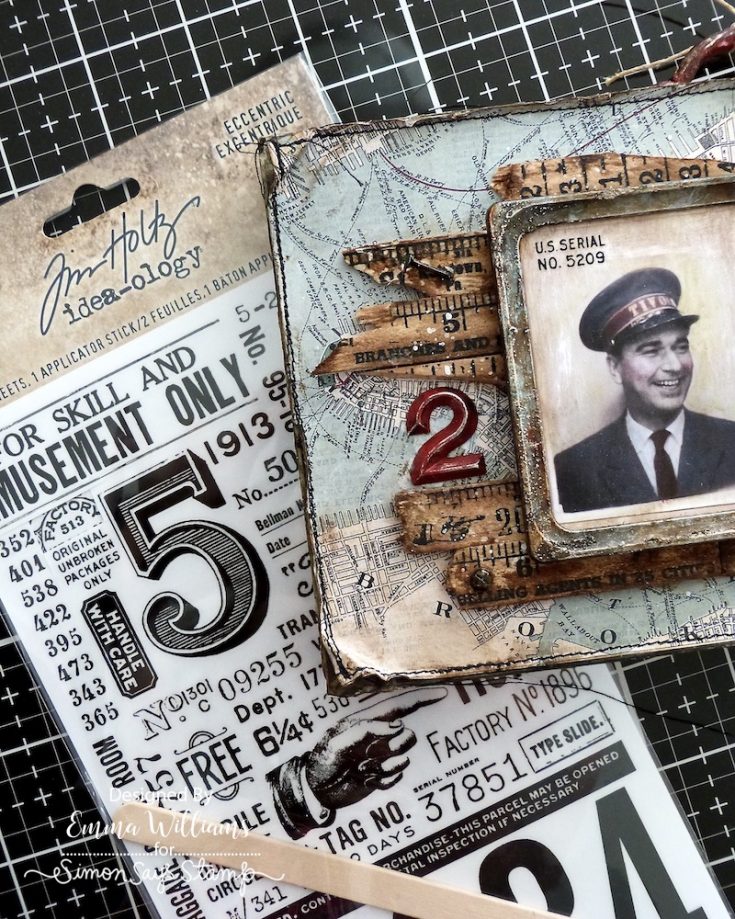
Adhere the photo behind the frame using Matte Collage Medium to secure it and attach the photo frame using foam pads over the top of the ruler pieces.
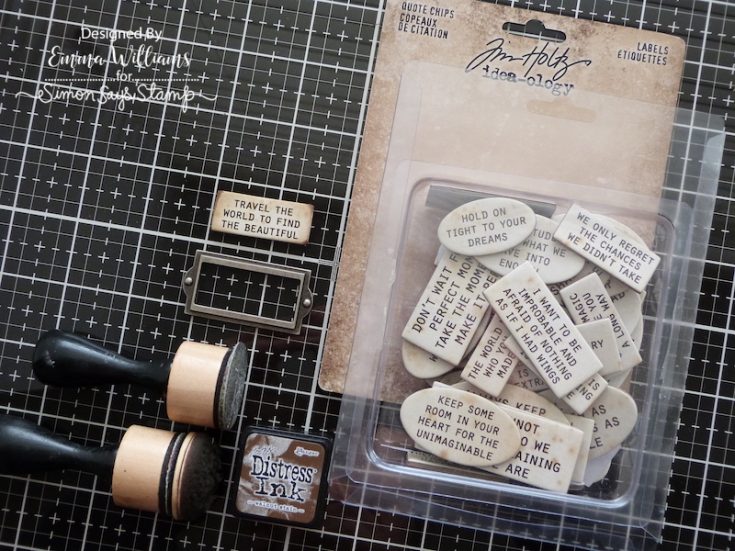
Sand and ink the edges of the “Travel The World To Find The Beautiful” Quote Chip with Walnut Stain Distress Ink. Place the quote chip inside the Label Frame.
Arrange all of the metal embellishments, including the quote chip label frame, to the right of the photo frame, layering each piece to create depth and dimension. At this stage I also added an idea-ology date dial inside one of the larger Industrial Gears, and also attached a piece of circular chipboard that I painted with a combination of Candied Apple and Black Soot Distress Paint. Complete the arrangement by adding Machinery Heads and Hardware Heads to the centres of some of the gears.
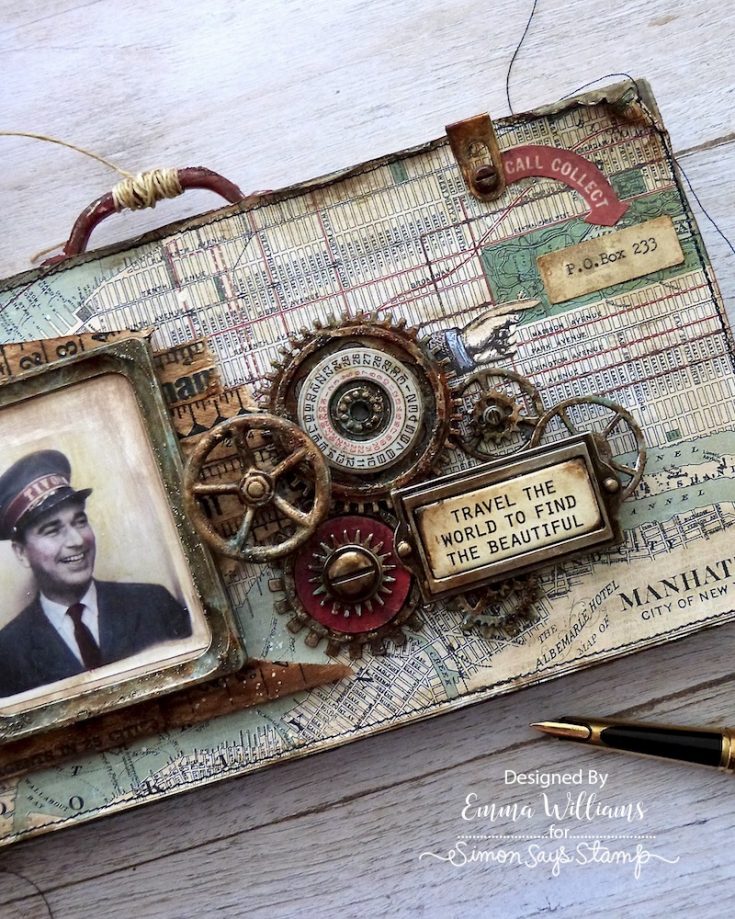
Add the finishing details to the top right hand corner of the tray, beginning with a pointy finger from the Memoir Ephemera pack.
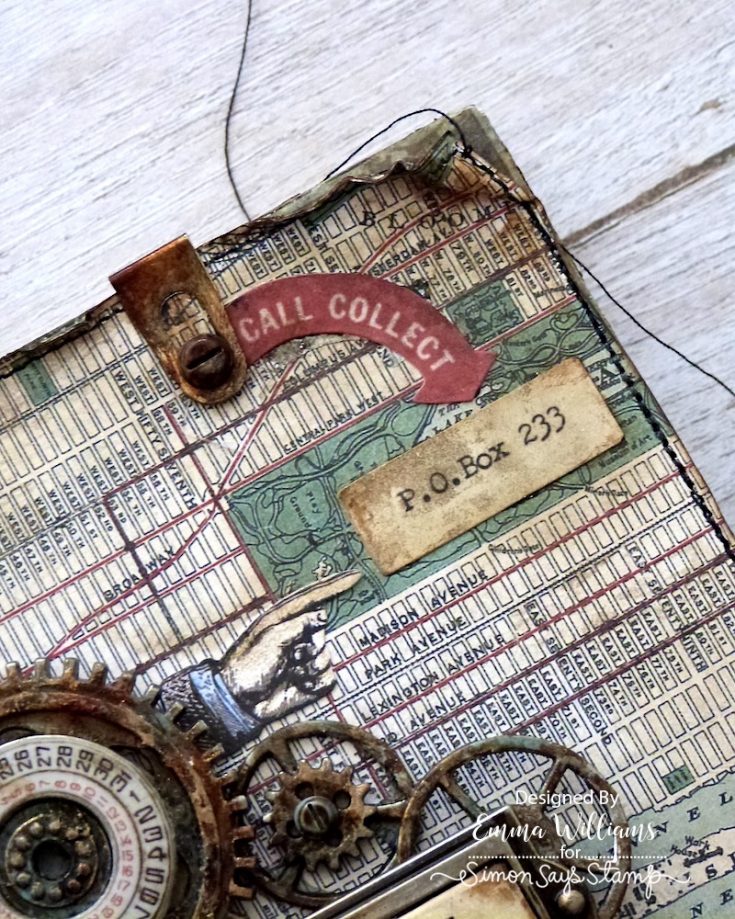
Colour the pointy finger using Faded Jeans and Tea Dye Distress Crayons and attach to the tray with Matte Collage Medium. This comprises of a Numbers Snippet and the Call Collect piece from the Memoir Ephemera Pack. Adhere both piece onto the tray with Matte Collage Medium and then scribble Walnut Stain Distress Crayon over the top to disperse the colour. I completed the arrangement with an Index Clip from my stash and a Hardware Head.
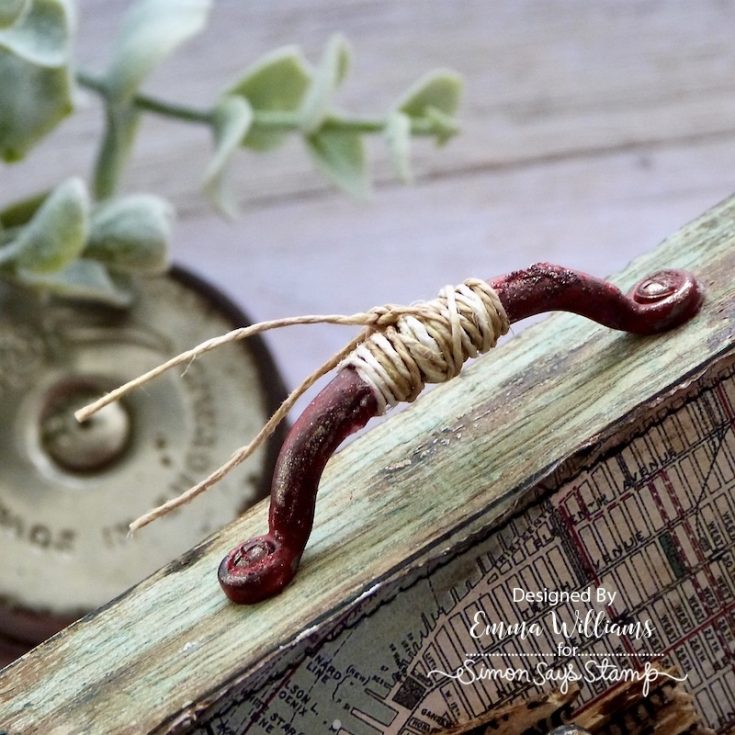
We’re nearly there and all that’s left is the final details, starting with a handle from the idea-ology Hardware Set, that I placed on the top of the tray. I applied Translucent Grit Paste to the metal surface and allowed to dry, before painting the handle and two hardware heads with Candied Apple Distress Paint.
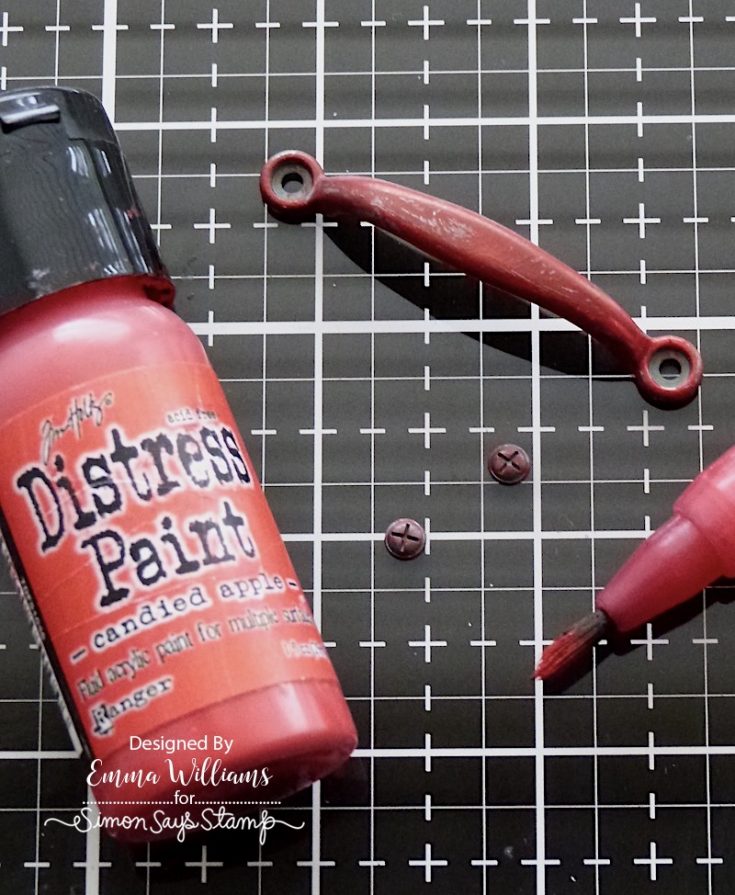
Once the paint was dry, I wrapped twine around the handle and attached it to the top of my tray, together with the matching red Hardware Heads that I attached to either side of the handle itself.

Finally, I painted the ‘number 2’ from the idea-ology Odds and Ends set with Candied Apple Distress Paint and attached this to the left of the Photo Frame, placing it amongst the ruler pieces, together with a final hardware head.
I really hope you’ve enjoyed this tutorial and been inspired by some of the techniques I’ve used to create the finished piece and whether you love making home decor pieces, cards or just want to try Mixed Media for the first time, these ideas can be used in so many different ways and I’ll be excited to see what you make. Thanks so much for stopping by today and see you again soon…–Emma x
SUPPLIES:
|


Thanks so much for stopping by, and thanks to Emma for being our guest!


I was just scrolling through different platforms when I noticed this one and decided to check it out.
You can also explore it here win adda Click here
So far, the experience has been quite smooth. Everything is easy to understand, and I didn’t face any confusion while navigating. The layout feels simple and clean, which makes it comfortable to use. I’ve been spending a little time on it daily, and it seems consistent. It’s always nice to find something that works without unnecessary complications.
In conclusion, knowing the correct Qutub Minar timing is crucial for a well-planned and enjoyable visit. With opening hours typically starting at 7:00 AM and closing in the early evening, the monument offers ample opportunity for visitors to explore its historical and architectural significance. Choosing the right time of day, considering seasonal weather, and arriving well before the closing hours can greatly enhance the overall experience. Whether you are a first-time visitor or returning to admire its beauty again, proper planning around Qutub Minar timings will ensure a memorable and stress-free journey into India’s rich past. local travel agent Rockford
En mi experiencia viajando por distintos países, uno de los mayores inconvenientes siempre ha sido la falta de continuidad en la cobertura médica, ya que cada nuevo viaje requería una nueva contratación de seguro y eso generaba pérdida de tiempo y falta de organización. Con el aumento de mis viajes anuales, empecé a buscar una solución más estable que cubriera todos mis desplazamientos sin necesidad de renovaciones constantes. Fue así como descubrí una opción de seguro anual que ofrecía cobertura global durante todo el año. En un momento clave decidí confiar en https://auras.insure/es-AR/seniors-travel-insurance/ para gestionar mi protección, lo que me permitió viajar con mayor libertad y sin interrupciones en la cobertura médica.
Absolutely beautiful work, Emma! The vintage details, rust effects, and layered textures are stunning. Such an inspiring mixed media project!
Emma’s vignette tray is absolutely beautiful! What a stunning piece of art. I love how crafting can capture the nostalgia of past journeys while keeping the excitement for future adventures alive. Looking at a travel-themed masterpiece like this definitely sparks some serious wanderlust. It immediately makes me think of the places I’ve been dreaming of exploring, with experiencing New Zealand tourism being at the very top of my bucket list. This post is the perfect inspiration to create something beautiful while daydreaming about future trips. Thanks for sharing!
Emma’s “Travel the World” vignette tray is an absolute masterpiece of mixed-media crafting! The vintage details, textures, and travel-themed elements are beautifully put together and incredibly inspiring for anyone who loves paper crafting. It instantly sparks wanderlust. When I am taking a break from working on creative home projects, I love sitting back with a hot cup of tea to enjoy some live entertainment. Checking out major sports tournaments with my Skyexchange ID is my absolute favorite way to unwind and enjoy some high-energy action after a quiet day of crafting. Keep up the gorgeous work!
I usually don’t leave reviews online, but I wanted to mention that fair play has worked really well for me recently. I installed it during cricket season and since then I’ve been using it almost every evening. The app opens quickly and switching between sections feels smooth on my device. Another thing I personally like is that the layout looks modern without becoming confusing. I also appreciate that the app performs decently even with slower mobile internet connections. Compared to a few similar apps I’ve tested before, this one feels much more convenient overall. So far I’m satisfied with the regular performance and user experience.
I completely agree with the brilliant perspectives and unique points raised throughout this article. Finding consistency in today’s rapidly shifting virtual landscape is an absolute challenge, as many mainstream platforms often fail to deliver a completely optimal user experience. Having a dependable, well-optimized hub to rely on saves a tremendous amount of time, energy, and unnecessary frustration in the long run. That is precisely why utilizing an established network like betbhai 9 makes perfect sense for daily users who prioritize premium security features and zero systemic downtime. This is an excellent post, and I look forward to your future updates!
Thank you for sharing such an interesting and well-crafted article. The information provided is both practical and enjoyable, making it valuable for a wide range of readers. I appreciate the effort that goes into creating content that is easy to follow while still being insightful and informative. The examples and explanations add depth and make the topic more relatable. Posts like this encourage readers to keep exploring and learning. Wishing you continued success with your blog, and I’m excited to see what you publish next. Keep up the fantastic work.allpanel
Daily rituals at Prem Mandir include morning and evening aartis, bhajans, and chanting sessions. These practices immerse devotees in an atmosphere of devotion, reinforcing the temple’s spiritual purpose. The rituals are conducted with precision and reverence, ensuring that visitors experience both the grandeur of the temple and the intimacy of personal devotion. The combination of ritual and architecture makes Prem Mandir a holistic spiritual experience. Prem Mandir Vrindavan
This vignette tray by Emma is an absolute masterpiece of mixed-media art! The vintage textures and layering beautifully capture the nostalgic, romantic essence of global exploration. It makes you want to step back in time and document your own journeys. Finding a beautifully crafted, high-quality space like this is incredibly inspiring. Whether you are creating intricate art or looking for a premium, reliable online platform like Radhe Exchange for your recreation, finding a trusted, seamless experience makes all the difference. Thank you for sharing this beautiful creative inspiration!
Transfers and taxis around Kilimanjaro form the backbone of travel logistics in northern Tanzania. From luxury SUVs to budget shuttles, options cater to diverse needs. Whether heading to Moshi for a trek, Arusha for a safari, or Materuni for a waterfall hike, reliable transfers ensure seamless journeys. By choosing reputable providers and customizing routes, travelers unlock the full potential of their Tanzanian adventure. moshi taxi
My dryer began showing signs of wear after years of regular use. Clothes were coming out damp, and I could tell the appliance was no longer operating efficiently. Rather than rushing into a major repair appointment, I spent some time researching possible causes. Once I identified the failed component, I visited Appliance Parts 4 All and found detailed information that helped confirm my diagnosis. WP34001340. I ordered the part and was pleased with how clearly everything was described. After receiving it, I installed the replacement and tested the dryer immediately. The results were obvious from the first load. Drying times improved, performance stabilized, and the machine felt like it had gained a second life. The repair was affordable and much less stressful than I expected. This experience showed me that many appliance problems can be solved with the right replacement part and a little patience.
Global alliances such as OneWorld and Star Alliance have expanded connectivity to Colombo. These partnerships allow travelers to book multi-leg journeys with ease, often unlocking hidden Sri Lanka flight deals. Sri Lanka’s Buddhist heritage draws pilgrims from across Asia. Flights from Australia to Sri Lanka often include travelers visiting sacred sites, boosting demand during religious festivals. Luxury travelers are increasingly drawn to Colombo’s boutique hotels and resorts. Airlines respond by offering premium flights from Australia to Sri Lanka, balancing affordability with exclusivity. Sri Lankan travel agency
Cultural immersion begins the moment travelers leave JRO Airport. Drivers often share stories about local traditions, wildlife, and history during transfers. Whether heading to Moshi to Kilimanjaro Airport or Arusha, these conversations provide a warm introduction to Tanzanian hospitality. Technology has transformed the way transfers are booked. Online platforms allow travelers to reserve taxis or shuttles in advance, compare prices, and read reviews. This transparency ensures that whether booking a Moshi taxi or an Arusha shuttle, travelers can make informed decisions. Kilimanjaro Airport to Moshi
Emma’s “Travel the World” vignette tray project is absolutely breathtaking! The vintage textures, layered ephemera, and exquisite attention to detail capture the true romance of old-school exploration. Mixed-media art like this requires incredible patience and a real passion for visual storytelling. Crafting unique pieces is a wonderful way to channel creativity, just as many people love to channel their competitive energy into online gaming using a Reddyanna Id during their free time. Thank you for showcasing this masterful project; it provides endless inspiration for paper crafters and mixed-media artists alike!
This is such a beautiful and inspiring creative project. The way Emma has transformed a simple vignette tray into a vintage masterpiece with weathered wood, rusted metal effects, and carefully layered textures is truly impressive. Every step shows incredible attention to detail and imagination. I especially love how the map paper and aged elements create a feeling of adventure and discovery. Projects like this remind me of the joy of exploring new places and preserving memories, much like planning unforgettable New Zealand Tours where every destination tells a unique story. Thank you for sharing this amazing tutorial and creative inspiration.