Studio Monday with Nina-Marie: Zig Marker Comparison
Hello crafters and Happy Monday! Have you tried out the Zig Clean Color FELT brush markers yet? Well if you haven’t, then you’ll want to check out today’s video because I am going to demonstrate the felt brush markers for you! I’ll also show you some of the differences between these and the REAL BRUSH Clean Color markers we all know and love.

Most of you are by now familiar with the Zig Clean Color Real Brush markers; these are a favorite coloring medium amongst many of the designers here at Simon and are featured regularly. Just recently Simon has started carrying the Zig Clean Color Felt Brush markers. With the same color palette as the Real Brush, these Felt Brush markers are a perfect compliment to the Real Brush, or as a stand-alone medium.
Because each of these have their own brush type, this means there are some differences between the two markers. I also find that each marker performs certain techniques better. We are going to dive into all of this in the post and the video below.
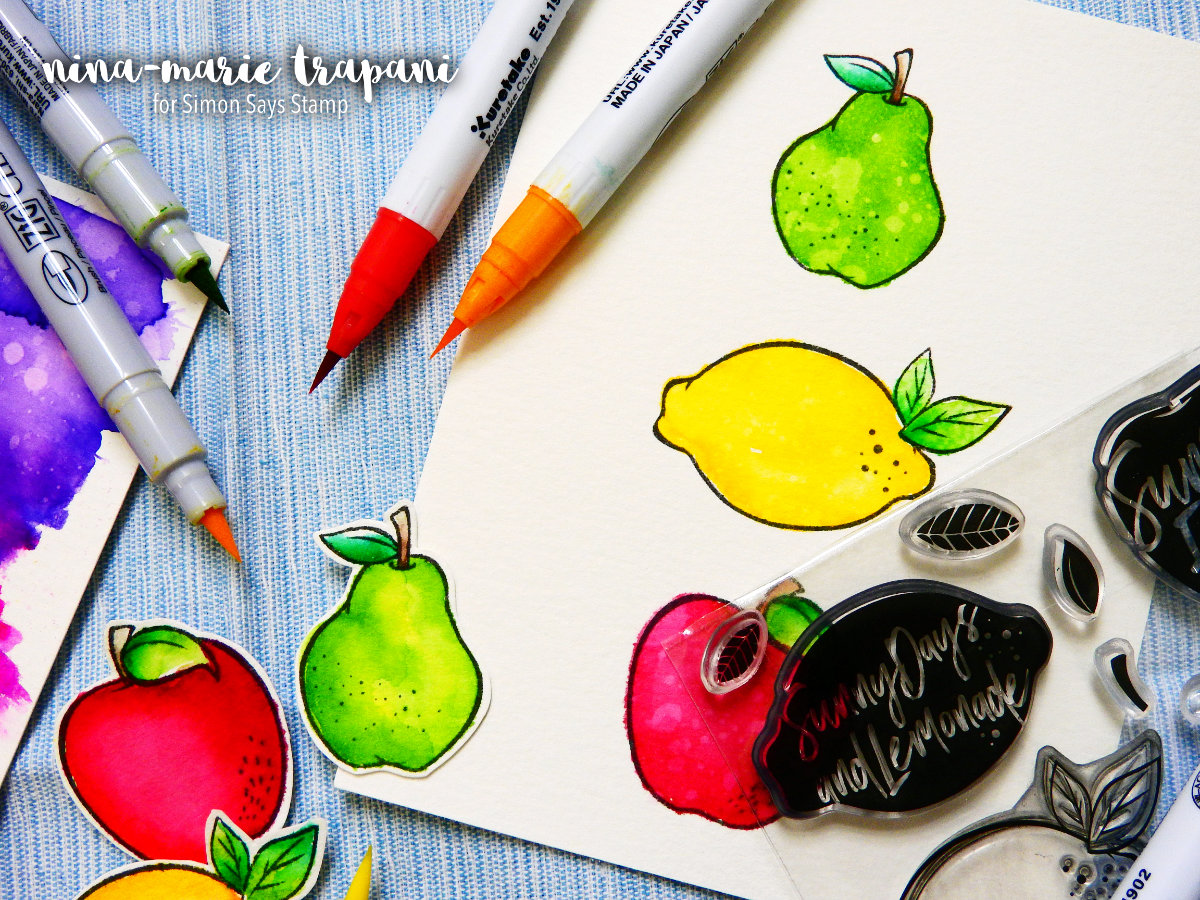
Note: In all examples, I used Strathmore Bristol Smooth paper for my coloring. Most people – myself included – get great results when using Zig Markers with this paper.
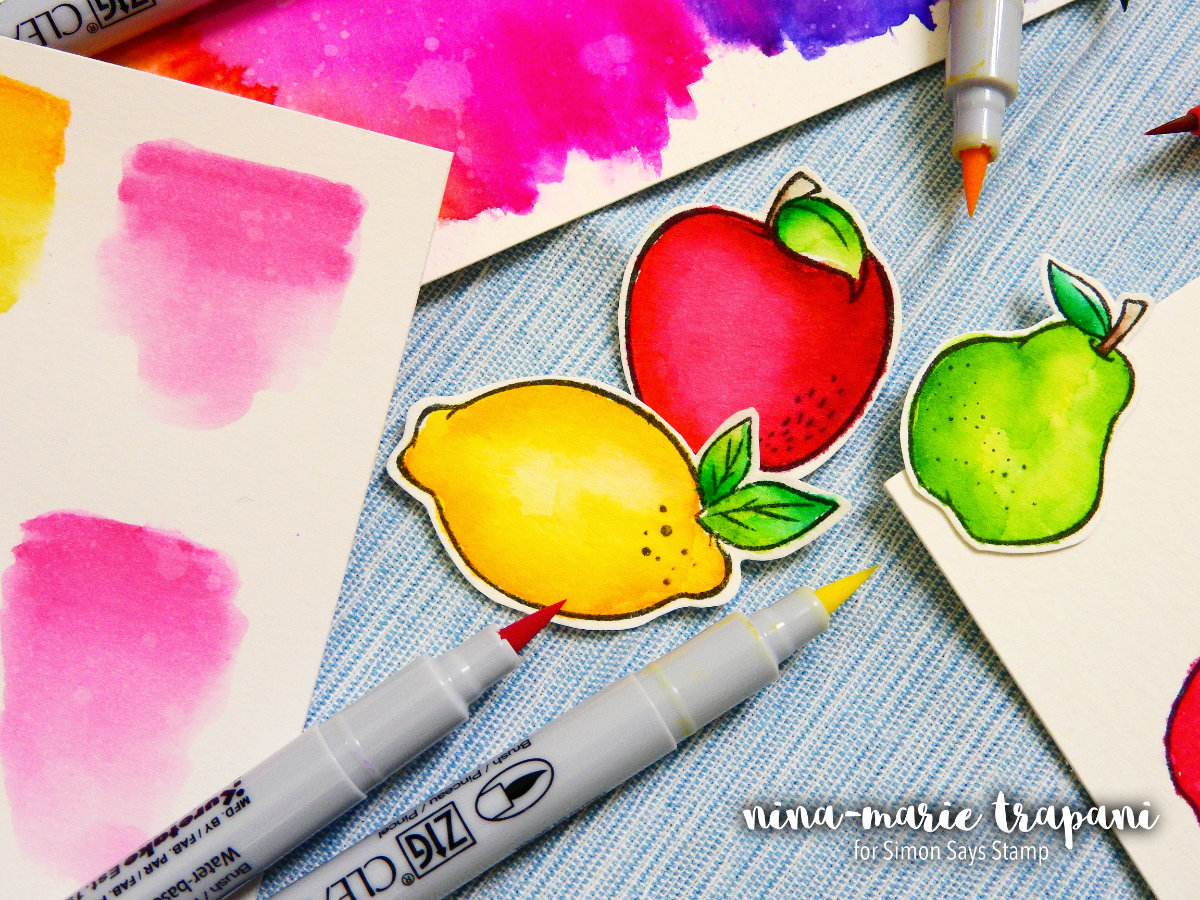
THE NIBS & MARKER BODIES
The first noticeable differences you’ll see between the Felt and Real Brush markers are the nib and the barrel differences. The Felt brush markers have a firm felt tip, whereas the Real Brush markers are made of flexible nylon bristles.
The Felt brush markers have a shorter body than the Real Brush markers; I cannot verify this, but I would assume this means they may hold slightly less ink than the Real Brush markers. The barrels of the Felt markers are gray, and the Real Brush markers are white. This makes it easy to distinguish them from one another.
Both markers have their corresponding ink color marked on the bottoms; this is another great reference feature.
As for the caps, only the Felt markers have the color number listed on them; the Real Brush marker caps are plain. But both Real Brush and Felt both have the color numbers listed on the sides.
COLORING DIFFERENCES
My initial curiosity when first trying out these markers was would they both act the same when used on paper or would there be distinct differences between them? The answer is somewhere in the middle… while there are certain aspects about these markers that are similar, there are other areas in which the markers behave different from the other.
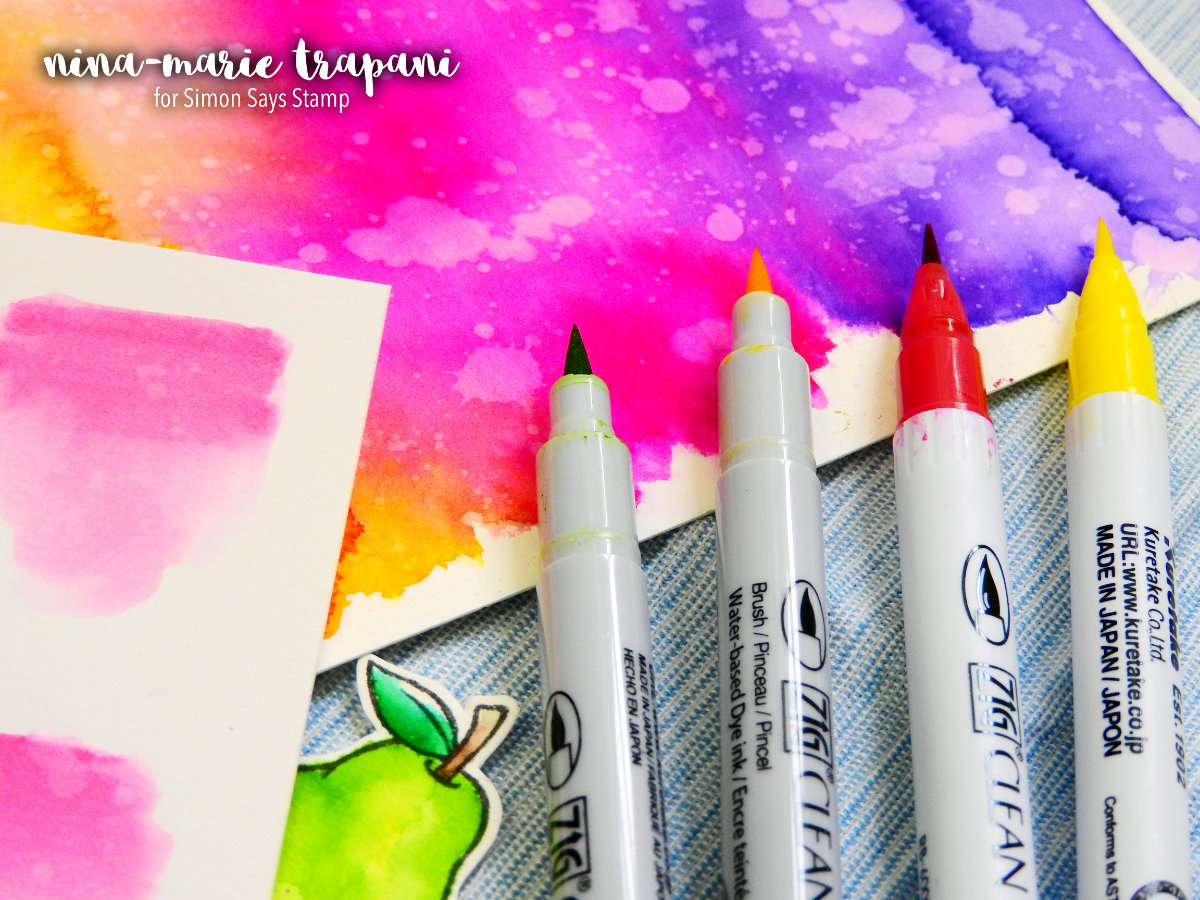
One big difference is how they react when used as a watercolor medium applied directly to paper. The Real Brush markers blend with even just a small amount of water almost instantly. The Felt markers however take a bit more water and/or effort to get them to blend. I believe this has a lot to do with the make up of the inks themselves.
Both markers are listed as water-based pigments, but the Felt brush markers also are listed as a dye ink. I noticed that the ink seeped into the paper a lot faster with the Felt brush markers than the Real Brush. The ink from the Real Brush markers sit on top of the paper longer.
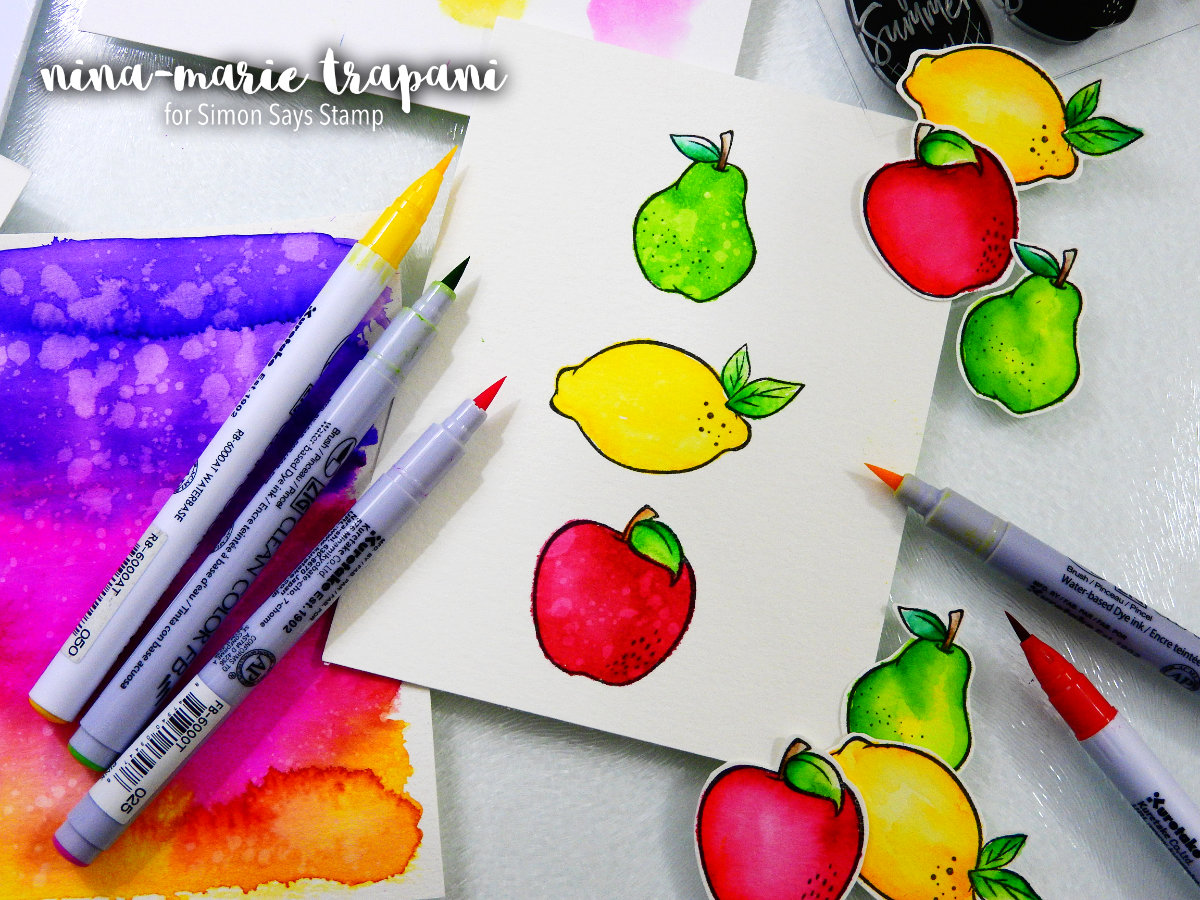
That said, you can still get watercolor effects with both, as demonstrated in the photo above. When applied directly to paper, I feel you get best results with the Real Brush markers. The Felt brush markers – when applied direct to paper – seem to dry faster.
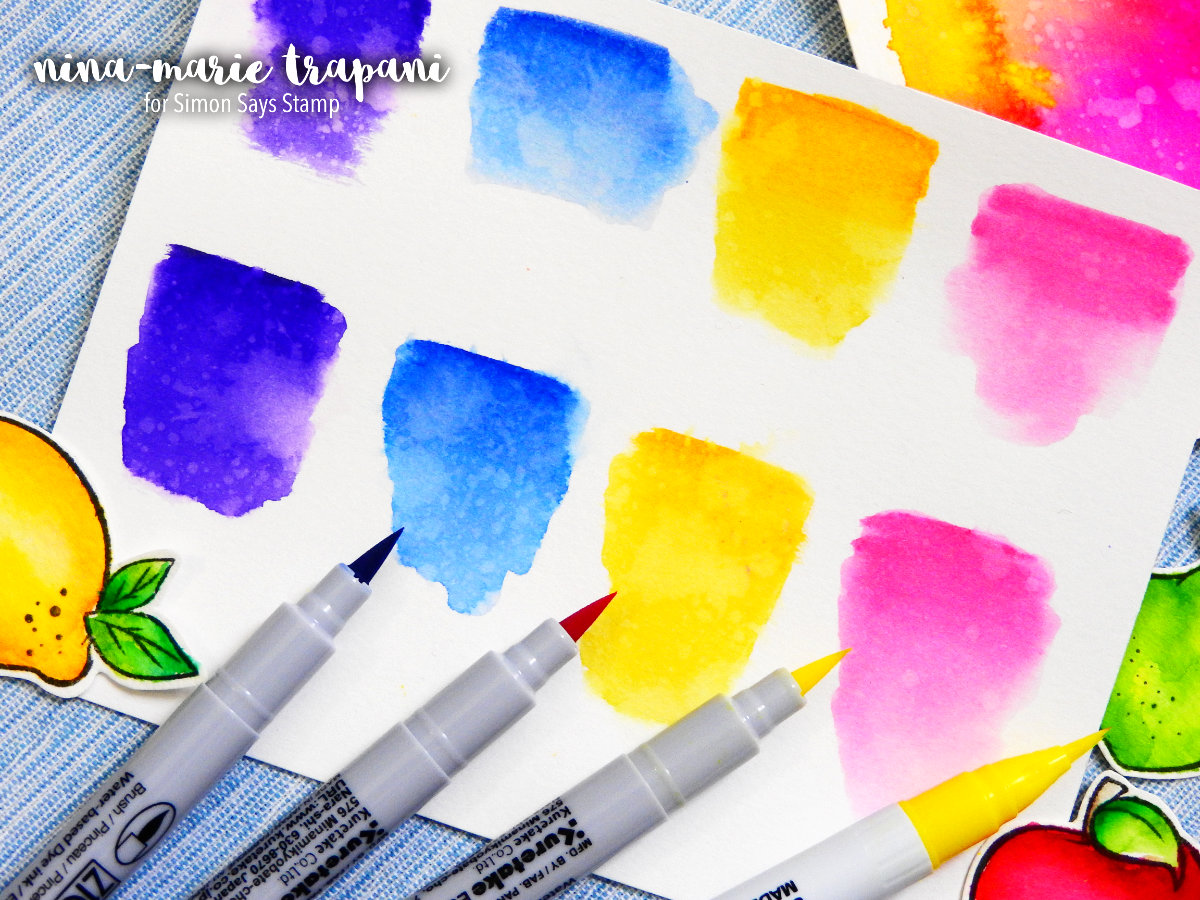
When applying the Felt brush markers to a slick surface, picking up the pigment with a water brush and applying the ink-coated paintbrush onto paper, you get better watercolor results. When Real Brush markers are applied to a slick surface and you pick up the pigment, the colors are much less saturated and not as intense. This method allows you to have better control of the intensity of the Felt brush marker’s pigment, as seen in the photo below.
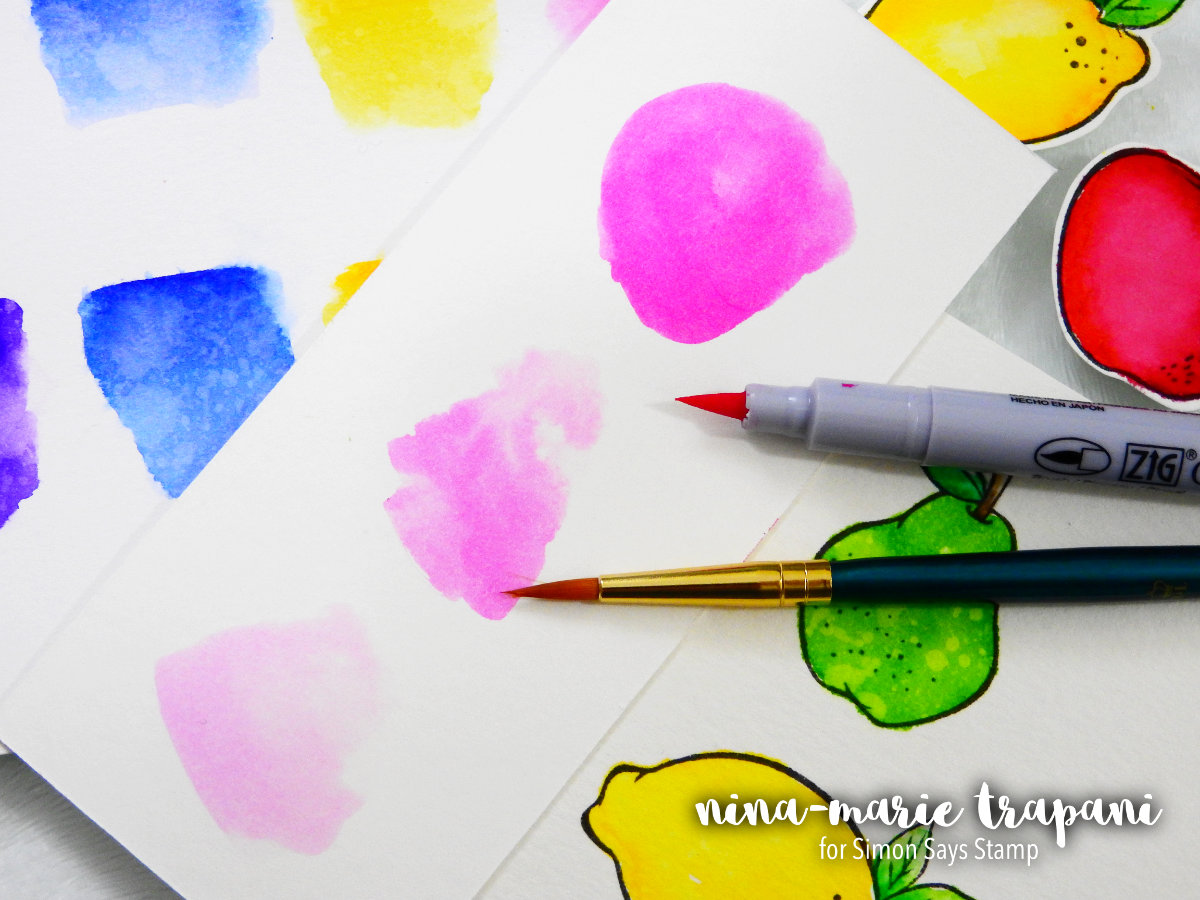
In this example I applied some pink Felt brush marker onto a palette; I then used a strong amount of pigment to paint the top swatch of color. The next two swatches have more water gradually added to the pigment on my palette. As you can see, the results got lighter the more water I added to the pigment. This is where I find the Felt brush markers shine when used as a watercolor.
COLORING STAMPED IMAGES
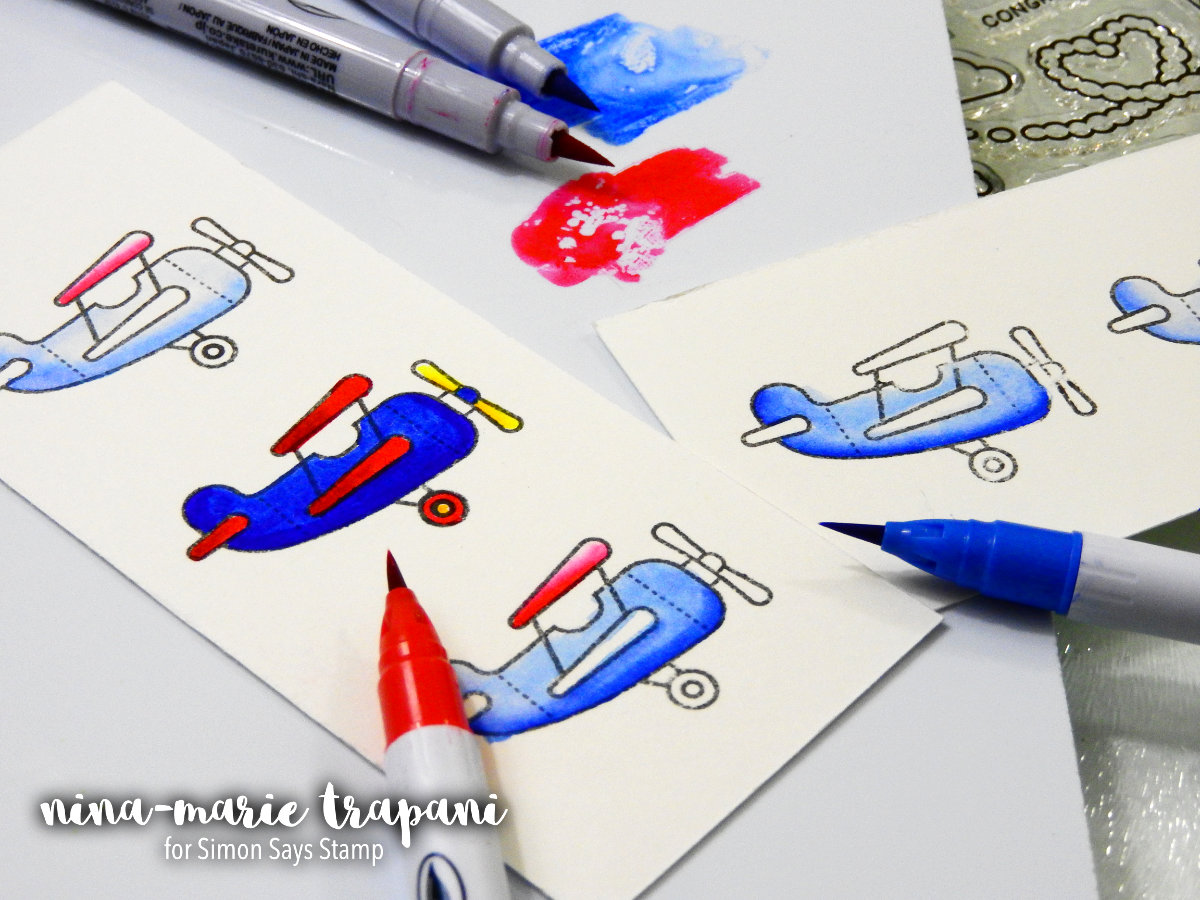
With the Real Brush markers, most everyone colors onto the paper and blends out with water for a watercolor effect. The Felt brush markers of course produce this same effect but you also have the ability to color layer them as well.
The only trick to color layering with the Felt brush markers is that you need to let areas dry after they’ve had a good amount of ink already applied. The Felt brush markers have a tendency to pill the paper if you overwork an area too quickly. But the results of the color layering look great if done with care, as seen in the airplane example above (see the middle airplane on the left).
I colored this airplane with two shades of each Felt tip marker and you can see I got pretty smooth results. Again, I made sure not to overwork any areas. If I were going to need to go back over an area, I would wait until the first layer had a chance to dry for a few minutes before going back in with more color.
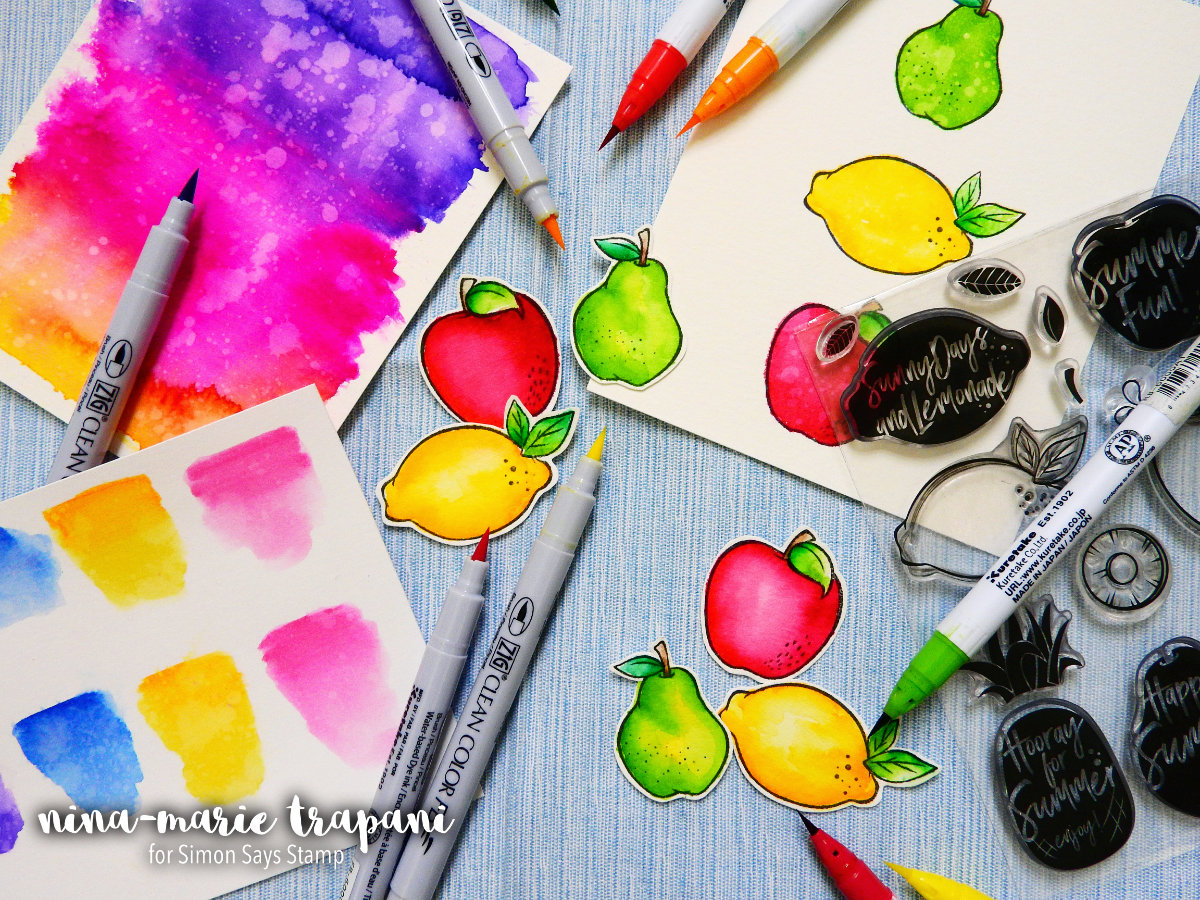
Another fun aspect about both markers is that they react to water beautifully when adding splatters over top. In the example above, I colored each image with one single color of the Felt brush markers and then added water splatters. The result leaves a great variegated finish to the coloring, and you almost can’t even tell that just one marker color was used on each image!
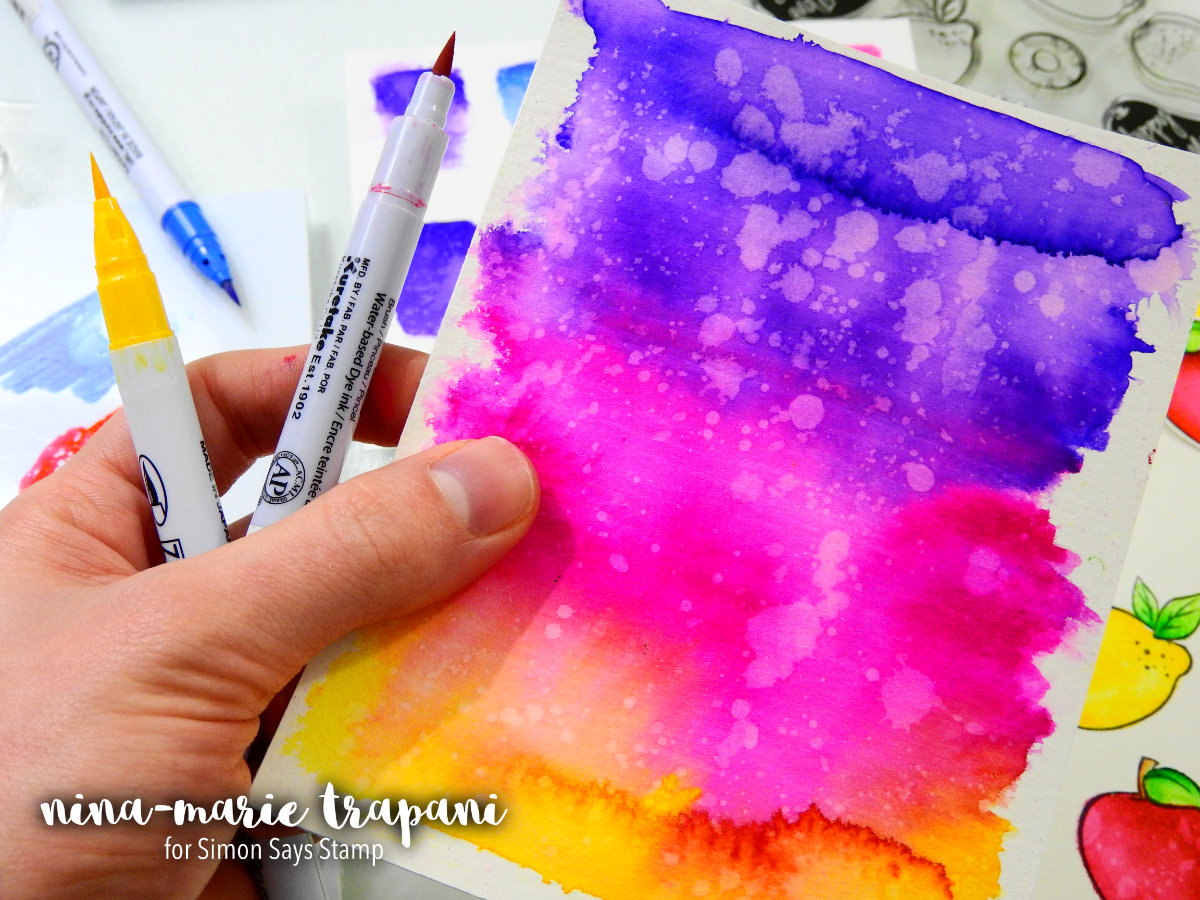
You can also create vivid backgrounds with both of these markers. Because most of you have already seen the Real Brush markers in action, the next example below was done with the Felt brush markers. I scribbled three areas of color onto the paper and then used a wet brush to blend the colors together. Again, because this was done with the Felt brush markers, I used quite a bit of water to get the blended results, but you can see that the intensity of the color stayed intact. Isn’t the color blending gorgeous!?
Yet another thing that you can use the Felt brush markers for is to highlight areas of your watercoloring done with the Real Brush markers. Because the marker colors are exactly the same between the Real Brush and Felt brush markers, you can use the two interchangeably on the same project and not notice any difference in color. I love the Felt brush markers for their detailed nib, whereas the Real Brush tip is a little less precise because of its flexible nature. So by pairing the two together, you have even more creative avenues to explore!
Be sure to check out the video below to see these markers in action and watch the demonstrations of everything I talked about! I hope today’s post and video helps you to decide if you need to add one or both of these markers to your crafty-stash; I had a lot of fun experimenting with these new Felt Brush markers and I think you will too!
Thanks for stopping by and visiting with me today! And until next week, have a fabulous day everyone!
SUPPLIES


Blog Candy Alert!! Follow our blog via email and comment on this post for a chance to win grab bags and blog candy! Remember to tag your awesome projects with #simonsaysstamp on social media so we can see what you are creating!


Thanks for the tips! :)
As fun as it is to see terrific cards and new products, understanding existing products and the differences is just the best post ever. Thanks for the tip tips!
As always, you are full of great information for us!
Great info! thanks for sharing!
Thanks for the great comparison! Very useful!
Great demo
Wonderful coloring of the fruit.
Melissa
“Sunshine HoneyBee”
Thanks for the awesome tips!
Great info. Thanks for sharing!
Thanks for the tips! Great info to keep in mind.
I love my Zig real brush markers.
My only problem has been trying
to match them to a color chart.
The numbers on some of my markers
are different than what the
color chart says – and some of
the numbers aren’t even on
the chart. I gave my copics
away after I got the zigs.
thanks for sharing.
Thanks for sharing this information. I especially appreciate the video as my brain makes more sense of watching things in progress!!
I haven’t tried Strathmore yet. I noticed that your link in the actual write-up is for Bristol but in your products list, it’s for the watercolour paper. I’m assuming you did use the watercolour but would love for you to confirm what’s best with the Zigs, please. Thanks!
Hi Kate! I indeed used the Bristol paper… I mistakenly called it watercolor paper, but it was Bristol! My mind was thinking watercolor when I was filming, LOL!
Thanks so much for your very comprehensive blog and video!! I have the Real Brush markers and didn’t even know about the felt tip markers! I’m always interested in something new to add to my collection! Thank you!!
Thanks for the comparison.
GREAT tutorial! Thank you for sharing.
Thanks for sharing these tips! Love my Zig markers!
Thanks for the awesome and detailed explanation!
Thanks for sharing the tips and comparison for the markers. I am just starting to try markers when crafting so the information helps.
Wow!!! Wonderful coloring of the fruits!!!Thanks so much for the awesome tips!
Nina your video was very informative. I hadn’t heard of these markers before but expect I will be now! It is ALWAYS nicer to see a comparison video so we can see them in action. Pictures just can’t do that so thanks for sharing this!
Awesome video Nina, it is very helpful to see the differences between these 2 types of Zigs!
Thank you so very much for the comparison!!
This is the first info I’ve seen on the Felt Brush markers. I knew there was obviously a difference but the product description for them didn’t really say much either. I’m so thrilled to finally learn the difference between the two. Thank you!
Awesome tips! I wish these would all come down in price. Thanks for sharing with us!
Thank you for sharing this information! Very helpful!
Very informative post.
Thanx for the comparison test!
great tutorial, Nina:)
So grateful for this video update and the comparison of these markers. I just purchased the Real Brush and I absolutely love them for all my water coloring needs. So for now I am sold on these alone. Thanks again!!!
Wow, the coloring is amazing and I appreciate all of the tips.
great tips!!
Thanks for the review–very helpful!
Wonderful tips! Thanks for sharing!
Such a great video!!! I love my Zig markers:)
Great information and help in picking the right tool for the work we plan to do with them.
Great information. Love my Real Brush markers.
Thanks for sharing the information on the marker. Great tips for using them.
Thanks for the great info!
Thanks for showing how to do these!
Thanks for the comparison! The felt tips look like they’d be fun to work with! Bright and beautiful! Thanks so much for the inspiration!
very inspiring!!
So informative and helpful! I just had a lesson with Chameleon markers yesterday! So much to learn!
Great comparison. Thanks.
Thanks for always doing videos. they are so helpful.
Love the vibrant colors! Really enjoyed watching the video. Thanks for the comparison.
Very informant and
looks lovely!
Carla from Utah
What an informative post! Thanks Nina for all your hard work and thought you put into this post.
I am not familiar with either markers although i have considered buying some. Thanks for such a great and thorough posting and video comparing the two!
Thanks for the comparison and thanks for sharing.\
Linda D.
Your demonstration is so thorough–that makes it very helpful for me to understand the differences. I do love my Zig brush markers, but am very intrigued by the bonuses you can get from the felt tips. Thank you!