Steampunk Village with Paula Cheney + Last Day of Summer School Sale!
Hi bloggers! Happy Friday to you! We have arrived at our last day of Summer School & we sure hope you’ve enjoyed this special feature with extra inspiration, tips, tricks, & techniques! Be sure to tune in Monday for all of the Summer School Blog Candy Winners!
To celebrate the last day of Summer School and say THANK YOU for those of you who have followed along, we’d like to offer a coupon for 20% off all Ranger products! This sale is valid through 11:59 PM Eastern Standard Time on June 23rd, 2013
Please use code rangersale
When you go to check out, enter the promotion code at the bottom of the page that says “Billing & Shipping” at the top. There will be a box for you to enter your promotion code which will automatically deduct this amount from your total upon check out. When entering your code please do not add any spaces and be sure it is entered in all lower case.
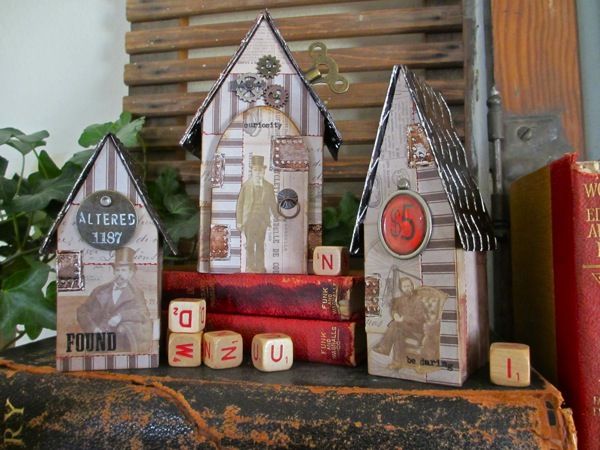
We are so pleased to have the magnificent Paula Cheney back as a guest on the blog to show us how to make this phenomenal Steampunk Village!
Hi again, Paula here! Super excited to share my Steampunk Village with you today. The houses are made using the Tim Holtz Artful Dwellings die – but I’m going to take it a step further and make them 3-D. I made a village like this at Christmas time but when January rolled around and the little village had to be packed up I was so sad to take it down. So, todays alternative is for everyday use…no packing up (at least till December). Enjoy!
(All instructions pictured left to right, top to bottom)
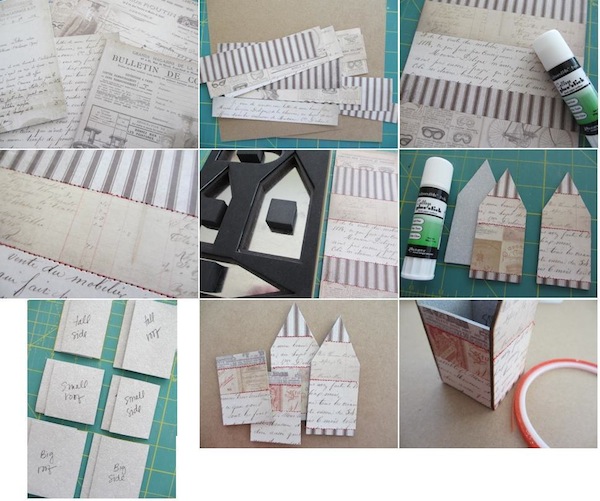
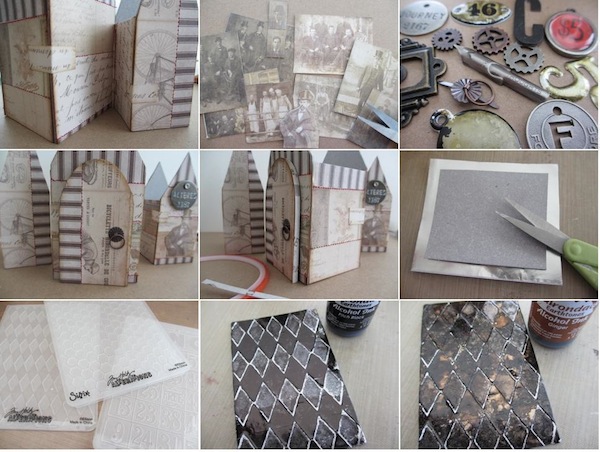
(1)Cut a variety of 6 x 6” papers from the back of the Tim Holtz French Industrial Paper Stash. Cut at least 4 of the 6 x 6″ papers into random sized strips. Also cut 3 pieces of cardstock 6 x 8 1/2” (I am using Ranger Kraft cardstock) (2)Use a Collage Glue stick to adhere the strips to each of the 3 pieces of cardstock, making sure they butt up against each other but do not overlap. (3)Use a sewing machine to stitch between the papers or for you sewers out there, “stitch in the ditch”. (4)Use the Tim Holtz Artful Dwellings die, cut TWO of the cardstock pieces as well as two matching pieces of Grungeboard. Note: there is one rounded top house piece in this die. I used this as a door so I only needed to cut one of them. Only the pointed top pieces were made into houses.(5)Use a Collage Glue stick to match up the pieces and glue them together. Once glued, place under a heavy book for 30 minutes. This will cement the paper and Grungeboard together. (6)Since we are making three little 3-D houses, we need sides and a roof for each. Using the measurements below, cut 2 sides and 2 roof pieces for each house from Grungeboard. Use a Sharpie to mark each piece accordingly.
roof – 2 x 2 1/4″
(7)Cover each SIDE piece with the remaining cardstock (do not cover the roof pieces with paper). Each house you create should have a front and back, 2 sides, and two roof pieces. (8)
Use 1/8″ Wonder tape to put the house pieces together. Way easier than liquid glue. (9)
If there are little pieces of red thread hanging, I just covered them with extra paper bits.
Blog Candy Alert! Join our following and comment on this post for a chance to win a special blog candy! Winners will all be announced next week!


There are no comments.
Leave the first?