Snowflakes that Won’t Melt
Hi readers! Happy Saturday! Have you ever looked at a snowflake? I mean really closely? The detail and uniqueness is incredible for those 2 seconds you can look at it before it melts in your hand!! Today on the blog, we asked for some help on how to make some of these beauties that won’t melt! With the help of some lovely Penny Black dies, I think we did just that! Check it out and enjoy!
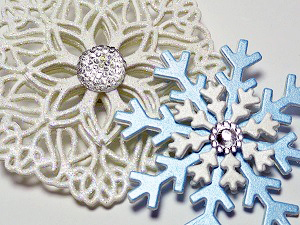
Gather your glitters, shimmers and gems as Elizabeth Allan shares how she made these one-of-a-kind, non-melting snowflakes.
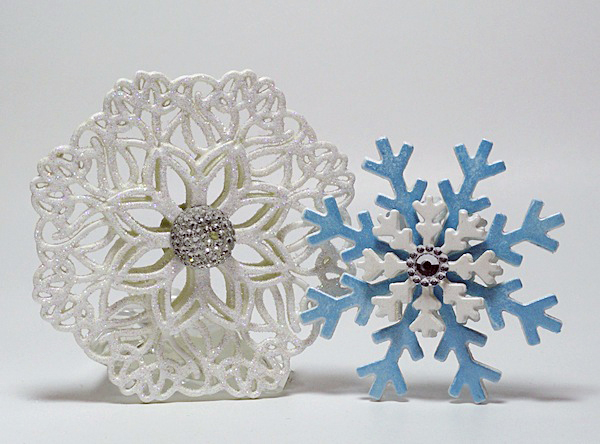
By layering Penny Black’s Creative Dies Gossamer and Crystal Trio, eye-capturing dimension is seen on BOTH sides of the snowflakes. The secret is in the symmetrical designs!
Let’s make some snowflakes…
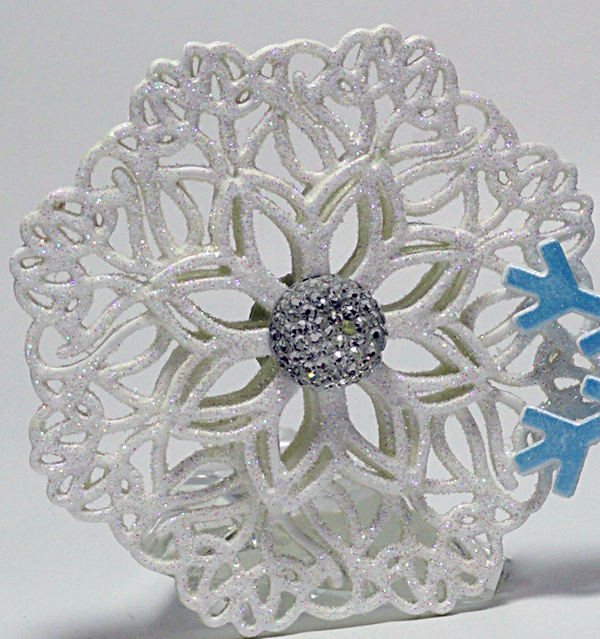
1) Die cut Gossamer 10 times from white cardstock. Leave 4 of the die cuts in their original full design and trim the remaining 6 to create the center star portion.
2) Using Gel Medium as an adhesive, align and glue two full snowflakes together (back to front). Repeat with the remaining two full snowflakes.
3) Align the two completed sets of snowflakes and glue back to back. Tip/Hint: Insert fishing line between the two layers if a hanging mechanism is desired.
4) Apply Duo Embellishing Adhesive with a paintbrush to the front of the design and let dry until clear and tacky. Sprinkle with glitter and tap off excess. Repeat on the other side.
5) Align and glue 3 of the smaller star portions: back to front then back to front. Repeat again with the remaining 3 pieces.
6) Align and attach the small stars portions (one to each side of the design) with Power Adhesive Tabs. Apply glitter as outlined in Step 4.
7) Accent the snowflake with crystal gemstones.
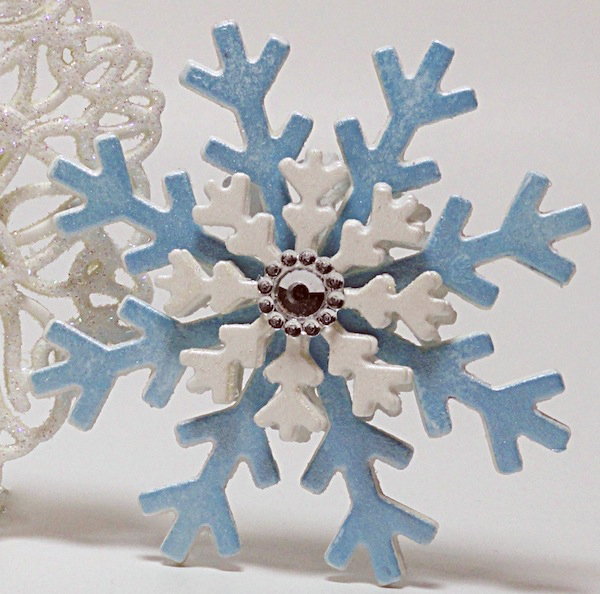
1) Die cut the largest snowflake in Crystal Trio 4 times and the smaller snowflake 6 times from white cardstock.
2) Using Gel Medium as an adhesive, align and glue two full snowflakes together (back to front). Repeat with the remaining two full snowflakes.
3) Align the two completed sets of snowflakes and glue back to back. Tip/Hint: Insert fishing line between the two layers if a hanging mechanism is desired.
4) Pounce the front of the snowflake with VersaMark Watermark Ink and apply Pearlescent Blue PanPastel with a small sponge. Spray with a fixative. Tip/Hint: Aerosol hairspray is a great fixative alternative. Repeat on the other side.
5) Align and glue 3 of the smaller star portions: back to front then back to front. Repeat again with the remaining 3 pieces.
6) Pounce the front of the smaller snowflake with VersaMark Watermark Ink and apply White Fine Pearl Medium PanPastel with a small sponge. Spray with a fixative. Repeat with the second set of small snowflakes.
7) Align and attach the small snowflake portions (one to each side of the design) with Power Adhesive Tabs.
8) Accent the snowflake with crystal gemstones.
For design variations, have fun experimenting with colored cardstocks, a dazzling array of glitters and the new pearlescent PanPastels.
Endless possibilities from present toppers to ornaments to window card embellishments!
Love these dies? Would you like to WIN them? Hop on over to Penny Black’s Facebook page, like their page, and comment on their wall that Simon Says Stamp sent you! They will draw the winners soon! Good luck!
Supplies:
 |
 |
 |
 |
 |
 |
 |
 |
 |
 |
 |
 |
Thanks for reading today and thanks to Elizabeth for being our guest!
Blog Candy Alert!! Follow our blog via email and comment on this post for a chance to win a special blog candy!


Your snowflakes are gorgeous, I love the dimension! Thank you
Beautiful “non melting” snowflakes!
Absolutely gorgeous!
These snowflakes are incredible! Elizabeth has taken those amazing intricate dies and added dimension and sparkle .. it’s magical!! I am amazed at how her photos! She was able to capture the glitter and sparkle. I am always inspired by Elizabeth Allan’s art!
WOW, how gorgeous are these! Let it snow :)
Very pretty snowflakes and a great job using her own touch!
What a good idea, thanks for the inspiration.
These snowflakes are gorgeous !!! Super idea – love the dimension idea !!!
The snowflakes are just beautiful. Love the dies. Visited Penny Black to say hello.
WOW! These are stunning.
These snowflakes are gorgeous as everyone is saying.
Snowflakes that don’t melt are the best kind to have. All snowflakes should last forever because they are all so beautiful.
These are gorgeous!
These are beautiful! Creative way of using dies other than on cards =)
These snowflakes are stunning!
Gorgeous!!! Love those dies!!
Love the snowflakes!!!! The dies are so fab!!
Great idea! I’ll surely try to experiment
GORGEOUS snowflakes Elizabeth!!!
LOVE the SHIMMER, LOVE the SPARKLE, LOVE the DELICATE designs too!!!
Beautiful snowflakes!
Such gorgeous snowflakes. Love all that sparkle.
These snowflakes are just glittery gorgeous goodies and I’m going to have to get me some snowflake dies!!!! Oh, and I follow you guys via email, and I’m soooo glad that I do as you give me so much inspiration overload!!! At least I’ll never be bored!!!
Amazing! So gorgeous. Thanks for sharing the instructions. I follow the blog by email.
These are beautiful!
Gorgeous! Who doesn’t love snowflakes!
This snowflakes won’t melt for sure but they melt my heart! So gorgeous!!!!! Thanks for a chance to win :)
Stunning, just imagine a Christmas tree decorated with these. Lots of work, but they would be beautiful. Thanks for the inspiration.
Beautiful snowflakes, love the glitter!
Just beautiful snowflakes. They would look loveky on a tree.
These snowflakes are stunning!!
Amazing snowflakes….who doesn’t love sparkles! !!
Like most folks, I love snowflakes. These are beautiful. Thank you for the tutorial.
Oh these are just
gorgeous!
Carla from Utah
Beautiful!
Absolutely Stunning!! :D
These are really beautiful!
These are absolutely beautiful!
Omg! this is a awesome ideal for trimming the trees and accessories to some adornments sitting around. I always did like the snow dies. Deck the halls with glittery snowflakes…fa la la la la la la la la
What a great idea!! These are going to be perfect as tree toppers for my set of mini Christmas trees!!! TFS!!!
These snowflakes are amazing! I could see hanging these on the tree or putting them on a gift with a bow…so pretty!
LOVE these new dies and what she did with them.
Love these snowflakes. Thank you for sharing! xx
These are stunning! Thanks for showing us how to make them.
Beautiful snowflakes and I am swooning over the pearlescent panpastels. Thank you for explaining how to use them!
Gorgeous snowflakes,love it !!!!
Love the snowflakes—wow!! Love everything about this post–even the photography. It wuld be great if here was a post about photographing the creations–settings used, etc. I sure do need help on that!
So, so pretty! I love glittery things!
absolutely gorgeous!! Love those dies!
Absolutely gorgeous!
Just beautiful, Would make wonderful ornaments or package toppers.