Sending & Wishing: Creative Ways to Stretch Your Supplies!
Hi readers! Happy Sunday to you! I hope you all are having very relaxing and fun weekends! I’m very excited to WELCOME first time Simon blog guest designer Kelly Latevola! She is as sweet as she is talented! And boy, does she have both qualities going on! Check out these floral beauties featuring some of our exclusive products! *Drool*
Read on and enjoy!
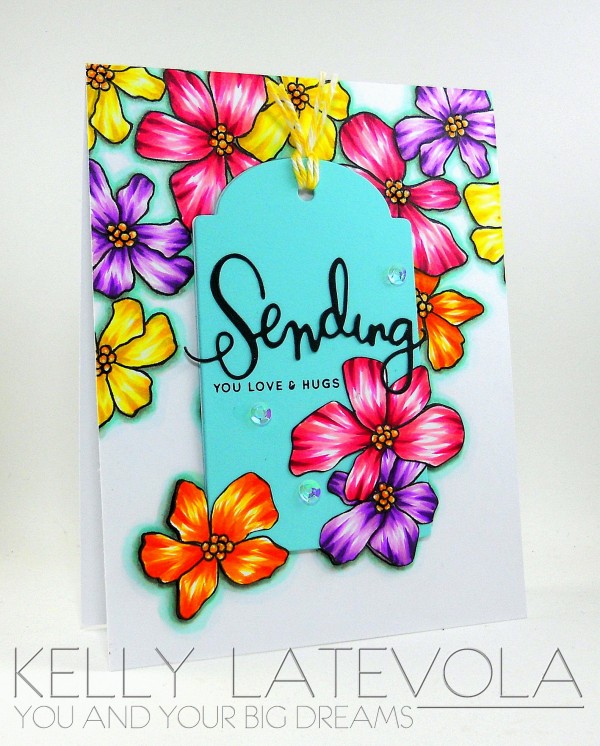
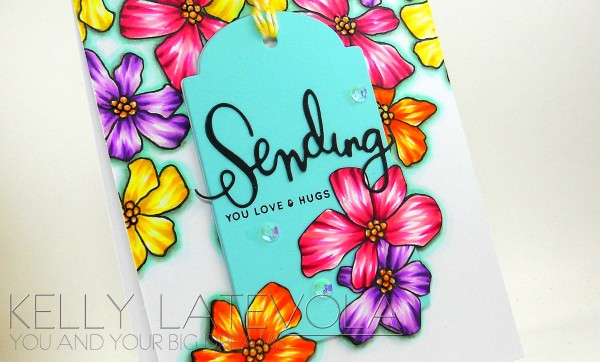
I started by stamping my Artful flowers on a white card panel. I created a few masks of the flowers so I could tuck a few behind the others. After they were all stamped I removed any masks and began coloring with my Copic markers. I usually start with my lightest to darkest for my base layer. To get some more blending I then go in reverse darkest to lightest. Basically I color the flower twice :) After all the flowers were colored I set to work on my background color. I used gray markers to add in a shadow behind the flowers. This really helps them appear 3D. After the shadows were done I outlined all the flowers in some blue greens. You can color right over the gray it’s okay, you won’t hurt it, I promise!
Once the coloring is done I outlined the flowers with a copic multiliner to really help them pop. I also added a few white dots with my gel pen to the centers.Now the scary part. I die cut a tag right out of the middle. Ahh. It is kind of scary after you spent all that time coloring but it’s usually worth it ;)
I die cut a second tag out of some Robin’s Egg Bazzill card stock. I also stamped and colored three flowers and fussy cut them out. Don’t forget to color your edges black for a finished look! I used my Black Soot Distress Marker for this. I arranged the flowers onto my tag by matching them up with the outline on my stamped panel. The sentiment is a combination of stamps and dies from Sending and Wishing. After stamping the sentiment I threaded some yellow bakers twine through my tag and added it to my card with foam tape. A few sequins and some glossy accents in the flower centers finished it off.
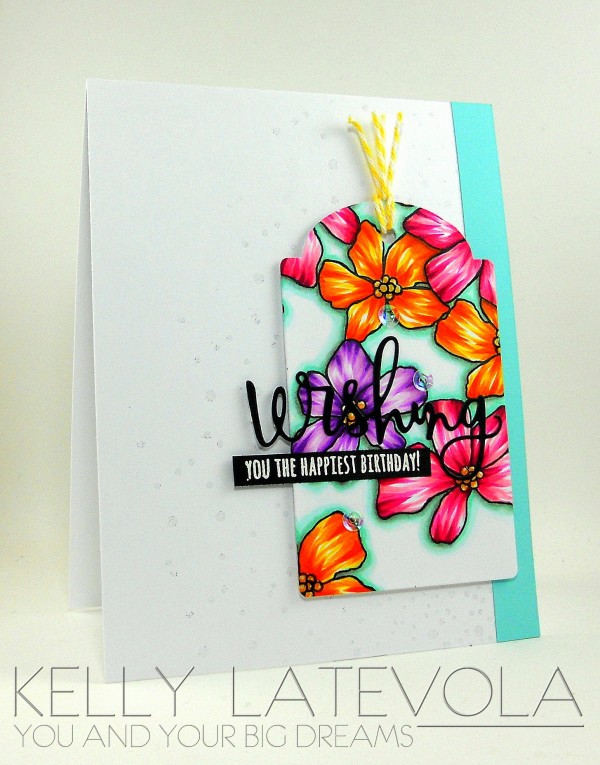
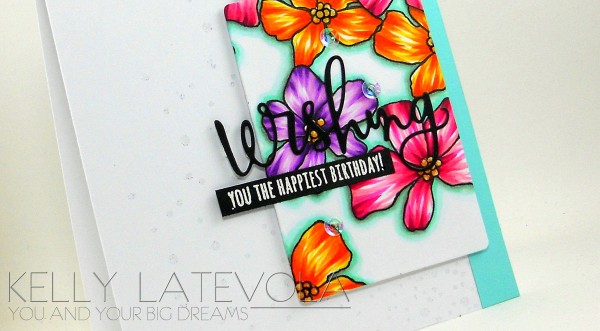
For the second card I didn’t have to do much since my focal point was already created. Yeah for less work! I added more yellow baker’s twine, glossy accents, and sequins. The sentiment is another combination of stamps and dies from Sending and Wishing set. Seriously, you can create so many different sayings with these. It’s wonderful! I decided I wanted this sentiment to really stand out against my busy background so I heat embossed it on black with white embossing powder.
For the background I took a white panel and trimmed it to 4 x 5.5. I stamped the circles from the Falling Backgrounds set horizontally and heat embossed them using Wow Neutral Ultra Shimmer. I love how this adds interest but doesn’t take anything away from the tag. I tried to vary the length of the circles reach by stamping more or less of it. This makes sure it reaches the edges behind my tag and trails off above and below it. I added this panel plus another piece of Robin’s Egg Bazzill card stock to my card base. The tag was added on top with foam adhesive and that completed the card.
SUPPLIES:
 |
 |
 |
 |
 |
 |
 |
 |
 |
 |
 |
 |
 |
 |
 |
 |
 |
 |
 |
 |
 |
|
|
 |
 |
 |
 |
 |
 |
 |
 |
 |
 |
|
 |
 |
 |

Blog Candy Alert!! Follow our blog via email and comment on this post for a chance to win a special blog candy!


I love this girl!! Thank you so much for featuring her exquisite talent and this stunning card here at Simon’s so more of the world can get to know her! Hugs, Darnell
What beautiful cards – the flowers look so lush!
What a beautiful card–love the colors!
ABSOLUTELY GORGEOUS! It looks like you can take the flowers right off the paper!
These have to be THE most beautiful flowers I have ever seen!!! What an amazingly talented artist!!
Beautiful flowers, colors are vibrant and really pop!
Absolutely stunning! The colors are fantastic!
Gorgeous coloring! Those cards are spectacular!
Gorgeous!! Hope to see more of your inspiration here on Simon Says Stamp
Strikingly beautiful cards!
Oh so very pretty!! Love the technique and the coloring!!!
Kelly, wow, you’ve taken floral cards to a whole new level. I’m just in awe of what you’ve done. And THANK you for sharing about using gray to help pop our images, creating shadows behind them, then using the blues over that. Yow!!!
Your flowers are amazing!! such beautiful cards!
What a perfect designs for summertime! The vivid colors chosen are almost tropical and make you think of a warm beach on a quiet island. :) These cards would definitely brighten the day of anyone blessed to receive one! I especially like the sentiment “Sending hugs & love!”
Love the depth and detail and the clever way you used both tags.
WOW!! The coloring on those cards is just amazing!! Beautiful cards!! :-)
BOLD & BEAUTIFUL cards Kelly!!!
LOVE your colouring and striking designs!!!
What beautiful cards. So colorful, bright and happy. Thanks for sharing such gorgeous projects.
Gorgeous tags and flowers! Amazing colors!
Wow, those flowers are popping right off the card. Gorgeous!
I am a sucker for bright BOLD colors and this card has two of my favorite things … Bright Bold colors and Flowers. But what I like most about this post is it features my middle name *Not literally* but Creative is something I am ALL about so this post really perked me up featuring many things I dearly love !!
Very pretty creations! Love the vibrancy of the colors too!
Kelly’s card is simply gorgeous, stunning, eyecatching!
Gorgeous vibrant cards! Love them!
Beautiful card. Die cutting after coloring is brave. It looks fantastic.
Ooh, those flowers are amazing. They glow! Love both cards. Hugz
Fabulous cards, love the stamps and sentiments x
Beautiful cards. Your color combinations are awesome.
Oh WOW! These two are GORGEOUS!!! Love the design and colors. :-D
I like all the colors on these wonderful cards!!! They are so cheerful!
So vibrant…love it!
Love the bright, bold colours and the way you made two cards out of one!
What beautiful colors. Matching up those flowers looks difficult I am not sure I am talented enough to do that. Thanks for sharing
Wow great card, love the copic coloring
Your cards are fabulous! I love the bright colorful flowers. Your copic coloring is perfect! I also love how you cut the tag out to create two cards!
wow–that is stunning!!
The coloring is fantastic! Beautiful cards.
The coloring on those flowers is ahhmazing! What versatile flowers….pastel watercolors to vivid colors and everything in between.
Kelly’s coloring makes my eyes pop!!! She is”not to be believed” amazing. All of her work is so vibrant and alive with movement and color. I am hoping for a Kelly video.
Just beautiful, love the coloring!!
WOWSERS!! These two cards are just an amazing pop of colour which I love! Might just have to check out those stamps and dies!! Also a brave move die cutting after colouring, that may have gone awfully wrong but she’s done an amazing job!
Such a gorgeous project. Love all the beautiful colors.
Beautiful cards. She has an eye for color!
Brilliantly colored cards Kelly!
I totally love this colour combo. It suits summer very well :)
Wow! I want to recreate these cards! Love the bright colors! Thanks for sharing all the how to!
I’m a huge fan of Kelly’s and agree – she is one amazing, talented lady! Her cards using Artful Flowers are simply STUNNING!
These cards are so gorgeous and I’m super happy that you’re highlighting a NEW designer!
Oh Kelly, I love both of these cards! The colors are so bright and rich! I love the layouts too. The falling raindrops background is a great accent to the second card!
Love all the pretty bright flowers! Lovely cards!