Under the Sea with Newton’s Nook!
Hi friends! Happy Sunday! Please welcome special guest Larissa Heskett from Newton’s Nook to share two adorable card samples featuring new stamp and die sets. Read on and enjoy!
Hello, crafty friends Larissa here today with a couple FUN Projects using some of the NEWLY released Newton’s Nook Designs Products! I’m SUPER HAPPY to be here and I hope I can INSPIRE you to try something NEW with my Projects today!!
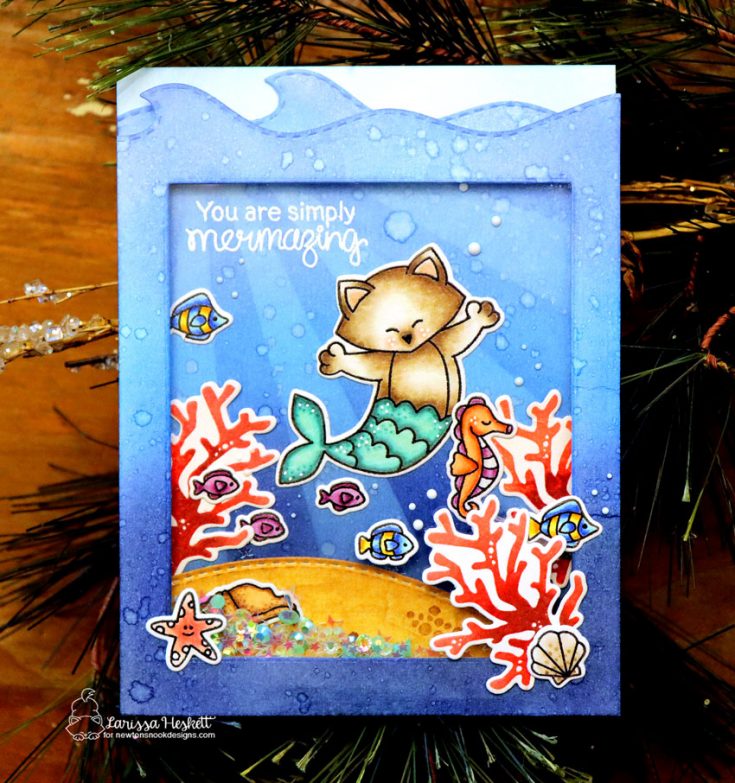
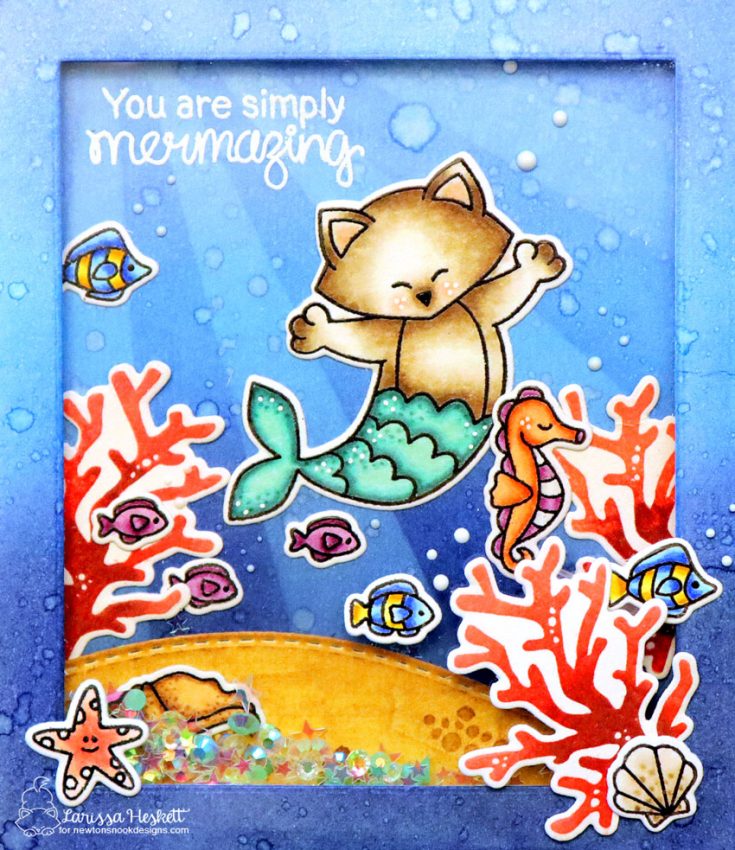
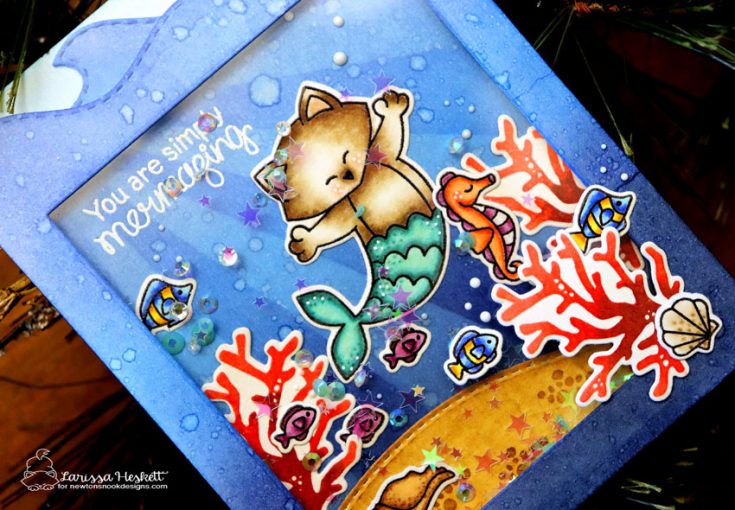
My first card is a shaker card. I LOVE to make shaker cards. Building a scene that mixes both new and older stamp sets. Its FUN to look through your stash and bring NEW life to some of the images you might not have used in a while. I started by stamping and embossing the Images from the Newton’s Nook Designs Purr-Maid Newton Stamp Set, Narly Mermaids, and Manatee-rific. I colored the images using Copic Markers.
Newton: E40, E43, E47 R20
Mermaid Tail: BG10, BG13, BG18
Starfish: R00, R20, R14
Angel Fish: Y11, Y13, Y19 B000, B12, B18
Seahorse: YR00, YR02, YR18 V01, V06, V12
Purple Fish: V01, V06
Sea Shell: E40, E43, E44
Then I used some Distress Oxide Inks in Tattered Rose, Abandoned Coral and Aged Mahogany to stamp the coral images from the Tranquil Tides Stamp Set. Then embossed them using some Wow clear embossing powder. I used the coordinating Dies from Purr-Maid Newton, Narly Mermaids, Manatee-rific and Tranquil Tides to Die Cut the images out and added some white gel pen details then set them aside.
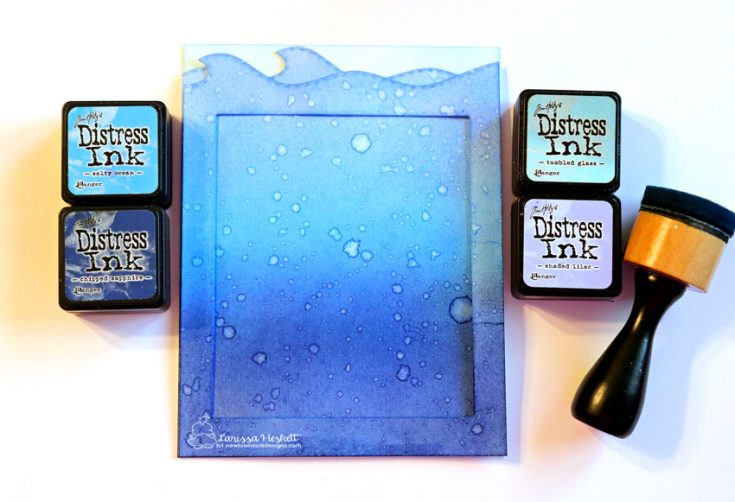
For the base, I started with an A2 Distress watercolor panel and inked it up using Tumbled Glass. Then I inked two more panels using Distress Inks in Tumbled Glass, Shaded Lilac, Salty Ocean and Chipped Sapphire. I added some water droplets using a Distress Sprayer for some dimension. Then I die cut the top of each of the panels to create some waves using the Newton’s Nook Designs Sea Borders die set.
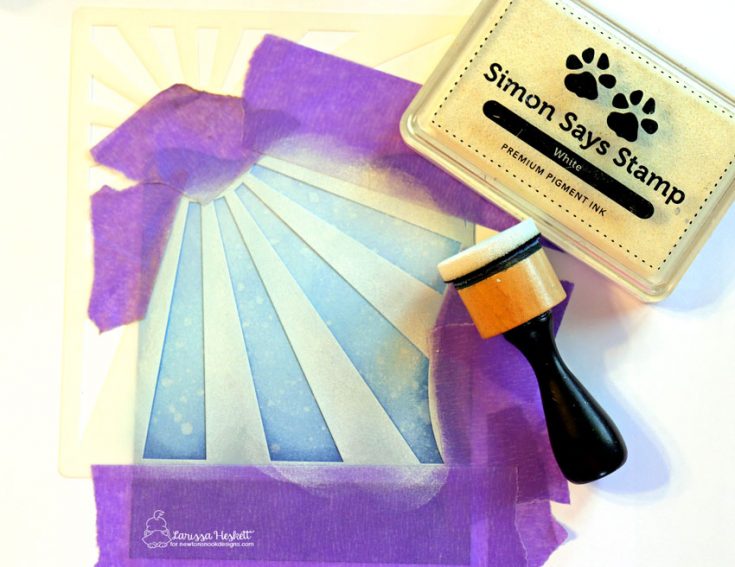
To add even more interest to my underwater scene I took the Newton’s Nook Designs Sunscape stencil and adhered it over my Distress inked panel with some Therm O Web Purple Tape. Then used some Simon Says Stamp white pigment Ink and inked it up using a Ranger mini ink blending tool. I love the look of light filtering in from up above. I used the Newton’s Nook Designs Land Borders Die Set to die cut a sandy bottom and used Distress inks in Antique Linen and Gathered Twigs to Ink it up. I added some stamped details using the image from the Tranquil Tides Stamp Set and Gathered Twigs.
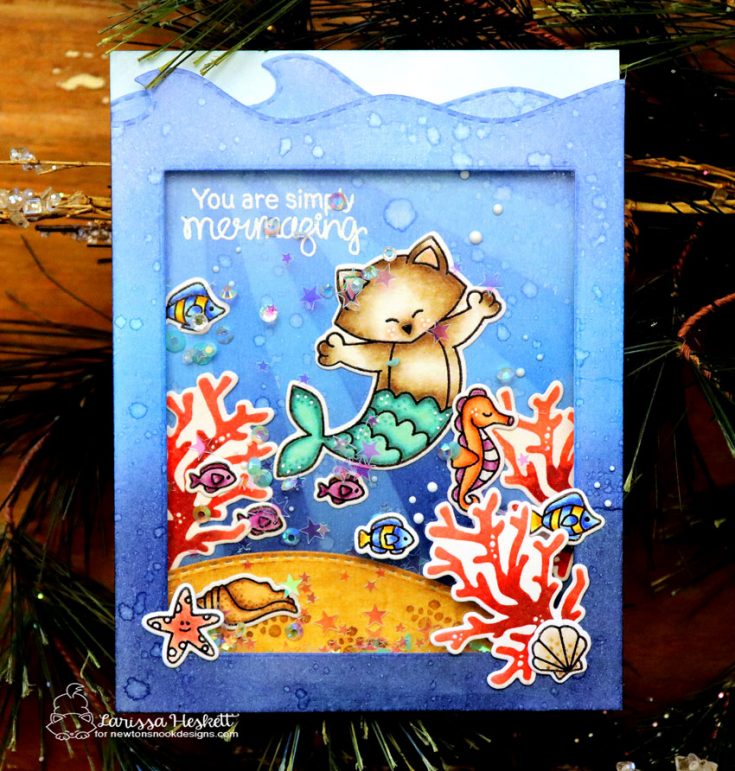
I stamped and embossed the sentiment from the Narly Mermaids Stamp Set in Wow Opaque Bright White Super Fine Embossing Powder. Then I adhered all of my images creating the FUN underwater scene using Therm O Web Mixed Media Multi-purpose Adhesive. Some Tonic Studios Simply White Nuvo Drops were used to create some water bubbles coming from the images and set aside to dry. I adhered some Hot Off the Press Acetate Sheet to the back of my card front panel using some Therm O Web iCraft Double Sided Tape. I used several Therm O Web 3D mounting squares to create my foam frame layer and added a mixture of Pretty Pink Posh Iridescent Mini Star Confetti, Sea Glass Jewels and Studio Katia Iridescent Crystals for the shaker elements.
I adhered a few of the images to the front of the frame to make it even more of a 3D Design and I really LOVE the way it turned out!
SUPPLIES:
|


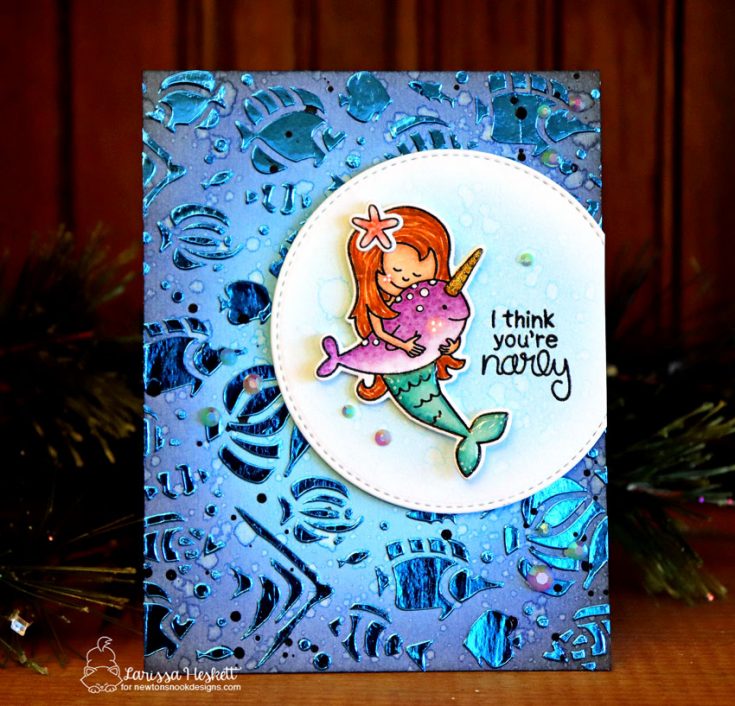
For my second card, I created a BEAUTIFUL stenciled and foiled background using the NEW Newton’s Nook Designs Tropical Fish Stencil and some Therm O Web Transfer Gel and Denim Deco Foil.
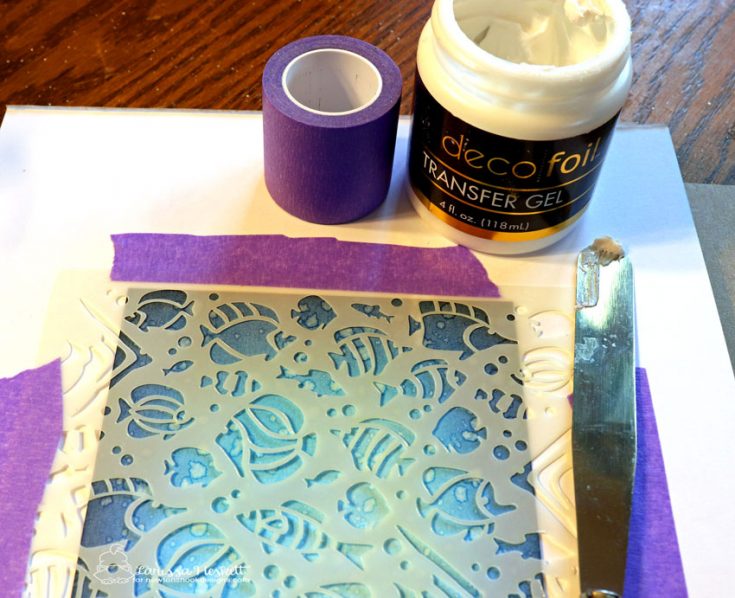
Adhere your Tropical Fish Stencil over a distress inked background. I used Tumbled Glass, Shaded Salty Ocean, Chipped Sapphire and Black Soot using some Therm O Web Purple Tape. Then I used a Tonic Studios Metal Palette Knife to apply an even layer of Therm O Web Transfer Gel. Remove the stencil and set aside to dry.
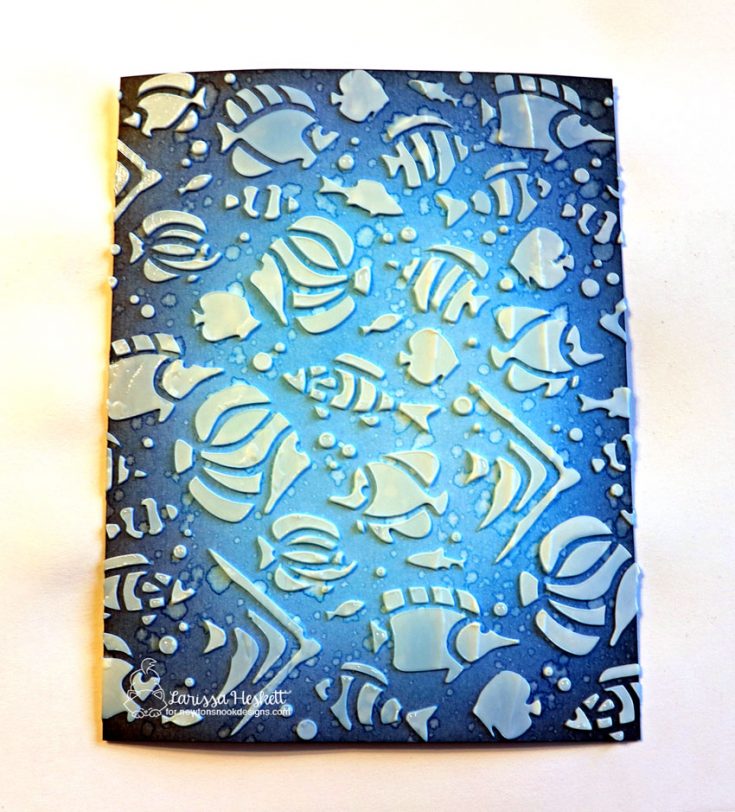
Once its dry cut a piece of Denim Deco Foil and run it through your laminating machine.
Then SQUEAL in delight after you remove the backing paper! I added some Black Soot Distress Paint Splatters and my background was finished.
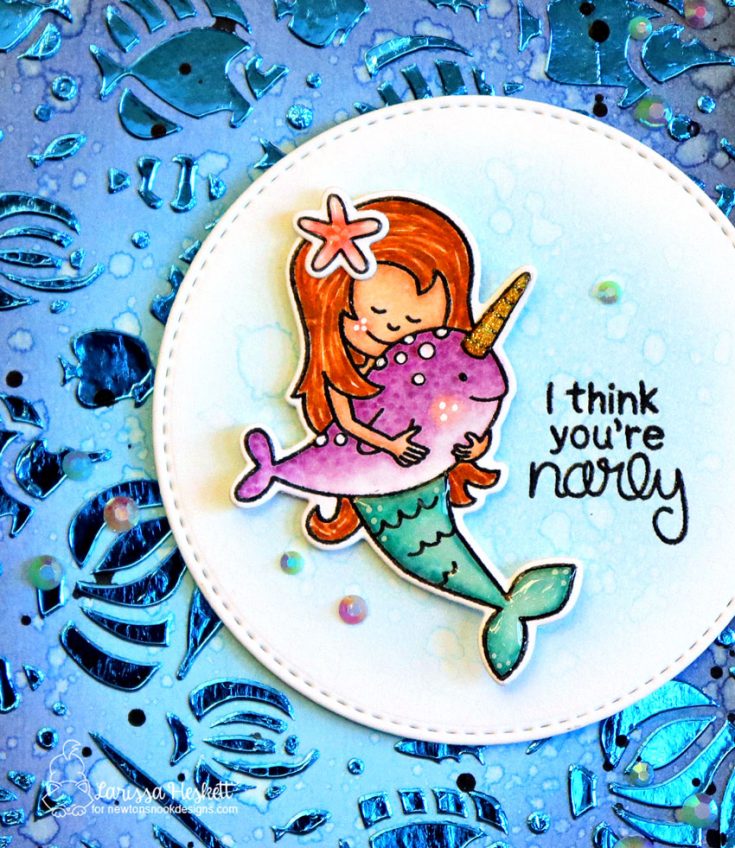
I stamped and embossed the Narly Mermaids and Manatee-rific images and colored them with Copic Markers.
Mermaid Tail: BG10, BG13, BG18
Mermaid Hair: E97, E99, E39
Mermaid Skin: E00, E11, E13 R20
Narwhal: V01, V06, V12 R20
Narwhal Horn: Y11, Y19, YR23
Starfish: R00, R20, R14
I used the coordinating Narly Mermaids and Manatee-rific Dies to die cut the images out and added some white gel pen details along with some Tonic Studios Morning Dew, Sea Breeze, and Honey Gold Glitter Nuvo Drops for some Dimension and Shine. I die cut a Simon Says Stamp Stitched Circle and inked the center using some Tumbled Glass Distress Ink. I stamped and embossed the sentiment and added a sprinkling of Pretty Pink Posh Sea Glass Jewels and Pansy Purple Jewels to finish it off.

THANKS SO MUCH for stopping by today and I hope you have a FABULOUS WEEK!
SUPPLIES:
|


Thanks so much for stopping by and to Larissa for being our guest!

Blog Candy Alert! Follow our blog via email and comment on this post for a chance to win special blog candy!


Love those cards. I really love the deco foil look. Love the colors also.
Fabulous cards! Love the fun purrmaid and the rays of light through the water. The fish stencil is fun.
What darling cards!
LOVE the ‘mew-maid!’
Fab fun cards! I LOVE your wonderful shiny fish!
What I’m falling love with most on these cards is the stencils! The idea of them is still pretty new to me. How have I missed them?! Eager to give them a try! Thank you!
THANKS SO MUCH for the SWEET Comment!! You’d LOVE Stencils!! They can be used in SO MANY ways and can be used for simple texture or more advance techniques with other mediums!! Hope you’ll share if you decide to try them!! I’d LOVE to see what you’re making!! Newton’s Nook Designs has a Group Share Page on FB https://www.facebook.com/groups/NewtonsNookDesigns/ and weekly Inky Paws Challenge Blog you can join in on too for chances to WIN!! Hope you have a FABULOUS WEEK!!
Oh my goodness, that cat mermaid is too cute and that foil background is FABULOUS!!!
The cat mermaid is adorable!
I love the Purr-Maid and the background is gorgeous. I love the use of the rays stencil to add the look of sunlight coming through the water. I loved the Narly card also with the use of the Deco Foil. I’ve seen it used with alcohol inks but not this way. Spectacular!!
These are adorable! :) I love the foil fish.
Cute cards.
Love that cat! I already follow by email.
OMG these are adorable!
Love the shaker and the
foil, fabulous designs.
Carla from Utah
Such adorable cards. The backgrounds are awesome.
Thanks for sharing…
Gorgeous backgrounds!!
I love the brilliant colors of these two cards and the happiness they both show.
These cards are sooooo ADORABLE!!!!
I especially love the mer-cat card. The fish and sea flora are wonderful.
Lovely! Especially those backgrounds so fun!
Very cute cards. Love the gorgeous images and the beautiful colouring.
Oh these are just so cute and fun!
Love all the sea theme cards – so sweet!
These cards are so lovely! The background of the second one is fantastic with the foil!
THESE ARE CUTE
I love your sea themed cards Larissa. The stenciled background is just amazing with that foil. Thanks for sharing with us.
Love the wave detail on the top of the card
Fabulous cards! I love the underwater scene with Newton!
Such adorable cards!!
Sweet cards! Thanks for the inspiration.
I have been stuck in bed with a horrible flu for over two weeks now, so am just getting around to a few emails and had to pop by to comment on the adorable cards in this post!
I love the way you did the rays on the first one. Super cute!
And oh my gosh, not only is the sentiment on the second one just the sweetest, but yes, I am squealing over the foiled bg!!! Fabulous! :)
Back to bed for me, but wonderful job!
Such a SWEET comment!! You MADE my DAY!! Sending HUGE Get Well Wishes your way and THANKS for the comment!! Hope you feel better SOON and have a FABULOUS WEEK!! <3
Fabulous cards! I love the backgrounds on both cards! Love ths 3 D effect of your shaker and the foiling on your 2nd card!
The colors and layouts are gorgeous, thanks for sharing!
Wow for foiled fish and narwhals. Hugz
Beautiful and cute cards! Very inspiring!
Beautiful cards! What a fun release! Love the colours, and that deco foil effect – wow!
Lovely work!
Love the stenciled background and fabulous “mermaids” especially!
Both cards are so adorable! Love the dimension and shine on the mermaid card, but he cat mermaid, well 2 of my favorites put together in one LOL!! Great cards, love them! Thanks for sharing!
Newton as a mermaid is really irresistible !! ?
Lots of great new-to-me ideas. What a fun technique on that second background! Wow just wow! Thanks!
Such darling cards and I love that stencil!!
Fun kids-cards! Love the texture on the 2nd!
Love the waves on the top of the card, so creative
The cat is very different and funny. I like your sense of humor, and your coloring.
Fun and cute card! I loved how you made the look of light filtering in from up above, so clever. Thanks for the inspiration.
What a great cards Larissa I love the stunning backgrounds and the gorgeous images. Thank you for showing.
These are super fun!! Fantastic cards! :)