Rhonda Palazzari WOWS with Stencil Inspiration!
Hi Bloggers! Welcome to another work week– Happy Monday! I’m so pleased to have a first time Simon guest designer, Ronda Palazzari on our blog today! She has quite a presence in the industry and I’m thrilled that she could carve some time out to share some exclusive content with us on our blog!
Without further ado, I’ll let Ronda take it away:
I love it when I can use the same product in different ways. Like on these two tags using my kaleidoscope stencil from the Crafter’s Workshop. The backgrounds were made using the same stencil with different products to create two unique tags.
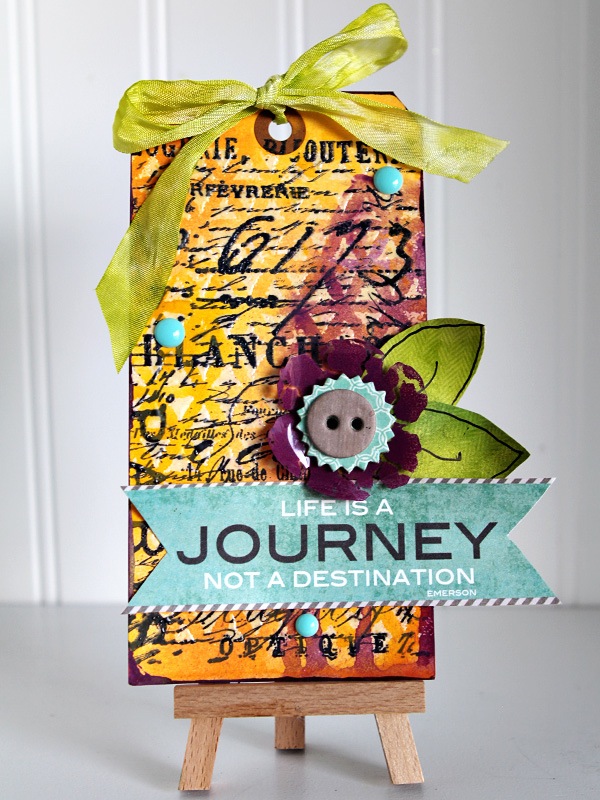
Journey Tag
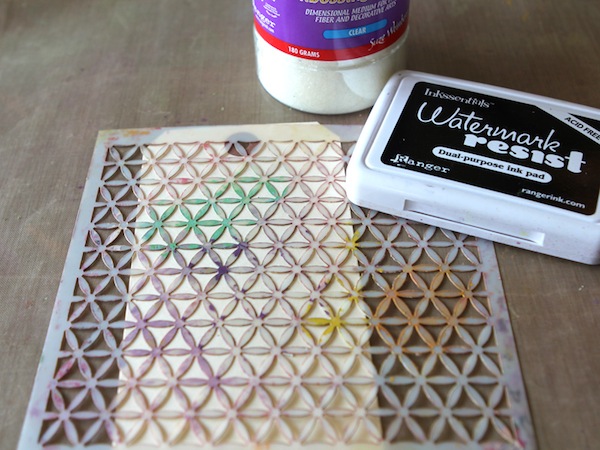
To begin this tag I used my kaleidoscope stencil with embossing ink and clear ultra-thick embossing powder, commonly called UTEE. Simply lay the stencil on top of the manila tag and push the pad through the stencil. Next sprinkle with clear UTEE and heat until the granules melt. Another option is to stamp the background first and then emboss the tag. Next grab some Distress paints in colors you like and add them to your craft mat in small piles near each other. Add water to these colors and swipe your tag through the paints careful not to over mix. I started with just mustard yellow and orange marmalade. Wipe off excess from the embossed areas and dry it using a heat gun. Repeat this process with another color to give it that pop. Dip the edges of the tag into the paint as well.

Next lay your stencil over the flower and with a paint brush carefully paint over the stencil onto the shape. Do not push too hard or it will bleed under the stencil. Another option is to sponge it on using a cosmetic sponge.
Heat the Clearly for Art to dry the paint and to make the piece flexible. Once the clearly art heats up enough, bend the edges of the flower towards the center creating a unique piece. Don’t like the shape? Heat it up again and it goes flat. You can play with this for hours. Add on some chipboard buttons to create a layered center for the flower.
Layer this adorable flower over the trimmed down journey title card. The leaves are made from My Mind’s Eye Memorable 6×6 pad. I covered the paper with a thin wash of gesso and painted on some Lime Metallic Maya Mist. I then hand cut some leaf shapes out and added in the doodled lines. For that pop of color, add enamel dots around the tag. Lastly I used the lime metallic mist to color the crinkle ribbon to top the tag.
Shop supplies for the Journey Tag:
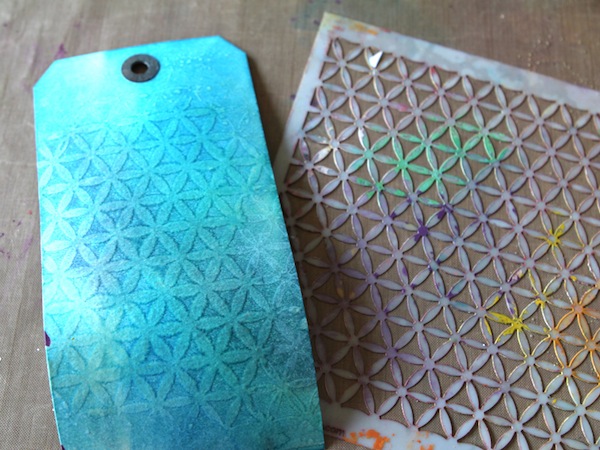
To begin this tag, I used a manila tag, some distress inks, a craft mat and a blending tool. Here I am using monochromatic colors but you can blend any colors your like.
Next spray your stencil with a misting bottle. You want to have the stencil covered with water but not soaking.
Flip this stencil over (water side down) into the distress inked tag. I like to use a roll of paper towels to press it into the tag.
Gently lift the stencil off the tag and dry with a heat tool. The water removes some of the ink to create a ghost effect.
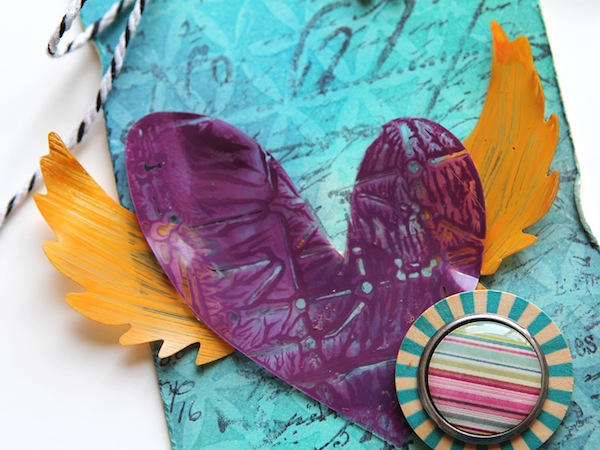
After distress the edges of the tag, I used the same stamp, Tim Holtz Papillon, I used in the Journey tag but I stamped off the ink to create a lighter image. I die-cut some more shapes out of the clearly for art, this time a Sizzix/Tim Holtz Heart Wings Die. On the heart I used my subway stencil, this time painting the stencil with distress paint and then stamping it onto the heart to get the reverse image. I painted the wings using distress ink in a sweeping motion to create the streaks on the wings. The little flowers are shrink plastic die-cut flowers to match the wings. After placing the heart on the tag, I added some layered buttons & brads, a metal word band, and a small heart brad. I love a pop of black so I tied some twine at the top to finish the tag.
Shop Supplies for the Hope Tag:
Thanks for reading today!
P.S. Don’t forget to join us this afternoon for DAY ONE of Simon Says Stamp: Summer School!!!
Blog Candy Alert! Join our following and comment on this post for a chance to win a special blog candy!


I hope everyone is in a great mood this Monday! I just read Rhonda Palazzari’s post about her inspiration with stencils, and it got me thinking about the importance of customization in our business.
Like Rhonda with her unique tags, I am looking for something special for lash extensions. I need to find customized lashes that will create a unique and distinctive look. I’m sure each of us wants our lashes to stand out and be unique, just like Rhonda’s work!
Let’s discuss what lashes you use and where do you find the best inspiration for your extensions? Maybe someone has tips for choosing customized lashes?
How are you?
Keep up the great work
Wow, how interesting your comment is, it shows that you have really read the article completely, which is great, regarding your question about extensions, I don’t know, I understand that there must be several stores that sell them but the problem is finding one that sells quality extensions, right? That’s always the complicated part, I couldn’t recommend any to you but someone on this entire site surely will.
Wow, how interesting your comment is, it shows that you have really read the article completely, which is great, regarding your question about extensions, I don’t know, I understand that there must be several stores that sell them but the problem is finding one that sells quality extensions, right? That’s always the complicated part, I couldn’t recommend any to you but someone on this entire site surely will.
Many stores sell extensions, but not all of them meet professional standards. A great place to start when looking for
lash supplies
is Stacy Lash. making them a great option if you’re aiming for customization and quality. It is a great option if you’re aiming for both customization and quality. Here you can find lash suppliers that offer not only variety but also quality to ensure a comfortable and long-lasting look for clients.