One Stamp, Five Ways: Wintertime Critters

Hi friends! Happy Friday! I’m so excited to share this ADORABLE latest edition of “One Stamp, Five Ways” with Suzy Plantamura! Read on and enjoy!
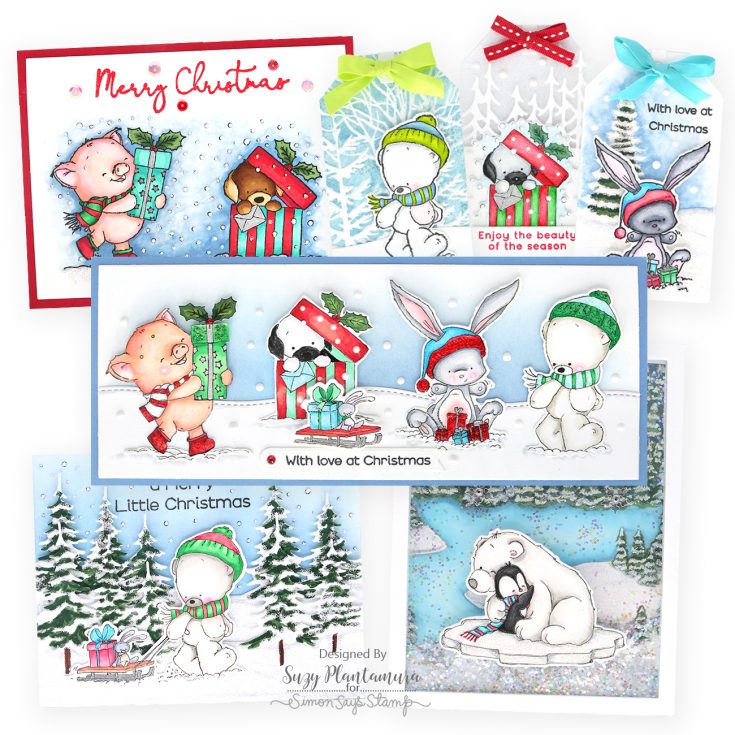
I know Halloween is right around the corner, but I did my “one stamp, five ways” guest post at the end of August with a Halloween stamp set. So today, I’m jumping ahead to another upcoming holiday that you should not be thinking about today, Christmas! Making Christmas cards is my favorite subject, but picking a holiday stamp set to use was the hard part! I went with a new set that was part of the Season of Wonder release called Wintertime Critters. I also used LOTS of other holiday/winter SSS products from the past on my projects because I love mixing the old with the new!
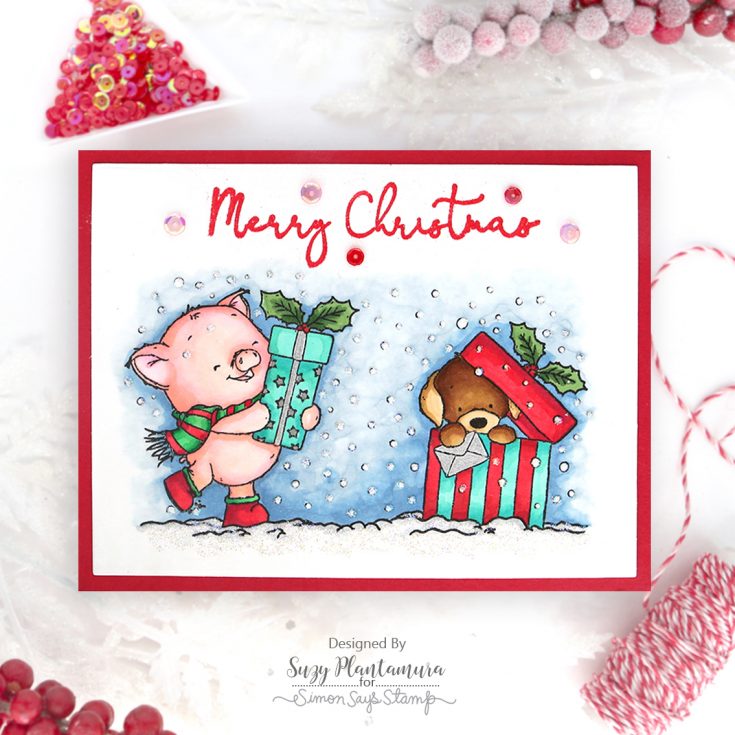
I stamped two of the creatures in the Wintertime Critters stamp set with black ink on white cardstock. They have little snowballs around them, so I spaced them a little and then drew my own snowballs over the sky and between them. I also joined the two grounds with a black pen. I colored the images in with Copic Markers. I used a Silver Uniball for details. For wintertime skies, I like to use B91, B93, and B95 Copics and then go over them with a Colorless Blender Pen which gives the sky a mottled look.
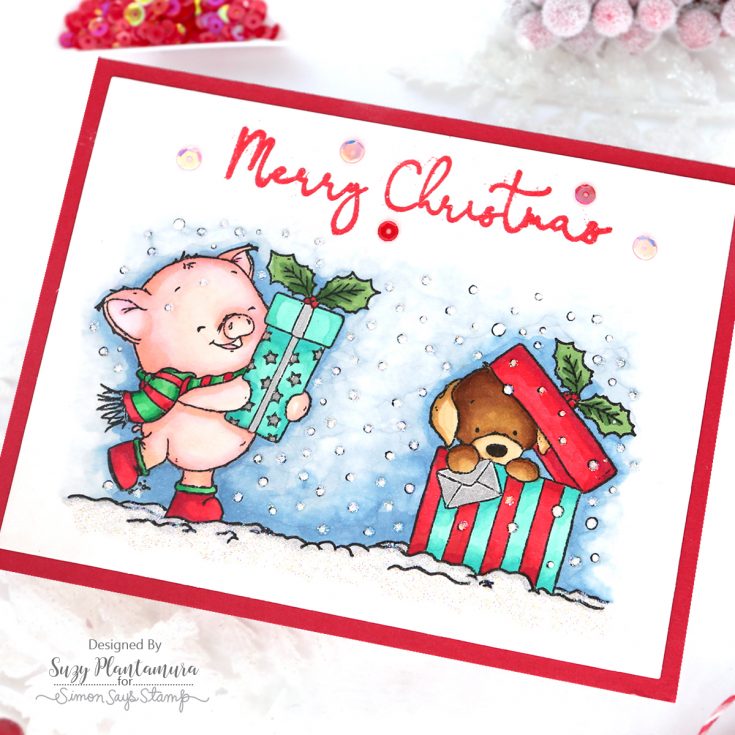
I die-cut this piece with a rectangle from the SSS Basic Rectangle Dies. I attached it to a red cardstock card base. I used Red Geranium embossing powder for the sentiment on the top of the card. I used a white Uniball gel pen over all the snow drops and then added some Crystal Ranger Stickles over them. I also used the sparkly glitter glue over the ground area. I used some of the new Red Berries Sequins around the sky.
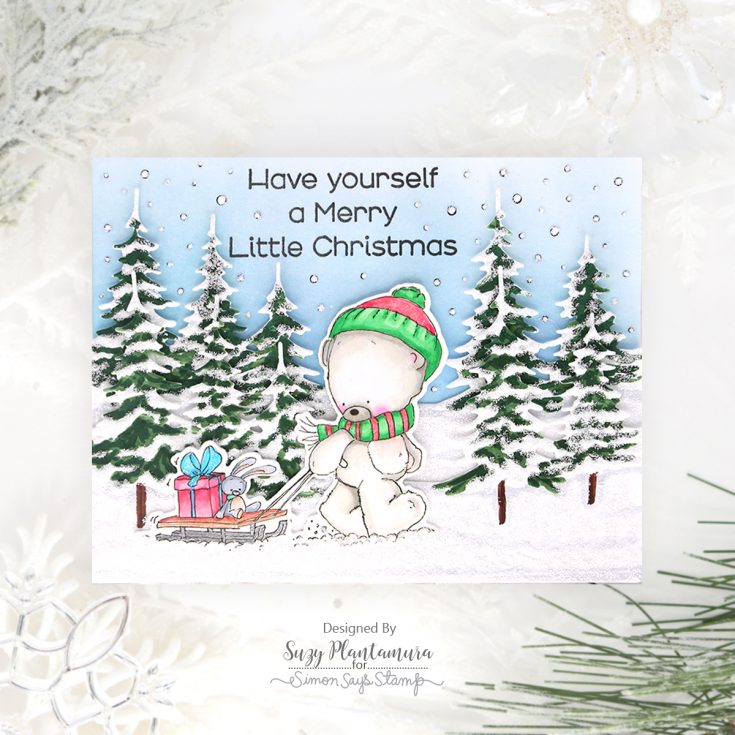
I discovered an older product in my stash that I used for the background of this card, and I love it! It is called the Pine Landscape Embossing Folder and Cutting Die. I die cut the cutting die portion twice out of white cardstock leaving about 1.5” for the ground. I then embossed both pieces with the matching embossing folder. I colored in the flat areas of the pine trees with my go to Copics for winter trees – Mistletoe and Pinetree Green. I then inked a sky with Marine and Morning Pawsitively Saturated Ink. I placed the two snowbank dies on top of each other with foam tape behind the top one. I used Ranger Frosty Lace Stickles glitter glue over all the snow on the ground and the trees. I also added snow to the sky with a black fine tip marker and then colored inside it with a white Uniball and last, added the Stickles over it as well.

I stamped the little polar bear with sled from the Wintertime Critter stamp set in Latte Pawsitively Saturated Ink on white cardstock. I colored him with Prismacolor Pencils and then used a really fine tip black marker to outline him. I attached him over the snowbanks with foam tape behind him. I added more Stickles around the snow at the bottom so it would look like part of the ground. I stamped a sentiment from the stamp set on the top center with Intense Black Ink.
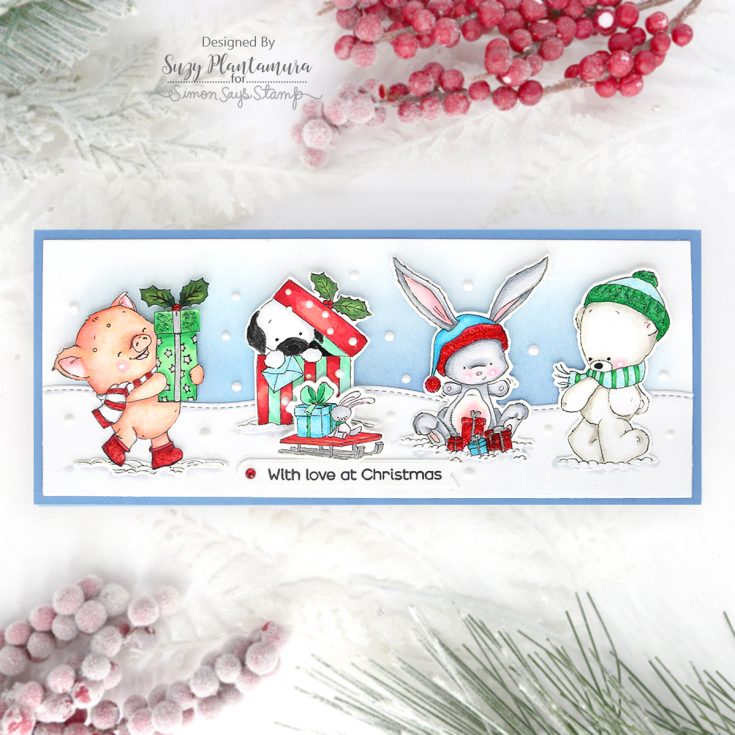
I wanted to fit all 5 of the Wintertime Critters on one card, so of course I went with a slimline design. I stamped them all with Latte Ink and colored them with a mix of Copics and colored pencils. I cut the sled off the bear and cut the pig and the dog in the present box out, so they didn’t have snow around them. I outlined them with a very fine tip black pen again. What can I say, I don’t like black outlines much haha.
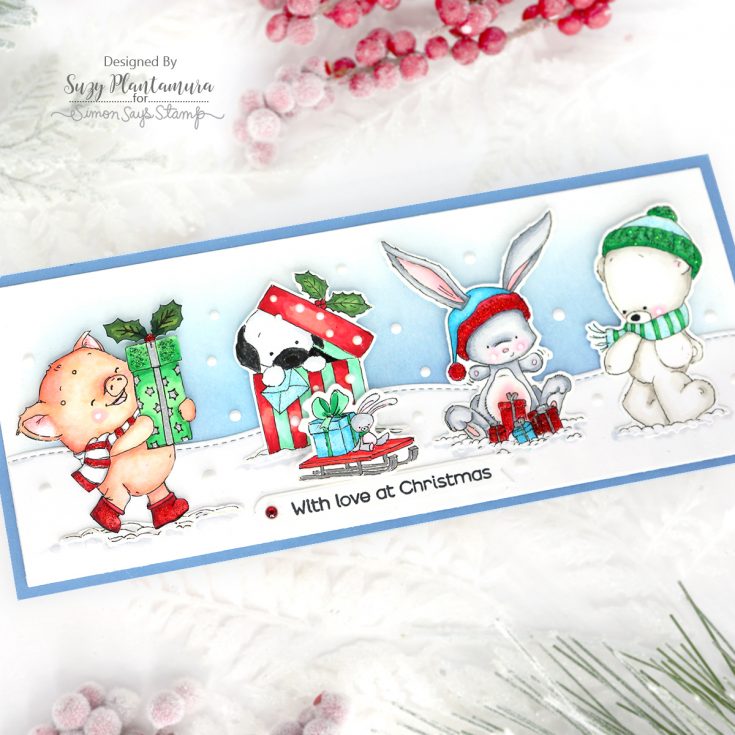
For the background, I die-cut a white rectangle using the SSS Nested Slimline Rectangle Dies (which I use on every one of my slimline cards!). I then die-cut a stitched slimline snowbank from white cardstock. I used Morning Pawsitively Saturated Ink for the sky, not taking the color all the way out to the edges. I attached the snowbank over the sky and attached that to a blue slimline card base. I added four of the critters (couldn’t fit the fifth!) and the sled using foam tape behind their heads. I stamped a sentiment with black ink on the bottom. I used Chalk Stick Vintage Drops for snow. I used Nuvo Glitter Drops over the hats and presents.
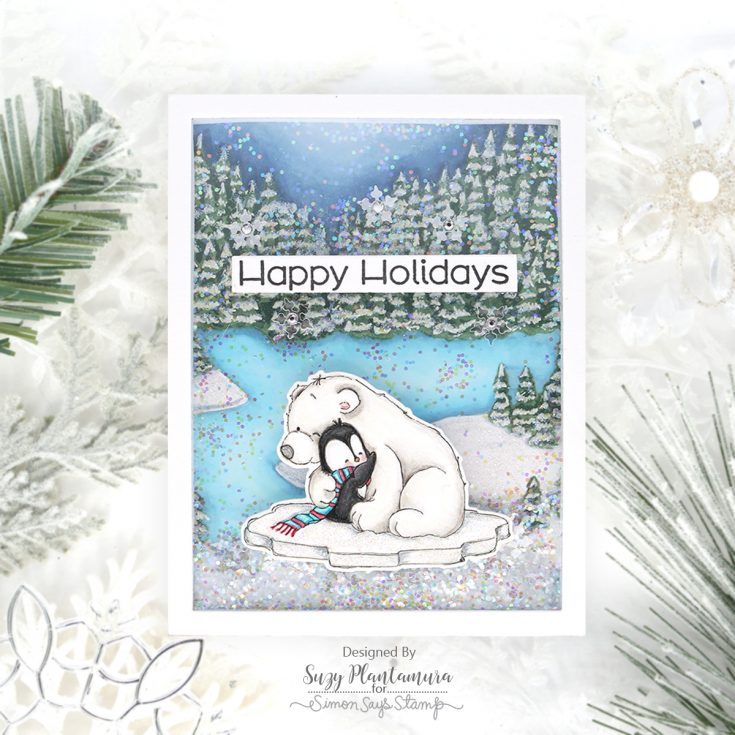
This is my favorite card of the 4 plus 3 tags! I started with another of my older embossing folders called the Pine Tree Meadow Embossing Folder. I colored it with Copics fast and really messy! I used the same two colors of green for the trees and a white Uniball over the white areas. I used B91, B93, and B95 for the sky. I used lighter/brighter blues for the water. I die-cut the largest frame in the MFT A2 Frame Dies out of white cardstock and then twice out of SSS Foam. I glued a piece of acetate under the white frame and then glued the two foam pieces below that. I filled the opening with Pretty Pink Posh Snowflake Sequins and SSS Unicorn Glitter – lots of it! I attached the frame over the filled background.
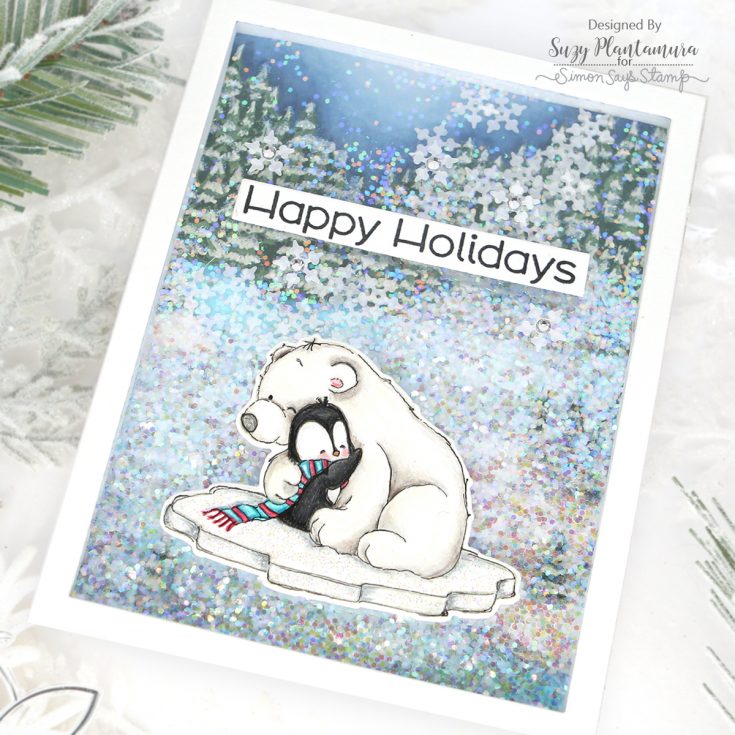
I stamped the bear and penguin and colored him in with colored pencils. This is my favorite image in the stamp set – it is so cute! I attached him over the front so that he looks like he is sitting on the snow inside the shaker. I stamped a sentiment from the stamp set on a SSS Label Banner Die with black ink and attached that to the top of the acetate. I then glued several of the snowflake sequins around it with silver rhinestones in their centers. I shook it for this second photo so you can see the snow all over the background. I’ve never used glitter inside a shaker before, but I really like it.
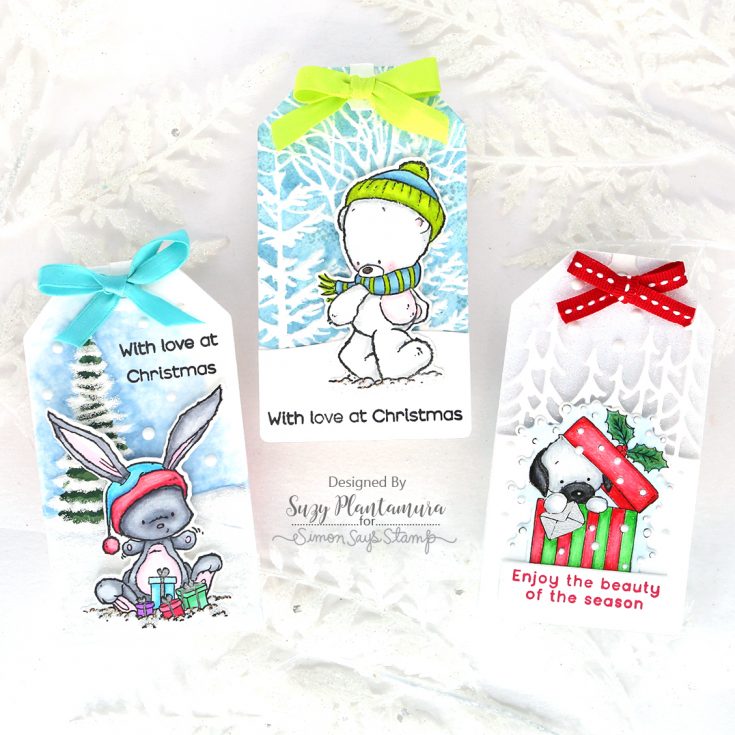
I made three tags using the CZ Nested Tag Dies (second largest) die-cut from white cardstock. The images in this stamp set are so perfect for using on holiday tags and are just the right size for this one. I again pulled out some older winter dies and embossing folders. It was so good to use them all again!
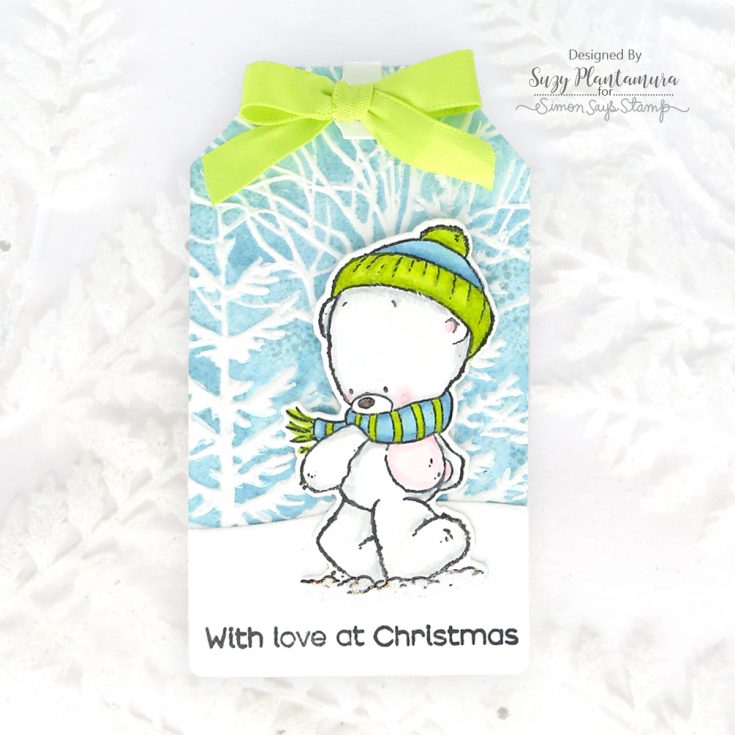
I embossed the first tag with the Forest Border Embossing Folder. I colored over the sky area with a Greenish Blue Copic. I went over it with a Copic Colorless Blender to give it a lighter/mottled look. I used a white Uniball to go over the trees where I colored over them with the Copic. I added a snowbank to the bottom of the tag. I stamped a sentiment from the stamp set with black ink on the bottom L used the polar bear stamp, but I cut off the sleigh. This time I used black ink to stamp it, so you can see how thick the lines are. I colored it with Copics and pencils. I like the thick lines on this one! I used a green bow on the top.
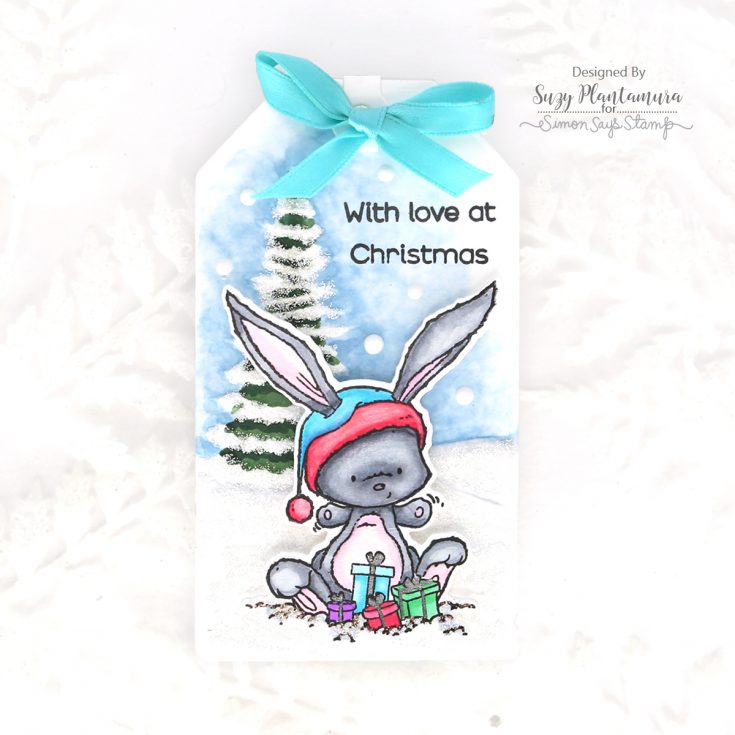
I embossed this one with the Snowy Path Embossing Folder. I used the same color Copics for the tree and the sky. I added Ranger Frosted Lace Stickles over all the snow. I stamped the sentiment by cutting into two pieces using black ink. I stamped the bunny with black ink also and colored him in with Copics. I added him to the bottom and used white Chalk Stick Nuvo Drops on the sky. I used a blue bow on the top.
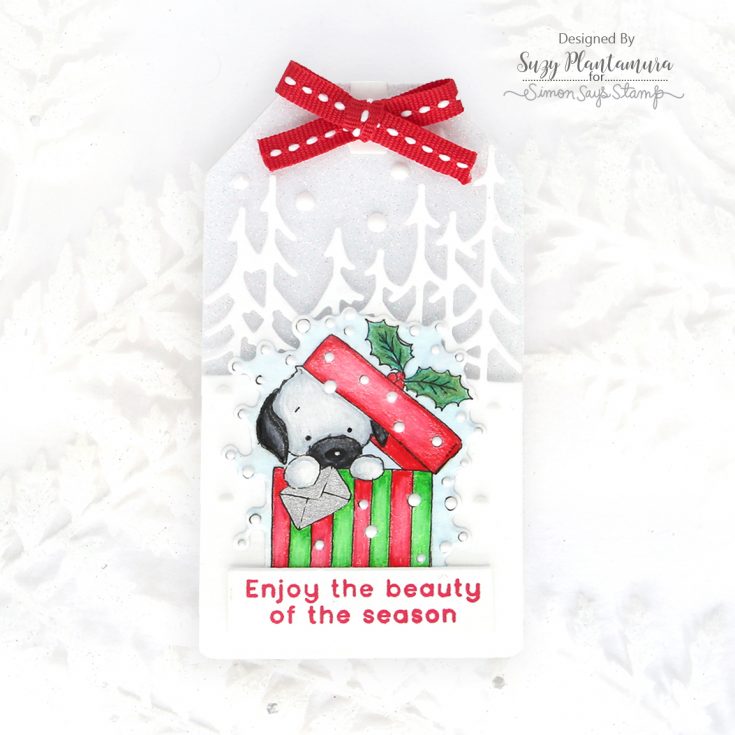
I die-cut the tag out of SSS White Glitter Paper. I then die-cut another tag out of white cardstock and used the Little Evergreen Trees die over this one so the trees would be in the sky. I attached that over the white glitter tag. I used the dog in the present on this one colored with pencils. I stamped a sentiment from who knows what stamp set (had it in my stash from last year) on a SSS Sentiment Label Die using Rainbow Splash Crimson Ink, which is my new favorite red red! I tied a red bow on the top of the tag.
Conclusion: Who is in the mood to dress up and go trick or treating tonight now? Haha Sorry to disappoint if you were hoping for another HW post as I did on HW the past two years! Hopefully this post will get you thinking about the next big holiday coming quickly (oh poor Thanksgiving, why do we always forget about you?!!!). This Wintertime Critters stamp set can be used for holiday cards but could also be used for just general winter themed cards. And don’t forget to pull out all your winter and holiday products when making your cards for the season as they are fun to incorporate with new products! Thanks for visiting and happy ALL the holidays!!! -Suzy
SUPPLIES:
|


Thanks so much for stopping by, and thanks to Suzy for being our guest!


Eeep! I may have to gush a bit! These are so cute, just darling!! I love all of the projects shared above, but that little bunny is just TOO CUTE! TFS!!
Lori S in PA
Oh My Goodness!!!!! These are soooo Sweet and ADORABLE!!!!!
These are just amazing … I love what Suzy did with this adorable stamp set
so super cute
Winter-themed creative projects always have a unique cozy feel, especially when layered stamps and seasonal colors are used this well. Posts like this remind me how much weather and winter routines shape everyday creativity during colder months. I recently came across https://www.snowdayprediction.ca/ which has been surprisingly useful for checking school closure chances before planning winter activities or family schedules.