One Stamp, Five Ways: Flowers for You

Hi friends! Happy STAMPtember® eve! My goodness, I cannot believe how fast this month (and year, quite frankly) have FLOWN! We’re back with the fabulously talented Suzy Plantamura in our monthly One Stamp, Five Ways series showcasing the gorgeous Flowers for You set. Be sure to read on to learn more, and enjoy!
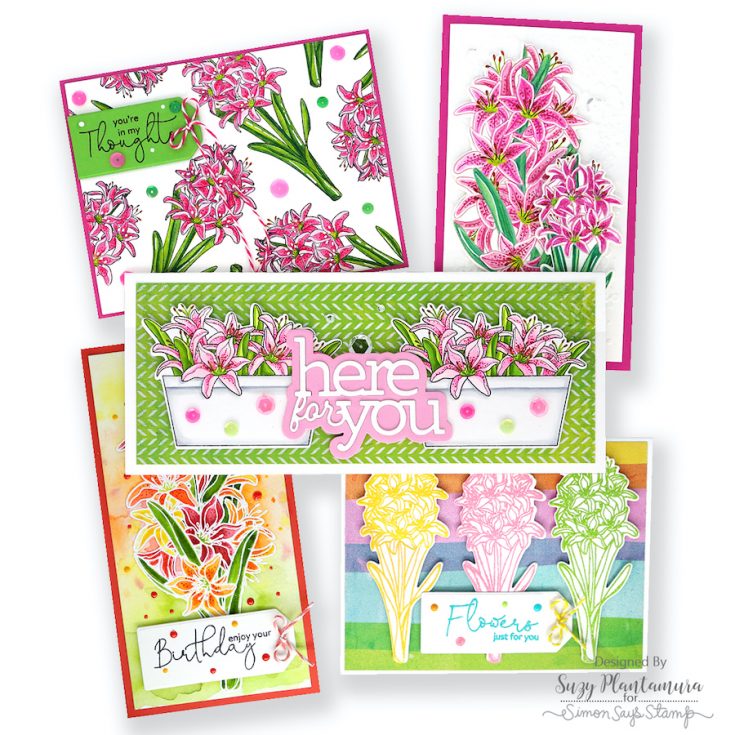
Hello friends! Well, it’s the end of another month which means it’s time for an installment of my “one stamp, five ways” series. For today’s post, I used a 6” x 8” stamp set from the Let’s Chill release called Flowers For You. I picked this set because I love it (I mean it’s flowers!) and I hadn’t gotten a chance to play with it much since it was released. With lots of greetings and three different floral groupings, it seemed perfect for a 5 card post!
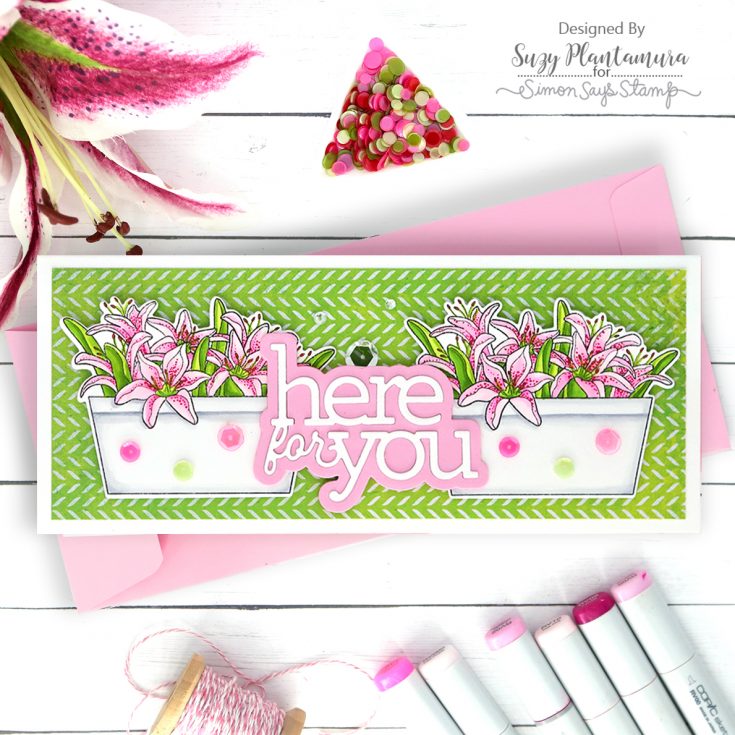
I wanted to use the pot of flowers on a slimline card since they are just the right height for this size. I thought I could fit 3 across, but I was only able to fit 2, so I used a large greeting die to fill in the open space between them. I used a piece of patterned paper from the August Card Kit in the Vicki Boutin Sweet Rush paper pad. I cut that to fit on the front of a white slimline card base.

I stamped two of the pots on white cardstock with Intense Black Ink. I then colored them in with Copic Markers and die cut them out with the matching dies. I attached them to the two sides of the card front with foam tape beneath them. I die-cut the CZ Here For You Wafer Die from pink and white cardstock and layered that in between the two pots. I added some sequins to the pots and around the top of the sentiment.
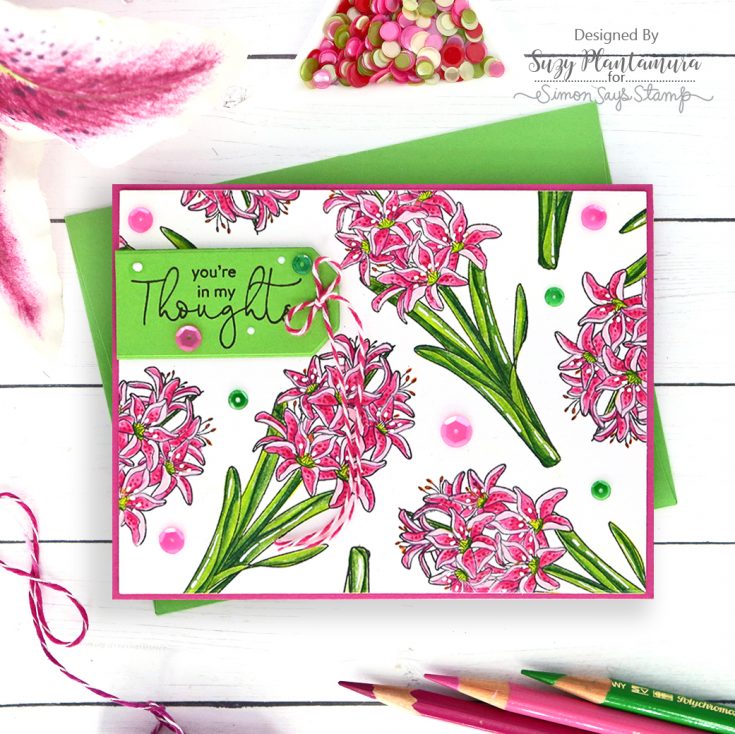
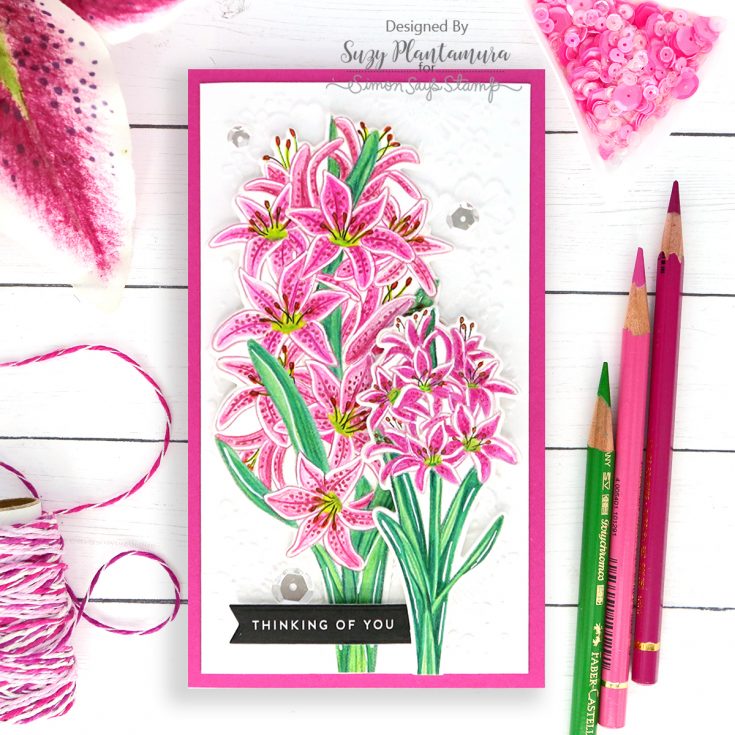
I started by die-cutting a piece of white cardstock with the largest die in the SSS Thin Frame Nested Rectangle Dies. I then stamped the smallest floral lily bouquet multiple times with Intense Black Ink. I call this technique “random stamping” and use it a lot because I think it really shows off a stamped image and creates a nice background piece. I colored all of the flowers in with colored pencils. I used a white Uniball gel pen for the top of the tendrils on the lily’s so they would show up.
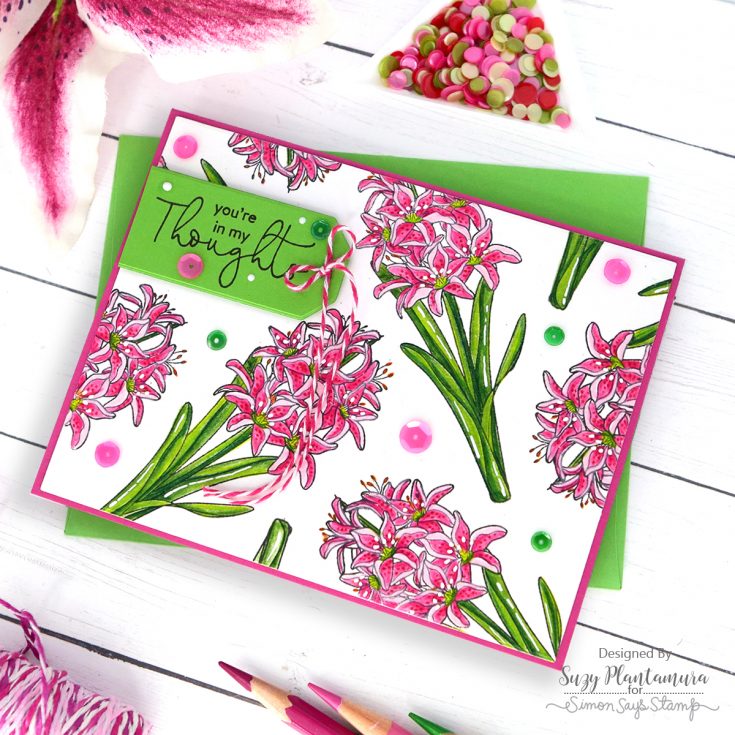
I attached this piece to a fuchsia card base. I then die-cut the banner in the stamp set from green cardstock. I stamped a sentiment in the stamp set on the banner with black ink. I attached that to the top of the card with foam tape under it for dimension, cutting off the left side of the tag. I used some sequins around the card in pink and green. I tied a small bow from twine and glued it to the top of the card letting the ends hang down. I used some Nuvo Chalk Stick drops around the tag.
I made two mini-slimline cards because the large floral bouquet fits so well on this size. I first embossed white cardstock using the SSS Floral Centerpiece Embossing Folder. I cut it down to be the size of a slimline card and attached it to a fuchsia card base. I stamped both of the floral bunches with SSS Pawsitively Saturated Ink in Latte (my new favorite no-line stamping ink).
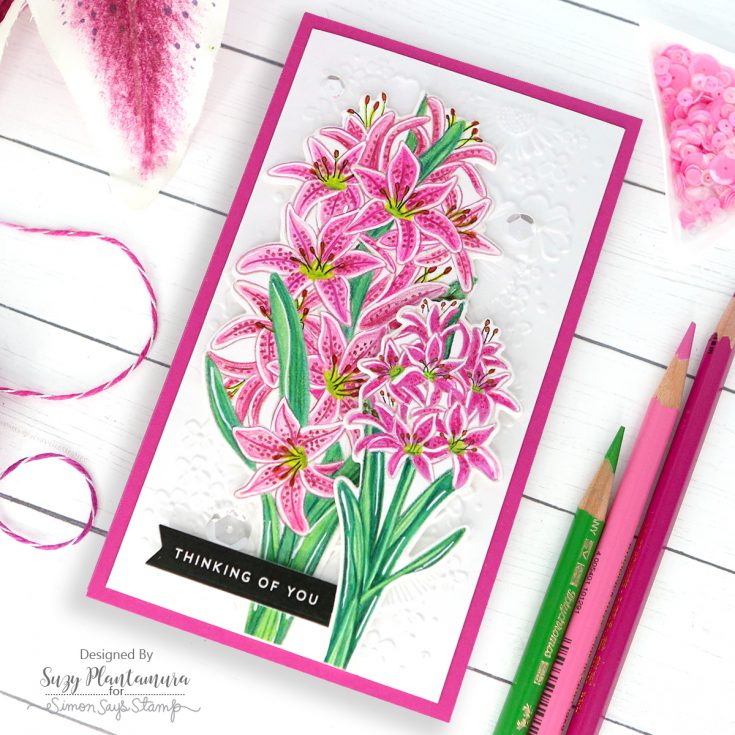
I colored the flowers in with colored pencils. I die-cut them out with the matching dies. I used a white Uniball gel pen to add lines to the stems. I attached the large floral bouquet first and then the smaller one over it with foam tape behind it. I die-cut a sentiment “thinking of you” from the CZ Reverse Sun and Moon Sentiment Strips. I used the Honeybee Sentiment Label Dies to die-cut it and then tucked the right end under the small bouquet. I added some sparkling clear sequins around the card.

I liked the paper pad in the August card kit so much that I ended up using another piece of the patterned paper on this card! I die-cut it with the same A2 Thin Frame die and attached it to a white card base. I then embossed the smaller bouquet 3 times (well, actually 5) using different colors of embossing powders.
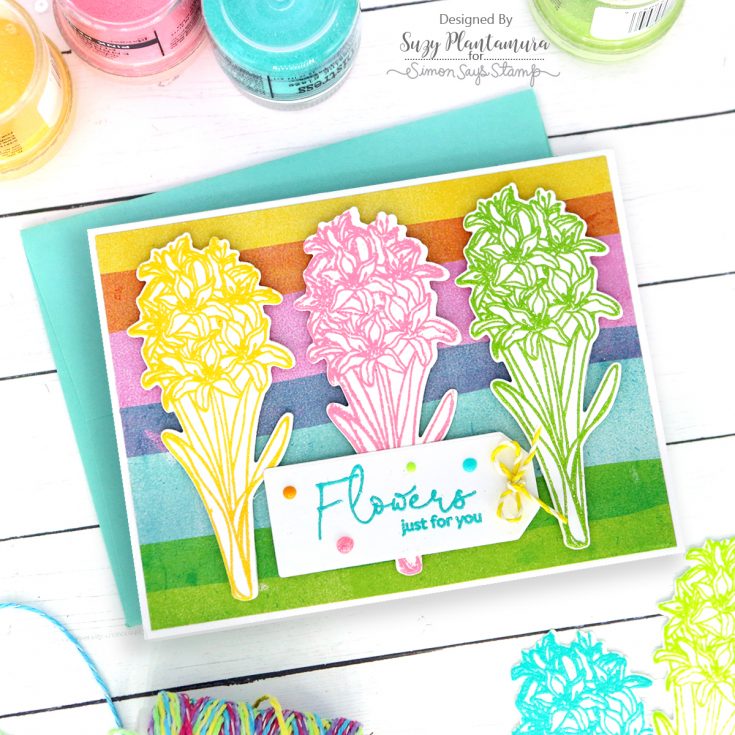
I attached the 3 bouquets that I thought looked the best on the front of the paper with foam tape beneath them. I then die-cut another one of the tags in the matching dies from white cardstock and embossed a sentiment from the stamp set with Garden Patina embossing powder. I attached it to the bottom of the center flower with foam tape. I then added a bow tied with yellow twine and some Nuvo Drops on the tag to match the different colors in the paper.
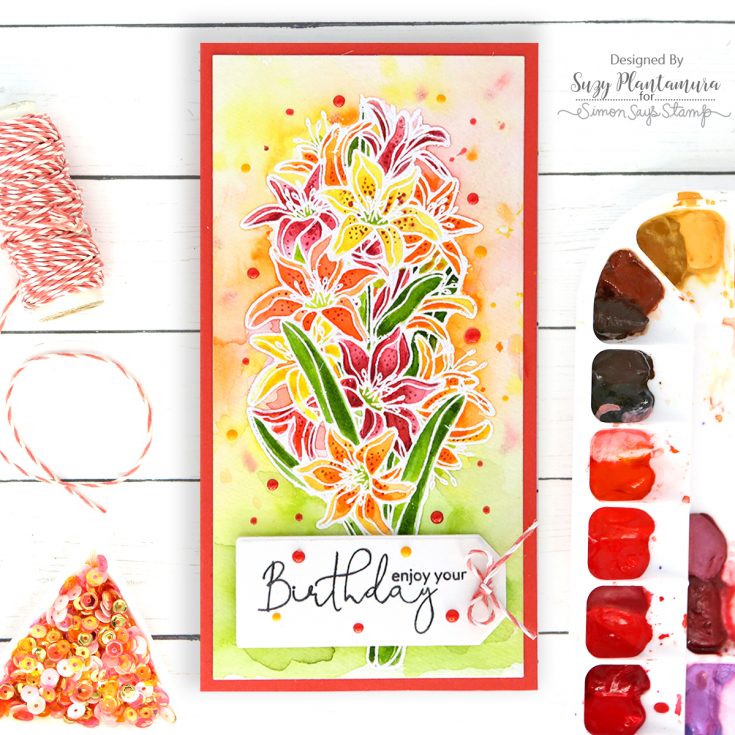
I die-cut a piece of Arches Watercolor Paper with the largest die in the SSS Nested Slimline Rectangle Dies. I then embossed the large floral bouquet on the center of it with white embossing powder. I painted it with Daniel Smith watercolors. I added a soft wash to the background with the same colors I used on the flowers and splattered some paint over it as well.
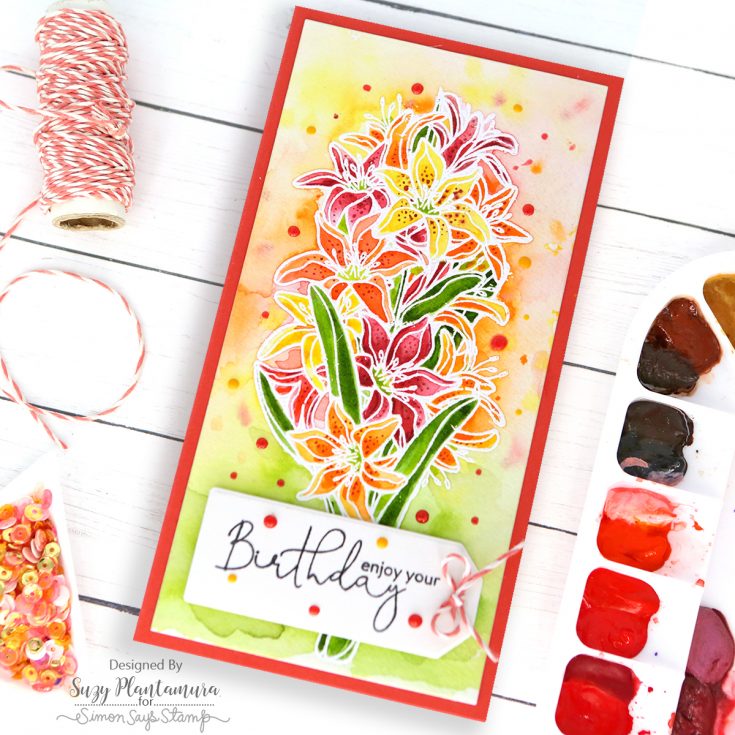
I attached this piece to a burnt orange cardstock card base. I then die-cut one of the tag die-cuts from cream cardstock. I stamped one of the sentiments on it with black ink. I attached it to the bottom of the stem with foam tape behind it. Last, I added some Nuvo drops around the tag and around the flowers and a twine bow to the center of the tag.
After using a stamp set for 5 cards, I either like it better or less then when I started. This time, I like it even better. I didn’t get a chance to stamp any of the sentiments on the pot and that is one of the best parts of this stamp! Maybe I should have made 10 cards???!!! I hope this “one stamp, five ways” post inspires you to use your stamps more! Come visit my blog to see my weekly “one stamp, five ways” post! Thanks so much for stopping by today! Suzy
SUPPLIES:
|


Thanks so much for stopping by, and thanks to Suzy for being our guest!
STAY TUNED…


Absolutely Amazing cards!!!! Such a Beautiful set!!!
EEEEK!!! Can’t wait for STAMPtember to get here!!!!
Wow these cards look absolutely amazing!!
So pretty – one of my favourite blog features
Such a variety of cards from one stamp. Gives us great ideas and makes you realize that a stamp can be used in many ways to make it look different.
For example, an orange flower means purity, chastity, and loveliness, while a red chrysanthemum means “I love you.”https://www.mcdvoicecom.info/
gorgeous cards