One Stamp, Five Ways: Black Eyed Susans

Hi friends! Happy Sunday! Can you even believe it’s the last day of April already?! My goodness time flies! We’re delighted to welcome back special guest Suzy Plantamura with her monthly One Stamp, Five Ways installment! This month, we’re spotlighting the beautiful Black Eyed Susan set! Read on and enjoy!
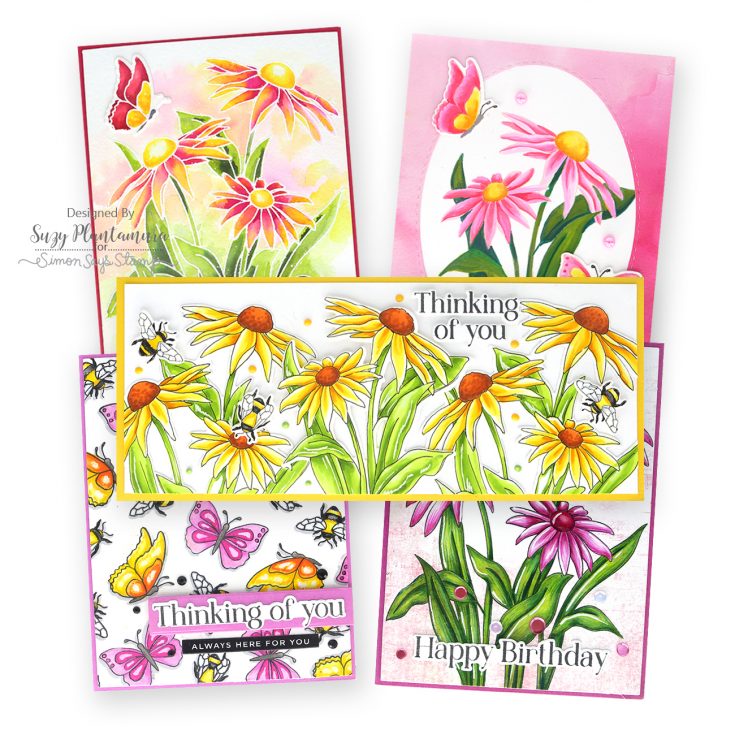
Spring is here! Not only on the actual calendar, but also in my post today! I have a “one stamp, five ways” post to share with you using the Black Eyed Susans stamp and matching dies. These were released last STAMPtember®, so they are not a brand-new set. But they are a set that I never got a chance to make much with and I wanted to go back and visit them. As you know, I love to color flowers and these daisies are perfect for spring!
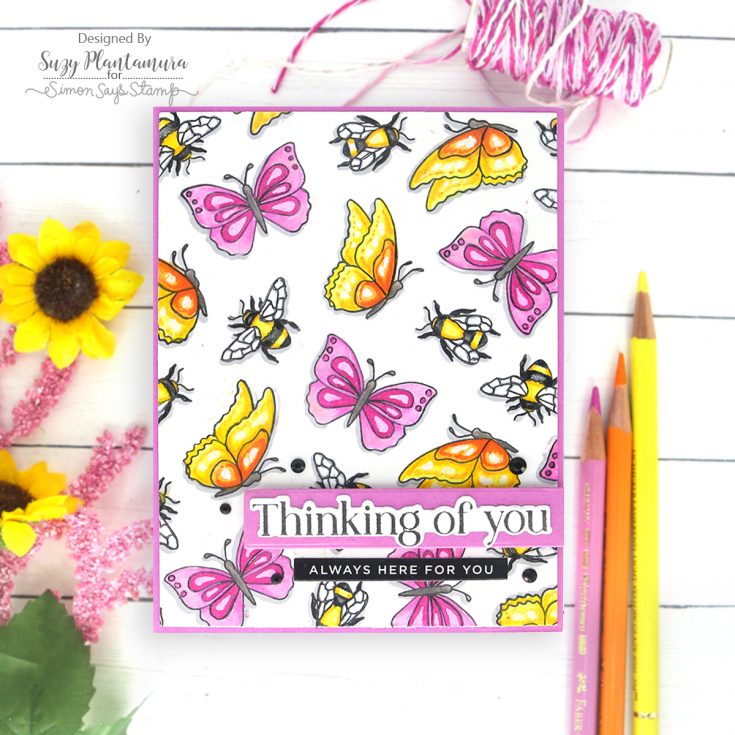
I’ve done my “random stamping” card again – every single time! I stamped the two butterflies and two bee stamp images with black ink on white cardstock. I arranged them together like a puzzle turning them all different directions. I cut this piece down with a SSS A2 Thin Frame Die. I colored all the images in with colored pencils. I used a gray pencil to shade the wings and then used a white Uniball gel pen over the inside spaces. I used the glitter pens we received in our May card kit by Crafter’s Companion to decorate the butterflies.
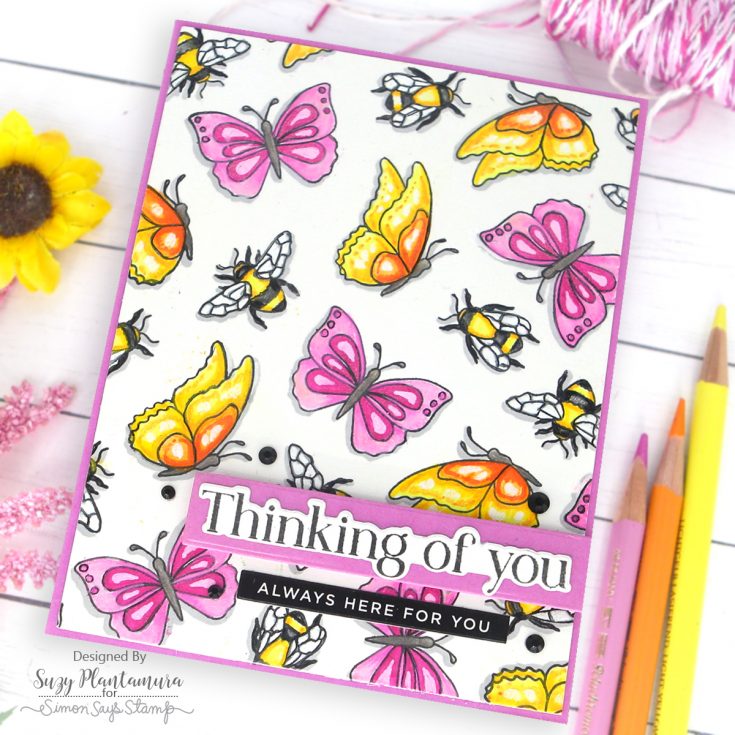
I stamped a sentiment from the stamp set on white cardstock and die-cut it out with the matching dies. I then adhered it to a banner cut with the SSS Sentiment Label Dies using Wildberry Heffy Doodle cardstock. I attached this piece to the same color cardstock card base. I added a second sentiment from the SSS Reverse Sisters sentiment labels die-cut with the SSS Sentiment Label Dies again. I also added some Honey Bee Back to Basics Gem Stickers in black around the sentiments.
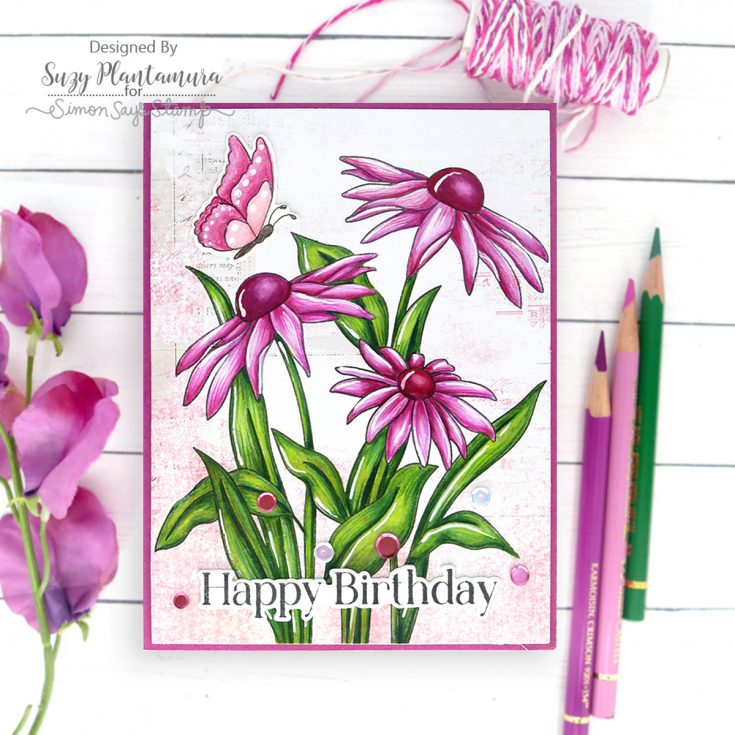
I recently bought some paper from 49 & Market called Color Swatch Blossom Paper. It is thick like cardstock and has nice pink subtle designs on one side. I decided to try stamping an image on it with colored pencils. The pencils did a good job covering up the color/design and I really like the kind of mixed media look to the background.
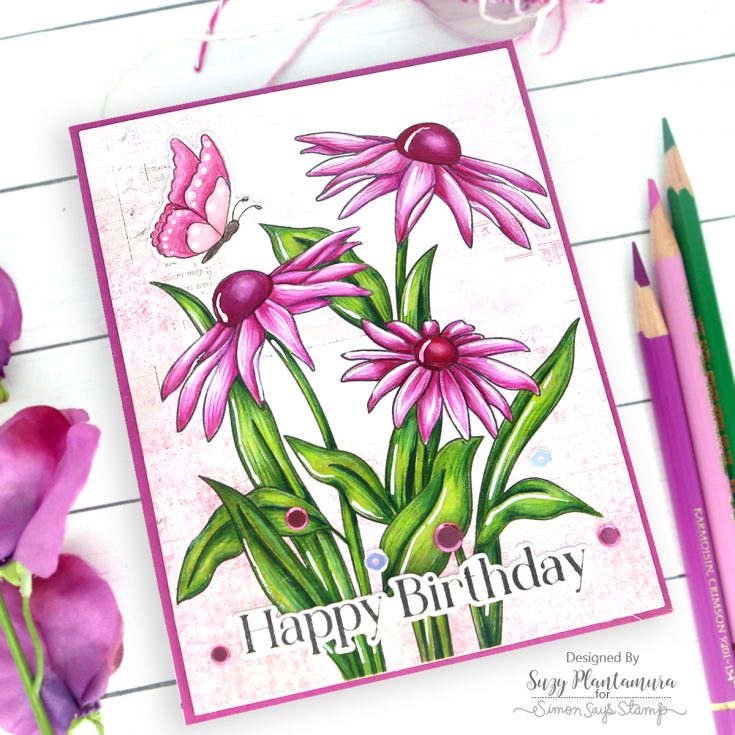
I stamped a butterfly and also colored it with colored pencils, die-cutting it out. I attached this to the top corner of my card. I die-cut my colored piece with the SSS A2 Thin Frame die and attached it to a purple cardstock card base. I added a sentiment from the stamp set stamped with black ink and die-cut with the matching dies. I also used some of the SSS new Surprise Party Sequin Mix around the sentiment.
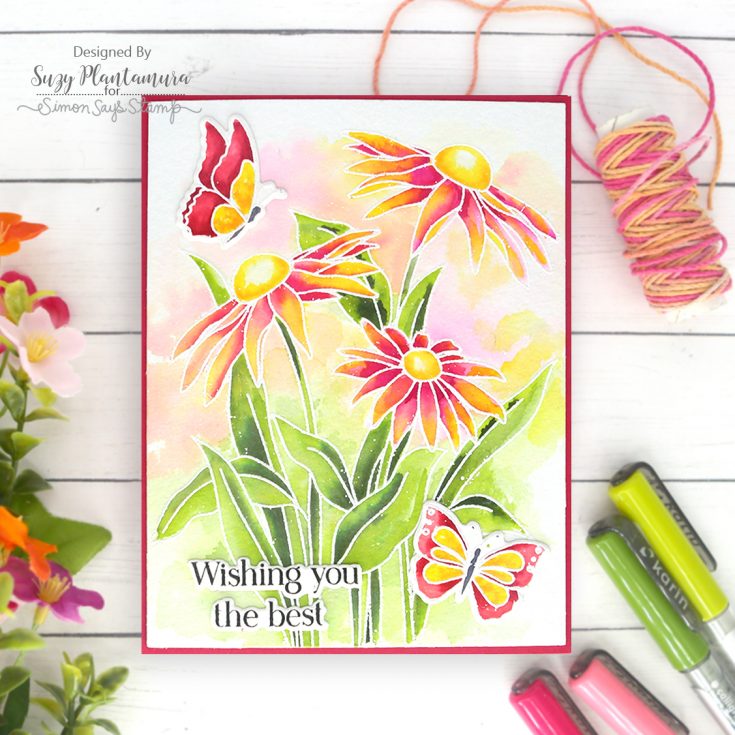
I embossed the larger floral image with white embossing powder on Arches cold-pressed watercolor paper. I think used my Karin Brushmarkers to watercolor the image. I love that they allow the color to move around even after they dry, so after I painted the image, I just ran a wet paintbrush over it to add color to the background. I touched my paintbrush to the tip of the markers for more saturated color. I like adding backgrounds that are soft washes of the colors in the image.
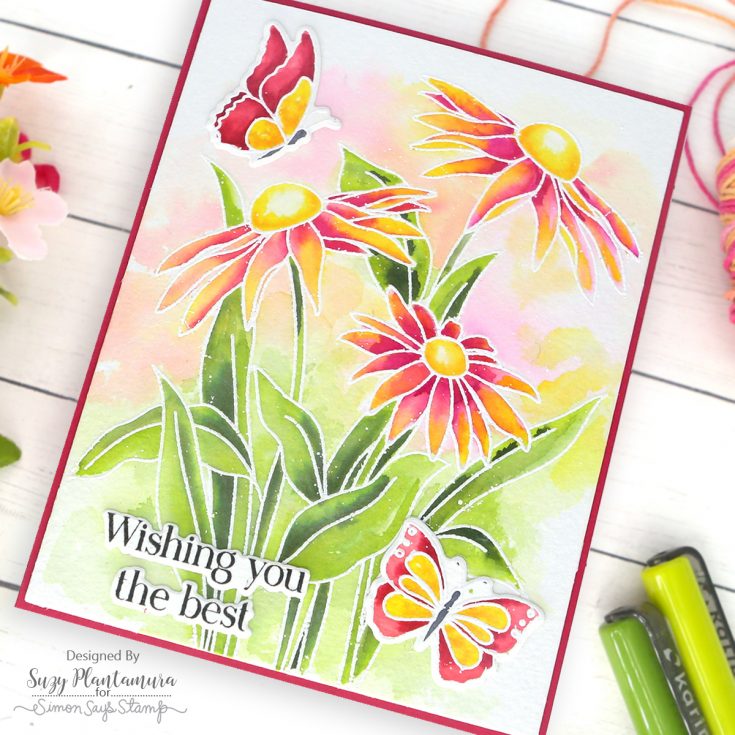
I also embossed two of the butterflies on the same paper and die-cut them out with the matching dies. I painted them as well and then attached them to the top and bottom of the flowers. I die-cut this piece out with the SSS A2 Thin Frame Die and attached it to Lawn Fawn Raspberry Cardstock. I stamped a sentiment from the stamp set on the same watercolor paper, so it matched and die-cut it out with the matching dies. I attached that over the bottom of the flowers.
I wanted to use a different coloring medium for each of my 5 cards, so this time I used my Karin Decobrush Markers which are like acrylic paints in a marker. I stamped one of the smaller floral image with SSS Latte Ink on white cardstock. I then colored the images in with these opaque markers. I really love how the colors mix and how intense they are. I also painted two of the butterflies and die-cut them out.
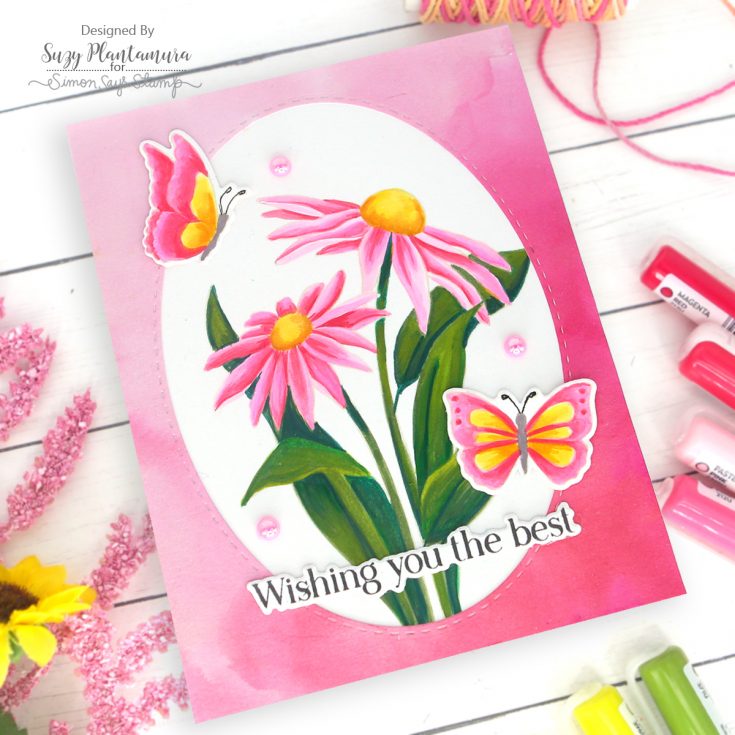
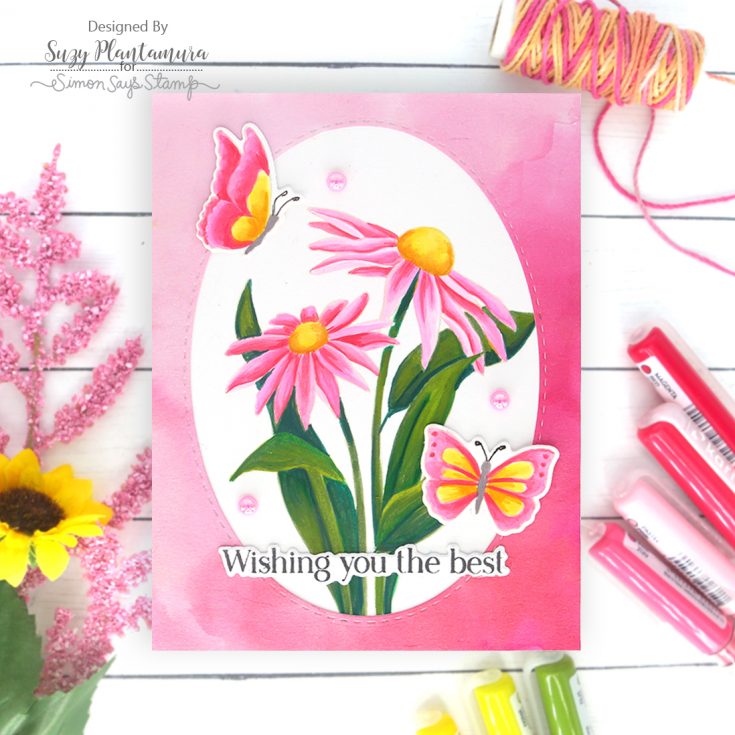
I painted a piece of watercolor paper with Catherine Wheel and Cherry Bomb Nuvo Shimmer Powders. I always have some of these painted in my stash to use for backgrounds. I die-cut an oval out of the center using the SSS Stitched Oval Dies. I attached that as a frame over the painted image. I added the two butterflies over the frame. I also stamped a sentiment from the stamp set with black ink and attached that over the bottom of the flowers. I added three pink pearls from Little Things From Lucy’s Cards Crystal Collection.
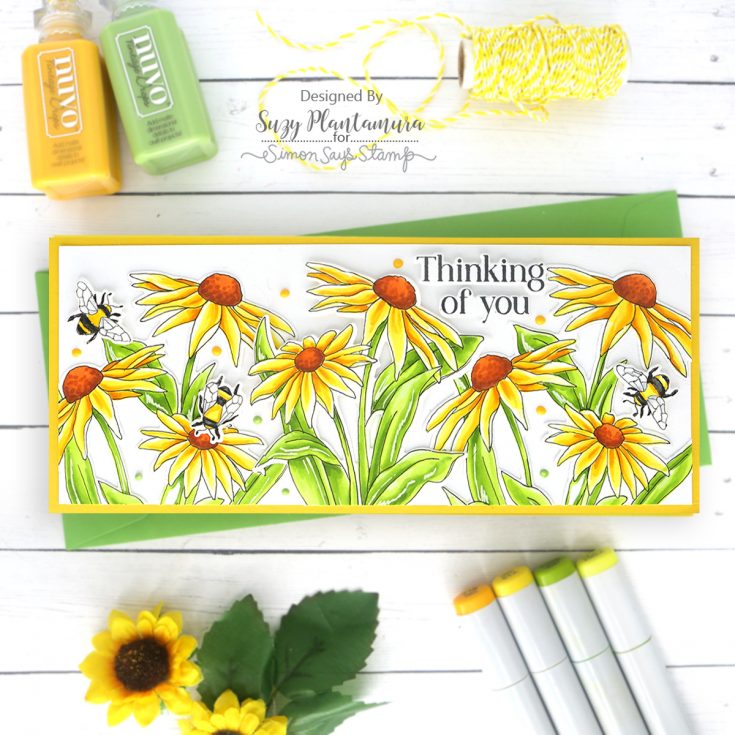
This is my favorite card as I love the look of the yellow daisies! I stamped two of the large floral grouping and one of the smaller with Latte Ink. I then colored them in with Copic Markers. I die-cut them out with the matching dies. I decided I wanted them to have outlines, so I doodled them with a fine tip black marker. I made them messy on purpose to add to the look. I also did the same with 3 of the bee images.
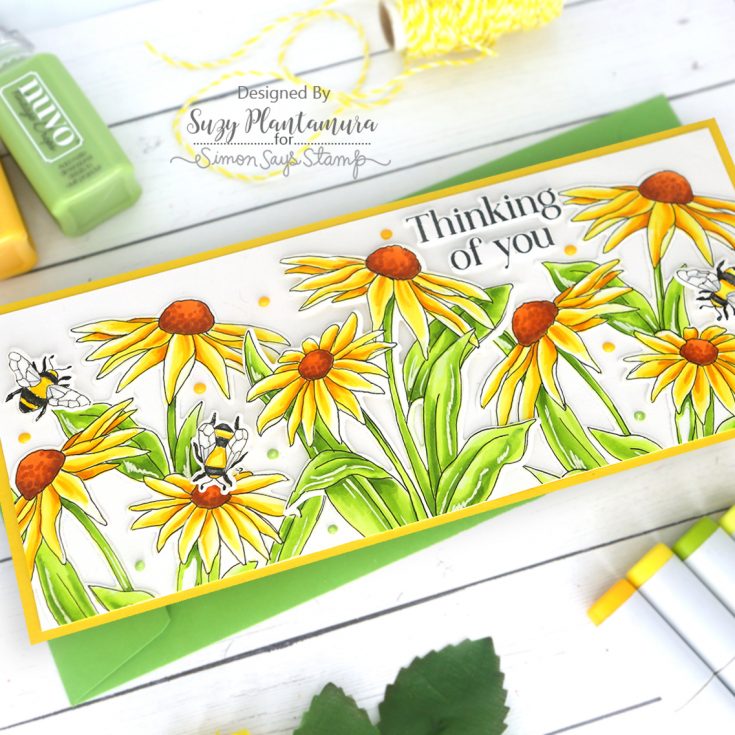
I attached the three floral images over a piece of white cardstock cut to be 8.5” x 3.5”. I used the two larger groupings on each side, hanging them over the sides and the bottom. I attached the smaller floral grouping in the center using foam tape under the top edges. I trimmed all the overhang along the two edges and the bottom. I then added the 3 bees with foam tape beneath them. I stamped a sentiment in the stamp set with black ink and cut it apart. I attached it to the top of the card with foam tape beneath it. I added Vintage Nuvo Drops in Yellow Brick Road and Pioneer Green around the images.
Now there is a dose of spring for you!!! I love to color, so this Black Eyed Susan stamp set is right up my alley of favorites. It was fun coloring it with 5 different coloring mediums. I hope you enjoyed this “one stamp, five ways” post today and that it motivates and inspires you to get more use out of your stamp sets! Thanks for visiting! Suzy
SUPPLIES:
|


Thanks so much for stopping by, and thanks to Suzy for being our guest!


These are all Soooo Beautiful!!! I love the 2 Karin ones!!
Dear Suzy –
Not even if I wanted to – had to – could I choose among these. They are ALL SO FABULOUS! Great job!!
It was my honor and pleasure to meet with and color with you during CREATE. What a thrill!
Lori S in PA
Fantastic variety of cards .. I know I say this every month, but this is my favourite blog feature!!
What great inspiration you’ve given! This is a beautiful stamp set and yes, I am truly inspired!
such gorgeous cards
The puzzle might be a playful riddle that challenges our thinking, offering a chance to explore hidden meanings and creative answers. It could be something that stirs curiosity, making us wonder if there’s more beneath the surface than what seems obvious. The bugtong meaning may point toward a traditional form of wordplay that gives the mind a moment to pause and reflect. There’s always a possibility that the answer lies in how we perceive the clues rather than what we immediately see, leaving room for imagination and a spark of discovery.