No Mess Stenciling 101
Welcome back amazing guest designer, Paula Cheney! She’s going to give us some great tips & tricks for using new Tim Holtz stencils!
Enjoy!
Stencils. I have had a love, hate relationship with them over the years. My desk is usually messy when I’m creating and it seemed I could never carve out enough space to lay down a dedicated craft mat, spray over the stencil, then clean everything up. That even sounds like too much work just typing it. Oh, and then there’s the storage issue…another challenge to keep them together and flat in a very small craft room.
Well, I have had a change of heart…welcome to “No Mess Stenciling 101”. You don’t need a large work surface, a special storage system or a hundred paper towels for cleanup, just a few simple supplies to create some magic. Let’s get started!Gather some supplies: A variety of Tim Holtz Layering Stencils, #8 manila tags, Distress Ink, Distress Paint, Blending Tool and extra foam pads (one for each color paint).
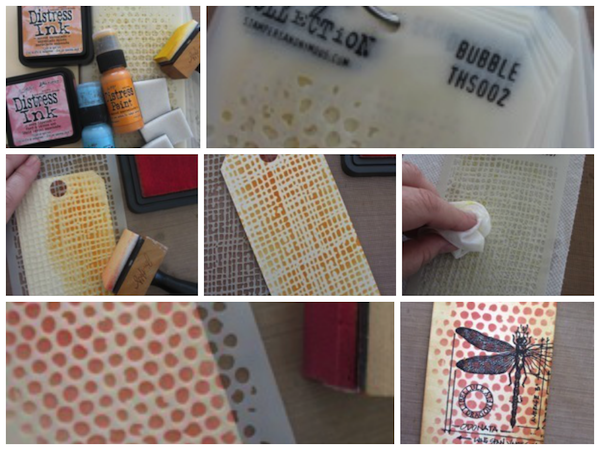
Tim’s new stencils are tag shaped with a hole at the top for a ring. Since I am using #8 tags today, I never had to remove the Layering Stencils off the ring. I find the one I want, flip it to the front for use. When I’m done, I wipe it off and it goes right back into the mix. And storage? they just hang on a hook right by my craft table. No more digging through the drawer to find what I’m looking for.
So lets start with Distress Ink, by far the easiest medium to work with. Place the Layering Stencil over the top of a #8 tag. While holding the stencil in place with your fingers, rub the color on with the Blending tool. It’s just that easy.Love the burlap image on the tag! A great background for so many projects.NOTE: Remember, Distress Ink reacts with water, so if you are planning to use Multi-medium or Mod Podge over the top, the ink can smear…in that case it’s better to use Distress Paint which is Permanent when dry (that’s coming up next).
For clean up, I like to place the stencil on a small paper towel and just wipe it off with a wet wipe. Done.Okay, so lets do another one…Bubbles this time (one of my favorites)…this time Distress Ink in Worn Lipstick. Same as before, lay the stencil over the tag and ink with the Blending tool.Ink the edges of the tag with your favorite Brown Distress ink (Vintage Photo and Frayed Burlap are mine). Stamp with the large dragonfly from the Stamper Anonymous Classic #1 set using black Archival ink.
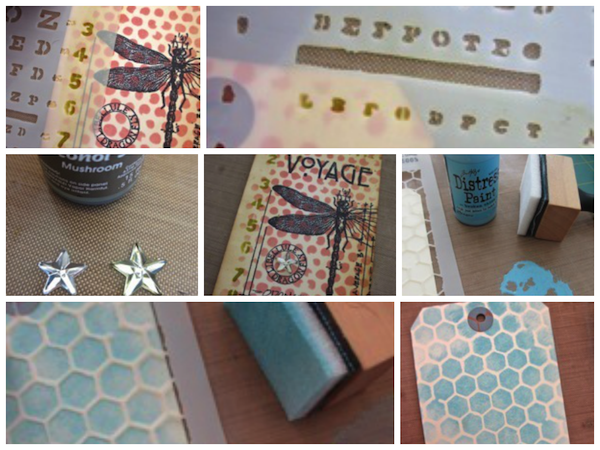
Using the Eye Chart Layering stencil, add numbers running down the side with Distress Ink – Peeled Paint.This stencil has lots of tiny holes for adding detail.Use Alcohol Ink in Mushroom to color a Mirrored Star. This color Alcohol ink is my go to weapon for instant aging. If I could only have one color of Alcohol ink, it would be this one…well maybe Butterscotch too.Add the Mirrored star in the small circle on the tag. And there it is, super quick and simple, with a lot of detail.So let’s try Distress Paint now. Broken China is up first and the stencil…Honeycomb.Same basic technique as Distress ink, but here are a few things to remember:
- Shake Distress Paint till you can hear the mixing ball.
- Squeeze, while pouncing paint bottle onto craft sheet...a little goes a long way!
- Pounce Blending tool into paint. Foam should be saturated but NOT soupy.
Hold the stencil/tag tight. Think of the foam pad as a “dry brush”. Soupy paint on the foam pad is not your friend.Depending on the stencil, I might pounce over the stencil, like traditional stenciling or use the circular motion I use when applying Distress ink. If you have too much paint on the foam, the pouncing method works much better to get a clean image.

The Distress paint on Manila cardstock dries very quickly so you can add the next layering stencil almost immediately. This time, Dot Fade in Spiced Marmalade over the blue. Same rules apply…dry foam.
Once you like what you see, clean the stencil immediately. Love the small dots over the larger Honeycomb…I think this would look great with so many combinations of colors.
Once you start, it’s hard to stop making tags…small, big, paint, ink…I like them all!
So what do you do with all the tags? I decided to make a card. I picked three #8 tags that were cohesive, blue, orange, and pink based tags with a variety of patterns and cut them into 1 1/2″ squares. You will need four – 1 1/2″ squares of each pattern.
I folded a piece of white cardstock and glued the squares to the front.
Then stitched across the squares with my sewing machine.
I love the new Tim Holtz Alterations Trophy Antlers die (available Sept). I decided to bling it up just a bit by using the new Distress Glitter in Pumice Stone on the antlers. Absolutely love this stuff. In my mind, it’s like fine mica with more weight to it. It does not spread like traditional glitter (you know what I mean) and you can actually leave your craft table without looking like a mirror ball. Very subtle, but beautiful effect.Once dry, I added the antlers to the card front. A little foam tape under the middle of each antler to give them a lift.I cut the word HELLO using the Sizzix Alterations Block Talk alphabet and Core’dinations Kraft Core cardstock in black. Easy to scuff the letters with the Sanding Grip to reveal the kraft color below. And just for a fun play on words, I added the Chit Chat word, “dear” inside the O…it just worked too well with the antlers.So there you go, a simple approach to stenciling that doesn’t create a huge mess! If I have peaked your interest in trying mess free stenciling, you might be interested in a mini book using the same techniques shown here.

Supplies:
 |
 |
 |
 |
 |
|
|
|
|
|
|
|
|
 |
 |
 |
|
 |
 |
|
|
 |
 |
 |
|
|


Super cool! Awesome technique, thank you for the breakdown. Love those glittery dear antlers.
After this, I think even I could be tempted by stencils!
cool stencils thanks for sharing with us.
lovely project today thank you for sharing it with us.
I love this card!
I love the tag you made today such neat stencils, thank you for sharing it with us.
What an absolutely fun card – those stencilled backgrounds and then the antlers. And the sentiment! Love it.
Paula is always inspiring, she’s so creative. I agree Tim’s stencils ROCK!
What a fun project, and I love the card you created with all of those stenciled pieces! :)
Love your ideas – thanks for the all the tips!
Beautiful stencilling Paula! x
Great use of stencils…thanks so much for sharing!
Such a great project to showcase a variety of stencils and techniques. TFS
I think I’ll give my stencils another try after reading your tutorial, you make it seem easy!
Thank you for sharing! I really like these stencils.
Just love these stencils, can’t wait to get mine, thanks for sharing!!,
I love these!! They are the perfect size, easy to store and I hate spray inks, so using them with the pads is perfect!
Fun! Thanks so much
for all the great tips.
Carla from Utah
Great idea, time to get back to stenciling. TFS.
This technique looks like so much fun! I’d love to give it a try.
I don’t use stencils much, but I am always impressed with the things people create with them. Lovely projects!
Just love everything Paula creates, and this is no exception. Can’t wait to get these stencils & the distress glitter. My Simon Says Stamp wish list just keeps getting bigger. Especially with Tim’s new releases and thanks to Paula, I have now added ” Stampers Anonymous Classi # 1″. I have been trying to work out which set the dragonfly came from for ages. It is on my wish list too. Thanks SSS for having Paula as a guest
Thanks, Paula, for sharing the process using great techniques with these fab new products. You always amaze me with your creativity!
Awesome card! I haven’t done any stenciling but this makes me want to!
Ooh, fabulous! Got to have the burlap stencil!
that is AWESOME.. thanks for sharing.. i love it
I love all those yummy stencils, and especially that little “hello deer” tucked into the letters! Cute!
I love these new stencils, thanks so much for the great tutorial.
Great ideas for using stencils in new ways — thanks!
Lots of great ideas…. thanks for sharing!
Such great distressing ideas to use these stencils. Can’t wait to try some of these techniques. Thanks for sharing.
Thanks Paula for showing us you’re work with the stencils. You sure inspired me. You’re card is just beautiful.
Thank you for sharing you’re work. I love the stencils.
Cute card, thanks for sharing the technique!
Fabulous techniques and I just love all the texture your card has from the stenciling! Thanks for sharing!
You put together quite a few outstanding tips in ur article, “No Mess Stenciling 101
| Simon Says Stamp Blog”. I am going to end
up returning to your web site in the near future. Thank you ,
Hildegard
Wonderful! I had no idea there were stencils that small! Thanks so much for sharing!
My stencils have finally shipped and should arrive next week. You can be sure I will be trying out your techniques with them, thanks for all the tips!
Oh wowzer–I totally love this! I have several stencils & never use them, but now I know what to do! Also adding the tag stencils to my wishlist. Thanks for the inspiration!
Love the new T. Holz stencils and what you did with them was real inspiration!
Very cool! Like!
Great ideas! I have been looking forward to getting these stencils, so it is nice to hear your ideas! I like the no mess approach. Love the card you created with your pretty tags too. Great job. Thanks for sharing.
Katie B.
What a fabulous way to use these stencils ..Absolutely loved the project created with it !!
Totally fun! Love the idea of making tags.
Thank you for sharing the stencil techniques, the results look great!!! I love those stencil patterns and I can’t wait to try them!
I love your ideas, thanks for sharing.xxxSara
This is soooooo super, thanks a lot for this tutorial and stunning endless ideas. They are sooooo on my never ending wishlist LOL!!!!!
xx Irene
What a super cool card here, and a great use of stencils. Something I´m sure, we could all get much better to use. Thanks sooo much for a great tut here.
Have a wonderful sunday everyone.
Great technique! Thanks for showing
this is great, loving the colours x
This is such a great technique–TFS!