Night Before Christmas Treat Box by Emma
Hi friends! As always, I’m delighted to welcome back special guest Emma Williams to our blog! She has an extra special treat box idea to share, be sure to read on for all the details and enjoy!!

Hello everyone! I’m so happy to be back on the SSS blog today and excited to share my make with you that I created using some of the gorgeous new Christmas products from Tim Holtz.
With Christmas and the Holidays nearly upon us, I was inspired by the grand trees that appear in stately homes here in the UK at Christmastime and with this in mind, I created a vintage home decor project that can be displayed in your home for the most wonderful time of the year.
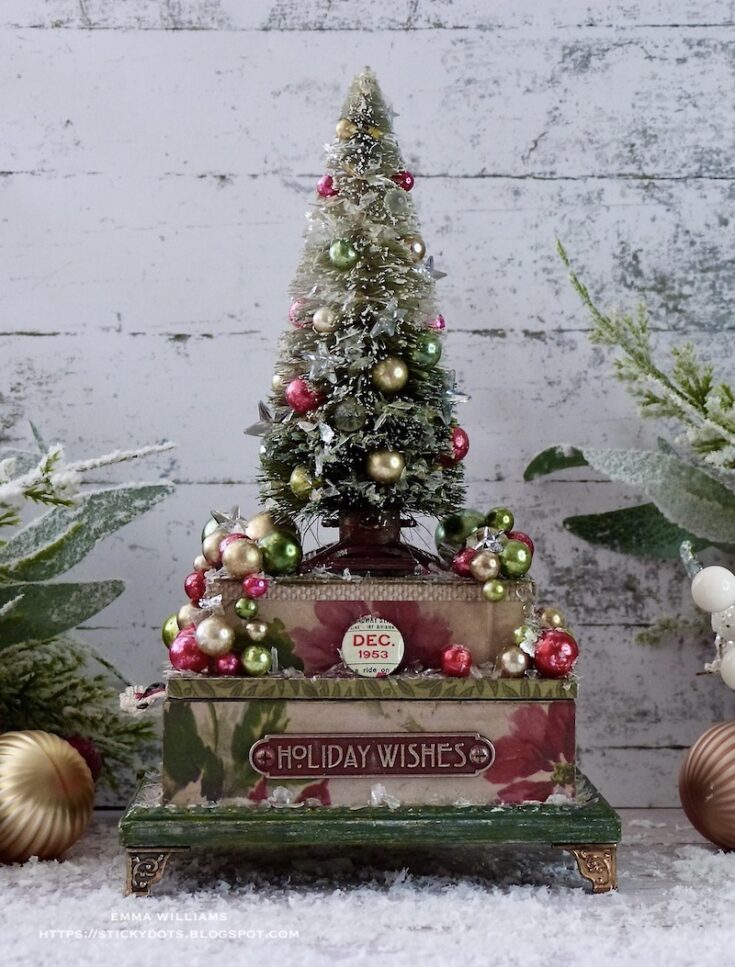
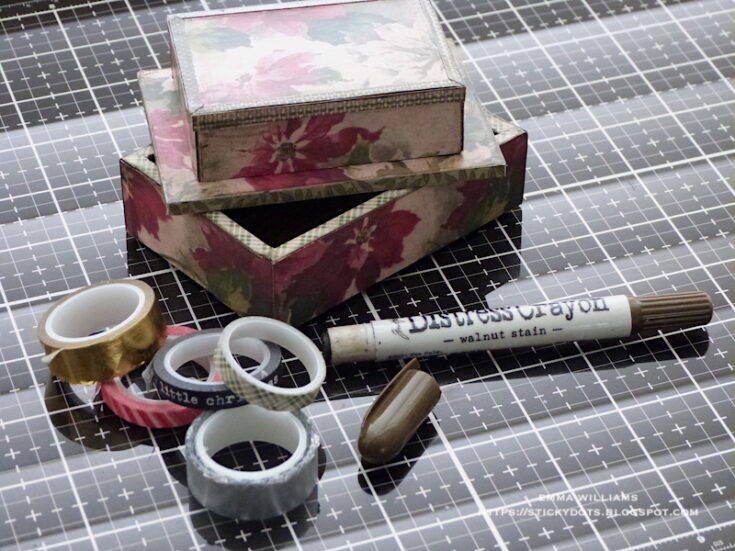
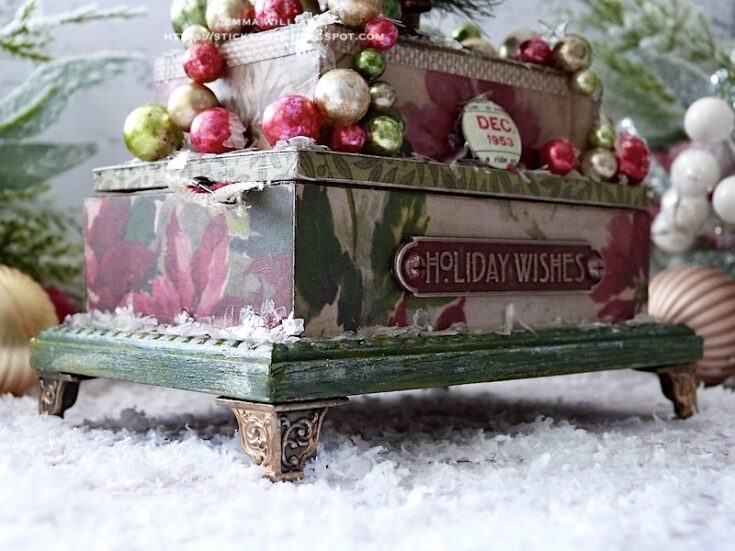
So, let’s get begin and to start this project you will need two of the smallest sized Tim Holtz idea-ology vignette boxes in the set of four. You will also need the second smallest Vignette Panel and the second largest Vignette Frame to create the stack.
Taking the Vignette Boxes and Vignette Panel, flip the small box upside down, placing it with the solid wood uppermost. I then covered each of the boxes with panels of the Christmas Backdrops paper, using a collage brush to attach the paper with Matte Collage Medium.
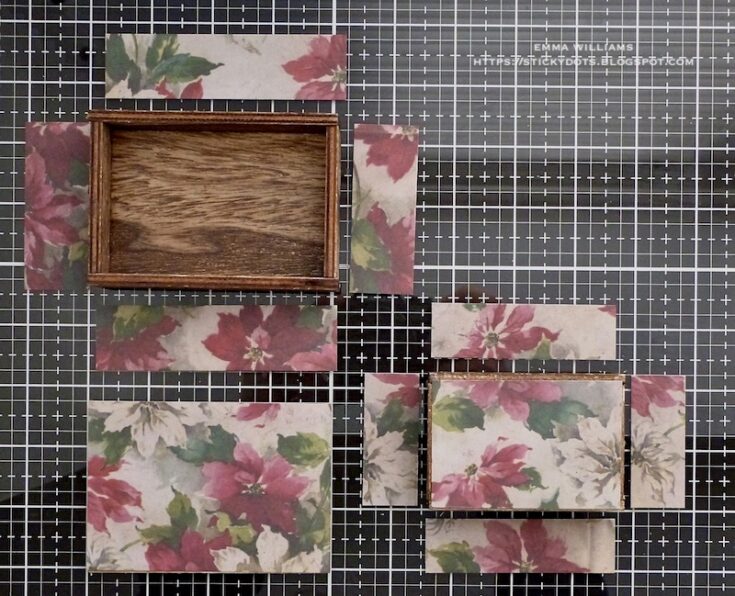
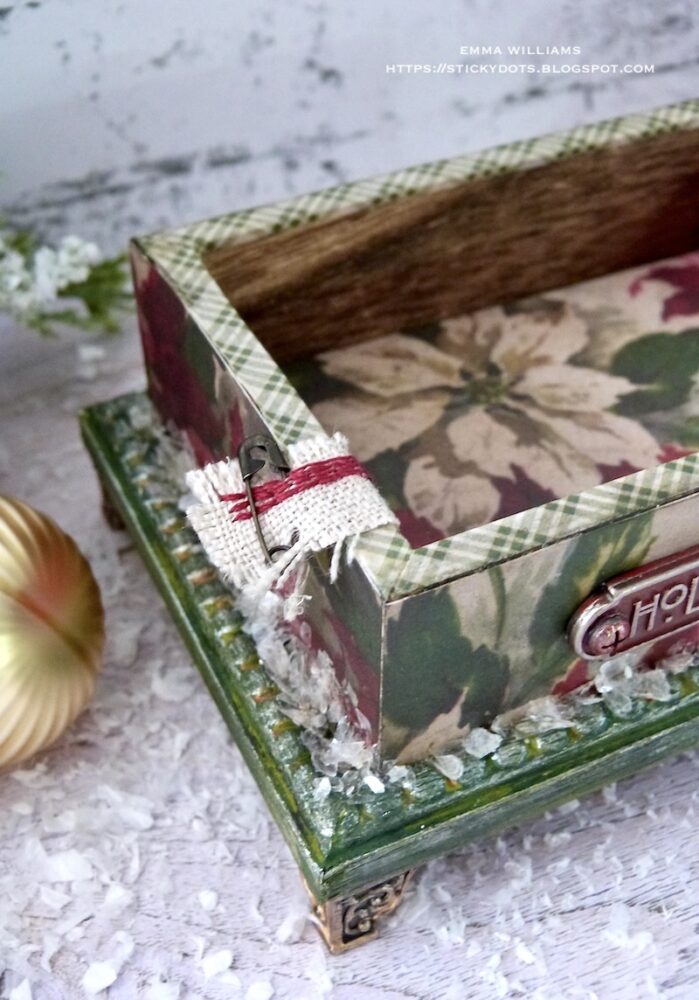
At this stage, I also attached a panel of the paper onto the base of the larger of the two boxes before adding a trim to the edges of the small box and the vignette panel. For this I cut narrow strips of a co-ordinating paper from the pack.
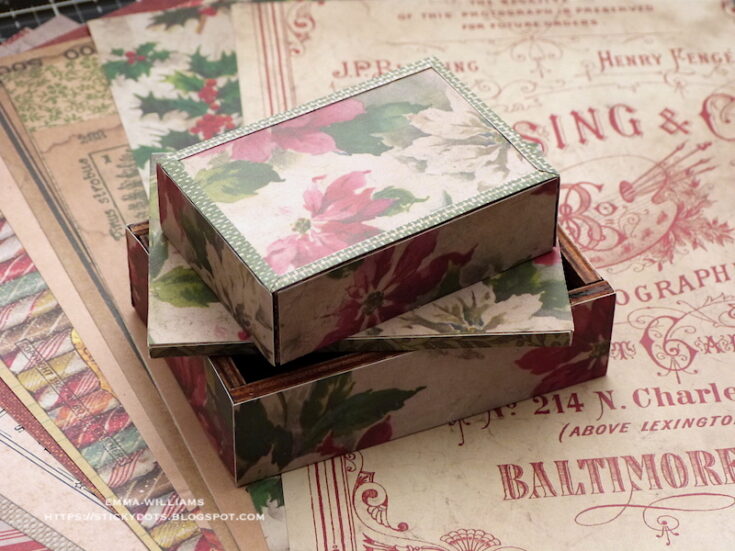
To neaten, and cover the raw wooden edges along the top of the larger sized box, I attached strips of Christmas Trim Tape to each of the four sides. Seal all the boxes and the panel by applying a coat of the medium over the surface. Once the medium was dry, I ran the Walnut Stain Distress Crayon around each of the joins, and blended out any harsh lines with my fingers ~ this will help to create more of an aged finish to the boxes.
To complete the larger sized box, I attached a Stitched Scrap on the left hand side, adhering the linen scrap over the edge of the box before pinning a Mini Pin into the material.
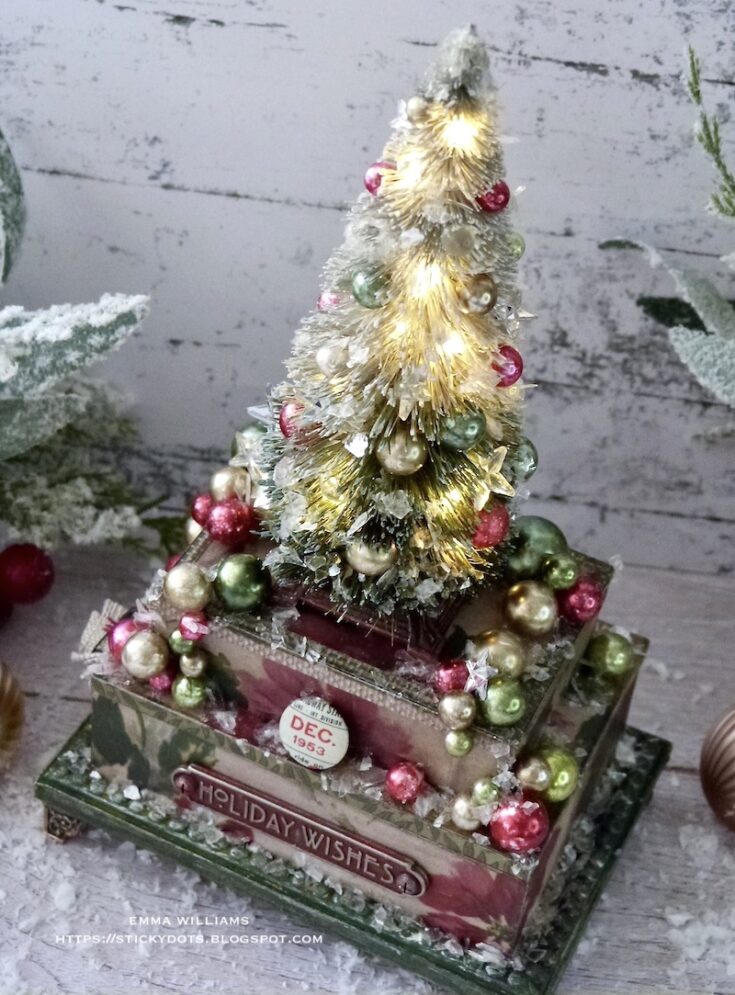
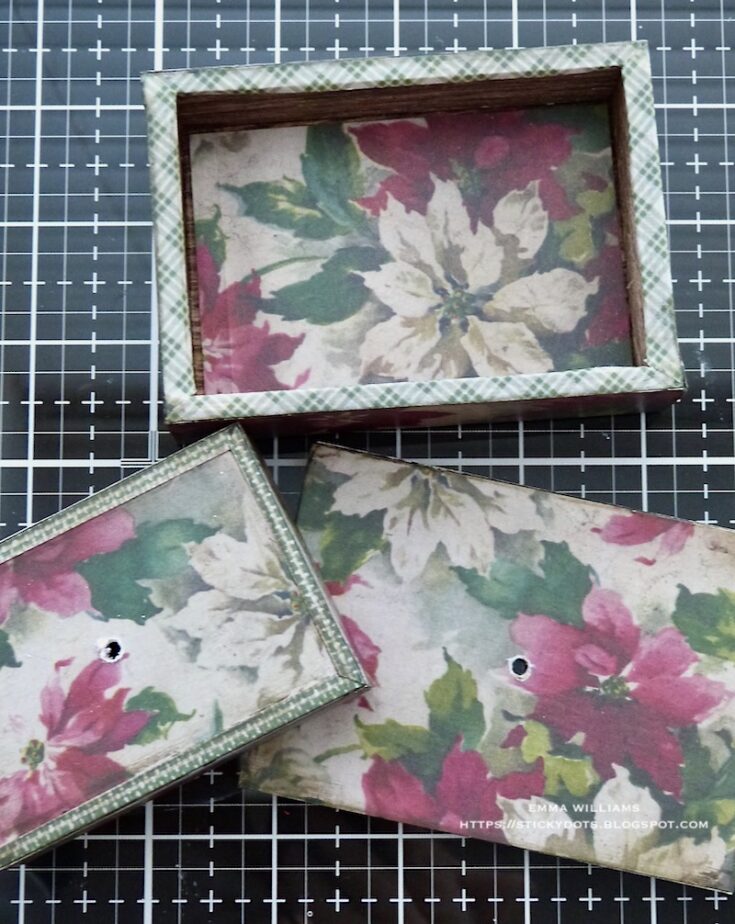
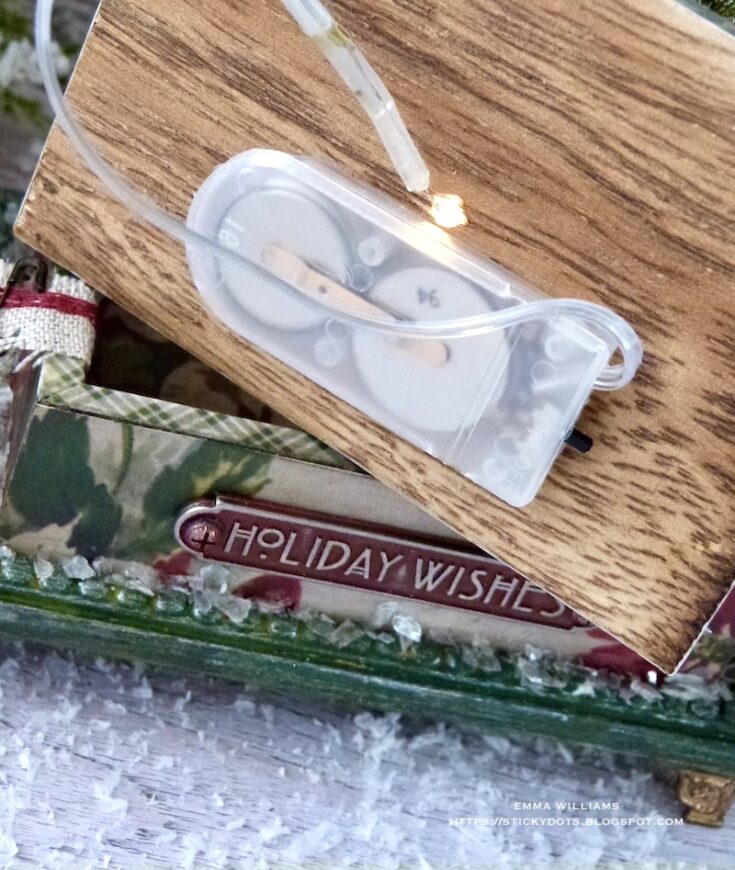
At this stage, I would recommend you drill the holes into the centre of the vignette panel and also through the top of the small box.
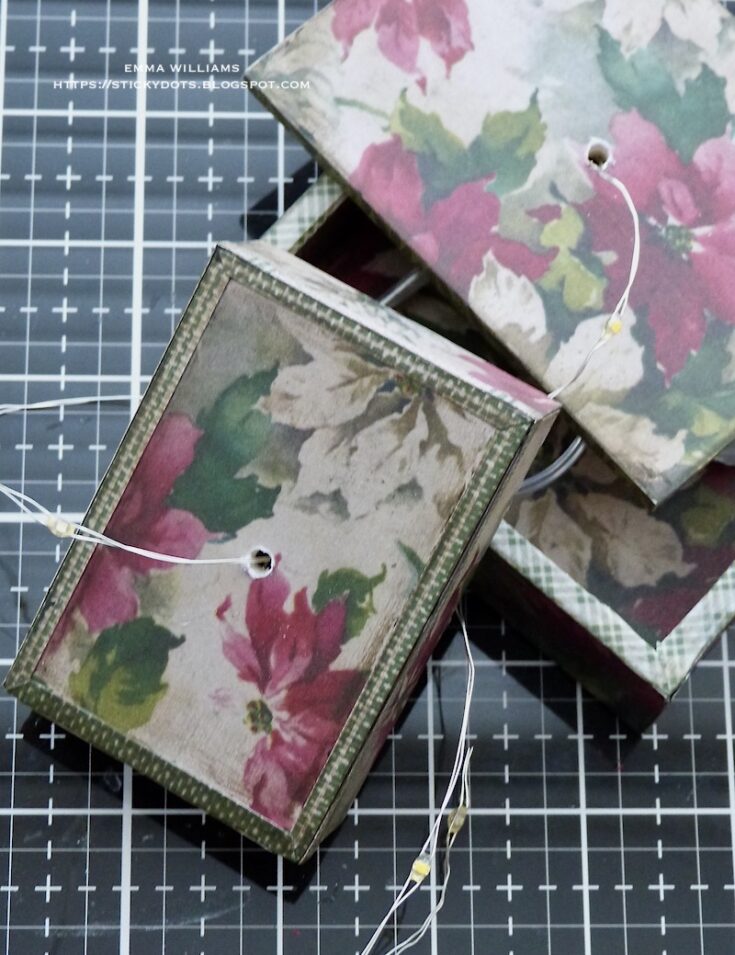
Thread the tiny lights through the hole in the panel and then continue threading them through the hole in the small box.
With the light strand in place, adhere the smaller box onto the centre of the covered vignette panel using Matte Collage Medium and set to one side to dry. You can see the finished stack here.
Attach the battery compartment to the underside of the vignette panel.
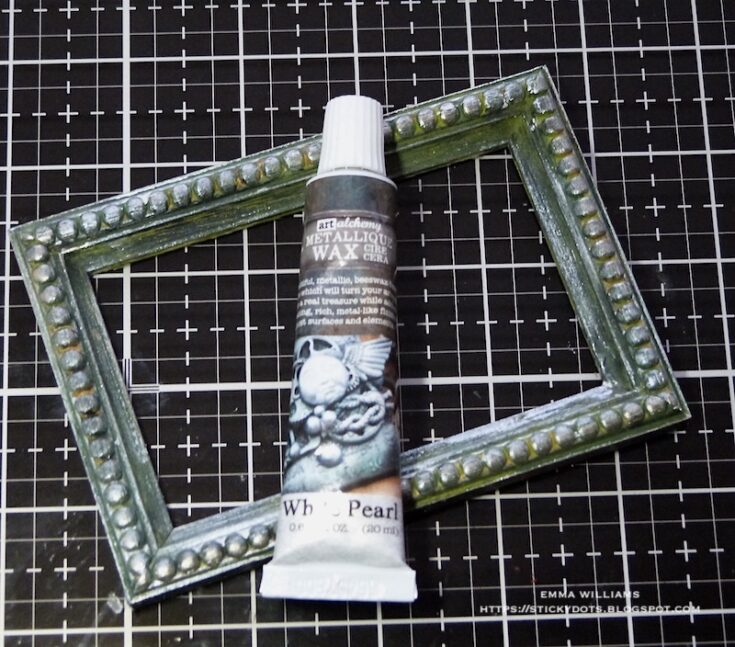
Apply a coat of Rustic Wilderness Distress Paint to the surface of the Vignette Frame and once this layer of paint was dry, I applied a very light touch of Black Soot Distress Paint over the surface using the dry brushing technique. For this technique pick up a small amount of the black paint on a paint brush and then remove the majority of paint onto a cloth before gently applying the paint over the surface using very gentle strokes. You only want a hint of the black paint, not a block coverage, so just kiss the surface of the wood with the brush.
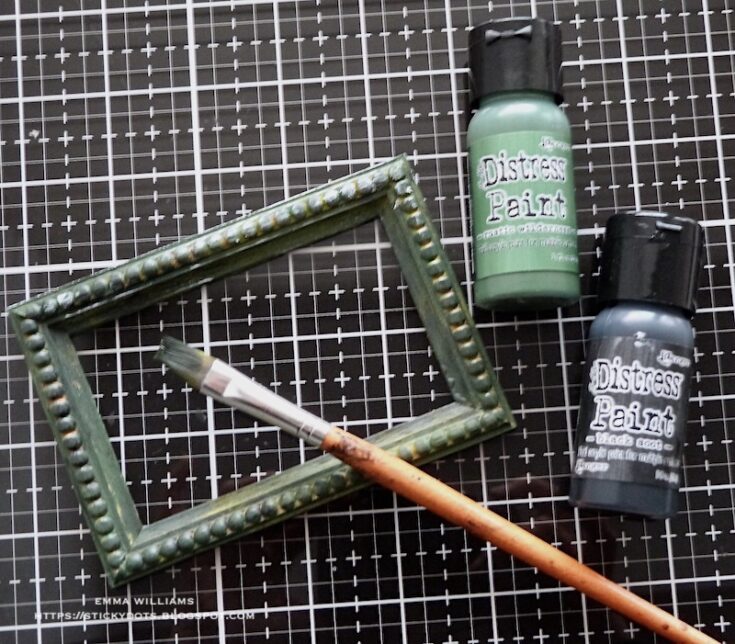
To accentuate the beading on the frame, I applied White Pearl Alchemy Wax, rubbing it onto the beading.
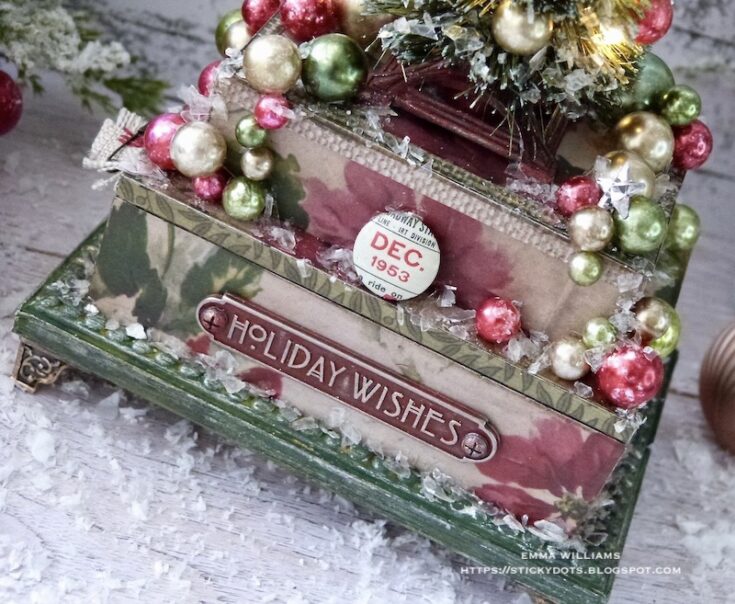
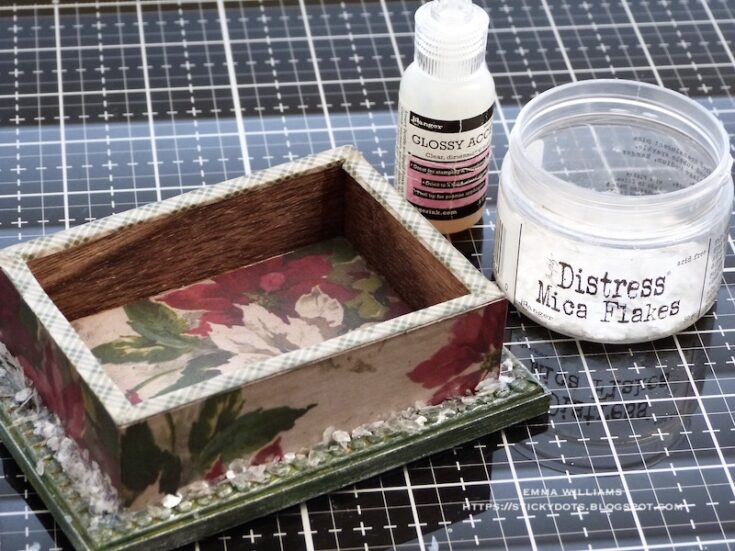
Attach the larger of the two boxes with Matte Collage Medium, placing it in the centre of the wooden frame. Once the glue is set, apply Glossy Accents around the bottom of the box and sprinkle Mica Flakes over the top. Tap away the excess and set to one side to dry.
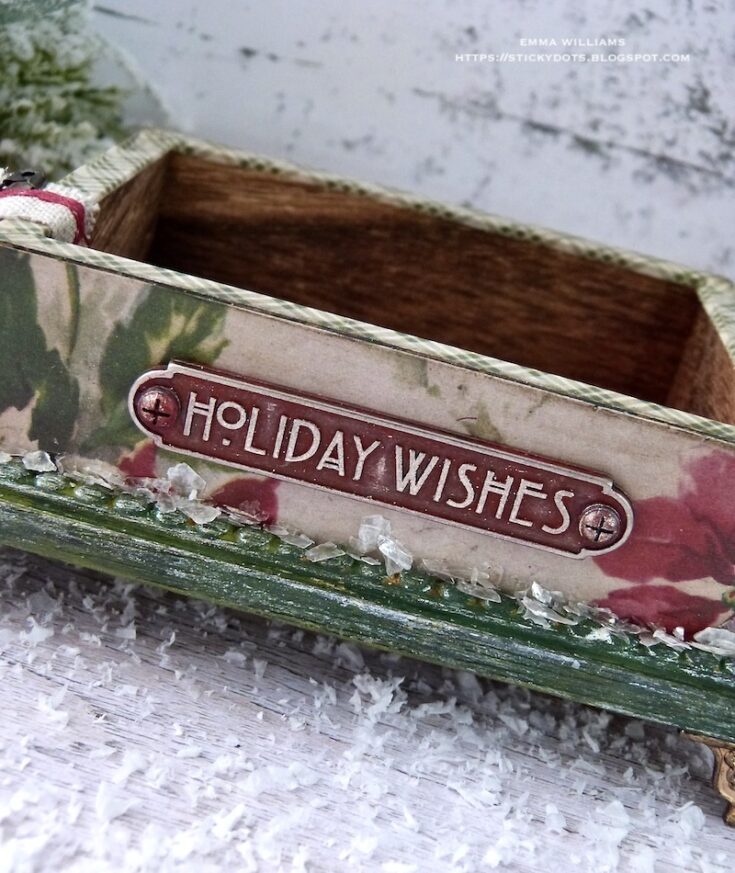
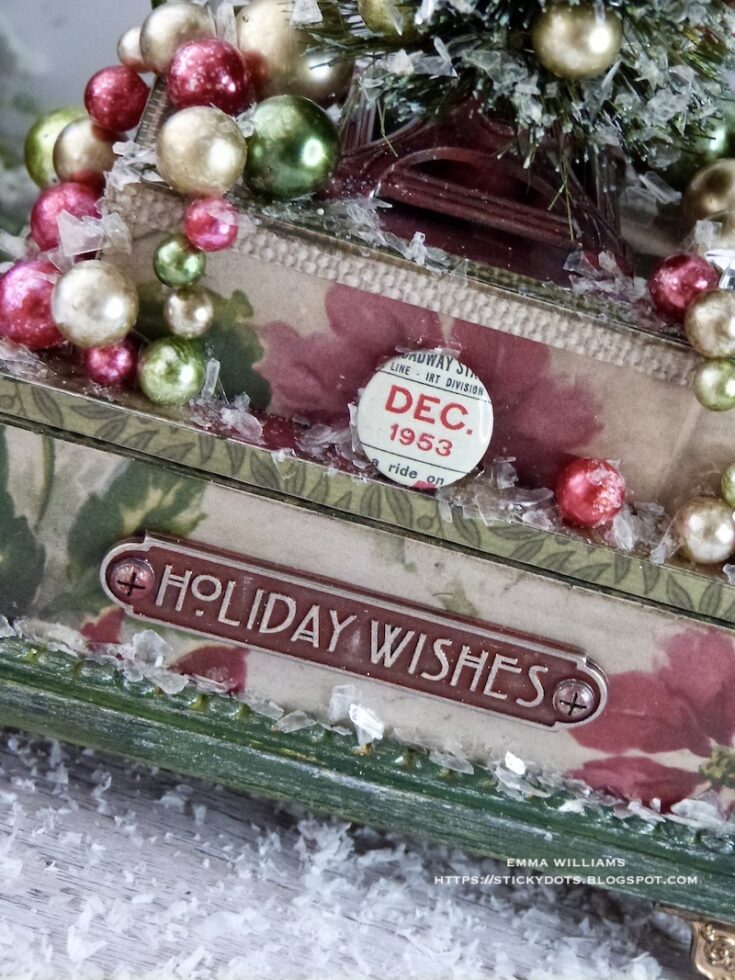
Paint the Christmas Word Plaque, “Holiday Wishes” with Candied Apple Distress Paint. Allow the paint to become slightly tacky before wiping away the majority to reveal the raised areas and the wording on the band.
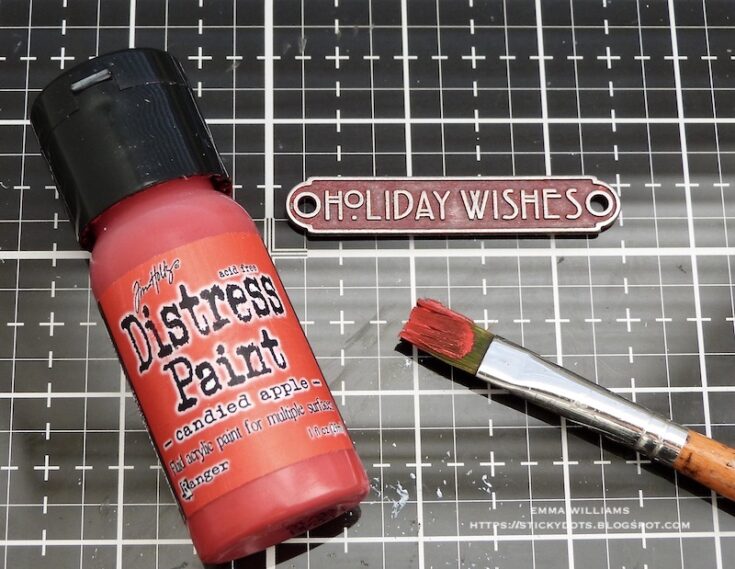
Attach the painted plaque to the centre of the box and attach a Hardware Head on either side of the plaque, which are also painted with Candied Apple Distress Paint.
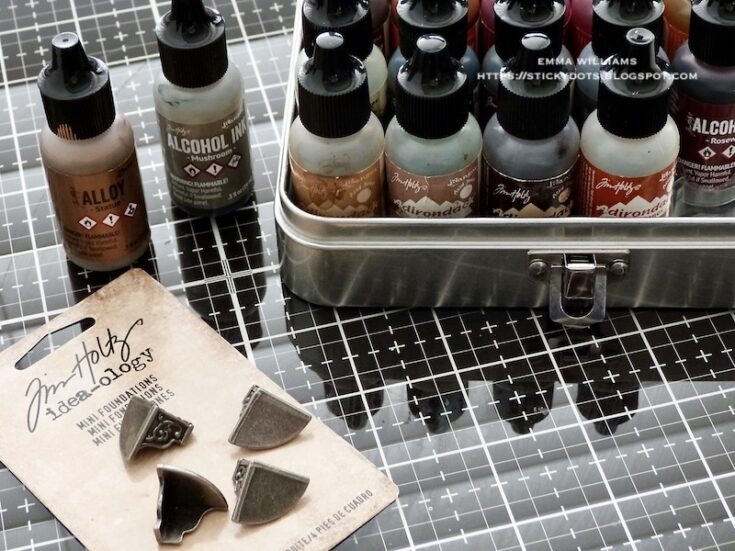
To complete the box, I added the Mini Foundations which I altered with a little Mushroom and Foundry Alloy Alcohol Ink. To apply the ink, place the feet into a small zip lock bag, and add a tiny drop of each ink. Seal and shake the bag to ensure an even coverage.
Attach the feet to the bottom of the frame using Matte Collage Medium.
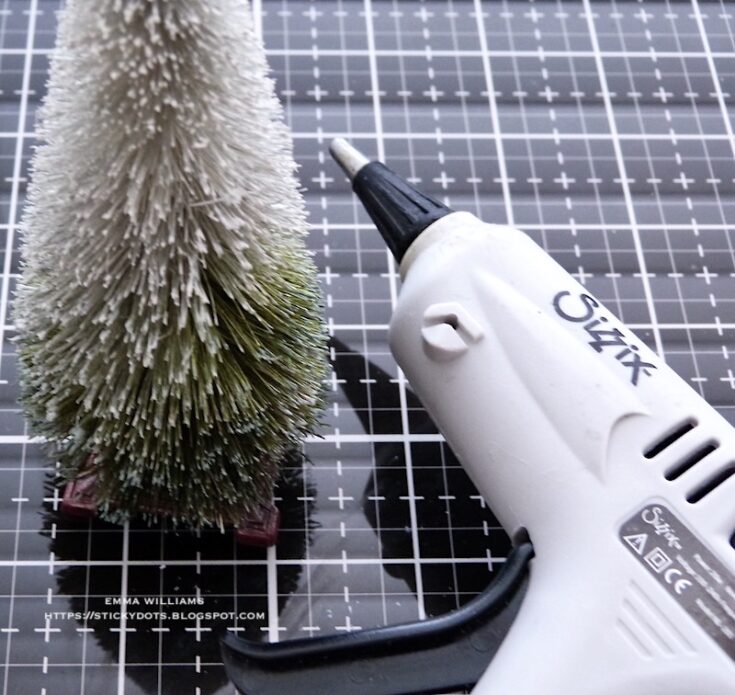
Moving onto the embellishments and starting with the tree, dab white gesso onto the tips of the woodland tree. This will act as a resist when you add the color and create a snowy effect to the tree.
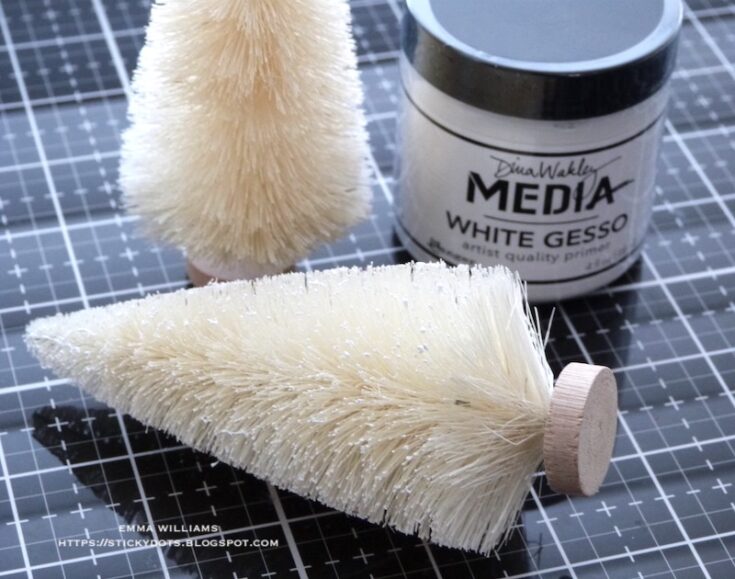
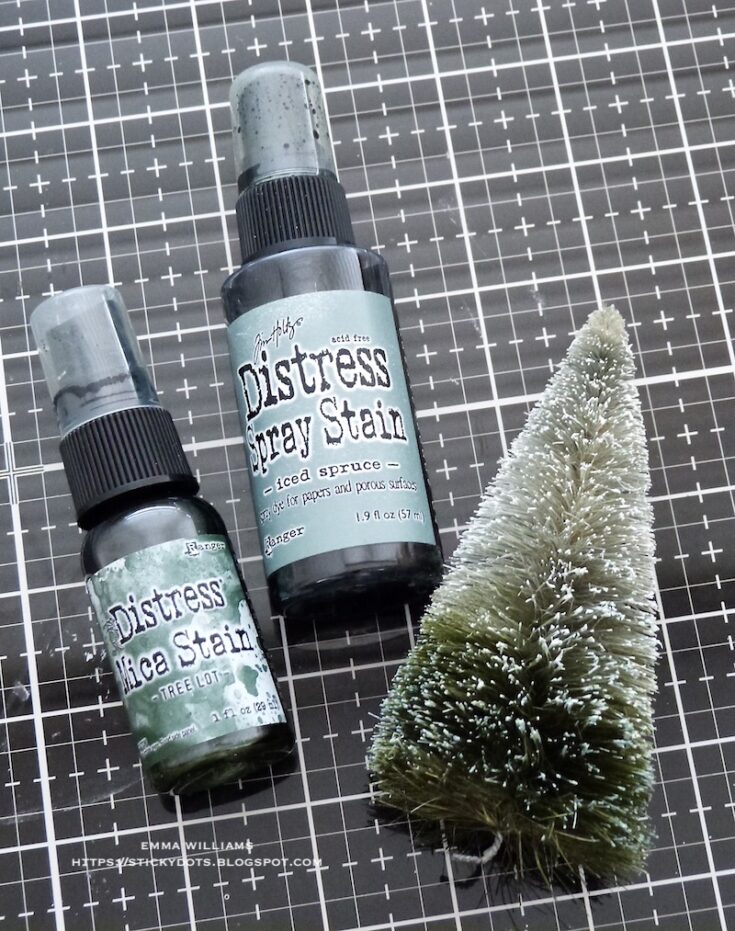
Remove the wooden base of the tree and once the gesso is dry, spritz the tree with Iced Spruce Distress Spray Stain and Woodland Lot Mica Spray Stain. Dry the stained tree thoroughly.
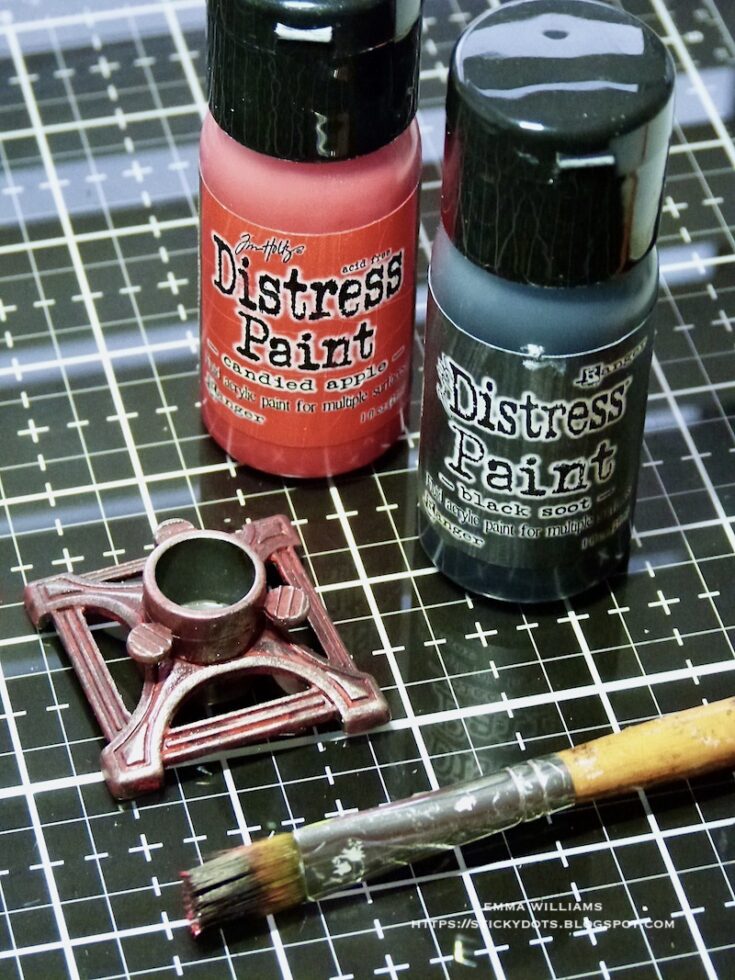
Paint one of the Tim Holtz idea-ology Tree Stands with Candied Apple Distress Paint. Allow to dry before adding a small amount of Black Soot Distress Paint over the top, wiping away the excess with a soft cloth.
Hot glue the tree into the stand.
Attach the tree in the stand, placing it centrally on top of the small box and ensuring the light strand is at the back of the tree stand. Wrap the entire strand of wired lights around the tree.

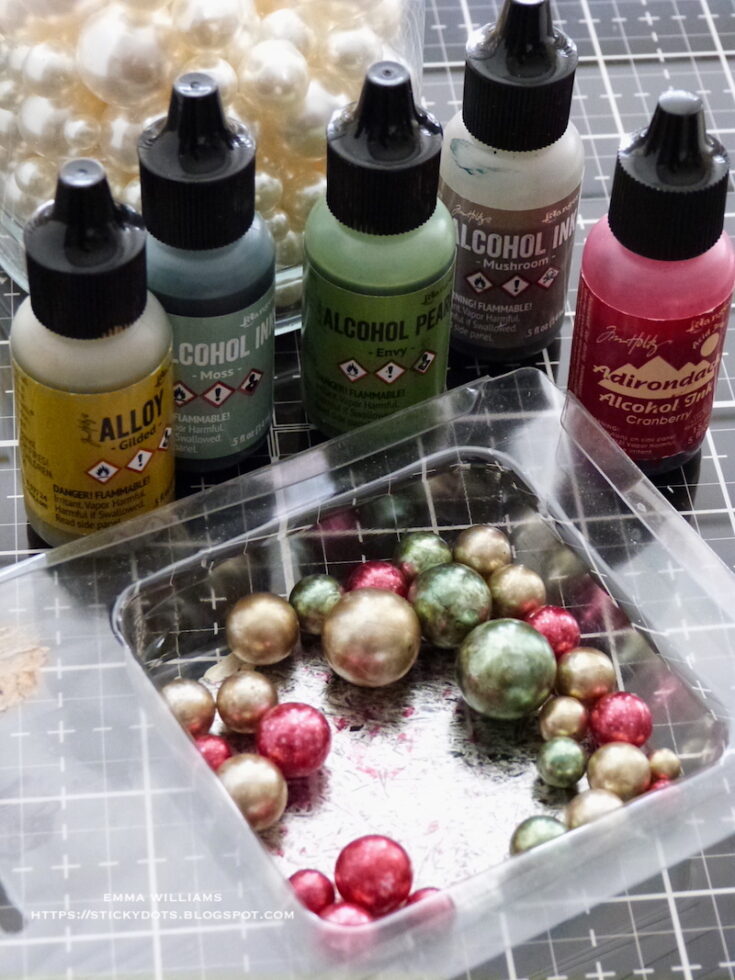
Color a selection of Baubles with Alcohol Inks. I used Moss, Cranberry, Mushroom, Gilded Alloy and Envy Alcohol Pearl. For each color, place the baubles into separate zip lock bags or small containers, I actually used the bauble packaging and then in each contained add small drops of the alcohol inks over the baubles. Shake the baubles to give an even coverage of color.
Attach a selection of the colored baubles, together with Mirrored Stars onto the tree using either hot glue, Glossy Accents or Matte Collage Medium before dabbing Glossy Accents over the tree tips and sprinkling with Mica Flakes.

Arrange the remaining baubles and Mirrored Stars on the top of the box, placing them to cascade over the edges and down the sides. Once they are in position, allow for these to dry thoroughly.
Attach a Mini Flair Embellishment to the centre of the small box.
To complete the box, I added a dusting of Mica Flakes over the top of baubles using Glossy Accents to secure them into place. Set aside to dry.

The box is finished and ready for you to fill with treats for the night before Christmas…I’ll be filling mine with a hot chocolate sachet, some candy and marshmallows for Santa.

I really hope you have enjoyed the process of the project piece was so much fun to make and hope you’ve been inspired by it and the techniques I’ve used.
Hope you all a very Happy Christmas…Emma x
SUPPLIES:
|


Thanks so much for stopping by, and thanks to Emma for being our guest!


Emma,
I love this so much!! I have almost everything to make it and sat with my supplies for an hour last night, not really loving my ideas. These are exactly what I wished I thought of lol. Thank you for the detailed instructions and beautiful inspiration ❤️ #making!!
Tina.B
SD, Ca.
Wow!!! Emma you outdid yourself!!!! Absolutely Gorgeous!!!! Sooo many Amazing details!!!!
This is so, so good…thank you for the time it takes to make such a wonderful tutorial…this is in line for making in Jan. when it is cold and snowy outside…then it will be ready for me next Christmas…wishing you the Merriest of Holiday Seasons….
Emma, I love ALL of your projects but this one is just so special, it has a wonderfully vintage vibe to it, just perfect in every way! xx
Magical – with wonderful photos and instruction!!
Oh wow, This is amazing! Thanks for all the photos
Very nice tree decor! Especially love all the colors of the baubles.
All men tend to need a lot from a young https://bestdatingsitesforover40.net/ lady. They need a supermodel sweetheart who loves stogies, bourbon, and strip clubs. The men need their sweethearts to appear as though pornography stars yet in addition cook like Gordon Ramsay. The rundown isn’t full. You might need a lot additional things from a young lady. The issue is, the more extended the rundown of unquestionable requirements you’re clutching, the less the quantity of potential accomplices you’ll find.
so beautiful
So very pretty!!! I’ve seen some of your beautiful pieces on Tim Holtz’s videos.