Magic of Christmas Card
Hi bloggers! Happy STAMPtember® Sunday to you! While it may seem silly as it’s the first day of fall today, we would like to share with you an absolutely beautiful holiday card tutorial with the fabulous, Paula Cheney! It’s never too early to get inspired, let alone get started on making cards, right?!
Enjoy!
Hi There! Paula from Tim Holtz brands.
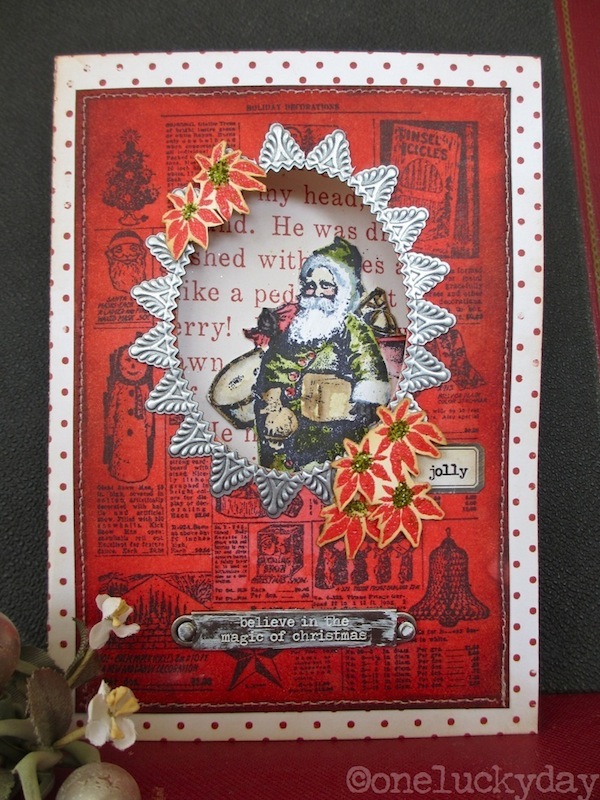
If you are anything like me, I need to start thinking about Christmas Cards in September to even think about getting them done by November! So my card for SSS STAMPtember is all about Christmas. I mean who can go wrong with the new Tim Holtz Christmas Stamps just released at CHA? From the great background to the jolly Santa. He was easy to color with Distress Markers and a detail water brush. Picket Fence Distress Marker for the beard and fur is the secret weapon!

- Cut a 5 x 7” piece of white cardstock. Use Barn Door Distress ink and a Blending Tool to color cardstock.
- Use the spritz and flick technique – spritz water into palm of your hand, flick onto cardstock. Let it sit for a few seconds and then dab off excess water with a paper towel. Dry with heat tool.
- Stamp Cardstock with Seasonal Catalog Christmas stamp and Black Archival ink.
- Trim off edges of cardstock so stamp is centered and paper is 4 1/4 x 6”.
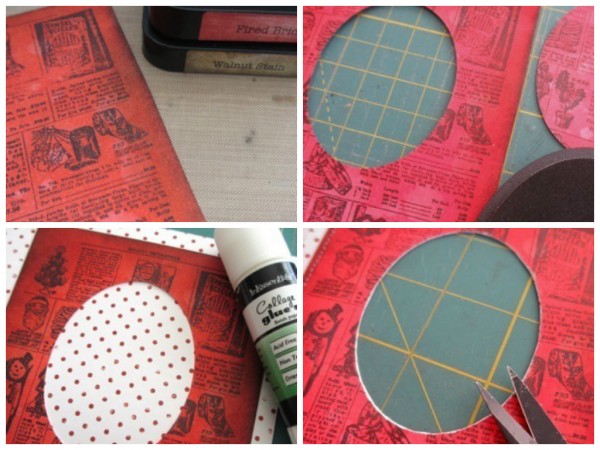
- Use Fired Brick and Walnut Stain Distress ink to enhance edges of cardstock.
- Position Sizzix Sized Oval – medium, on card front and run through die cut machine. Discard center oval.
- Cut card base from Merriment Paper Stash – 6 3/4 x 9 3/4”. Fold in half and score. Adhere stamped cardstock on Merriment paper with Collage Glue Stick.
- Stitch around edge of cardstock with sewing machine. (optional) Use small scissors to cut away Merriment paper inside oval shape and create a window in the card front.
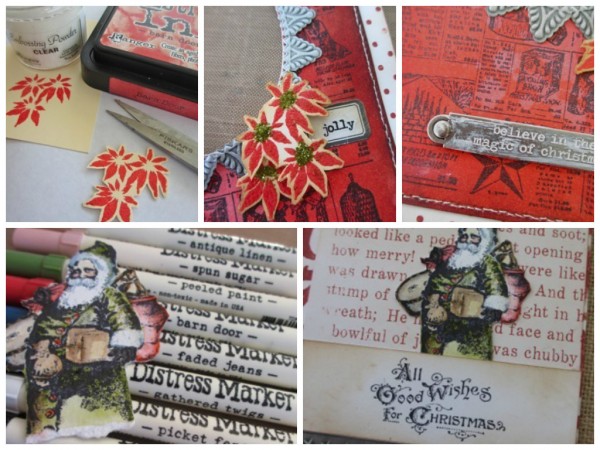
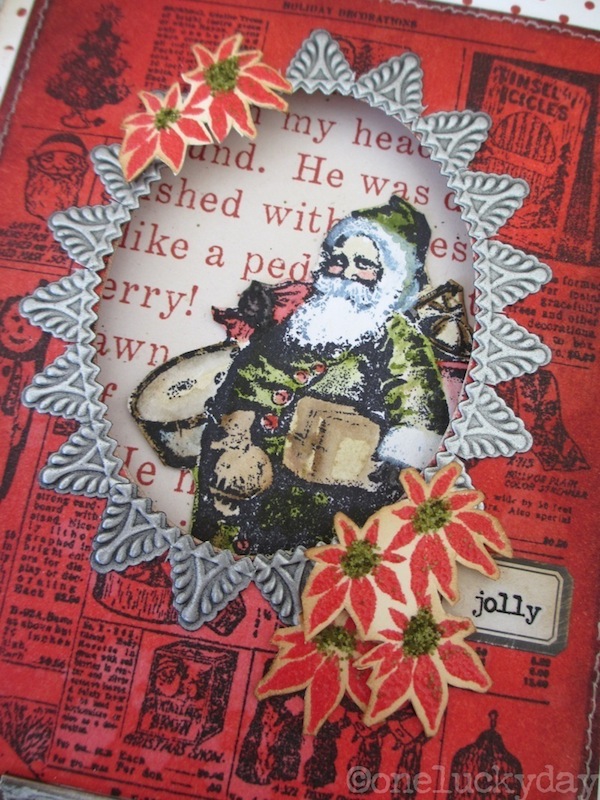
- Clip between points in Industrious sticker border so it conforms to the oval shape. Add to card front. Note: the border does not reach all the way around the oval. The opening is hidden under the poinsettias in the lower right corner of the oval. Stamp 2 sets of poinsettias from the Mini Holidays 5 set onto manila cardstock with Barn Door Distress Ink.
- Use Ranger Clear Embossing Powder to heat emboss the red poinsettias. Cut out the two groups of flowers, leaving a small manila border. Ink edges with Distress Ink. Add a small amount of liquid glue to center of each flower. Pour Distress Glitter – Peeled Paint over glue for a fabulously shinny flower center. Add poinsettias to card front with foam tape.
- Add Vial Label with Remnant Rub word, jolly. Swipe white Dabber Paint across a Christmas Word Band. Wipe away excess. Add Word Band to front of card with brads.
- Stamp Santa onto Ranger Water Color paper with black Archival Ink. Color with Distress Markers and Detail Water Brush.
- Add Santa with stamped sentiment and another Industrious board strip to inside of card.
SUPPLIES:
|
|
|
 |
 |
 |
 |
 |
 |
 |
 |
 |
 |
 |
 |
 |
 |
 |
 |
|
 |
 |
 |
 |
 |
|
 |
 |
|
|
|
 |
 |

Blog Candy Alert!! Follow our blog via email and comment on this post for a chance to win a special blog candy!


Great vintage card! Thanks for sharing the instructions. ;-)
What a beautiful card!
I love the vintage look of this card…it’s absolutely beautiful!
Gorgeous card – vintage and elegant! Thank you for how-to details!!
c
Lovely vintage look and I like the oval framing.
Love all the awesome details!
This is beautiful! Excellent job!
Interesting techniques here that I’ll have to try. The vintage Santa sure looks like something out of my childhood!
wow totally gorgeous…
Gorgeous card, So many beautiful details. I have been working on Halloween projects but after seeing on this card I think I’ll get my Christmas stash out.
Paula… Simply beautiful card. I love the border around the oval and that even though it didn’t fit, you made it work :-)
This is such a fun month!
Fantastic card,love the details!!
It’s all in the details…. so nicely done.
Beautiful card! Love the vintage look!
Beautiful card thanks for sharing your technique.
This is a very cute vintage christmas card. Thanks for the step by step.
What a delightful Christmas card! Thank you for the awesome tutorial!
Awesome vintage Christmas card.
What a lovely vintage card!
What a lovely traditional holiday card!
This is just too cute!
Love the vintage feeling and that red is just perfect for an xmas card love it !!!
Such a vintage looking Xmas card, I love it! Thanks so much for sharing! Super inspirational!
This is a beautiful vintage card…I don’t do this style well at all, but your tutorial really helped with piecing things together!
Love all the little details on this card and thanks for the tutorial on how to complete. Tim Holtz has some fabulous designs and you showcased them perfectly!
I love how the border sticker was used around the oval opening — great card!
Never too early to get started on Christmas cards and this one is gorgeous.
Love all the detail on this beautiful card!!!
This is such a beautiful card..reminds me of Christmas as a child!
Great Vintage Card! Thanks for sharing.
What a beautiful card!
lovely card thanks for sharing with us today
great cards today tfs !!
Super cute…but it’s Paula so I’m totally not surprised! :D TFS
I love the Christmas card today thank you for sharing it with us today !!
Great vintage colors ~ I love it!
Great contrast from the red and vintage images!
Beautiful card! I love that background stamp!
I love the vintage feel of this christmas card. thanks for the tutorial. I can’t believe it is that time of year already.
Great vintage card.
Oh My, what a lovely card! Love that vintage look.
Love the vintage Christmas card!
This is a beautiful Santa Christmas card. It reminds me of taking our daughter to see Santa. For years the same Santa was at this one place. We have pictures of our daughter with him for her first 6 or so Christmases. Thanks for the memory boost.
D~
designsbydragonfly.blogspot
email follower dmcardmaker at AOL
What a great card! Also, thanks for the remeinder that I need to get busy making Christmas cards.
What a great card! I especially like the border to the oval aperture.
Great vintage Christmas card.
Lovely card. Love the santa set back in the aperture. Gorgeous stamps
Such a pretty take on vintage Christmas…thanks so much for sharing!
love the look! thanks for the inspiration.
Sandra ltb