Life Moments
Happy Saturday bloggers!! Today we are so excited to have Tammy Tutterow on the blog with a beautiful fall themed tag created with all kinds of fun Tim Holtz products!! The details and colors on this project are amazing! Enjoy!
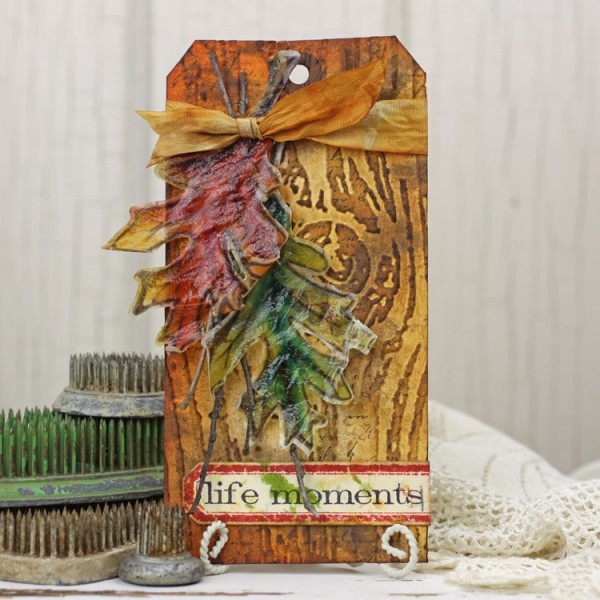
I love how September brings such change when the heat of summer gives way to the crispness of fall air. I spent the first day of fall this year with the windows open in my studio enjoying the fresh cool air. As I reached for my supplies, I found myself picking up things with fall in mind. I decided to create a tag that celebrated the season and the time when the trees in my yard are full of a mix of the leaves of summer and fall.To create my tag, I first misted Antique Linen and Walnut Stain Distress Stains (I keep a mister bottle of each color for misting) onto a #8 manila tag. I misted the tag with water to blend the colors. After drying, I used an ink blending tool to apply Scattered Straw and Rusty Hinge Distress Inks to the edges of the tag. I embossed the tag with the Tim Holtz Woodgrain Texture Fade. After embossing, I lightly stamped the raised areas of the tag with my favorite script stamp, Hero Arts Old Letter Writing using Jet Black Archival Ink.
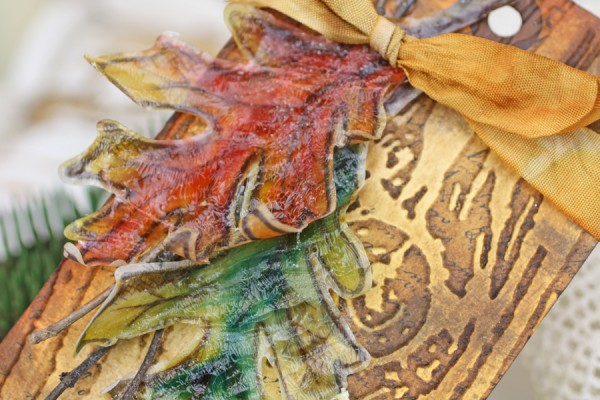
To embellish the tag, I stamped the Tim Holtz BluePrint leaf from the new Framelits stamp and die set onto vellum using Jet Black Archival Ink. I colored the leaves with Distress Ink Markers, blending the colors with a water brush. After drying the vellum, I die cut the leaves using the matching Framelits die. I brushed the die cut leaves with Tim Holtz Clear Rock Candy Distress Crack Paint. While the paint was still wet, I sprinkled a small pinch of Tim Holtz Clear Rock Candy Distress Stickles Glitter onto it to add a bit of sparkle.
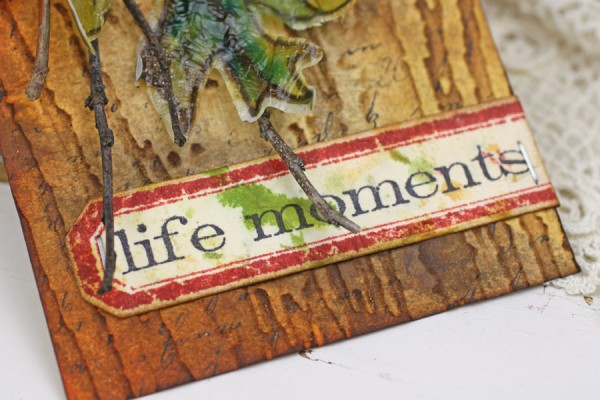
To embellish the tag, I adhered the leaves along with a few small twigs from my yard to the front of the tag. I dyed a piece of Crinkle Ribbon to match the tag and tied it around the top of the tag. I stamped and die cut a label from a piece of manila from my scrap bin. The piece was a project fail on the front, but was super cool looking on the back. I thought using it for a label would add a touch of fun color. I added the sentiment to the label and adhered it to the front of the tag. I off set the text a little so that I could wrap a bit of the label around to the back of the tag. I added a couple of Tiny Attacher Staples to the ends of the label.I love how the finished tag turned out. I think it captured just what I love about the start of fall. Isn’t it fun how we can capture that type of feeling and memory with simple supplies like paper, stamp, and inks?
SUPPLIES
 |
 |
 |
|
 |
 |
|
 |
 |
|
|
 |
 |
|
|
|
 |
 |
 |
 |
 |
 |
 |
 |
 |
 |
Thanks so much for reading today, and thanks to Tammy for being a guest today!
BONUS!
Head on over to Tammy’s blog for a special coupon you won’t find anywhere else!!
Blog Candy Alert!! Follow our blog via email and comment on this post for a chance to win a special blog candy!


Wow! Beautiful tag! I love all the fall colors! Looking at it, I can smell the damp earth and leaves already! Thanks for sharing!
Wow, this tag is gorgeous! Love the effect of the leaf!
So beautiful!!! I love the Rock Candy Stickles on the leaf image
Oh that’s one gorgeous tag!!
What a beautiful Fall tag! :)
Awesome tag – love the colors.
[email protected]
What a beautiful tag Tammy! Love the background with the embossing folder and the leaves are gorgeous.
lovely tag today tfs !!
great project thank you for sharing it
awesome project tfs !!
Those leaves are amazing!
I love the leaves great look.
Wonderful looking tag.
The crackled paint on
the leaves really adds
to it.
Carla from Utah
great tag. love the technique of stamping on velum and adding the crackle paint to the top. stunning.
Wonderful tag! I love the rich colors and the leaves stamped on vellum!
Tammy rocks!! I love this tag and the stamping on the vellum.
love Tammy’s work … who wouldn’t?
Sandra ltb
This tag is incredible. Think I may need to try and scraplift this design… Thanks for the inspiration.
Wow! This is one beautiful tag!
So beautiful, love the intense colors.
Gorgeous !! The leaves on the vellum are fabulous!
Wow! Those vellum leaves are amazing!
stunning tag!
great use of vellum. would never have thought to do that!
This is fabulous. Love all the texture.
Tammy always amazes me with her creativity!! Down to the tiniest details, her projects never fail to inspire me to go buy more stuff…. Oh, wait, I mean, go create more stuff!!! Lol!
a fantastic tag
Fall’s here – beautiful
I love the idea of stamping the leaf’s on vellum. Awesome. Thanks for sharing with us!
What a wonderfully creative tag idea. TFS.
Crafty hugs,
D~
designsbydragonfly.blogspot
email follower dmcardmaker at AOL
Such a gorgeous tag…I love all the texture and dimension!
Great inspiration. Such a cool look!
Beautiful tag. Fabulous details.
Oh my! I love the vellum leaves. They are gorgeous.
Extraordinary! Love that tag.
That tag almost looks like real wood! Great job!!
Fantastic colour and texture on the tag. Such a gorgeous project
Awesome tag! Tammy’s work is amazing! I love how the leaves turned out. Thanks for sharing.
Katie B.
So many techniques! Love the color and texture on these leaves.
Yes, this for sure says “Fall”! Beautiful colors and I love the distress inks!
I can’t believe the leaves were done on vellum – it looks like clear glassine! I follow the blog by email.
This tag is lovely; so woodsy!
Gorgeous tag. I love the vellum leave.
This is a beautiful tag! Thanks for sharing the techniques!
That leaves are beautiful! Good idea to use vellum; something I´ll try in the next weeks! Inky greetings, Gerrina