Hello SPRING: DIY Gift Boxes and Gift Card Holder by Emma Williams!
Hi friends! Happy Sunday and if you celebrate, Happy St. Patrick’s Day! We’re SO excited to share this gorgeous Spring trio by Emma Williams sure to inspire for your Spring makes and beyond! Read on and enjoy!

Hello everyone! I’m so happy to be back on the SSS blog today and can’t wait to share my latest projects with you and take you through all the details of how I used some of the new Tim Holtz/Sizzix Vault dies to make some gift boxes and a gift card holder, which are perfect for Easter and Spring.
With Easter and Spring just around the corner, I always enjoy making tiny gift boxes that can be used for table settings and these are the perfect size to fill with treats and place on a dinner plate. Also, the ideas I’m sharing with you today, can also be used in so many different ways, so whether you use them for cards, home decor, tags or just to decorate ready made boxes, I’d be really excited to see what you make.


So, let’s get started and for these three pieces, I chose to use the following Tim Holtz/Sizzix dies: Vault Pillow Box and Bag Thinlits Dies, Curio Box Bigz XL Die and the envelope from the Collector Die Set.
Cut the the lid and base of the Curio Box from Watercolour Cardstock.
Then cut the envelope from the Collector Die Set, from Woodgrain Cardstock.
For the pillow box, use Watercolor Cardstock to make two separate cuts of the same piece, which will form the back and front.
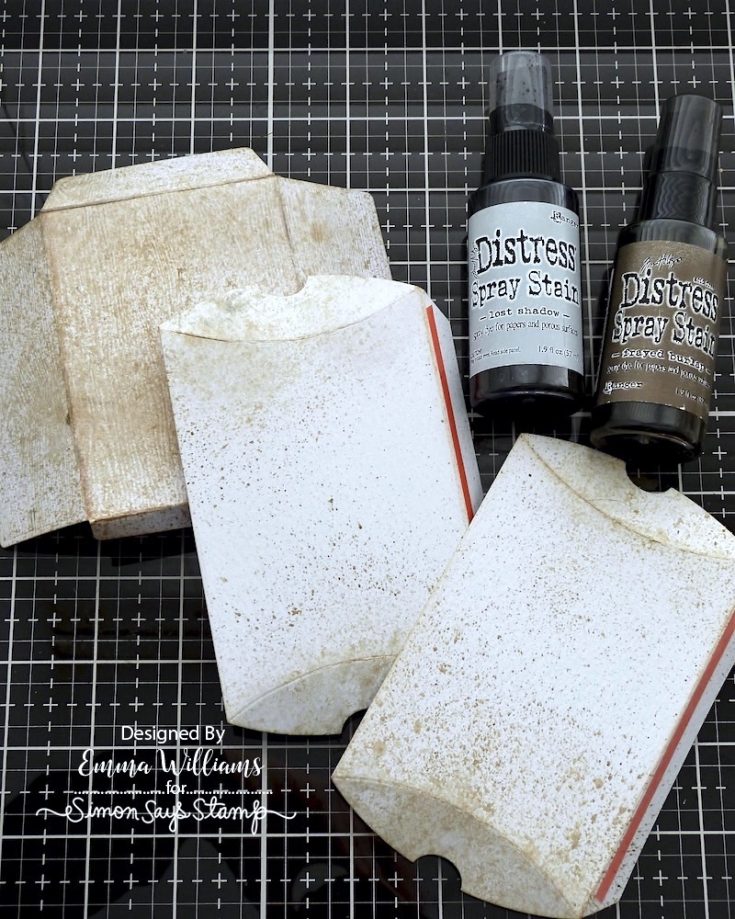

To knock back the ‘whiteness’ of the cardstock, I misted each die cut with a little water, and then spritzed with Lost Shadow and Frayed Burlap Distress Spray Stains, applying the lighter colour first, heat drying the surface and then applying the second colour, Frayed Burlap. I heat dried the pieces thoroughly before assembling each of the boxes/envelope, folding along the scorelines and attaching the tabs with red line tape.
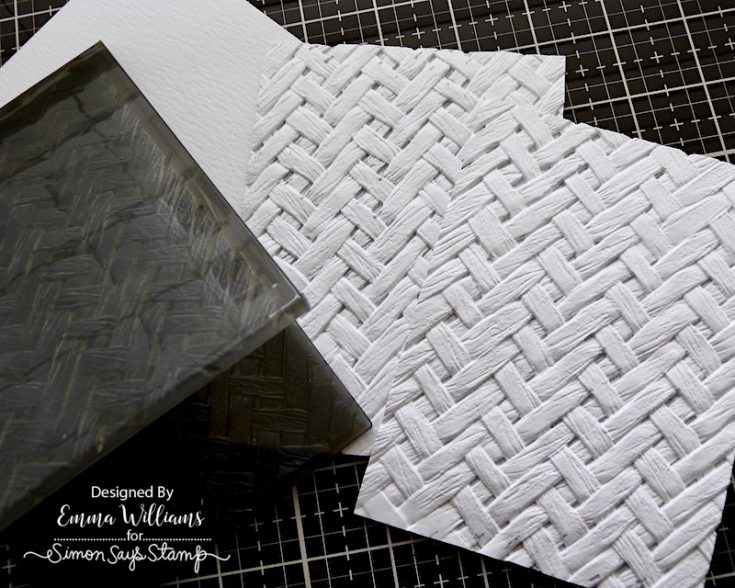
To create texture, I covered each piece using the Intertwined 3D Texture Fade to emboss Distress Watercolour Card. You will need to cut enough panels of card to cover each surface.
To emboss the card, I rubbed the deep textured side of the folder with Hickory Smoke Archival Ink and then lightly spritzed a piece of the watercolor paper with water, which I then placed in the folder and ran through my Sizzix Foldaway.


After the paper was embossed, I misted water over the surface before spritzing with Lost Shadow and Frayed Burlap Distress Spray Stains. Heat dry the first panel and then repeat this process with the remaining card panels.
Using a paper trimmer, cut each of the embossed panels. I covered the top of the curio box, together with the sides of the lid and the sides of the base.

You also need enough panels for the top and bottom of the pillow box and the front of the envelope. Ink the edges of each panel with Walnut Stain Distress Ink.


Using Matte Collage Medium, I adhered the smaller side panels onto the the lid and base of the curio box before machine stitching a border around each of the larger embossed panels. Adhere these panels onto each of the boxes and the envelope
Each of the treat boxes and the envelope are decorated using flowers and greens cut with the Vault WildFlowers Thinlits Die Set and I began by cutting a selection of stems from watercolor cardstock.
With the die cuts placed in front of me, I watercolored each piece using Distress Watercolor Pencils. As a guide, I chose ~ Wild Honey, Mustard Seed, Fossilized Amber, Tattered Rose, Kitsch Flamingo, Prize Ribbon, Speckled Egg, Broken China, Gathered Twigs, Peeled Paint, Shabby Shutters and Rustic Wilderness. I applied the pencil direct to the die cut, and then used a waterbrush, (or you can use a paintbrush), to blend the color over the surface. I heat dry between each layer and don’t oversaturate the die cuts as they are delicate and can easily break or tear. To build up the intensity and add shading, I used my brush to pick up color direct from the pencil nib itself, and then applied this to the die cut. Heat dry again after each application of color.

Once I was happy, I added some small details to the centers of the flowers, using a black fine line pen and a white gel pen.

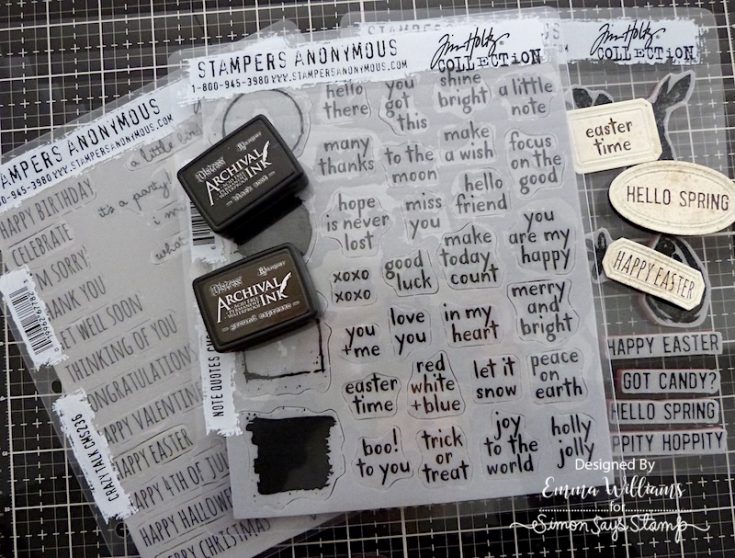
For the sentiments on each box, I used the Vintage Labels Die Set to die cut Distress Watercolor card, which I had already colored with the same Distress Stains as I’ve used throughout ~ Frayed Burlap and Lost Shadow. These dies have a de-bossed border around the edge and to highlight this I used Speckled Egg Archival Ink. Run a brayer over the ink pad, picking up as much ink as possible and then apply the brayer directly over the surface of the die. Place the die, face down onto the cardstock and run through a die cutting machine to reveal the de-bossed border. Ink the edges of each label with Walnut Stain Distress Ink.
Stamp each sentiment onto the labels in Ground Espresso and Black Soot Archival Ink. The sentiments I chose are a selection from the Stampers Anonymous Spring Shadows, Crazy Talk and Note Quotes stamp sets by Tim Holtz. We’re now ready to decorate the boxes and envelope with our bouquets and sentiments.
CURIO BOX ~

I began by dying a piece of Seam Binding Ribbon from my own stash, which I will wrap around the lid of the box. I coloured the ribbon with a combination of Speckled Egg, Antique Linen and Frayed Burlap Distress Spray Stains, spritzed directly onto the binding.
Once the ribbon was dry, I cut a strip and wrapped it around the lid, attaching and securing the ends on the inside of the box, which I then covered with panels of decorative paper which I attached on the inside.


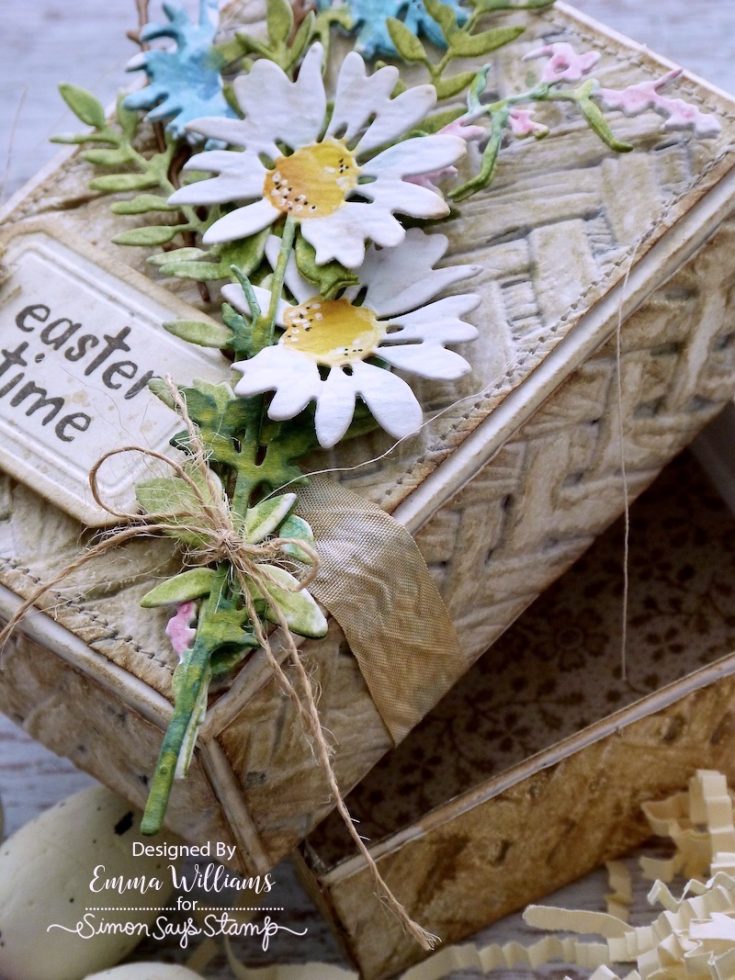
Attach and arrange the wildflowers onto the lid, using foam pads on the backs, to add height and dimension. Tie a piece of twine around the stems before attaching the Vintage Label sentiment, Easter Time, using foam pads.
To complete the sentiment label, I attached a scrap of linen from my stash box, and complete with a small button that I hand stitched into place. I attached the linen scrap to the box with Collage Medium.
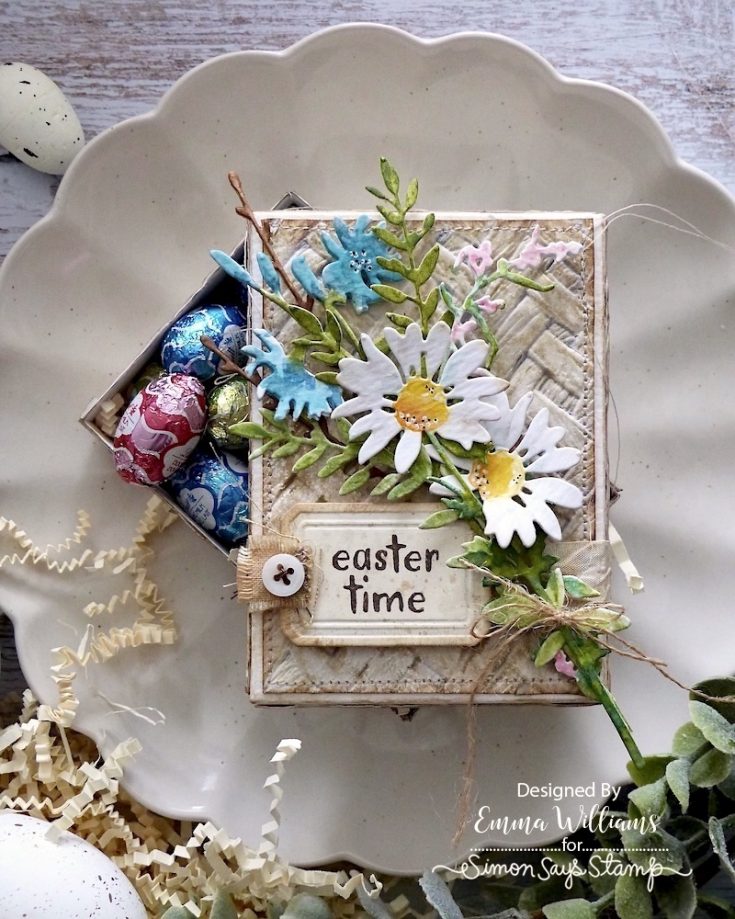

The box is now ready to fill with all those Easter treats.
PILLOW BOX ~

Wrap a piece of the hand dyed seam binding ribbon from a previous step, and tie this horizontally around the pillow box, securing the ribbon on the front of the box only and leaving the side openings free of ribbon, so that you can still open and close each end of the pillow box.

Attach the arrangement of wildflower daisies onto the front, placing them across the box itself and then using foam pads, adhere the “Hello Spring” vintage label into position on the right hand side of the flowers. Tie the ribbon into a bow.
ENVELOPE ~

For the closure to the envelope, I used a Crop A Tile tool to punch a hole in the centre of the top flap and then fixed an eyelet into position with the same tool before threading twine through the eyelet.
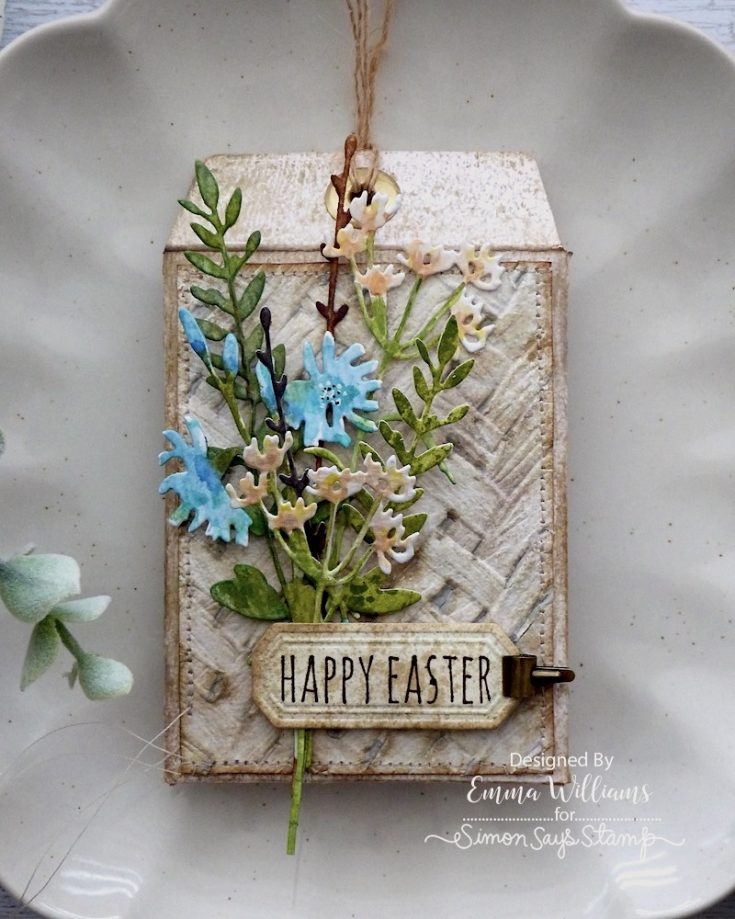
Attach a bunch of wildflowers to the front of the envelope before placing the “Happy Easter” vintage label sentiment using foam pads, to complete the arrangement. Finally, clip a Tiny Clip to the side of the label.
I really hope you’ve enjoyed this tutorial and been inspired by some of the techniques I’ve used to create the finished pieces, that are now ready for my Easter/Spring table setting.
Thanks so much for stopping by today and see you again soon…Emma x
SUPPLIES:
|


Thanks so much for stopping by, and thanks to Emma for being our guest!


WOW…Fabulous work with great explanations.
absolutely gorgeous!!
These are Amazing!!!! I love the soft flowers and the weave texture!!!
These are so pretty
Hello fellow students, I encountered an informative answer addressing the question of age limits in nursing school https://www.nursingpaper.com/questions/how-old-is-too-old-for-nursing-school/. It offers practical advice and considerations for individuals of varying ages who are contemplating a career in nursing. Whether you’re a younger student or considering a career change later in life, this response provides valuable insights into navigating age-related concerns in nursing education.
Supermarkets and malls have become central to modern lifestyles, offering convenience, variety, and entertainment under one roof. Shoppers can find fresh produce, household essentials, fashion, and electronics in a single trip. Many people also seek guidance on services, making it useful to know how to contact walmart for inquiries or assistance. Beyond shopping, malls provide social spaces, dining options, and leisure activities, turning a simple visit into a full experience.