Friendship Gives Wings to the Heart
Hi readers! Happy Saturday to you! I must say when Anna-Karin Evaldsson sent me this gorgeous feature to share with you all, are lovely readers, I literally said OOOOOH! :) This is mixed media at it’s finest folks! Just look at all the detail and texture…not to mention the gorgeous blues and purples! Anna-Karin so kindly made a lovely tutorial to explain her process. Enjoy!
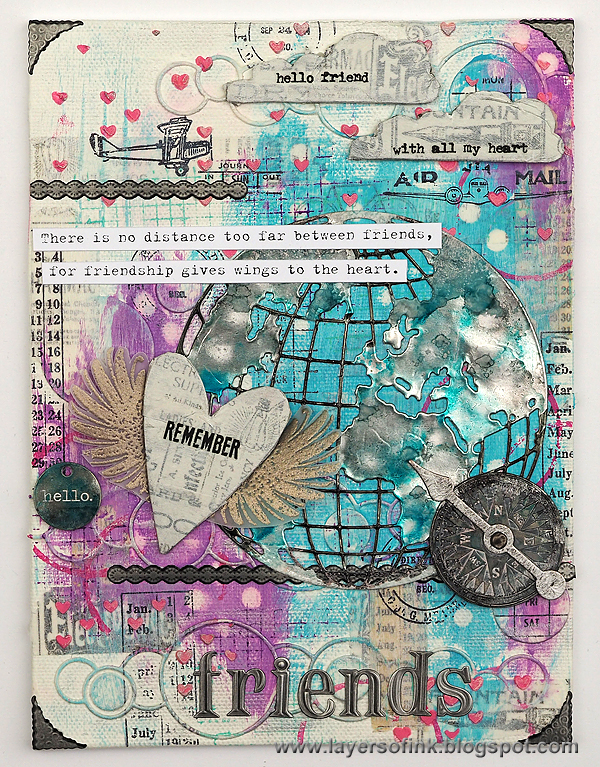
I made a canvas board for a friend who lives far away, but the techniques would work just as well for other themes, and on other surfaces, such as an art journal page or a card. I used a mix of fun products by Simon Says Stamp, Tim Holtz, Sizzix, and Ranger. Let’s start.
-
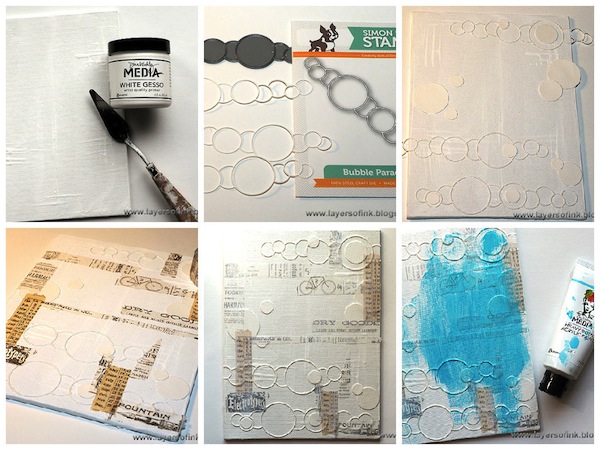
Start by covering the surface with gesso. I used a 6 x 8 canvas board, but. Add some lines of gesso with your palette knife, for extra texture.
-
It is fun to embed die cut shapes into a background, and it is a great way of getting even more out of your dies. I used the Bubble Parade and die cut it three times from watercolour paper. Since this is a wafer thin die, it works great together with the Sizzix Magnetic Platform.
-
Glue the Bubble Parade die cuts and some of the inside circles to the background with multi-medium.
-
Add more texture and detail by adhering pieces of tissue and design tape to the background.
-
Whitewash the background with a thin coat of Dina Wakley’s white paint, to tone down the tape and make it more a part of the background.
-
Paint Sky paint on the background with a paint brush.
-
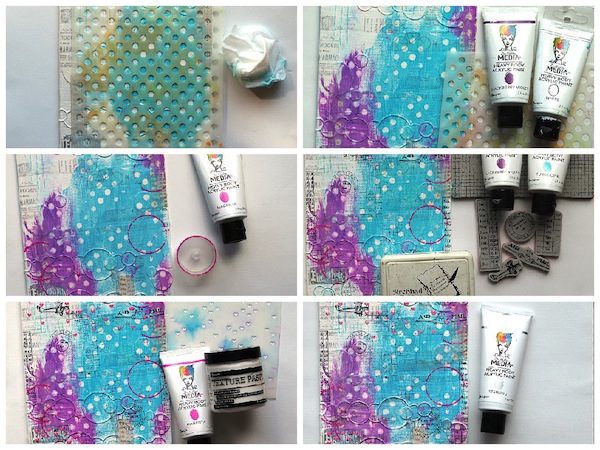
Before the paint is dry, place a stencil on top and rub some paint off with a baby wipe.
-
Mix a little Blackberry Violet into white paint for a lighter shade of purple. Paint and repeat with the stencil.
-
I used the lid of a glue bottle to add more circles to the background, this time with Magenta paint.
-
The background was stamped with a grid background stamp, using both Turquoise and Blackberry Violent paint. Remember to always clean your stamps immediately after using them with paint, otherwise the paint will dry on the stamp. I also stamped the background with a variety of postage and traveling related stamps, using Jet Black ink.
-
Mix a little Magenta paint into Texture Paste to make colored paste. Don’t use too much paint since that might make the paste too thin. Smear through the Falling Hearts stencil with a palette knife.
-
Dry-brush a tiny bit of Sterling paint on the background, to add subtle silver shine. The effect is hard to capture on a photo, but looks particularly nice on the textured parts.

-
Adhere Ranger’s Metal Foil Tape to a piece of smooth white cardstock. The Globe die is very detailed, and Sizzix has now come out with the Precision Base Plate, which helps you get a perfect die cut with these types of detailed dies. You only need to run it through the machine once. The plate replaces one of the Cutting Pads in your sandwich. Use this sandwich: Magnetic Platform, Precision Base Plate with the metallic side facing up, paper, die facing down, Cutting Pad.
-
Here you can see the perfectly die cut globe, together with the Precision Base Plate and the die.
-
Put a piece of felt on an ink blending tool and add drops of Slate, Stream and Silver Mixative, and a drop of Blending Solution. Pounce on the globe, particularly the continents, until you are happy with the effect. Add a tiny bit of Snow Cap and pounce on the two poles, and where there might be snow. Use an Alcohol Ink Fillable Pen and Pitch Black alcohol ink to colour the longitudes and latitudes black.
-
Die cut two clouds and a heart from grungeboard.
-
Coat the shapes with white gesso and, when dry, add tissue tape. Whitewash the tissue tape with white paint. Finally, add a little bit of Stirling silver metallic paint.
-
Stamp wings on vellum with embossing ink, sprinkle with Platinum embossing powder and melt with a heat gun. Cut the wings out.
-
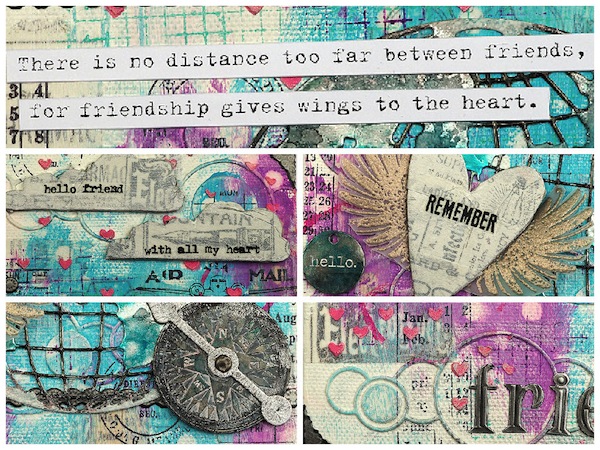
Print a sentiment and cut into strips. I love that little vintage plane stamp.
-
The clouds are a great place for additional sentiments, these are rub-ons, but you could also use stamps or handwriting.
-
The grungeboard heart was glued to the wings and then to the canvas. I also added a rub-on word to it.
-
The Globe looks really nice colored with the alcohol inks. I used the same inks on the metallic idea-ology embellishments. The Game Spinner is painted with Sterling.
-
I used Industrious Stickers for the title and to add some details. My favorite part of this project is the background, with the various types of circles, stamping and stenciled hearts.
Thank you so much for looking!
SUPPLIES:
 |
 |
 |
 |
 |
 |
 |
 |
 |
 |
 |
 |
 |
 |
 |
 |
 |
 |
 |
 |
 |
 |
 |
 |
 |
 |
 |
 |
 |
 |
 |
 |
 |
 |
 |
 |
 |
 |
 |
 |
 |
 |
 |
 |
 |
Thanks for reading today, and thanks to Anna-Karin for being our amazing guest!

Blog Candy Alert!! Follow our blog via email and comment on this post for a chance to win a special blog candy!


I love the colors and so many details.
I love ti thanks
Oh wow, this is so cool. Love how you used the bubble parade die…I have one and now I have some inspiration to use it in a new and unique way. All of your layers -swoon. :-)
Thank you for sharing your project – love it.
This is so pretty, and very cool. I love the details. That globe, wonderful. Very clever techniques. Michelle t
What a lovely gift to receive from a far-away friend!
What a beautiful canvas! Loved the color combos and textures. The tutorial was very detail too. Thank for sharing!
So many pieces make one great piece. I love the colors and the elements. Thanks for the die cutting tip.
Nice artwork canvas creation. Like the detail & dimension. Like the use of the new TH Globe. Saw the Globe at Hobby Lobby and bought TH Tea Tim and will go back to get the Globe.
Melissa
“Sunshine HoneyBee”
Beautiful work Anna-Karin! Love the globe!
Love the metalic world!
Gorgeous work, love the color palette!!!
Amazing work of art. Stunning beautiful !
I like the colors that you used! Collages can sometimes be very dark/grungy but yours is very light and happy!
A fun layout. So colorful and so interesting.
thanks for sharing.
Love all the details and beautiful colors.
What an amazing piece of art and love. Just wow!
Wow so much attention to detail and color. Lot of fun techniques and products too.
Amazing piece of artwork, love the colors and all the textures! Thanks for the in depth tutorial with all the products you used too.
What a masterpiece and such time and attention spent on this beautiful canvas. Nice soft colors also.
WOW! I can’t say nothing else.
I just saw the new precision plate by Sizzix somewhere else. Looks like a must have. Great mix of textures and techniques! Thanks for the video.
Oops lol. Not video.. Instructions.
Stunning. Thanks for the inspiration.
Beautiful project! I love all the textures and layers!
Oh, how I love Anna-Karin and her amazing talent! Wonderful tutorial, great tips and a totally gorgeous canvas!
Love blues and purples!!!
Beautiful piece of art! I love all the shapes and textures. Hugs, Robin
So very stunning! I love mixed media…using all the different mediums and paints. Just gorgeous!
Awesome project!! Thanks for sharing the steps!! Happy Memorial Day weekend!!!
Thanks for sharing this cool piece and tutorial!
Wow ! So many interesting techniques
FANTASTIC! That must have been FUN to make!!!
What a fabulous project! I love all the textures wonderful colors.
This is a lovely tribute to friendship….love the sentiment, the beautiful colors and the amazing detail.
Cool project.
I love a lot of Anna-Karin’s work and this is one I really like; so much to see and such fine colouring!
Awesome!
Wow what a beautiful project!
cool technique!
Wow this is gorgeous! Love the colors and all the texture!
what a beautiful piece of work!
Great project! ;-)
What a feast for the eyes! I love this project, wonderful colours!
What a lovely gift for a friend! I love the layers and stamping! Gorgeous!
I’m in awe–a masterpiece!
What a wonderful piece you made! I really like the globe piece! Thank you for sharing.
very nice!!
WOW, THIS IS SOOOO COOL!! Sensational
Cool, I love the layout and the embellishments!
wow, the world IS gorgeous!
Awesome! Love the techniques used to make this canvas.