Feminine & Masculine Birthdays!
Hi readers!! Happy Sunday to you!! We’re happy to be celebrating Winnie & Walter today on our blog; another great stamp company that joined in our STAMPtember® festivities!
Enjoy!

Hello, Shay of Winnie & Walter here! Julie Mogford and I are so thrilled to be able to share in the STAMPtember® festivities! Simon Says Stamp holds a very special place in our hearts as so this is a very joyous month for us as well.
Today I wanted to share a couple of projects I made using our A Tree for All Seasons stamp set.
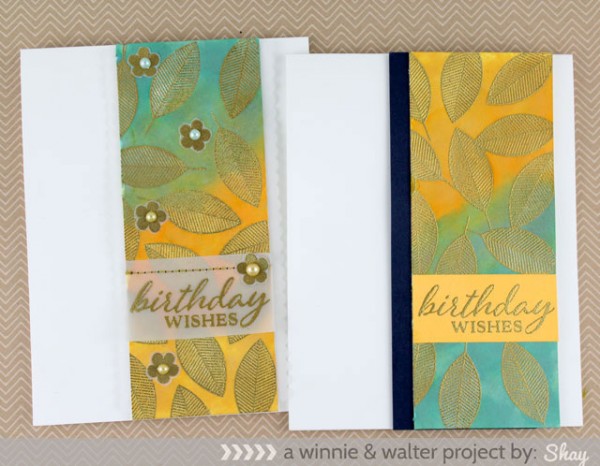
These cards began with the same central element (watercolored leaf panel) and design, but then by altering a few items I was able to make a more masculine and then a more feminine version.
How I Made the Cards:
For both cards: Stamp cat’s eye shaped leaf from stamp set in Versamark randomly and repeatedly on a piece of 4.25 x 5.5 white cardstock. Heat emboss with gold embossing powder. Paint over leaf panel with distress ink diluted with water making sure to blend colors. Cut panel in half lengthwise so then you have two (2) 2.125 x 5.5 inch leaf panels.
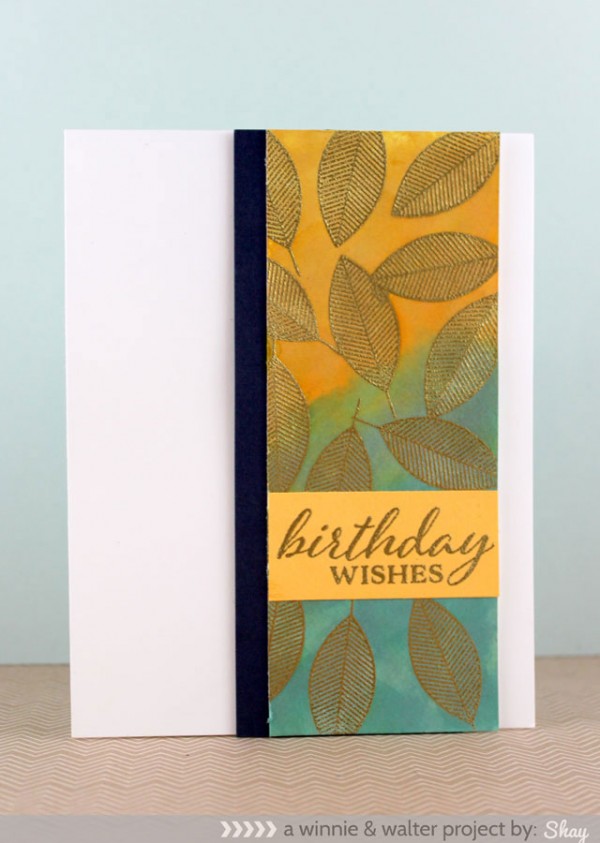
Masculine version: Adhere a layer of navy cardstock behind the left hand side. Stamp sentiment with Versamark onto piece of orange cardstock and heat emboss with gold embossing powder. Adhere on leaf panel. With dimensional foam adhesive add leaf panel to the right hand side of white A2 card.
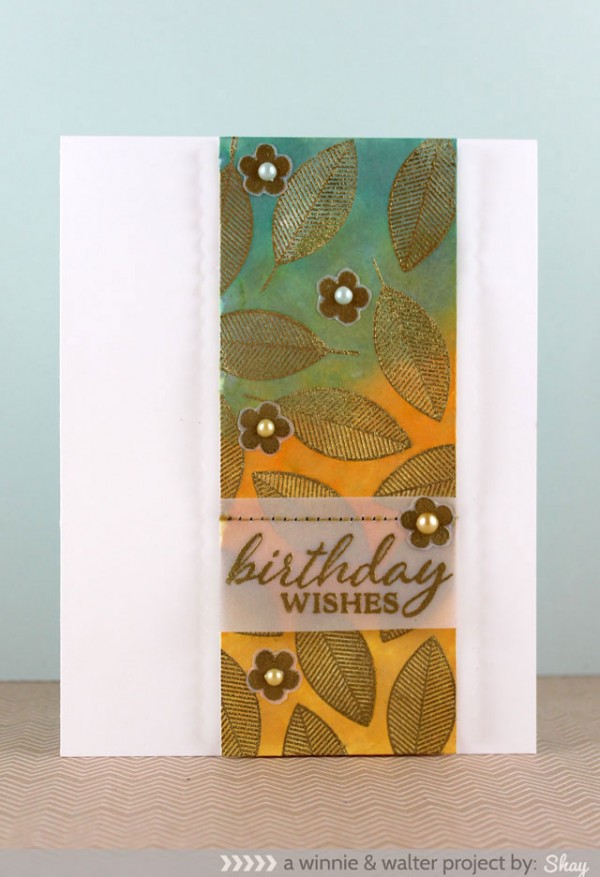
Feminine version: Stamp sentiment with Versamark on a piece of vellum using powder tool applicator or embossing magic powder bag to dust powder over vellum before embossing (works wonders and especially needed for vellum). Sew sentiment to leaf panel. Go over thread with gold Wink of Stella pen. Cut out 2 vellum scallop edges from die and adhere on both sides behind the leaf panel. Place leaf panel on a white A2 card with dimensional foam adhesive. In Versamark stamp larger flower from stamp set 5 times on vellum and gold emboss. Fussy cut out flowers. Add to leaf panel. Top each flower with a pearl center.
Easy right? We hope you are inspired to try making masculine and feminine version of cards too and we would love to see them if you did.
Happiest of STAMPtember® to you!
Julie and Shay of Winnie & Walter
SUPPLIES:
 |
 |
 |
 |
 |
 |
 |
 |
 |
 |
 |
 |
 |
 |
 |
 |
 |
 |
 |
Thanks for reading today, and thanks to Shay & Julie for the fabulous inspiration!
Blog Candy Alert!! Follow our blog via email and comment on this post for a chance to win a special blog candy from our STAMPtember stash!


wonderful cards… thanks for sharing how to make two different cards using one background!
Love the cards and the little additions for to change it to be either fem or masculine. TFS
Cool techniques for masculine and feminine cards!
Great cards! Thanks for the tips on changing them up.
Great to see the two (2) versions of the same card and how easily a few quick changes make it masculine. . . .thank you!
What beautiful leaves
Love this idea of making two versions of the same card. They are beautiful!
cool backgrounds
Beautiful cards. I love the colours. TFS xxx
Great card ideas
Two terrific variations on a great card.
I ❤️ Winnie & Walters! Awesome cards! God bless…
Great cards!!!!!
Ooohh, I love the colors! It looks very fall season!
Those are lovely! I’m usually a big yellow user, but I really enjoy the look and those colors together! Now I have to try it out, lol. Thanks for the inspiration :)!
That’s supposed to say that I’m NOT usually a big yellow user! Lol.
I love the look of these cards……simple, yet very elegant!
I really love the subtle color change.
Oh I love these! Hi Shay, it’s great to see you on SSS! I definitely will try this
Such an innovative way of making use of the stamps, thanks for the inspiration <3
Love both versions of the card! TFS
What absolutely beautiful cards! Just love the gold leaves.
I love the beautiful background colors you used on your cards. It makes those beautiful leaves standout.
Great ideas. I’ll have to think about making both masculine and feminine cards from now on.
So pretty! I love how those leaves stand out against the pretty backgrounds!
How fun seeing a masculine and feminine version!
Wow, those cards are soooo beautiful. The detail embossing and the color tones…both perfect for male or female. Gorgeous!
Very pretty!! Love all the colors!
Lovely cards. Always looking for male cards.
Beautiful cards!
Amazing stamp set and a superb idea to create Masculine and Feminine Birthday cards on teh go. TFS
LOVE Winnie & Walter stamps, and I love the warm fall colors on both cards!
Incredible effect with the gold embossed leaves combined with the watercolor background. Beautiful cards. Cheers!
Great cards!
Those embossed leaves are gorgeous. I love that Simon Says Stamp continues to bring us products from such a wide variety of vendors. Thanks Simon.
Wow, those cards are soooo amazing. The detail embossing and the color tones…both perfect for male or female. Gorgeous! TFS
CU hellerlittle
I love the leaf background!
Gorgeous cards!
Both of these cards are absolutely beautiful!
LOVE these cards!
Beautiful cards,I love them both!!! GREAT idea for masculine and feminine card. Thank you for sharing!
I love that the same design can be done for both masculine and feminine cards!! Just genius!
Amazing idea, one design in two different version, loved them!
They’re both beautiful cards! I love the colors and the embossing. Thank you for the inspiration. I’m trying to learn all I can about making cards and when I see cards like this, that are so well designed it really makes me want to get in my studio and create things.
Love the cards very striking! the leaves look so gorgeous!
VERY cool!
Wonderful cards. Love how they were turned into masculine and feminine versions with just a few different touches.
Love the background with the gold embossed leaves. Thanks for sharing how to create a masculine and feminine card.
Simple but beautiful card ideas.
What a great card! I just love Winnie & Walter stamps!
So pretty! Great idea!