Dreamy Mixed Media Canvas
Hi readers! Thanks for stopping by our blog today! We’re hoping it gives you good inspiration! We’re thrilled to welcome back special guest designer Emma Williams to our blog! Did you know? She’s also one of our design team members on our Monday Challenge blog? Be sure to give her blog a good peruse for lots more inspiration! (Once you’re done reading this, that is. ;))
Enjoy!
Hello everyone, it’s Emma here!
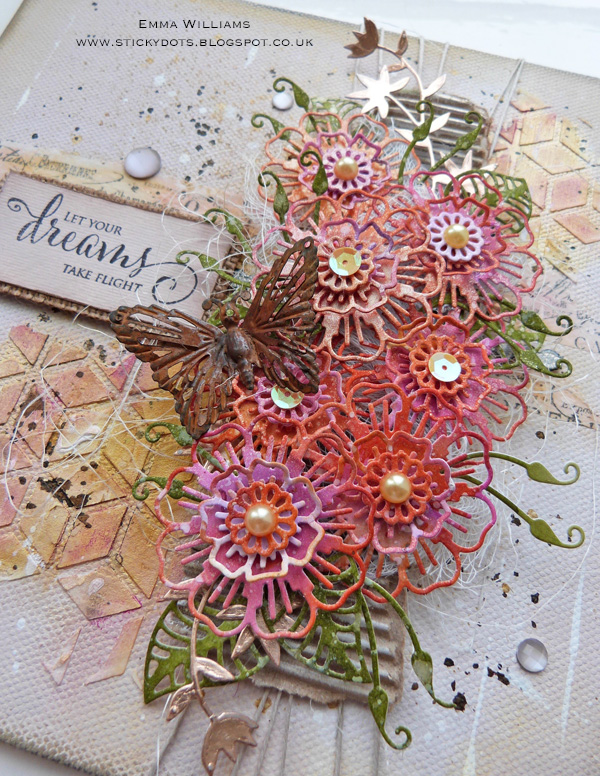
Today, I’m thrilled to have been invited back to the Simon Says Stamp blog to share a summery home decor project that showcases some wonderful Penny Black dies and stamps. This canvas panel that I’ve created for you, is packed full of ideas that can also be used to make special cards to send to loved ones or even a matching gift tag, if you choose…
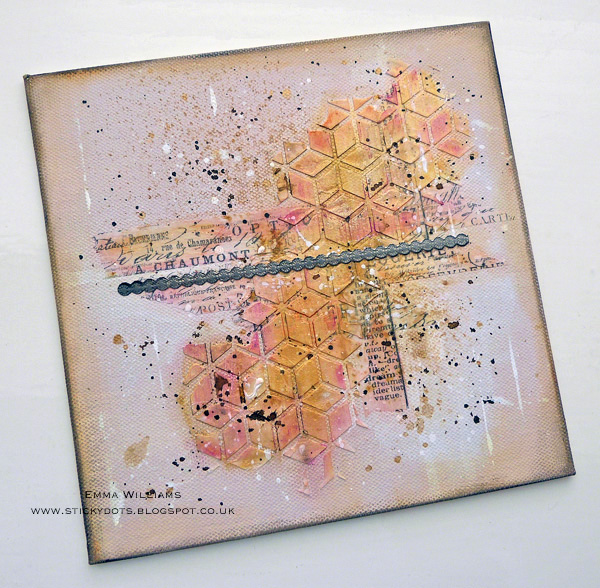
1. I started by cutting a mixed media board to measure 8” square. The boards from this pack are already pre-gessoed so you can start applying your paints to these straightaway.
2. To create the background on the canvas, I began by using a paint brush to apply Spun Sugar Distress Paint to the background and once dry, I then added a small amount of Picket Fence Distress Paint to the centre, spritzed it with water and allowed the paint to run and form drips across the canvas. Heat dry the paint thoroughly before moving onto the next stage.
3. Tear off strips of Tim Holtz tissue tape, (I used Symphony and Sketchbook) and using a small amount of collage medium, attach these across the centre of the painted surface.
4. Lay down the Tim Holtz Blocks Layering Stencil, placing it over the top of the tape and apply Ranger Texture Paste through the stencil using a palette knife.
5. Once the paste is dry, use a dry paintbrush to apply some Prima Metallique Gold Rush Alchemy Paint over the top of the stencilled area, highlighting the gorgeous detail of the raised surface. Once again, thoroughly dry the paint before applying the next layer, otherwise you’ll end up with a muddy mess of colour.
6. Next, I used Picked Raspberry and Spiced Marmalade Distress Crayons and added a small amount of color to random areas of the pasted area, I then used a semi-dry baby wipe to gently blend the colors over the top of the gold paint and I also used my fingertip to take the color from the crayons and extend it over the areas of tissue tape that were still showing.

7. Once I was happy with my background, I then added flicks of the Gold Rush Alchemy Paint, Picket Fence and Ground Espresso Distress Paint over the entire surface. After heat drying the background thoroughly, I then attached a border strip across the centre and added a small amount of Black Soot and Spiced Marmalade Distress crayon around the edge of the canvas, smudging and blending the colours to create a framed border.
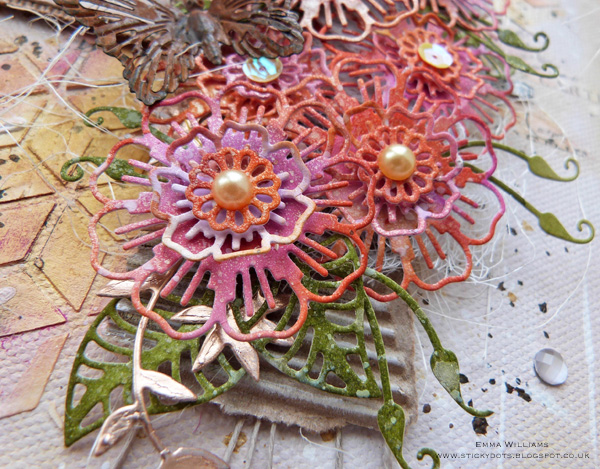
8. Now you have your background, it’s time to move onto creating that burst of flowers and for this I began by applying a small amount of each of the following Distress Stains to a craft sheet: Spiced Marmalade, Picked Raspberry and Wilted Violet. Spritz the stains with water and swipe your watercolor card through the stains, picking up all the color of the ink. Heat dry the card.
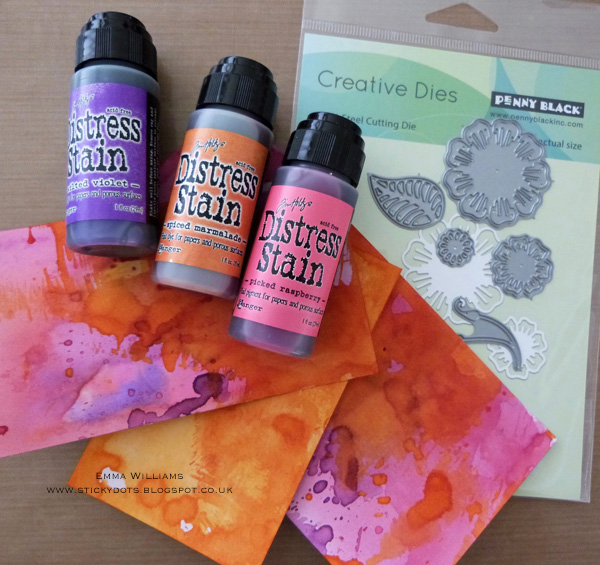
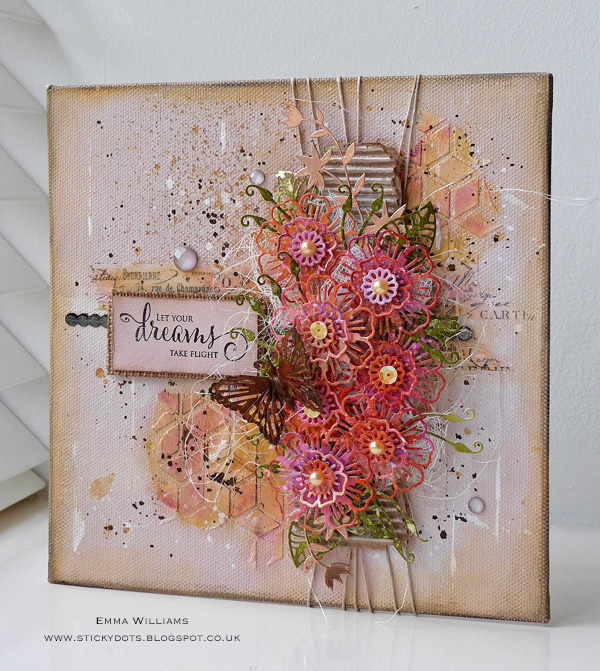
9. Using all three sizes of flowers from the Layered Flower Penny Black Flower Die, die cut the stained card ~ you will need 7 of each size, 21 pieces in total. I spritzed the individual die cuts with Wendy Vecchi’s Pearl Mica Spray for an added shimmer and dried these thoroughly before layering the flowers to create 7 dimensional blooms, attaching each section with a foam pad for added dimension.
10. Add sequins and pearls from the Sunshine 28 Lilac Lane Embellishment Kit to the center of each flower, attaching them with a small dot of Glossy Accents.
11. Tear a strip of corrugated card taken from the Textured Surfaces Pack and apply a light covering of Picket Fence Distress Paint over the top. Once dry, I arranged and stuck the flowers onto the card using foam pads and a hot glue gun to secure.
12. Die cut some leaves and stems from watercolour card, using the Layered Flower die. I then lightly spritzed the die cuts with water before spraying Peeled Paint Distress Spray Stain over the top. Dry the foliage pieces thoroughly and then place them into your flower arrangement, tucking them underneath the flowers. At this stage, I also tucked small pieces of cheesecloth into the arrangement.
13. To complete the arrangement, I used the Flower Frolic die to die cut Gold Metallic Kraft Core Card Stock and placed these die cuts, at the top and bottom my cluster of flowers.
14. I wrapped some twine vertically around my painted canvas and secured the ends with a knot at the back before attaching the flower arrangement over the top of the twine, using foam pads on the back of the corrugated card.
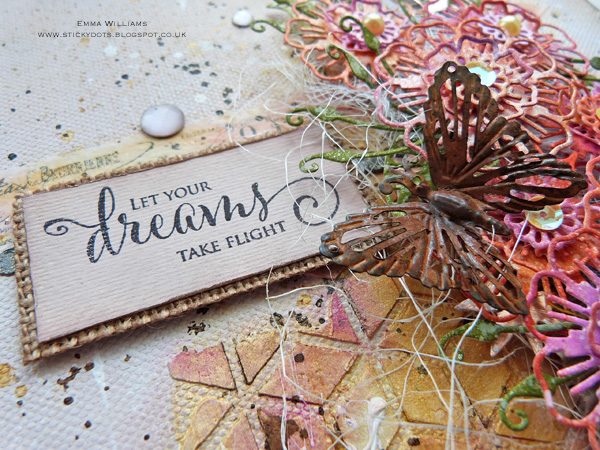
15. Cut a small piece of white card and ink the card with Spun Sugar and Victorian Velvet Distress Ink.
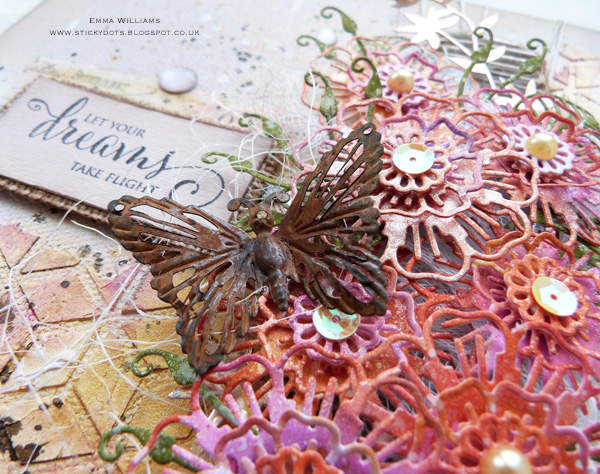
16. I inked up the “Let Your Dreams Take Flight” quote from the Snippets Stamp Set using Jet Black Archival Ink and stamp the message onto the card, before matting and layering the message onto a piece of burlap from the Textured Surfaces pack and attaching this with foam pads to the left hand side of my flower arrangement.
17. As a finishing touch, I shaped the wings of a Finnabair Grungy Butterfly and added this to the flower arrangement, attaching it with hot glue and placing it over the top of the flowers and also three small Prima crystals, which I placed onto the background. I really hope you’ve enjoyed the creative process for this project and that some of the techniques I’ve used will inspire you to create projects of your own using these gorgeous products from Penny Black!
Thank you so much for stopping by today…
Happy Crafting!
Emma
Supplies:
 |
 |
 |
 |
 |
 |
 |
 |
 |
 |
 |
 |
 |
 |
 |
 |
 |
 |
 |
 |
 |
 |
 |
 |
 |
 |
 |
 |
 |
 |
 |
 |
 |
 |
 |
 |
 |
 |
 |
 |
 |

Blog Candy Alert!! Follow our blog via email and comment on this post for a chance to win a special blog candy!


Wow this is truly stunning! Absolutely love it! I’d love to have a masterpiece like that hanging off my craftroom wall!
Wow–so amazing. I always love looking at the mixed media projects. One of these days I’m even going to try one myself. Thanks for the inspiration!
Lovely!
this is fabulous.
I love all of the wispy flowers.
I’d love to have this to display in my house.
thanks for sharing.
Wow, so much dimension!
Absolutely stunning!
Simply GORGEOUS!! Thanks for sharing how you made this canvas with us.
Lovely project!
OH MY GOODNESS … that background is amazing; that texture, the color, the composition OMG … THEN those amazing details … those flowers, those colors, the embellishments WOW !!
How lovely is this! I just used some of my Distress stains today on a card – thanks for showing us your beautiful work!
Holy Buckets of Gorgeousness!!! LOVE, LOVE and LOVE your canvas!!! There’s not a thing on your canvas that I don’t like. Stunningly beautiful!!! The colors and flowers and background are just spectacular! LOVE!!!
Oooooh what a beautiful project :)
Wow!! This is really stunning.
Just gorgeous! Love
the colors and all the
flowers.
Carla from Utah
Wow, this project is eye popping:)
Stunning mixed media piece – thanks for the great instructions and inspiration !
Lovely panel. Beautiful colors!
Awwww…. This canvas is just AMAZING! Love, love this masterpiece! Great background and adore these flowers! Thanks for sharing the process!!
That intricate die is just gorgeous. Love the whole look!
Love mixed media! this is so pretty!
Oh WOW!!!!! This is stunning ans gorgeous!
Wow! I love your project!!! Really gorgeus!!!
Wow…..so incredibly soft and pretty!! Love the dreamy feeling I get just looking at it!!
<3 J
jwoolbright at gmail dot com
HerPeacefulGarden.blogspot.com
WOW! simply stunning. . . .
Wow! Beautiful! TFS
Oh my!!! I really love this. I love detail and intricateness of the flower and butterfly dies and the colors just make the card pop! Thanks so much for the inspiration.
Beautiful!! Love the butterfly and the saying :)
Beautiful!
Superb!! Love this a lot!! Nicola x
Absolutely beautiful and intricate!
Emma’s work is FANTASTIC! She always inspires me to reach higher.
Oh my goodness Emma, this is just breathtakingly beautiful! Thanks so much for your wonderful explanation of each step and for sharing this lovely work of art! I love it!!!
Absolutely STUNNING Emma, what a fabulous, PERFECT creation. A feast for the eyes ♥♥ xxx
Those flowers are glorious! Love the sentiment and that fabulous butterfly too!
Wow!! Those layered flowers are so impressive and beautiful! This is a real work of art!
Love this project. So very pretty!
Absolutely gorgeous! Love the texture and all the rich colors! That flower die is amazing!
So pretty, love the gold and the flowers!
This is absolutely amazing! Love the colours you used on the paper you cut all the beautiful flowers from.
Wow, this is just stunning!!!
another stunner. so much detail. fab xx
Simply amazing – great colors and lots of layers!
I will tell you honestly that i have not gotten into the mixed media craze…I have a hard enough trying to make cards right now!! That being said….this is one of the more beautiful home decor projects I have seen!!
Wow, this is so pretty and lacy. Even the background by itself is amazing!
Gorgeous canvas!
Wow!! This is absolutely AMAZING!! Such a stunning, stunning card! I’m in awe!!
Wow!! Really Beautiful canvas!!
The dimension and textures on your project are stunning. What a great blend of colours!
Very beautiful! Love all the colorful flowers and the butterfly!
This is fabulous! The background, the die cut layers , the layout , the EVERYTHING! Well done!