Dream As If You’ll Live Forever
Hi readers! Happy Sunday to you! I hope you’re having a great weekend! I’m pleased to be back with special guest designer Tammy Tutterow. She made a fun little canvas project that has layers of tips, tricks, techniques, & FUN!
Enjoy!
-
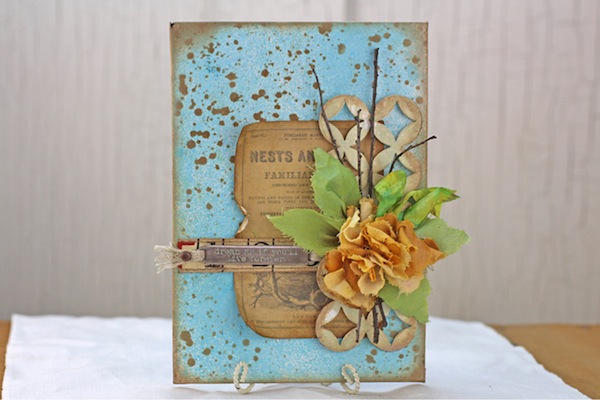
I love making small embellished canvases for gift giving. They can serve as both a card and a gift. How fun for someone to receive something that you have made from your heart and your hands that can add beauty and sentiment to their decor. Best of all, they can be relatively inexpensive to create by starting with an expensive art canvas panel (usually only a few dollars for a four pack) and using supplies you probably already have on hand!
-
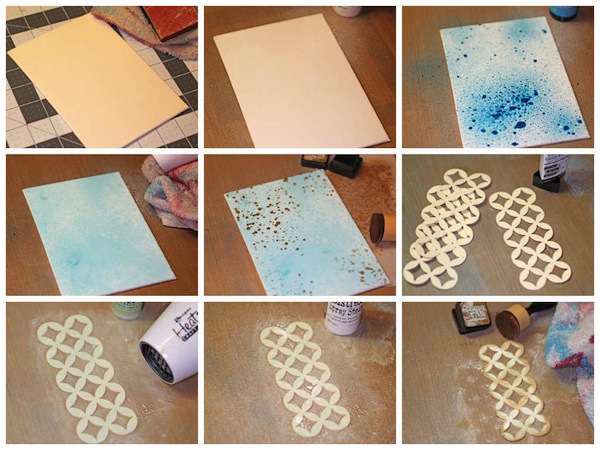
Sand over the surface of the canvas with a Sanding Grip. Sanding will help remove some of the finish on the canvas. The finish applied to canvases can sometimes make Distress Ink harder to dry. Removing some of the finish will help the ink adhere and soak into the surface better.
-
Randomly mist over the canvas with Picket Fence Distress Spray Stains. Dry the mist well with a heat tool.
-
Randomly mist over the canvas with Broken China Distress Spray Stains.
-
Blot the stain with a dry cloth. Dry the stain well with a heat tool. You may notice in the photo that the areas of Picket Fence create a subtle resist to the Broken China.
-
Place the Speckles Layering Stencil on the canvas. Use an ink blending tool to pounce Gathered Twigs Distress Ink onto the canvas through the stencil. Move the stencil around on the canvas to add specks randomly around the canvas. A well inked blending tool will add bolder specks while a lightly inked blending tool will add faint specks. A combination of both will look great!
-
Use an ink blending tool inked with Gathered Twigs Distress Ink to add a blended brown edge to the edges of the canvas.
-
Die cut three Courtyard Frameworks pieces from manila cardstock. Use a glue stick to adhere the three layers together. This is an easy way to add depth when you don’t have a thicker material like mat board or chipboard on hand to die cut.
-
Dab over the assembled die cut with Bundled Sage Distress Paint. Dry the paint well with a heat tool.
-
Mist lightly over the painted die cut with Picket Fence Distress Spray Stain. Use a heat tool to dry the stain.
-
Use an ink blending tool inked with Gathered Twigs Distress Ink to add a blended brown edge to the edges of the die cut. Rub over the die cut with a dry cloth to soften the ink and to remove any excess on top of the paint. Dry the ink with a heat tool.
-
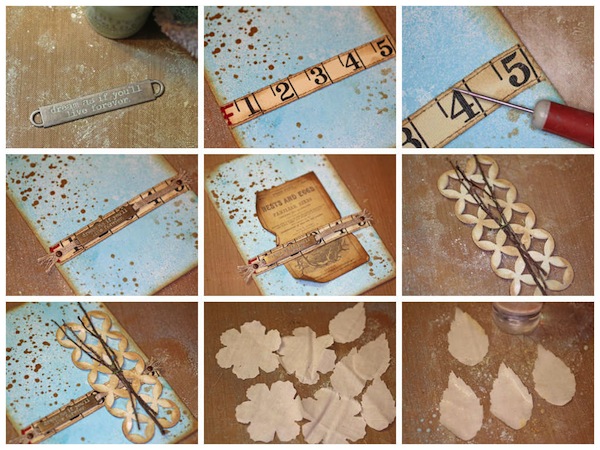
Dab Bundled Sage Distress Paint onto a Word Band. Allow the paint to set a few moments before wiping off with a dry cloth. The paint will remain in the recessed letters.
-
Cut a 4 1/2” strip of ruler ribbon. Lay the ribbon across the canvas about 2 1/4” from the bottom. Add a small amount of adhesive under the two ended to help keep in place.
-
Use a craft pick to poke a hole through the ribbon and the canvas on both sides.
-
Cut a 5 1/2” piece of Linen Ribbon. Feed the ribbon through the Word Band. Use a long fastener (brad) through each end of the ribbon. Place the long fasteners through the holes in the Ruler Ribbon and canvas. Flatten the prongs of the long fasteners on the back of the canvas.
-
Ink, wrinkle, curl, and tear the edges of the nest and eggs book cover piece of Tim Holtz Thrift Shop Ephemera. Slip the ephemera under the ribbon, slightly off center on the front of the canvas.
-
Use wire to attach a bundle of small thin twigs to the front of the Courtyard die cut piece.
-
Use foam tape pieces to adhere the die cut piece to the front of the canvas. (After taking the photo, I decided it needed the ephemera, so your project should have the ephemera in place already.)
-
Die cut four flowers and four leaves from muslin using the Tim Holtz Jumbo Tattered Florals die.
-
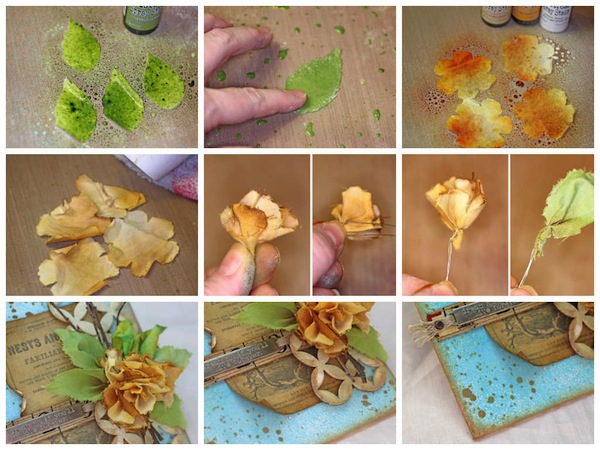
Mist the fabric pieces with water.
-
Mist the leaves with Peeled Paint Distress Spray Stain. Allow the stain to soak into the fabric well. The water will help the color wick through the fabric.
-
Flip the pieces over and move them around in the stain to make sure the back sides are also covered well. My craft sheet had dry Picket Fence Distress Paint on it. The stain mixed with it to create a creamy color. I happen to like it when that happens so I sometimes leave my craft sheet dirty during a project on purpose to see what kind of happy color mixing accidents I can have.
-
Mist the flowers with water and then Distress Spray Stains. You can mix and match colors on the flowers to create color variations. I used Antique Linen, Wild Honey, and Picket Fence. Allow the stain to soak in well.
-
Wring out the excess moisture from the fabric pieces with a dry cloth. Dry all well with a heat tool. If you want bolder color, you could mist again using less water.
-
Fold the flowers into a cone shape. Pinch the point of the cone between two fingers. Place a small piece of thin paddle wire around the flower above your fingers.
-
Twist the wire until it is secure around the cone tip of the flower. It creates a wire “stem” for the flower. Do the same thing for the leaves. You can brush the edges of the pieces with a brown distress Ink to add a bold edge.
-
Trim the wire as needed. Apply a clear quick drying glue like Beacon 3 in 1 to the wire. Adhere the four flowers and four leaves to the front of the die cut piece. I also added a scrap of Crinkle Ribbon that I already had colored that was left over from another project.
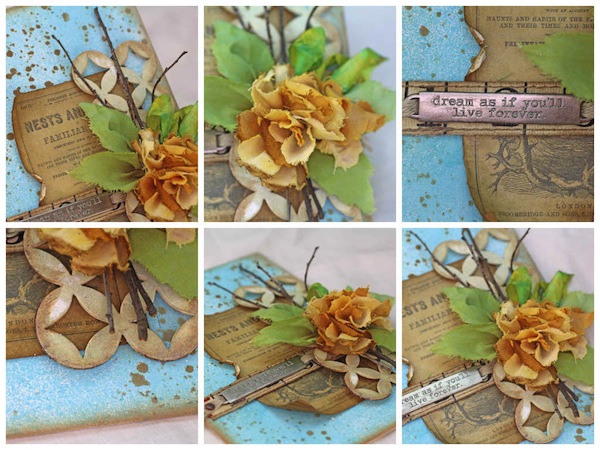
Isn’t it so lovely? I love that it is an easy project to assemble. In the amount of time you might take to create a card, you can create a canvas! Add a piece of cardstock or a journaling card to the back to add a sentiment and your small piece of art can double as a card too!
SUPPLIES:
 |
 |
 |
 |
 |
 |
 |
 |
 |
 |
 |
 |
 |
 |
 |
 |
 |
 |
 |
 |
 |
 |
 |
 |
 |
Thanks for reading today and thanks again to Tammy for this lovely tutorial!
Blog Candy Alert!! Follow our blog via email and comment on this post for a chance to win a special blog candy!


Beautiful canvas and love the tutorial, seeing how it all comes together and the process….now I want to make one!! :)
Love the technique!! What a great tutorial. Can’t wait to try it!
What a fun project and super tutorial…clear, great photos, logical. thanks so much for sharing!
Thank you for the detailed instructions for this beautiful project!
I know this is so totally and completely unrelated, but the first thing that popped into my mind was the perfect Steelers logo shapes! I just had to find out what you used, turned out to be the Courtyard Frameworks die. Must have! I could so easily make Steelers related stuff for my Steelers fan hubby! <3
So many great techniques! Love your project and thanks.
Beautiful project, Tammy! I can see using this design for a card that can be mailed.
This is lovely. It is certainly a work of art. I love the color combinations.
Great techniques, lovely colours. Very effective!
Wow! Looks like a lot of effort, but time well spent, and great fun, too, I’m sure! Beautiful results! TFS!
So gorgeous! Thanks for the tutorial, Tammy1
* sigh!*…so beautiful! love how there are step by step photos, too. Thanks for being so awesome! :)
Tammy – so very. very pretty! I love all of the colors you used!
Great project Tammy! thanks for the step by step. i love the combo of picket fence and broken china – will give that resist technique a go. i follow the blog by email.
Thanks, Tammy, for the wonderful tutorial!
so pretty
What a pretty work of art.
Gorgeous project, thanks so much for the tutorial~
This is a lovely piece of art Tammy – thanks so much. Love the quote too – good way to live!!!
Awesome card! Love everything you make! :) Love the splatters! Thank you for sharing.
Katie B.
Cool project. Thanks for the tutorial.
Gorgeous card! I love the background and flowers.
Thanks for sharing this absolutely great step by step tutorial.
I love the distressed looking Fall canvas that you made. I would be proud to showcase it in my home for evreryone to enjoy. Thanks for sharing with us.
Great project!
What a wonderful tutorial on such a gorgeous piece of art. Thank you for sharing all these steps on your process.
I love the look of this card!
Absolutely gorgeous! Love the colors, design and depth! Thanks so much for sharing this wonderful piece of art! :)
What a fun project! Great step by step details!
Beautiful piece! I love the blue on the background!
Awesome!! I love how you did that flower!
Great share
Such a big statement on a little canvas. Such a happy piece. Thanks for the detailed tutorial.
What a unique look. thanks for the tutorial.
Fabulous project! Thank you so much for the wonderful tutorial!
Thank you for the great tutorial! This is one idea I will definitely try out. Would make a nice Christmas gift ^^
Beautiful canvas, gorgeous design and brilliant techniques! x
Nice n beautiful card
Sweet and elegant design, it is a masterpiece.
Oh wow, what a scrumptious card!!!! I LOVE that linen flower..soooo dreamy!!! Must try asap!!! Wonderful work achieving all that fabulous interest and texture!! Super inspiring!!! :)
Beautiful make and so clear explained in the pics/tutorial! Thankd again for great inspiration!
Thanks Tammy. Great project.
Wonderful creation. Love the muted colours and the flower arrangement looks so pretty!
OOOh this is sooooo gorgeous, I’m lost for words but LOVE everything about it!!
xx Irene M
Oh Tammy has done it again, a wonderful piece of art with super techniques and tips. Cannot wait to have a go at making one of these canvases.
BEAUTIFUL canvas Tammy – LOVE IT ALL!!!
THANK YOU for sharing your CREATIVE INSPIRATION and tutorial – I look forward to trying my hand at die cutting muslin, getting inky and making pretty flowers & leaves like yours :)
Wow! That is so pretty! What a fun gift idea.
Beautiful! I am so glad she shared how she made the flowers!
Tammy so beautiful as always. Thank you for sharing and inspiring us all!
Beautiful!! Thanks for the tutorial!