Doodling with Debby: Simple Watercolored Tartan Valentine’s Card

Hi friends! Happy Wednesday! Please join me in welcoming special monthly guest Debby Hughes in our Doodling with Debby blog feature! I love the gorgeous colors palette and how effortless Debby makes the process look! Read on and be sure to watch the video for more info! Enjoy!
Hi, it’s Debby here and my Doodling With Debby video series this month came about after messaging with my sister the other day. She asked if I was going to do a tartan heart card for Valentine’s and so here we are! I kept this card clean and simple and used minimal supplies, so this is a card you can knock up at any time, even with just a day or so to go before the day.
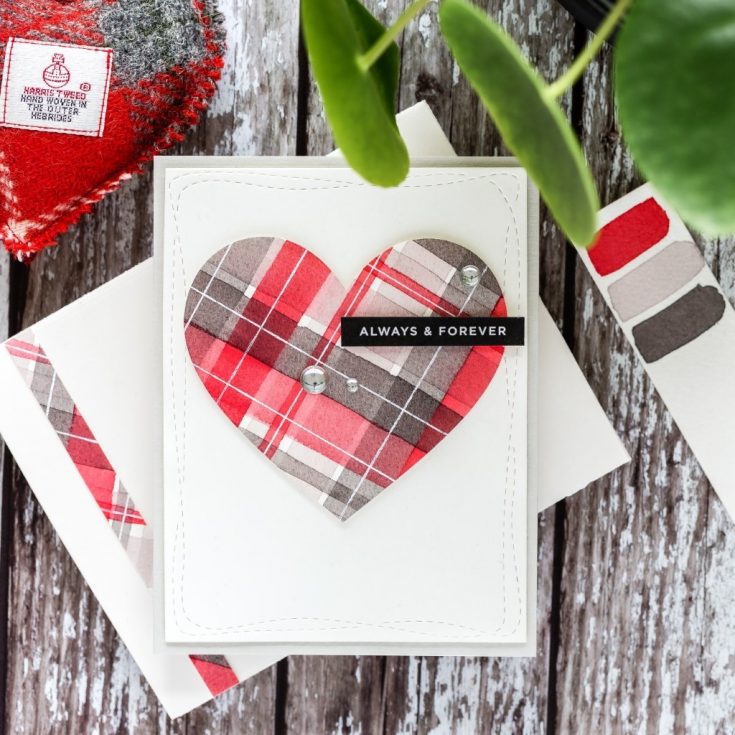
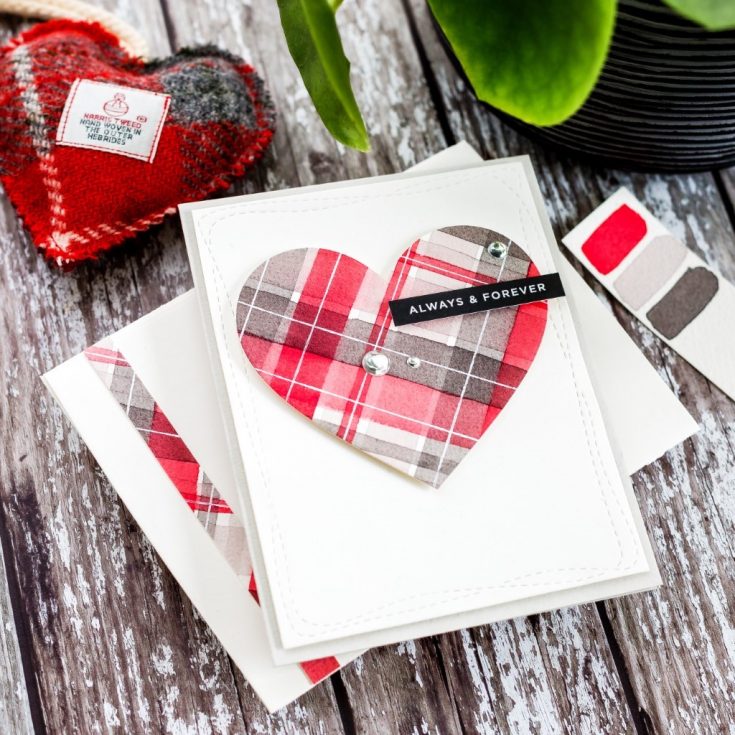
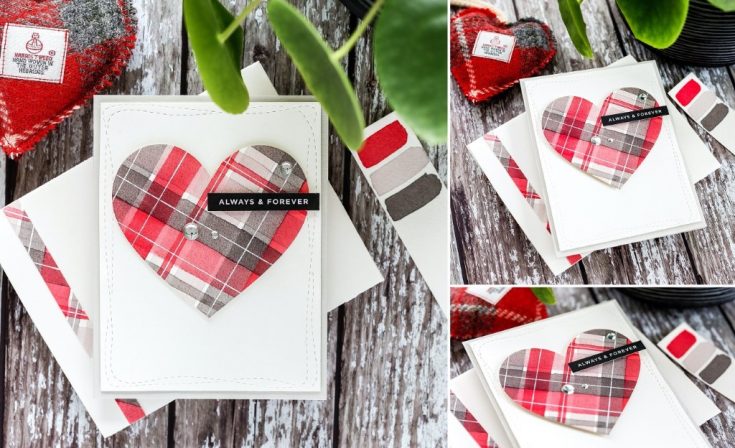
I’ve watercolored various plaids and tartans over the years. I call this pattern a tartan, but I think the correct term is a plaid as the pattern has a randomness to it whereas a tartan is more uniform in design. Regarding colour palettes, my favourite is a classic red, light grey and dark grey combination. I worked out the colours to use and mixed those into three wells of a palette. I used Arches Cold-Pressed watercolour card and two sizes of flat brush. Flat brushes make life easier for painting strips, but you can use any brush by painting the bordering lines of a stripe and then fill in the gaps. Use what you have to hand is the best thing.
I taped my piece of card to a board to prevent warping, but also to aid in painting the stripes. I find that when I first place my brush down, I’m not into the flow of the stroke and my bristles are not uniformly flat. So, by starting off the paper first and getting the brush how I want it to be, I get a more consistent stripe width. The key here is to go slow and steady. For each stripe, I painted across the paper at a diagonal once and then evened out the line by painting it a second time. The larger of the two flat brushes holds plenty of water, and it wasn’t a problem to paint the whole stripe without refilling my brush. However, for the smaller brush, I often ran out of paint part way, and my tip here is that once you’ve refilled your brush you start back in on an area already painted and that way you will have a more consistent stripe and flow of paint through the stripe. I painted the stripes in a random order of brush widths and colours and also gaps between the stripes. Just remember that if you butt one stripe up against another then the first stripe has to be fully dry or the colours will bleed together and for that, I just made sure to hit any stripes with my heat gun before painting the next one. I finished painting stripes across the panel in one direction and then dried it thoroughly with my heat gun before moving on to the stripes in the other direction. I also made sure to wipe away any excess paint from the masking tape at this point as I didn’t want these blobs of colour to get pulled across the paper once I started in the other direction.
I’ve not talked about the colour media I used yet – Daniel Smith watercolours. However, any water-based media would work. You could colour the stripes with brush markers, re-inkers or squidge water-based inks onto a mat and pick up the colour with a brush – use what you have at hand. You don’t even need to use water-based media. You could colour the stripes with pencils or weave strips of card together to create a pattern. Once I’d finished the second set of lines, I dried the panel with my heat tool again and then lifted the painter’s tape, and this is always a favourite part as that blue tape is somewhat distracting. However, it is the best I’ve found and lifts easily too without tearing the paper. I added detail to the stripes with a white gel pen. I love using a white gel pen, but there is a bit of a knack to using one. First, go slow and let the gel flow! If the pen is jumping, then warm the ink up a little by scribbling on your hand to get it flowing again. When drawing these stripes on, I found that slow, steady back and forward motions gave the best results. Once dry, you can always go back in and fill in any gaps if necessary but don’t try doing that while the ink is still wet, or it just seems to lift ink off rather than depositing more.
This panel would make an excellent background for a card, but I used the Nested Hearts dies from Simon Says Stamp. I chose one of the dies which would fill a card front nicely and then chose the area I wanted to cut the die. I then ran that through my die cutting machine. I’ll keep the rest of this panel to use on another card. In fact, I did use a little of it to accent a matching envelope to go with the card.
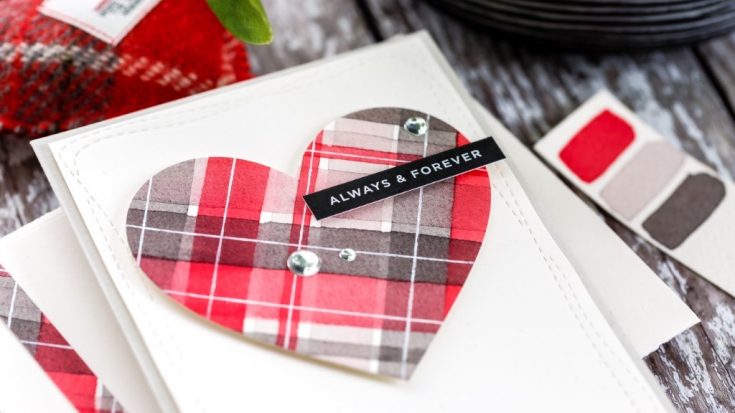
I used a Wonky Rectangles die to add a stitched detail around a piece of Ivory card on which to mount the heart. I used foam squares generously over the back of the heart and then 3M foam tape over the back of the Ivory panel. I mounted the panel to a card base cut and scored from Fog card from Simon Says Stamp. One of my favourite ways to add a sentiment to a card is on a skinny black strip with white heat embossing, and so I’m enjoying the new sentiment strips from Cathy Zielske. Being pre-printed, they are so simple to cut up and add to your card, and each pack comes with a range of greeting options. I chose the Always & Forever sentiment and cut that with a ruler and a craft knife. I added foam tape to the back of the strip and then used a T-square ruler to make sure I had it on straight. I then used a trio of Pink & Main glossy silver dots to accent around the sentiment. I like these dots as they add a bit of bling while toning with everything.
I was excited to see the new envelope dies in the recent Simon Says Stamp release. I used the A2 V flap one, and I love that you can cut an envelope from whatever card you want. I cut the main panel and two of the side triangle pieces from Ivory card and added score-tape to the back of the flaps before lining them up to create the body of the envelope. I then added more tape to the sides of the bottom flap and folded it up to complete the envelope. I took a skinny strip of my watercolour pattern and added that down the side of the front for a pop of matching colour. So, there you have it a clean and simple card with a watercoloured tartan heart and matching envelope. This card would be great for Valentine’s, but also, I picked a sentiment that would work well for an anniversary too.
Thanks for joining me today and I hope you join me next time for Doodling With Debby.
Watch below or in HD on YouTube.
SUPPLIES:
|


Thanks so much for stopping by and and thanks to Debby for being our guest!


Awesome tartan heart, thanks so much for the watercoloring video!
This is beautiful and would be fun to re-create! Perfect as a masculine Valentine as well. Thanks Debby! You always inspire.
So simple and cute. I love the plaid…tartan. :)
Beautiful card!
THANK YOU, Debby for showing us how you did this! BEAUTIFULLY DONE!!!!!!! ;)<3
Beautiful, love that tartan plaid background.
I’ve painted stripes, but don’t think I’ve ever done a plaid. This is so neat–gotta try it! Thanks for all the tips. I discovered the same thing recently about using a white gel pen. Thanks for the inspiration, Debby!
I LOVE it! Thanks for sharing such detailed instructions, too! Can’t wait to try it. I’m grandson-sitting 50 miles from my flat brushes so it will have to wait, but I willl be trying it- I’ll let you know how it goes!
Thanks, Debby!
hugs, Dori
Fabulous card!
Love the plaid heart.
Debby
I love your tartan heart so much! Wish it was a paper!!
Debbie, I love your CAS tartan heart card! It is fantastic!
I love a good plaid!!! Beautiful card!!!
Love your plaid design, Debby! I have been wanting to try this technique for awhile. Guess I had better get at it. Thanks for your inspiration.
such a lovely card – thanks for sharing
This is a beautiful card and such a well done, easy to follow tutorial video. Thank you so much for the inspiration and technique.
Cleaver!!
Tartan or Plaid I find this very enchanting… love your colors and who doesn’t love a heart?
Wow! You make the plaid look so simple! I bet it’s not, but I’m inspired to try! Thank you!
This card is amazing. I love how simple yet pretty it is. But my favourite is the matching envelope to go with it. Stunning!
Great video showing the process to create this background. Like the envelope tie in with the strip.
What a delightful tartan heart! Thanks for sharing your card and the video showing how to create the coloring for the heart die cut.
Love this card … great colours!
Beautiful card, I love the plaid colors, awesome technique!
Tartan or plaid, it remains a beautiful card.
The heart looks like you have cut it from a piece of flannel fabric.
I love that you made the envelope matching the card, I often forget that but it looks so gorgeous.
Thank you so much for sharing and have a wonderful day.
Such a great use of plaid in this simple design.
Fantastic ! Thank you for showing how to make this tartan or plaid design. You make it look so easy, I think I will practice a little before putting mine on a card. Loved the colour combination x
Making the tartan or plaid seemed so easy watching you. Thanks for all your tips.
This is so gorgeous!! I never would have guessed it was done with water colors; it looks so perfect! Love the color combo you chose!