Discover Tim Holtz Mini Book
Hi readers! Happy Sunday! Please join me in welcoming back the awesome Paula Cheney back as a guest on our blog! She’s gathered up some of her favorite Tim Holtz goodies to create a fun little mini book that could be altered for a multitude of occasions!
Enjoy!
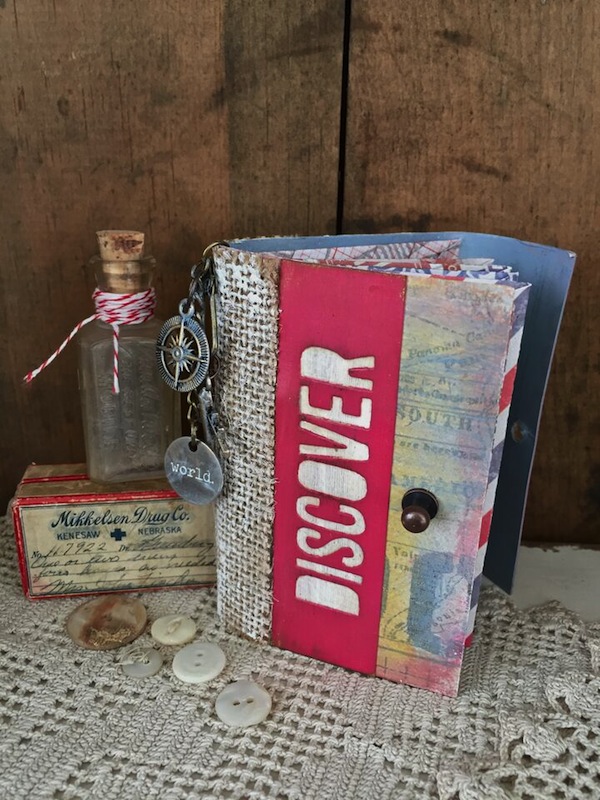
Hi everyone, glad to be here again at Simon sharing a project! Today I have created a little book that has the potential for many variations from color to paper. What’s unique is the simple spine that makes adding the envelope pages really easy. Follow along and I’ll show you how I did it.
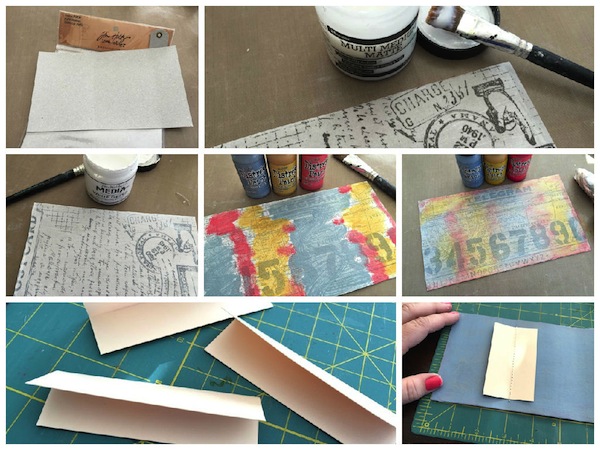
1. Cut a piece of Grungepaper 4 1/4 x 7” for the cover of the book. This material is sturdy yet flexible, which will allow me to use multiple wet mediums and then sew right through it. The perfect material for a cover!
2. Use Multi Medium to cover both sides of Grungepaper with Postal Tissue Wrap. This will create a nice pattern over the Grungepaper.
3. Paint a thin coat of Media White Gesso over the Tissue Wrap. If the Gesso becomes too opaque to see the print, remove excess Gesso with wet wipe. Let dry.
4. Use the dabber top to add Distress Paint Stormy Sky, Fossilized Amber, Festive Berries over the Tissue Wrap cover (shake before use). NOTE: It may look a bit bright but most of the paint will be wiped away in the next step.
5. Using a flat brush and then a wet wipe, blend the paint until you have a you have muted color over the entire cover. The inside of the cover will be painted Stormy Sky.
6. Cut at least three pieces of Ranger Manila Cardstock 3 3/8 x 2”. Fold each piece in half lengthwise and score.
7. Measure 3” from the left side of cover. Using a wide stitch on the sewing machine, sew the first of three 2” strips of cardstock.
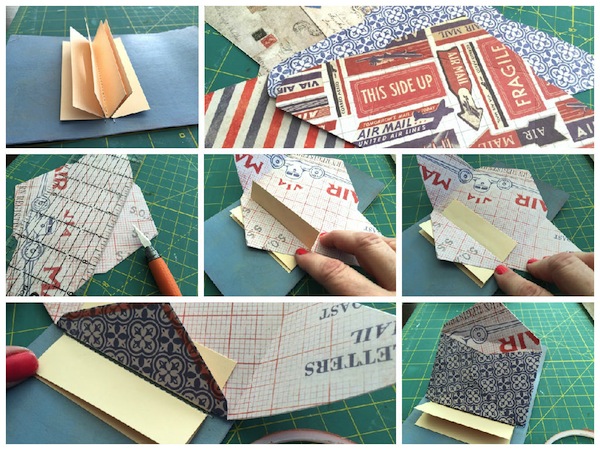
8. Add the second cardstock strip next first and so on. Each strip sewn into the book will allow you to add two envelopes, so plan accordingly (3 strips = 6 envelopes).
9. Using the Sizzix Alterations Envelope Die, cut six envelopes from Correspondence Paper Stash. NOTE: The Envelope die is part of the Movers and Shapers family, which means that a small die such as a heart can be placed on the Envelope base die, so when the envelope is cut and then folded, the heart will be cut out.
10. Use a craft knife to create a 3 3/8” opening following the score line at bottom of the envelope.
11. Take the envelope and slip it onto one of the pieces of cardstock that was previously sew into the book.
12. Use a tape runner to secure the cardstock to the envelope.
13. Add 1/8” Wonder Tape to the envelope.
14. Remove red plastic coating and fold envelope.
15. Add an envelope to each manila strip until all envelopes are part of the book. The Correspondence Paper is two sided so either side can be used for variety.
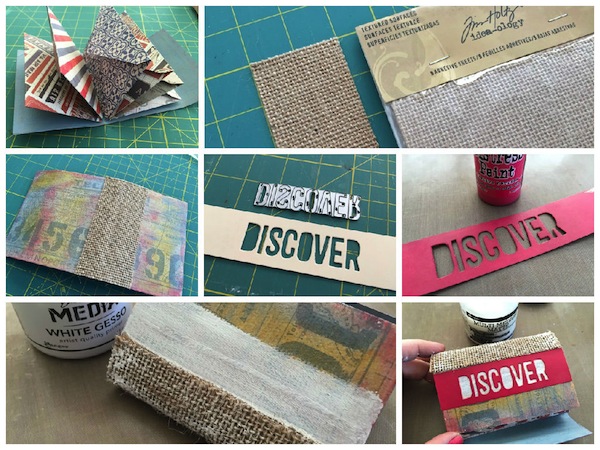
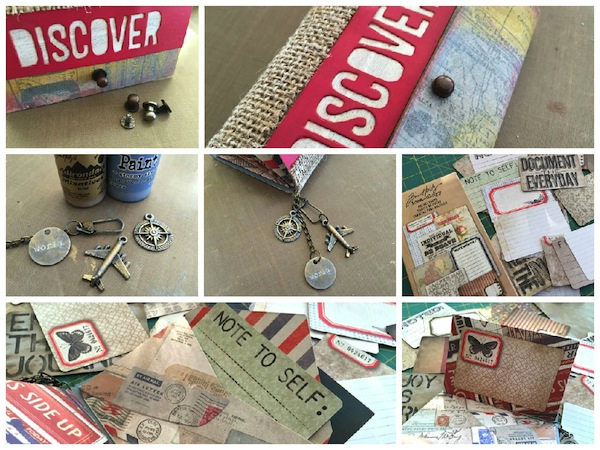
16. Cut a small piece of burlap (2 x 4 1/4”) from the Textured Surfaces pack.
17. Peel off the protective coating and add the self-adhesive burlap to the cover, covering the machine stitching on the outside.
18. Using Ranger Manila cardstock and the Adventure Word Block Thinlits, cut a word for cover.
19. Paint with Festive Berries Distress Paint.
20. Using your fingertip, add a strip of White Gesso to cover of book as well as the burlap. Let dry.
21. Add Word Block with Multi Medium, trim edges to fit. Once dry, sand edges and add Distress Ink Gathered Twigs with a Mini Blending Tool.
22. Punch a hole in cover with a Crop a Dile and add Hitch Fastener for a closure.
23. Punch another hole in right side of cover, large enough to fit over the Hitch Fastener.
24. Wipe a bit of Stormy Sky paint onto metal charms, Typed Token and Swivel Clasp. Once dry, pounce a small amount of Gold Mixatives Alcohol Ink over the paint to give the pieces a rustic appearance.
25. Pierce the Grungepaper with a paper piercer to create a hole for charms. Connect the chain using the jump ring right below the base of the Swivel Clasp.
26. The smallest size of the cards found in the Pocket Card pack fits perfectly inside the envelope die.
27. Add cards to each envelope.
28. More cards can be used to decorate the outside of the envelopes.Well, that’s it. Simple right? I can see the basic idea being used with different themes to create little books for for birthdays, vacations, a new baby, or just because! Thanks Simon for letting me share my project here today!
now carry on,
paula
Supplies:
 |
 |
 |
 |
 |
 |
 |
 |
 |
 |
 |
 |
 |
 |
 |
 |
 |
 |
 |
 |
 |
 |
 |
 |

Blog Candy Alert!! Follow our blog via email and comment on this post for a chance to win a special blog candy!


Very interesting project, it has a lot of possibilities. Thanks for sharing. Cheers!
Great project! Thanks for sharing, Paula.
Whoa! So many elements! I love it!
That mini book is so fantastic. I love it. So many ways to add color, paper, designs. Thanks so much for sharing. (Thanks for the chance to win a great prize).
very cute book… Love your work and Tim’s stuff…..
Fantastic envelope book, thanks so much for the instructions! I love the idea of using the durable grungeboard for the cover!
This is Fantastic!!!
What a fantastic design, Paula. I love your projects!
Wow what a great use of TH products. Thanks for the ideas!
That is so fabulous Paula, go to make one for sure! Thanks so much for this wonderful tutorial, what a great envelope album!
A wonderful project. Thanks for sharing.
Gorgeous mini-book! Love all the texture!!
That’s super awesome! Thanks for sharing! =)
Brilliant idea.
Well that’s quite a project! It turned out wonderfully! I don’t know if I have the patience or talent to make this yet, but I am going to keep it in mind. TFS!
Oh my this is AWESOME!
Great book and tutorial. Thanks for sharing.