Dip Dye Technique
Hi readers! Happy Thursday to you! I’m pleased to welcome back guest designer Jocelyn Olson to our blog for a fun technique and a spotlight on Paper Smooches stamps and dies! Doesn’t this dip dye technique have a pretty effect? Read on for more details!
Recently, I’ve seen some cards and tags with dip-dyed bottoms, like these examples on my Pinterest Design Inspiration page. I love this trend, and using some Paper Smooches stamps and dies, I went about trying to recreate the dip-dyed look:
I’ve got a step-by-step tutorial to achieve this look.
-
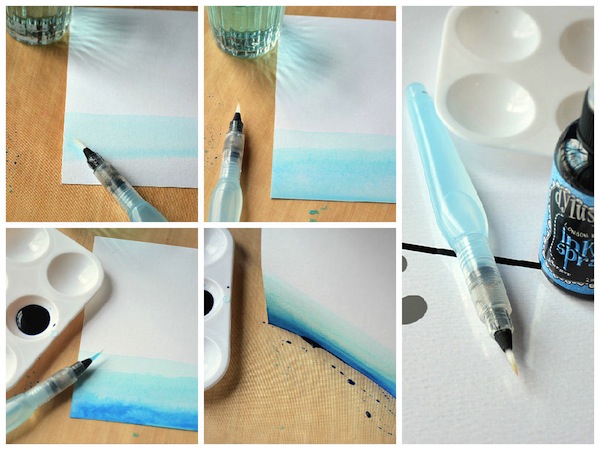
First, gather your supplies….a waterbrush, watercolor paper, a craft mat, and watercolor medium. I wanted an intense look, so I used spray mists. Dye reinkers (watered down) would work, too. When I tried watercolors, they worked, but the results were more muted.
-
The next step is to brush water onto the bottom half of the watercolor paper. While the paper is wet, dip the brush into the spray mist and then dip the brush in water. When most of the ink is removed, brush it onto the paper.
-
Next, water down the ink (a lot). When the lightest layer is still wet, brush on the next layer. I found the trick was to work quickly while the layers are wet and keep blending the layers.
-
For the third layer, add a little water to the ink and brush onto the paper. Once these layers are on, allow the panel to dry (or heat emboss if you’re impatient like me). When the paper is dry, lightly brush over the layers to blend them.
-
The last step is to put the spray mist on your craft mat and drag the bottom of the card into the ink. Once the card was dry, I added some white splatter and layers.
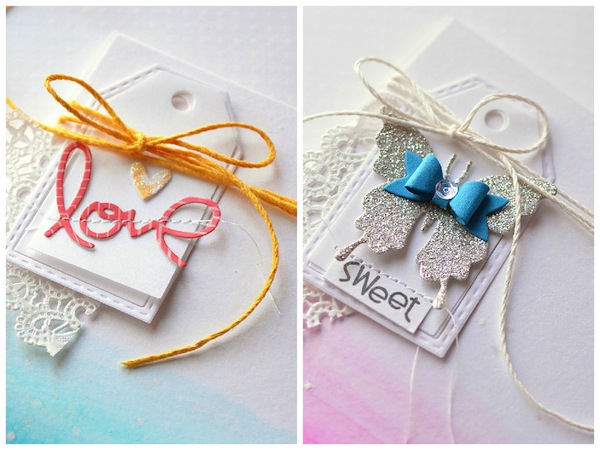
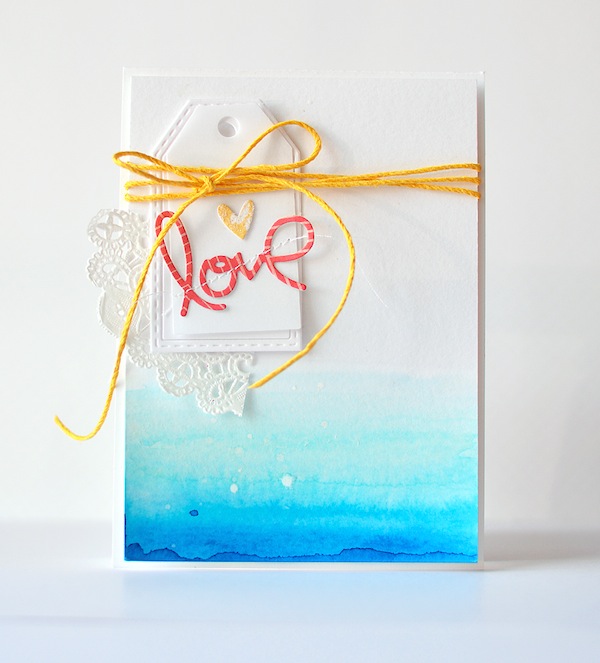
I die-cut the Paper Smooches Gift Tags 2 die out of both vellum and cardstock. The border of the die is separate from the inside, so I added tape on the back to hold the layers together. Using the Paper Smooches Love and Cherish dies, I die-cut the “love” and stitched it. The Love and Cherish dies have a heart, and I added glitter a little glitter.
Using the same technique, I made a second card:
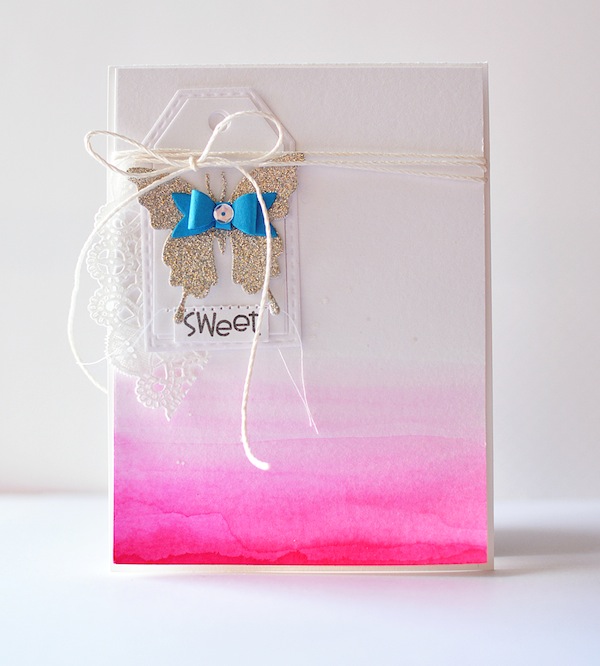
For this card, I used the same Tag 2 die, and then layered the new Paper Smooches Butterfly Duet die and the Baby Bow die. Isn’t that bow so cute? I finished the card with a sentiment from the Fruitastic set.
Thanks to Stephanie and Heidi for having me on the blog!
SUPPLIES:
 |
 |
 |
 |
 |
 |
 |
 |
 |
 |
 |
 |
 |
 |
 |
 |
 |
 |
 |

Blog Candy Alert!! Follow our blog via email and comment on this post for a chance to win a special blog candy!


Jocelyn, this is just gorgeous! I am definitely going to try this tonight when I get home from work. Thanks so much for the instructions!
Pretty! And looks like fun!
I love the gradient effect of this…so versatile! I always enjoy trying to find more uses for the supplies I own. Thanks, Jocelyn!
i can’t even stand the amaingness here!! those dip dye card bases – swoon!! INCREDIBLE!! soooooooooooo pretty!!! and the layered tags…the stitching! wow!! <3 <3 <3 just beautiful! i am going to look at these cards all day!
Beautiful card, I love the ombre effect!
What a fun technique!! And the results look fabulous!! Thanks for the inspiration!!
I really have to try this. The cards are gorgeous.
Great technique!
So pretty -the coloring and the tags attached too!!
What a great look! Seems like an easy enough technique.
What a great technique! I will have to try this one.
What pretty cards and great water coloring techniques. Thank you for the inspiration:)
Wow!!! Totally loving these creations :)
These cards are just gorgeous. love the coloring.
Beautiful cards. A great technique that I have to try. Thanks for sharing.
WOWZERS! Gorgeous cards, Beautiful watercolored backgrounds!
Lovely effect. Thanks for reminding me to dig some re-inkers I have stowed away to recreate this technique. Beautiful card. Cheers!
SO clever! I will certainly have to try this technique!
Super fab cards ! Thanks for the lovely tut ..
FUN technique and BEAUTIFUL cards Jocelyn!!!
THANK YOU for sharing your CREATIVE INSPIRATION & tutorial – I look forward to trying this out :)
The look is wonderful with the shades of color.
Melissa
“Sunshine HoneyBee”
Lots of layers….can I say LOVE. These are so pretty…an getting an ombre effect with different mediums is awesome.
such a cool technique… love the look.
Love the effect of this technique, beautiful!!!
Great technique. I can hardly wait to try it.
Very pretty cards! A very interesting and nice technique, thanks for the inspiration.
Wow! Cool technique x
Beautiful! What a fun technique ♥
fun technique and great looking cards.
thanks.
Super elegant card! thanks for the tutorial
Oh!!! I love Dylusions and i LOVE this technique!! A definite must try.
These are gorgeous. Love the watercolor look with this technique.
LOVE LOVE LOVE the water color effect at the bottom of these cards … so very lovely … will definitely be trying this dip dye technique!!!
Just beautiful cards! Great technique!
stunning.
this is gorgeous!!!! i love this technique!
Very pretty!!! Thanks for the inspiration:)
Love it! Can’t wait to try it, thanks for the inspiration.
I love ombre effect on cards!
Very cool effect!
This is a tecjnique I always like; you can do this with somany different styles!
Great results with this fun technique.
What a great technique1 love the look of the cards!
I really enjoyed the mess of ink with the crispness of the embellishments.
oh so PURTY!!! :D
I love a dip dye or ombre effect paper
So pretty thanks for sharing your technique
Love this technique! Can’t wait to try!
I love seeing different techniques–this one looks like fun! TFS!
I love both cards! Awesome backgrounds and lovely focal points! Wow Jocelyn, awesome job! TFS