Cupcake Break
Hi readers! Are you ready for a cupcake break? Say what? Cupcakes? Yes, please! I’ll take one of each! Today I’m stoked to have the amazing and talented Richele Christensen back as a guest on our blog showing some cheerful Tim Holtz inspired cards for guys and gals! How fun! Are you ready to learn how to make them for yourself? Read on!
Enjoy!
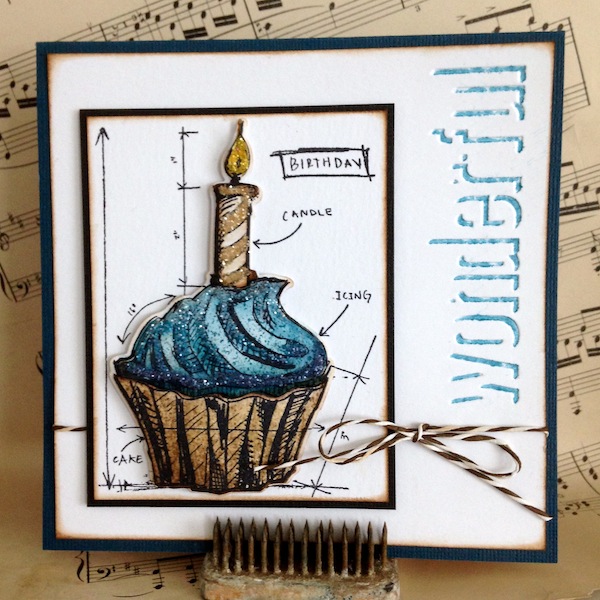
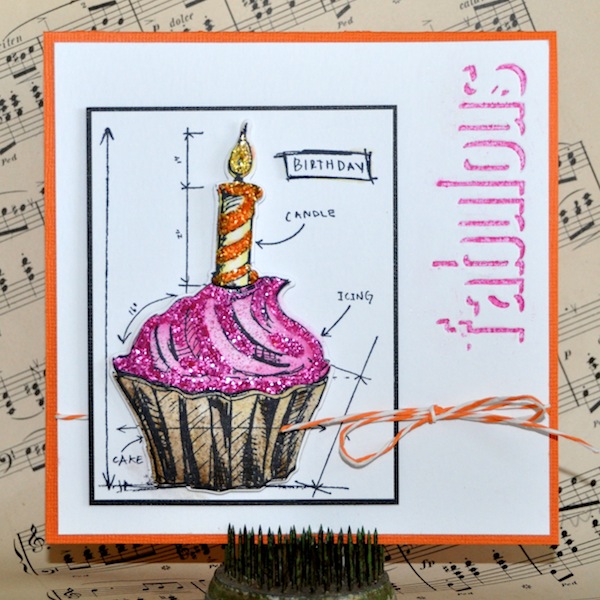
Hello friends and happy Saturday! I’m so excited to be back on the Simon Says Stamp blog. My project today features Shadowpress, Framelits with Stamps, Mini Distress Ink pads, and Distress Glitter. I loved using the Shadowpress de-bossing folders with the Mini Distress Ink pads to create a fun colored shadow effect. Another favorite today is the Framelits and Stamp sets, no more detail cutting to create multi layered cards. Framelits makes it so quick and easy!
Instructions:

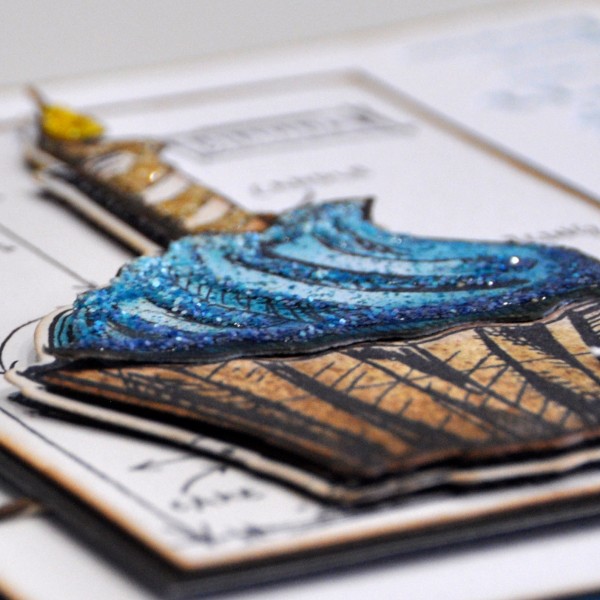
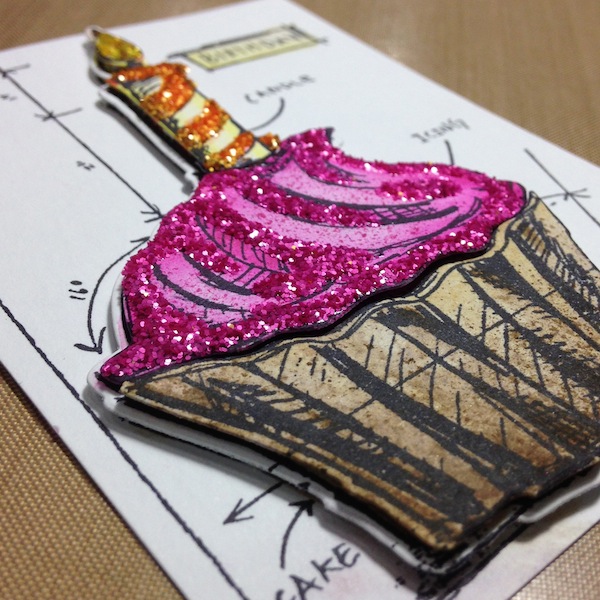
- Stamp Cupcake image with Jet Black Archival Ink onto Watercolor Cardstock. Die cut all the pieces using from the Cupcake Framelits on the Magnetic Platform. Tip: Place one cutting pad on top of the magnetic platform, line up the stamped images with the Framelits, place another cutting pad on top and run through your machine. The Magnetic Platform is very helpful to hold the Framelits in place, no taping necessary.
- Color all the layers with Distress Markers.
- Using a Detail Water Brush smooth out the colors for a blended look and let dry.
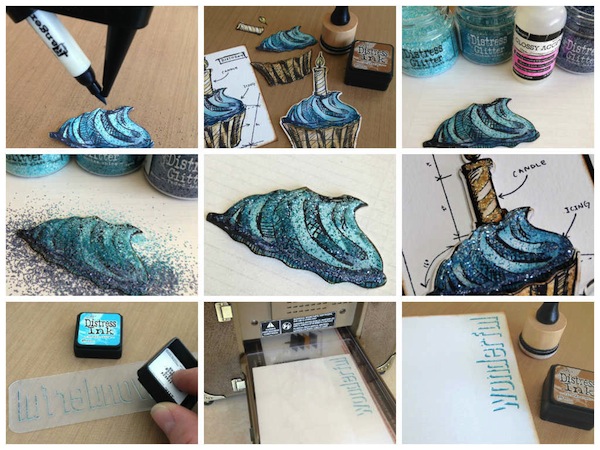
- Spritz some color onto the Cupcake top with the Distress Spritzer and the middle value Distress Marker. Hold the Spritzer about 6” above your project. I really like the little specs that are created with the Spritzer. and the Spritzer fits a wide variety of markers.
- Ink the edges of all the layers with Vintage Photo Distress Ink on a Mini Blending Tool.
- Add Glossy Accents in a few areas for the Distress Glitter, leaving some areas and the black outline untouched.
- Use your fingers to take a pinch of Distress Glitter and sprinkle over the Glossy Accents. To create an ombré effect start with the lightest color and lightly glitter the top of the cupcake, add the next two colors with the darkest Distress Glitter on the bottom of the Cupcake.
- Shake off the excess and set aside to dry.
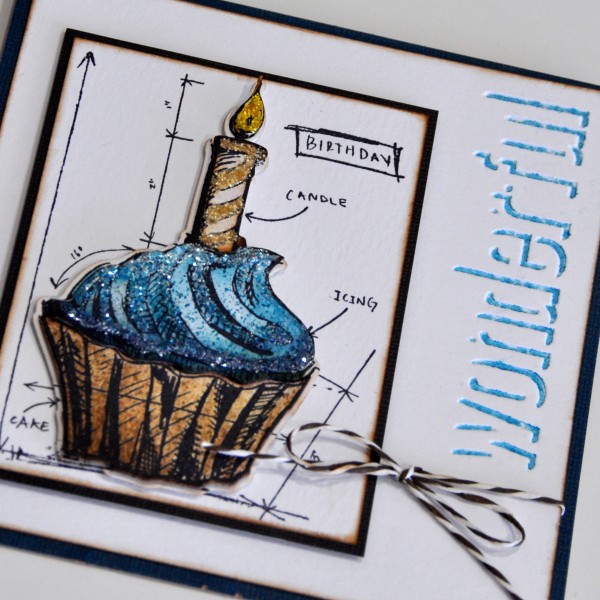
- Add Distress Glitter to the Candle and the Flame the same way. Adhere Cupcake layers together with foam tape, mat with black Kraft’core cardstock and adhere to card.
- Ink the Shadowpress de-bossing folder carefully with a Mini Distress Ink Pad. This took some practice so grab some scraps and give it a try. You’ll want to ink the raised area of the letters on the folder. Tip: Once you get the ink where you want it, lightly mist the ink with a little water. Also Archival Ink is a great choice in creating a smoother shadow because the oil based ink covers the plastic better.
- Position the edge of the folder with the edge of your Watercolor cardstock then run through your die cutting machine.
- Ink the outer edges of the de-bossed cardstock with a little Vintage Photo Distress Ink on a Mini Ink Blending Tool. Tie Striped Paper String around Watercolor cardstock and adhere piece to a Kraft’core card with foam tape.
I’m in love with this ombré effect with Distress Glitter! You can change the colors of your cupcake for a super girlie card like this pink one or use blues and browns for a more masculine card. What color will you make your next Birthday Cupcake? Picked Raspberry…Spiced Marmalade…Festive berries…they all sound good enough to eat.
Thank so much for stopping in!
Richele
SUPPLIES:
 |
 |
 |
 |
 |
 |
 |
 |
 |
 |
 |
 |
 |
 |
 |
 |
 |
 |
 |
 |
 |
 |
 |
 |
Thanks for reading today and thanks to Richele for being our guest!
Blog Candy Alert!! Follow our blog via email and comment on this post for a chance to win a special blog candy!


Wow, that cupcake is simply amazing! I love all of the gorgeous tones of distress glitter you added to the frosting and all of the wonderful layers too! Well done!
I’m a certified glitter junkie, so of course I adore the cupcakes, but what has piqued my interest is that shadowpress inking technique….Nice examples!
Wow! What an awesome card! I love the texture and your colors. So inspiring. Thanks!
I think I’m hungry for a cupcake now! Love the sparkle!
Fun cupcakes!
Dawn
dmg314
They look good enough to eat~!~ Love the colors.
What a fabulous combination of stamping and embossing. They look so good together.
How to make a cupcake??? Really now, I cannot make cupcakes turn out in real life to save my soul, maybe this kind would turn out for me. Thx for instructions . :)
What yummy sprinkled cupcakes such pretty cards :)
I love candy. And I especially love blog candy. Thanks so much for featuring the cupcake recipe!!!
Gorgeous stamping and colouring – the cupcakes look good enough to eat and now I want a cupcake! Thank you for sharing how you created it with us too Karen x
Wow, just love these cards and the cupcakes look good enough to eat. Outstanding job.
Great techniques. Love the card.
Love the cards
LOVE the sparkle!!!
<3 J
jwoolbright at gmail dot com
HerPeacefulGarden.blogspot.com
Amazing cards! I love the way she used this blueprint stamp…so fun!
Holy Cup Cake what a fantabulous creative job your have done!!! It’s unbelievable how real they look you sure know how to tease a gal dangling all these cupcakes in front of me….geeze Oh Pete now I’m so hungry for a cupcake!! Super great creative job!!!
Love,,,love the birthday card!! Awesome job… sparkle and glitter…really like the embossing on the side!!
I’ve been wanting to try Tim Holtz “Blueprint” stamps…… this is the one! Love it!
Great card–love the glitter frosting–thanks for the tutorial–love how this cupcake pops off the card.
These are beautiful cards, and look easy to reproduce – which is great.
However these “blueprint” stamps just are not a big hit with me, they make the card way too busy in my honest opinion. Tim Holtz has put out some great products but I think he missed the mark with these types of stamps.
Awesome birthday cards!!! The cupcake stamp is one of my favorites! Love all the sparkle!
Beautiful cards! Thanks for sharing a masculine and feminine version!
Those cupcakes look good enough to eat! Gorgeous cards!
Could i have one please ? My birthday is coming !!!
Hugs from France
Lunea
After this “Cupcake Break” I just want to go out and buy my own, LOVED the process and final product.
Such a happy card! Love the colors!
I love Tim’s blueprint stamps. Your treatment with the distress markers and glitter is just amazing! Thanks for sharing.
Love the cards, the cupcakes look great!
Love the cupcake. Looks good enough to eat!
Love the sparkle on those cupcakes.
Now I want cupcakes! I love the glitter accents – so sparkly. I follow the blog by email.
I love this lil cupcake. Especially with all the bling! Scrumptious colors. Love the matching die. Sure makes life easier. TFS
Already following via email. Love the glitter on your cupcake…makes it look more scrumptious
In a word…. SWEET!! ;)
Cool! i love all that glitters!
LOVE these cards! Awesome glitter and great stenciled word on each. :)
Brilliant cupcake card! x
Gorgeous glittery cupcakes. Love the debossed words.
Great cards! I LOVE the cupcakes glittering, they look so gorgeous and yammy…!!! Thank you for the inspiration!
The cupcakes looked so yummy and real!! I loved it
Debbie
OMG !! The vivid colors, sparkle and shading on these cupcakes is absolutely STUNNING!
Love the glittery goodness!
The marker and glitter technique make the cupcakes that much sweeter. Love the embossed words.
Such a fabulous card, love the glitter on it. So pretty……..
The layers on this are just awesome! Great colors and I love the glitter, too!
Absolutely perfect with the glitter!!
I love these cards! So cute!! Love the glittery cupcakes and I actually have this set so I will have to do this!
Such a fabulous way/ways to use the stamp. It opens my eyes to many possibilities.
I love these cards! Tim’s blueprint stamps are some of my favourites.