Crafting with the 2013 Holiday Card Kit Inspired By Tim Holtz
Hi bloggers! Happy Saturday to you! I’m so pleased to have Richele Christensen back as a guest designer on our blog! I just loved seeing what she made with our 2013 Holiday Kit Inspired by Tim Holtz! I sure hope it inspires you too! We’re excited to be able to offer the kit with CLEAR or CLING stamps so you can pick your preference!
Enjoy!
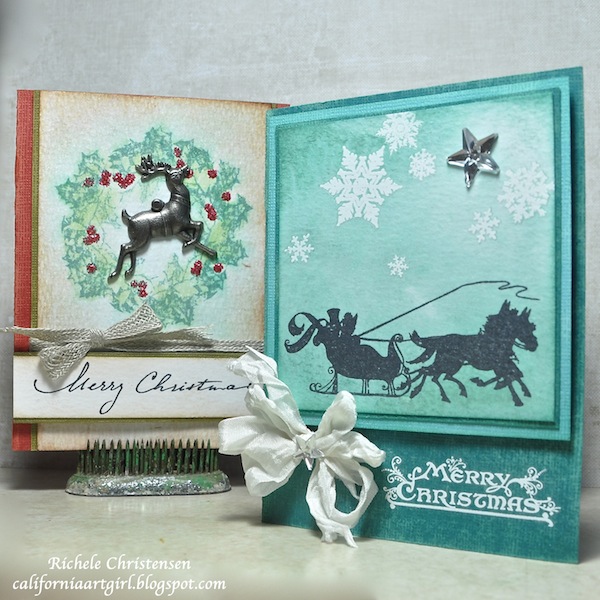
Hi bloggers, it’s Richele Christensen… I’m here with a few cards I made from the Tim Holtz inspired Card Kit! It’s amazing how much comes in this kit, Stamps, Ink, Cards, Cardstock, Ribbons, Rub Ons, Trinkets, a little sparkle and even more! So much to create with!
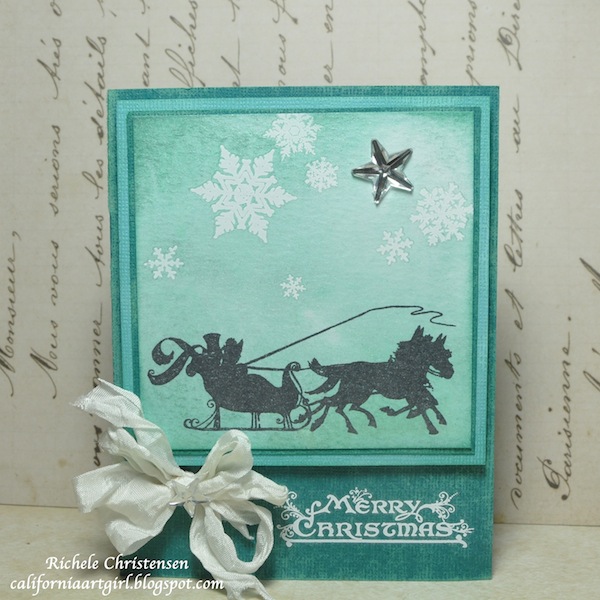
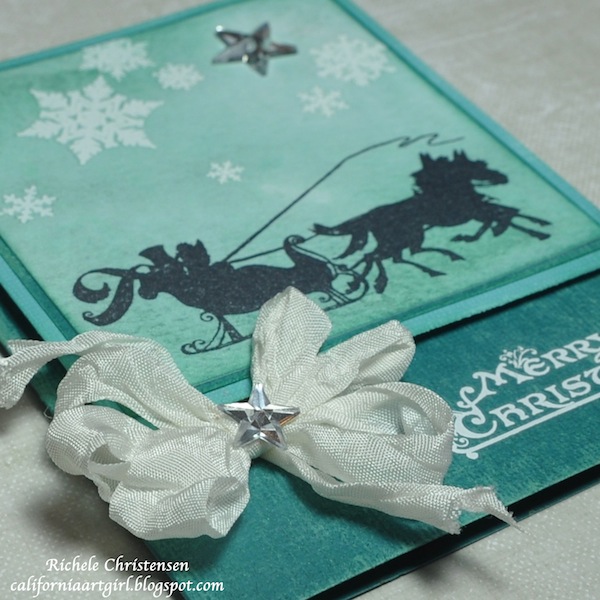
For our sleigh card apply Evergreen Bough and a little Iced Spruce Distress Ink directly to your craft sheet. Fill the Mini Mister with water and add 2 scoops of Perfect Pearls using the end of a popsicle stick. Spritz the ink until it makes ringlets. Cut a piece of Watercolor paper 3 5/8” x 3 5/8” and swipe through the ink. Dry with a heat tool. Repeat if desired. Stamp the sleigh image with Jet Black Archival Ink. Apply Snowflake Rubs. Mat with a light and darker turquoise cardstock. Sand all the edges and ink with Evergreen Bough using an Ink Blending Tool. Adhere together and Pop dot to the base card. The base card is darker turquoise cardstock cut to 8 1/2” x 5 1/2” scored and folded in half. Embellish the card with a big bow from Crinkle Ribbon, Mirrored Stars and Rubs for the message.
I love the look of the shimmer from the Perfect Pearls. It’s perfect for the season.
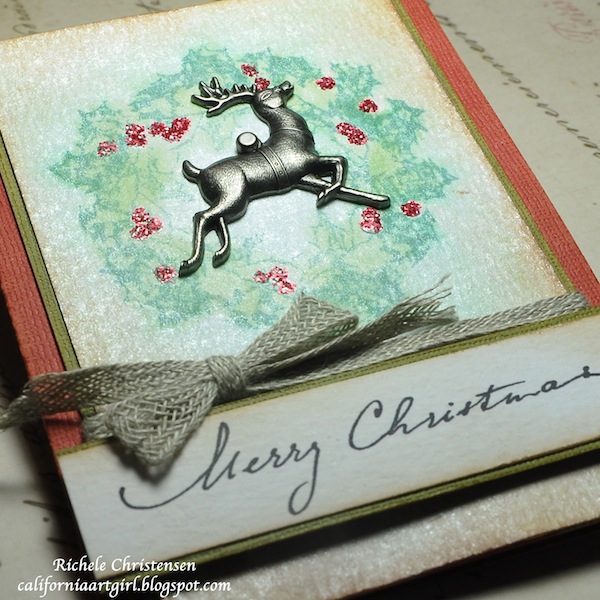
Our second card uses the Holly Stamp to create a Wreath. Cut a piece of Watercolor paper 3 1/2” x 5 1/5”. Stamp the Holly branch with Evergreen Bough Distress Ink in a circle to create a Wreath. Spray the Wreath with Perfect Pearls. Dry with a heat tool. Ink the edges with Vintage Photo Distress Ink. Color the Wreath with a Water brush and Mowed Lawn Distress Ink. Add the berries by applying dots of Glossy Accents and adding Red Distress Glitter. Shake off the excess and let dry. Mat with green cardstock. Adhere green behind Wreath piece. Using the Linen Ribbon tie a bow around the Wreath piece. Attach the Reindeer with a long Fastener to the center of the wreath. Cut red cardstock 8 1/2” x 5 1/2”, score and fold in half. Sand the edges and ink with Vintage Photo Distress Ink on an Ink Blending Tool. Adhere pieces together. Add the message that has been stamped with Jet Black Archival Ink. Ink the edges with Vintage Photo Distress Ink on an Ink Blending Tool. Mat with green cardstock and pop dot to card.
What a great kit! I’ve made 2 cards today and I have lots of things left to create more!
Thanks for stoping by! Have a great day! Richele
SUPPLIES:
 |
|
 |
|
 |
 |
 |
 |
 |
Thanks so much for reading today, and thanks to Richele for being a guest on our blog! Enjoy your day!

Blog Candy Alert!! Follow our blog via email and comment on this post for a chance to win a special blog candy!


Love the cards and techniques!
Beautiful cards, great techniques…!!
Beautiful cards!!
Such gorgeous cards Richele. This Holiday set is so awesome with so many products. Love.
Beautiful cards. Masterful execution of techniques!
This card kit would make a great addition
To any stamper’s collection. Cheers
Lovely cards. I just love the blue-grn color, the that reindeer is so cute. Thank you so much for sharing with us.
Awesome!! thanks so much for sharing and have a Fabulous Weekend!! =)
I love both cards!
Beautiful, love the colors!
Very beautiful cards, love the colors!
These cards are breathtaking and I can’t wait to try them myself! Thanks for the inspiration!
Blessings,
Melitta
That is a really beautiful card. Those colors are wonderful.
What beautiful cards, makes that Holiday kit even more tempting.
Beautiful cards! This kit looks like it is full of fun.
Gorgeous cards, absolutely stunning! That reindeer trinket is amazing and I love the way you used it!
Simply stunning cards!
These are sooo pretty, love the colours and design!
Gorgeous cards!
This is magical !!!!
Hugs from France
Lunéa♥
Lovely cards….Superb distressing…Great color combos :)
Love that metal deer!
Gorgeous cards and great techniques xx
Love the first aqua card :)
Wow! Stunning, love the metal reindeer! x
Cards are beautiful!
Both cards are spectacular! Love the turquoise colour scheme on the one card and that crinkle ribbon bow – beautiful!
Beautiful cards.
Gor
Both cards are so beautiful, but the one with the sledge is for sure my favorite! Thanks for the inspiration!
Gorgeous!!
so beautiful card thanks for the inspiration
These are beautiful cards! I hope to get this kit soon!
Just gorgeous! I follow your blog!
That looks like such an amazing kit and your cards are both stunning Richele!
Always love seeing techniques. Cards look great!
Both are so gorgeous! Love the one with the deer. hugs! MOjca
These cards are beautiful.
Gorgeous cards!
Those cards are so pretty with lots of details. My favorite is the 2nd one.
Beautiful project.
These cards are gorgeous! I’m a huge fan of TIm’s wonderful products.
Fantastic cards! The more I see of this kit, the more I like it.
Gorgeous cards….love the turquoise on turquoise look.
Beautiful cards. I love the metal deer.
Love the cards and techniques. Wonderful colours.
I just love your cards, they are simply stunning!
Such a striking color combination.
Love that sleigh and reindeer.
Love all things Tim Holtz! These cards are gorgeous!! Love them both!!
Lovely cards from an awesome kit! :) TFS!