Christmas in July!
Hi readers! Happy Tuesday to you! Today I have a festive treat by the always cool & creative Paula Cheney! Let’s check it out together… shall we?
Enjoy!
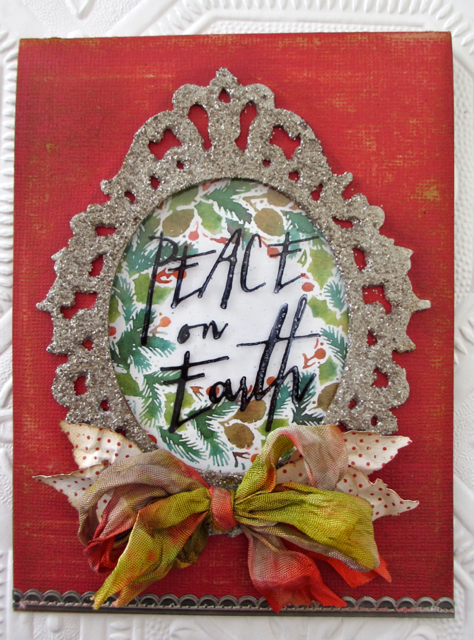
I know it’s only July, but for me that is the best time to start thinking Christmas cards! Today I’m using a couple new sets of stamps just released by Tim Holtz and Stamper Anonymous. Two of my favorites in fact! I love coloring the stamp to create a watercolor effect – super easy to do and the Ranger Watercolor paper is the perfect surface for this technique. Hope you will give it a try!
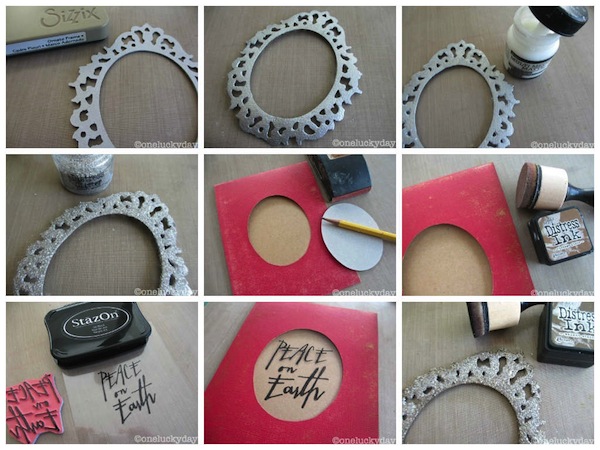
- Cut Grungeboard using the Sizzix Ornate Frames die (save center oval).
- Paint Ornate Frame with Distress Paint – Brushed Pewter. Let dry.
- Brush on a coat of Multi Medium.Place frame onto a scrap piece of paper. Pour Distress Glitter -Pumice Stone over the frame. Tap off excess (do not press down). Return excess Glitter to jar. Set aside to dry.
- Cut Kraft-Core cardstock 4 1/2 x 12”. Fold in half to create card base.
- Use oval shape (saved from die cutting) as a template forcard front opening. Trace around oval and cut away center. Distress cardstock with Sanding Grip to reveal the second layer.
- Ink card front with Mini Distress Ink – Vintage Photo (set #3)Cut a piece of plastic the size of card front.
- Use Jet Black – StazOn Ink to stamp a sentiment using the new Stampers Anonymous- Handwritten Holidays 2 set.
- Add plastic to inside card front so sentiment shows through oval window.
- Once Distress glitter on Ornate Frame is dry, ink the edges with Mini Distress Ink – Walnut Stain (set #3). Yes, Distress Glitter is totally inkable!
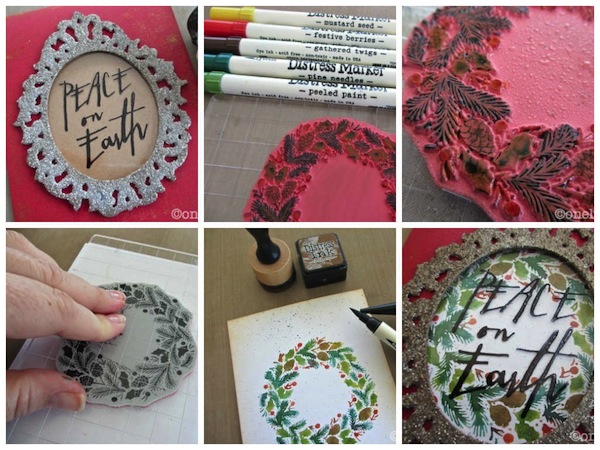
- Use Multi Medium to add the Ornate Frame to the card front.
- Use Brush end of Distress Markers to color wreath from Stampers Anonymous – Styled Woodlands.
- Lightly spritz the image with water to reactivate the ink.
- Cut a piece of Ranger Watercolor cardstock. Stamp wreath image in center.
- Use Distress Marker Spritzer and a Distress Marker to add speckles of color to background.
- Align wreath to show through window.
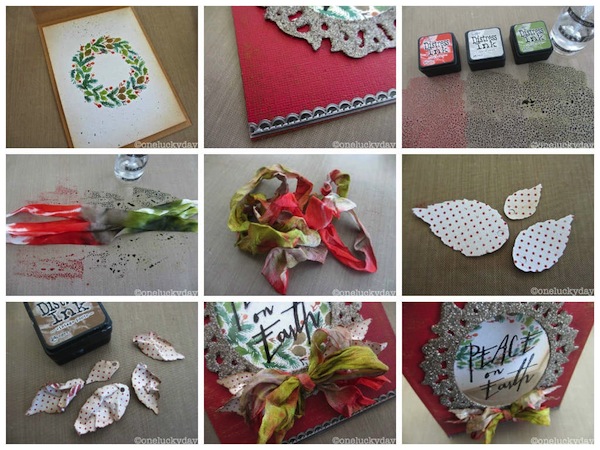
- Cut watercolor cardstock to fit inside of card and adhere to card back.
- Add Industrious Sticker strip to bottom edge of card. (I stitched the sticker strip to the card just to add a bit of texture)
- Add three colors of Mini Distress Ink from set #5 – Barn Door, Pumice Stone, and Peeled Paint to craft mat. Make sure the colors touch, but don’t overlap. Spritz with water.
- Spritz Crinkle Ribbon with a bit of water to help control the ribbon. Fold the ribbon into thirds and lay it over the three ink colors. Let the Distress Ink soak into the ribbon to get pure color. You can add more water to make the colors bleed. Once the Crinkle
- Ribbon has soaked up enough color, move it around on the craft sheet to add a bit of variation.
- Dry Crinkle Ribbon with Heat it Tool, scrunching as you go.
- Cut a few leaves from the Merriment Paper Stash (polka dot) with the Sizzix Tattered Flower Garland Decorative strip.
- Ink edges of leaves with Distress Ink. Crumple to create a more realistic look.
- Create a loopy bow with dyed Crinkle Ribbon. Adhere to frame with Multi Medium. Add polka dot leaves under bow.
SUPPLIES:
 |
 |
 |
 |
 |
 |
 |
 |
 |
 |
 |
 |
 |
 |
 |
 |
 |
 |
 |
|
 |
 |
 |
 |
 |
 |
 |
 |
 |
 |
Thanks for reading today, and thanks to Paula for being our guest!
Blog Candy Alert!! Follow our blog via email and comment on this post for a chance to win a special blog candy!

Congrats! Blog Candy Winners!
From: Wish Big & Good Vibes: Krista D!
From: “Play” Art Journal Page: Stokely!
From: Midnight Green Color Coordinates!: Dawn Burrows!
From: Hope Your Day is Super Duper: Pam C!
Please email me ([email protected]) with your mailing address and the name of the blog you won from to claim your prize!


Beautiful card! Thanks for the inspiration!
Amazing idea here and thanks a lot for a great tut . This frame looks fabulous.
Beautiful card! But I can’t start thinking about Christmas already! But I know it will be here before we know it.
Wow that bow is awesome. Giving me good ideas
Wow, still so many techniques to try…
Great card! It’s never too early to start on Christmas cards!
Love the way you colored the bow to match the wreath!
Fabulous card! Thanks for the lovely step by step. Love this fab card!
Gorgeous! I love your card, Paula!
Thanks for the fun tutorial.mi really should make some holiday cards, but I just can’t get into Christmas until after Halloween.
wonderful card. like that she posted all the photos.
stamping sue
http://stampingsueinconnecticut.blogspot.com/
First off…congrats to the winners! Second…this is sure stirring my need to make Christmas cards! I make them year round but have been concentrating on OWH cards for a few weeks. Guess with this kind of inspiration I could go ahead and start my OWH Christmas cards!!
Beautiful card!!!
Lovely! I love these new stamps. What a great way to use the ornate frame die
I love Christmas in July it helps me get my Christmas ideas flowing, This Card is just beautiful.
Lovely frame. Love the card
What a fabulous idea! I’m going to try this!
Wow! This has it all. Just a gorgeous card. Thanks for the how to. Very inspirational!
Wow great card! Thanks for sharing the directions.
What an absolutely gorgeous card! Love it!
Cute card. I like transparency
Beautiful card
This is a beautiful card!! Love Christmas in July (:
Even though our temperatures are trying to trick me into thinking it is October, 43 degrees when I woke up this a.m. And it is the middle of July, our summer is so short that I refuse to play with my winter stamps in the middle of summer. I have eight full months to play with winter stamps.
Love the frame and how you made the wreath.
Your card is gorgeous. Love what you did to the ribbon. Thanks for sharing.
Great cards!
Nice card. Love the Ornate Frame.
Beautiful! I was just thinking it was time to start my cards.
I am hooked! I love everything about this card and want to start my cards immediately!! Love your blog for such inspiration!
Thanks for sharing your BEAUTIFUL card.
Crafty hugs,
D~
DesignsByDragonfly.blogspot
I love this look. Maybe it will inspire me to make some Christmas cards.
Hard to believe Christmas is just 5 months away. Great card!
Your card is absolutely amazing!
Beautiful card, I love the fancy frame :)
Very pretty. You could make a lovely ornament with that die cut as well.
Beautiful card!!
Awesome! She always has great ideas and samples
another fabulous tutorial! Paul gives great instruction!
Haven’t used this medium before very interesting. …
This is a great project, but I’m not ready for Christmas cards. I am making my Christmas list, though!
I love the idea of thinking of Christmas right now! Great inspiration!
Lovely Christmas card.
Great tutorial and project…love the colors!
Beautiful card! What a joyful thing to spread holiday cheer with! Thanks for the stepped out tutorial. I forget to pull out my markers when I’m stamping. It makes such a wonderful watercolor effect. Have a great day!
Looks fantastic! Love the frame with the wreath behind!
This card is so pretty! I love that wreath stamp!
The wreath stamp is beautiful and I love how you framed it – those sentiment stamps are a must have too!
The frame is so pretty!
So pretty, and never too early to start thinking about Christmas crafting… Love the window!