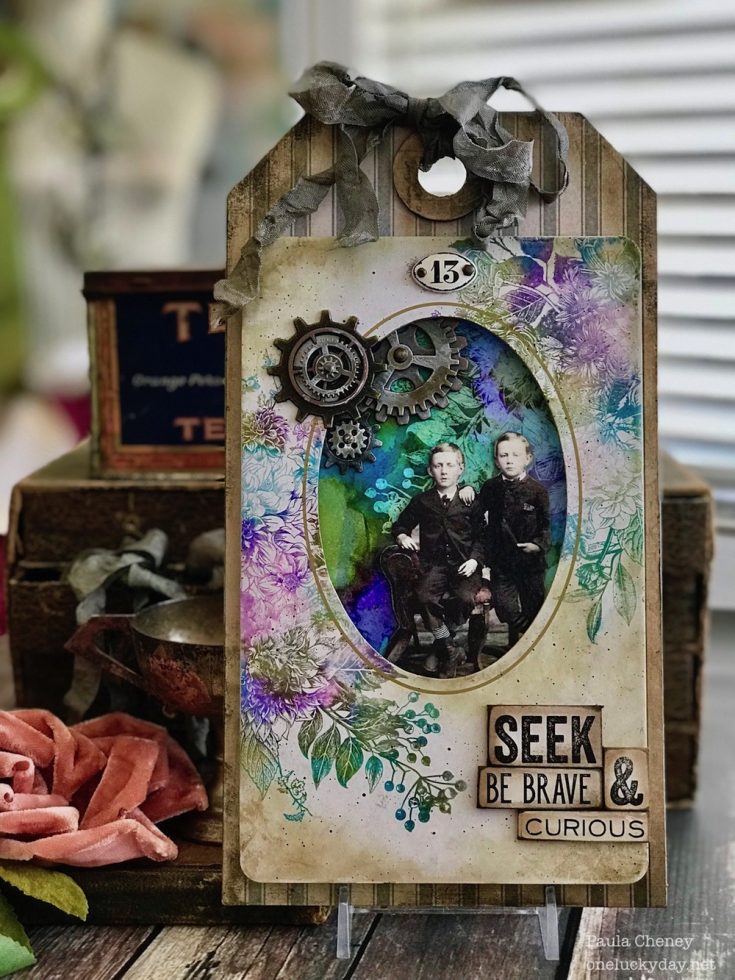
Be Brave Etcetera Tag by Paula Cheney
Hi friends! Happy Monday! Grab a cup of coffee and have a seat to take in this GORGEOUS tutorial by Paula Cheney and enjoy!
Hi friends! I’m glad to be back here today at Simon Says Stamp with a project using Alcohol Lift-Ink from Tim Holtz and Ranger. This is a fun new product that has just a bit of a learning curve! So I’ll be giving you some tips and tricks to using the ink as well as photos of each step along the way. Let’s get started!
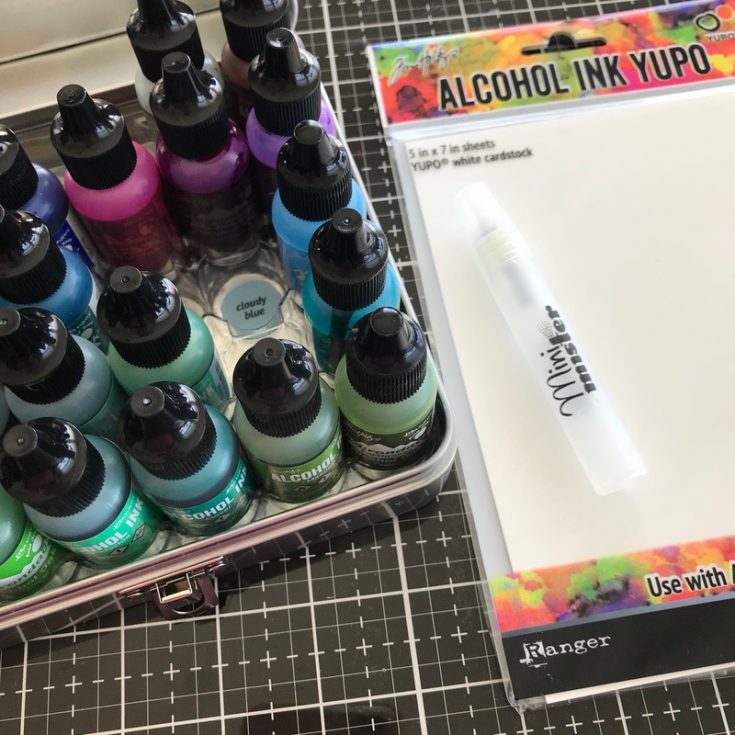
1. To prepare you will need to gather a few things:
Yupo: You will need a sheet of 5 x 7-inch Yupo, which is a non-porous surface.
Alcohol Ink: I chose colors from the cool side of the color wheel like Amethyst, Patina, Meadow, and Turquoise. I have found that you get the best results for this particular technique using darker/richer colors. Open all the bottles so you can work quickly adding colors to the Yupo (it is not a problem to leave the Alcohol Inks open when working with them, just work in a well-ventilated room).
Mini Mister: Fill a Mini Mister with Rubbing Alcohol (DO NOT substitute Blending Solution).
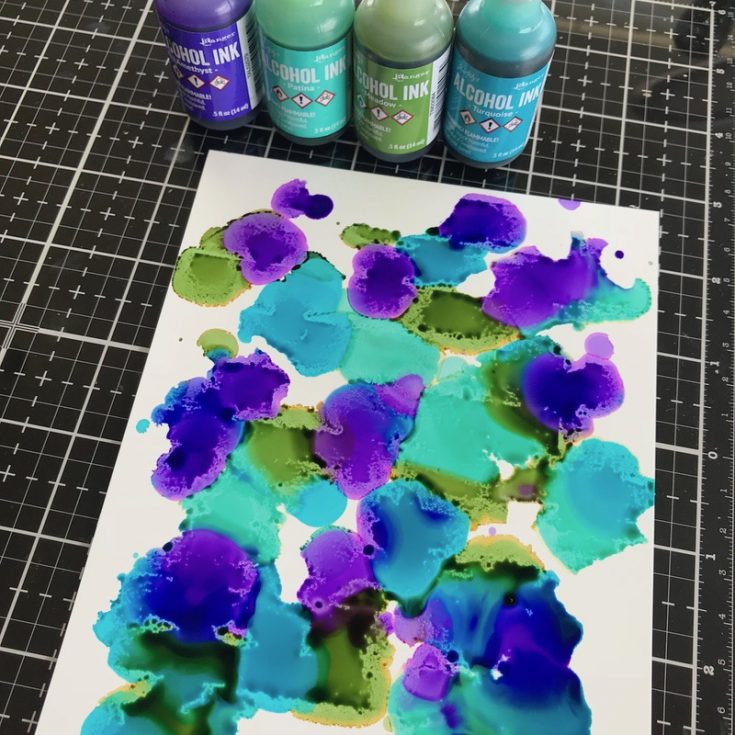
2. Working quickly, sprinkle drops of Alcohol ink over the Yupo surface.
3. Spray Rubbing Alcohol from the Mini Mister over the Alcohol Ink. It’s amazing to see the blending of the Alcohol Ink colors when sprayed. You can add more Alcohol Ink if necessary as well as more layers of Rubbing Alcohol. Be sure to take the color right to the edge.
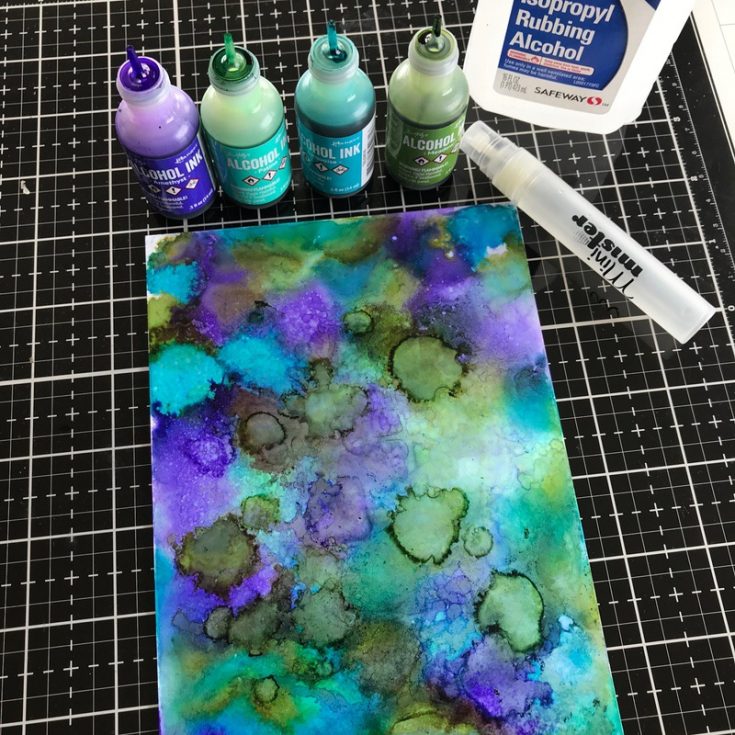
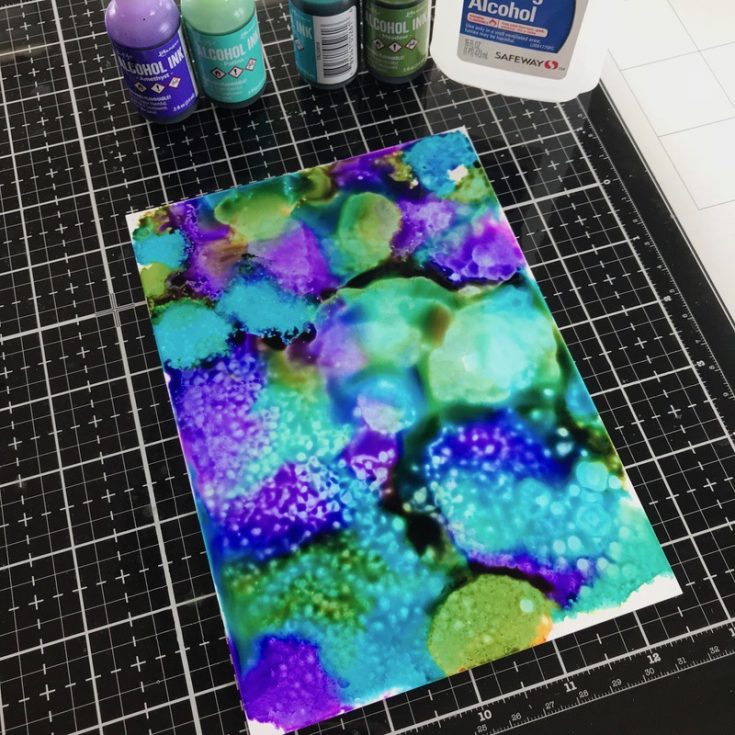
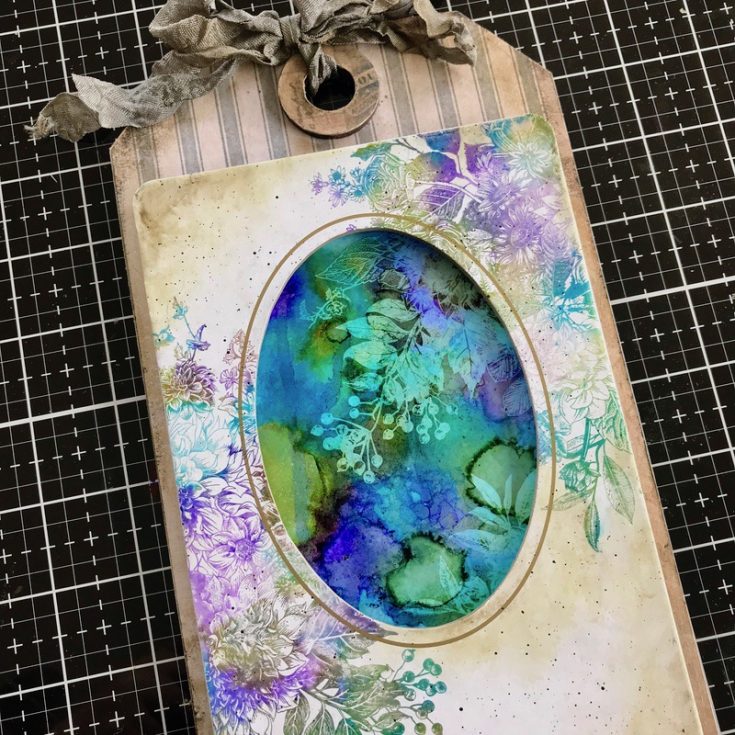
4. When the layers of ink have reached the edges of the Yupo, set aside to dry. You can dry with a heat tool, although Yupo is a synthetic material so don’t get the heat tool close or it can warp. Set aside.
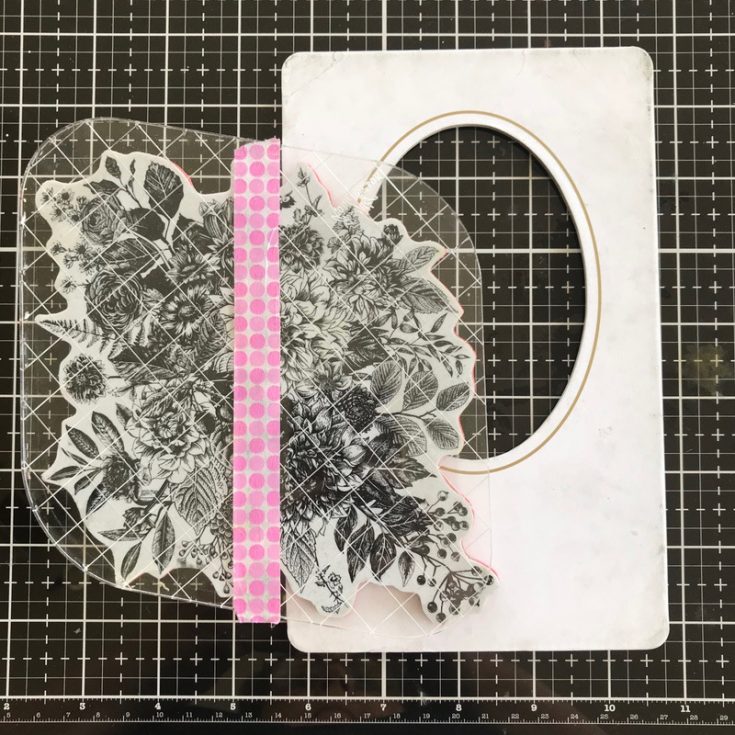
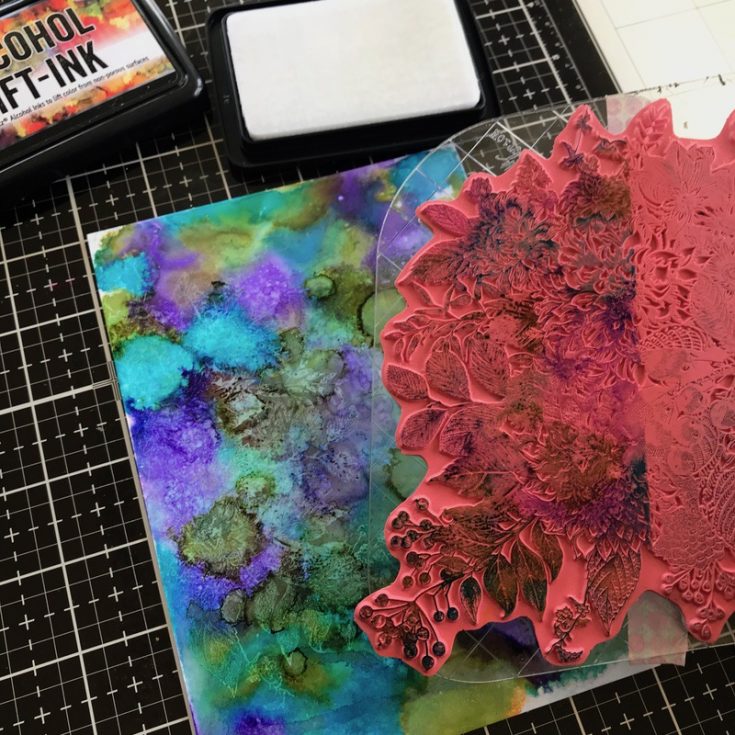
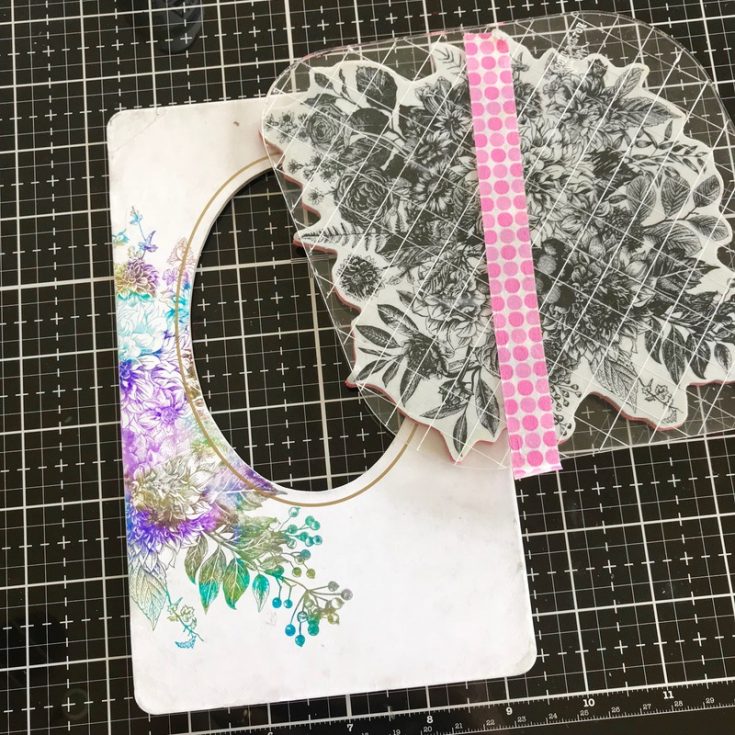
5. I am using an idea-ology Collage Frame and the Stampers Anonymous Glorious Bouquet stamp for the next step. Because the Glorious Bouquet stamp is so large, it comes with its own custom stamp block. I positioned the stamp over the frame (no ink) then added a piece of Washi Tape to mark the edge frame. This way when I turned the stamp over to ink it, I only need to add ink to the part being stamped.
NOTE: make sure your stamp is clean before adding the ink or you will contaminate your stamp pad.
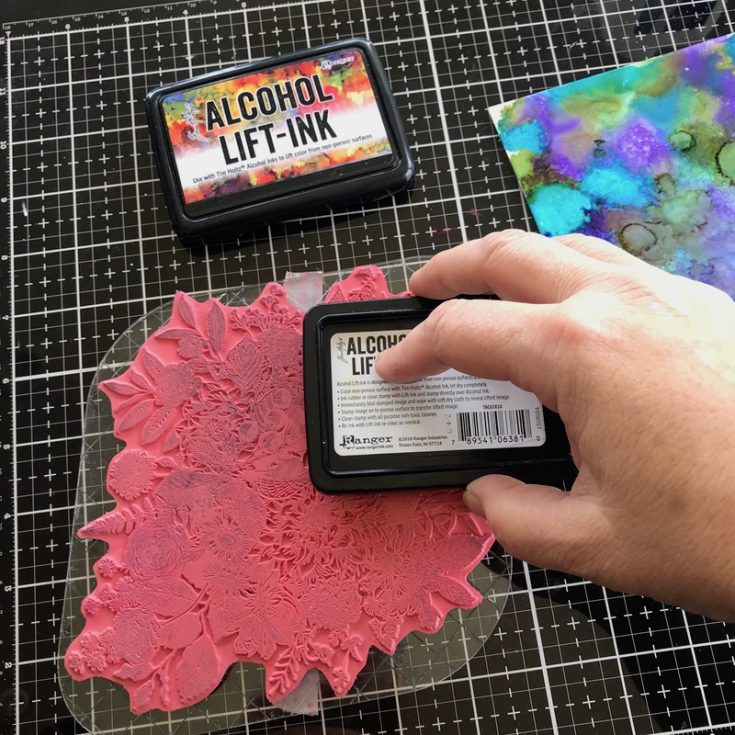
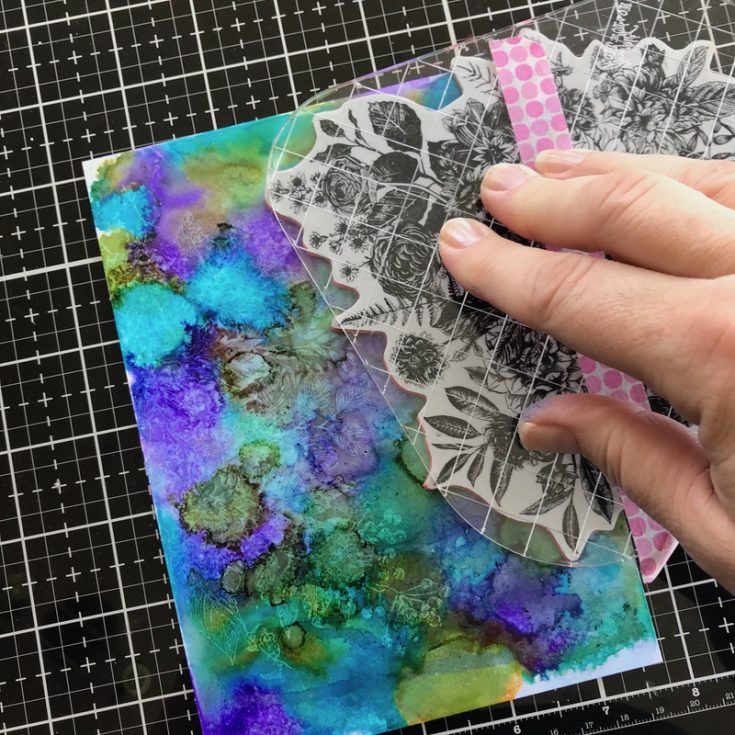
6. Lift-Ink is designed to literally lift Alcohol Ink from a non-porous surface and transfer it to a porous surface. The Lift-Ink pad works using both rubber or clear stamps, and the coordinating re-inker is ideal for using with stencils. Using Alcohol Lift-Ink, ink the portion of the stamp being used. Lift-Ink is clear so you may have the tendency to add more than necessary. Just remember, the more you put on, the more you have to take off.
7. With the stamp inked, line up the washi tape along the edge of the Yupo paper (non-porous), press down to get a good impression.
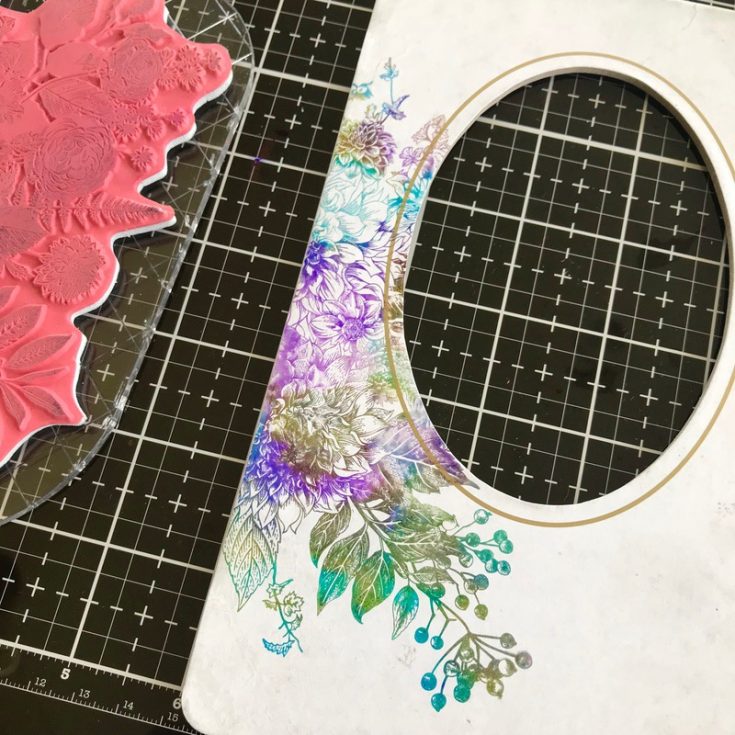
8. Lift the stamp. You will see that the Alcohol Ink has been lifted and is resting on the surface of the stamp. You will also see that the Yupo will have a slight image of the stamp. Set the sheet of Yupo aside and we’ll come back to it.
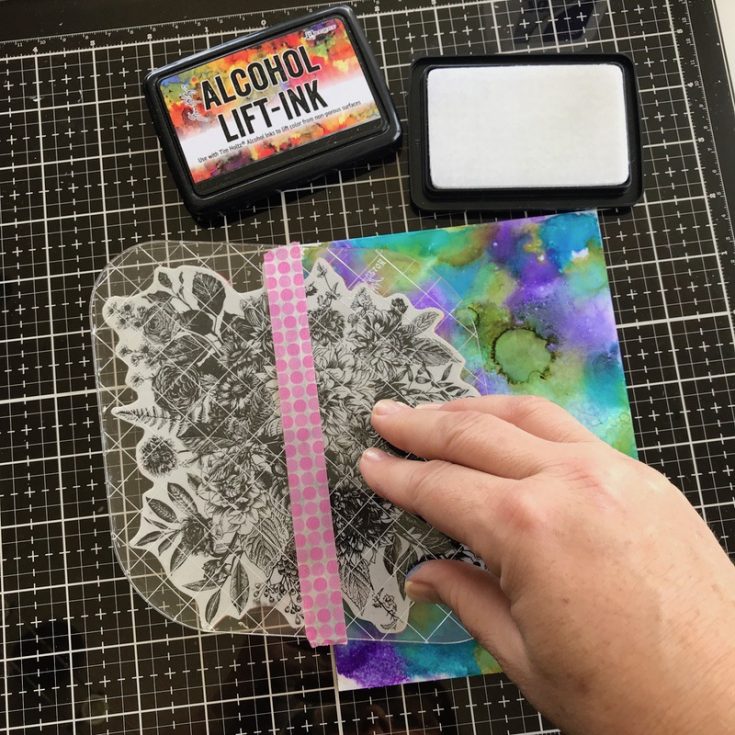
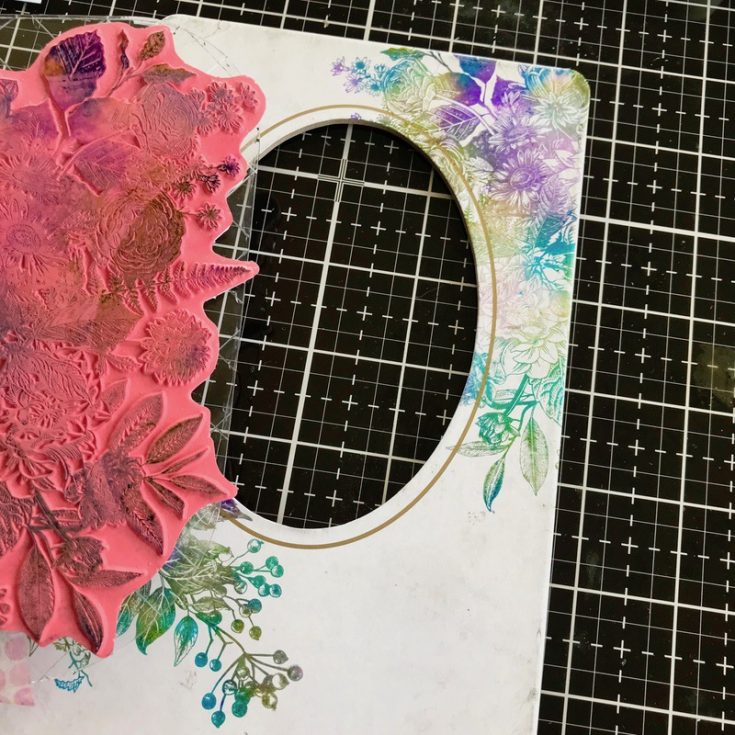
9. Moving back to our Collage Frame, line up the washi tape with the edge of the Collage Frame (just where we started) and press down to get a good impression.
10. And just like that, the Alcohol Ink has been transferred to the face of the Collage Frame (a porous surface).
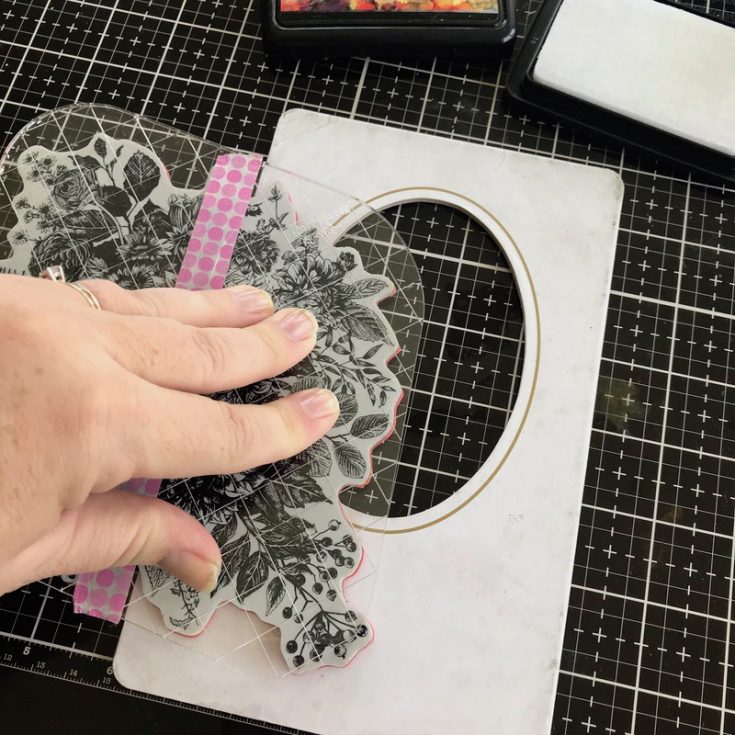
11. To get the second stamped image for the right side of the Collage Frame we will need to clean our stamp before adding the Lift-Ink (remember we want to keep the ink pad clean).
12. One of the benefits of using a large stamp like Glorious Bouquet is that you can turn the image to use a totally different part of the stamp. I did just that. Once I decided on placement, I adjusted the Washi Tape to reflect the new stamp placement.
13. We need ink the stamp with Lift-Ink just as before but use the right side of the Yupo. This space was untouched in our first go-round so it’s perfect for the second stamping.
NOTE: If you are using a smaller stamp or not needing to stamp the image twice, you could have started with a smaller piece of Yupo. In this case, we needed the 5 x 7” sheet to allow for both stampings.
14. Stamp the surface of the Collage Frame using the washi tape as your guide.
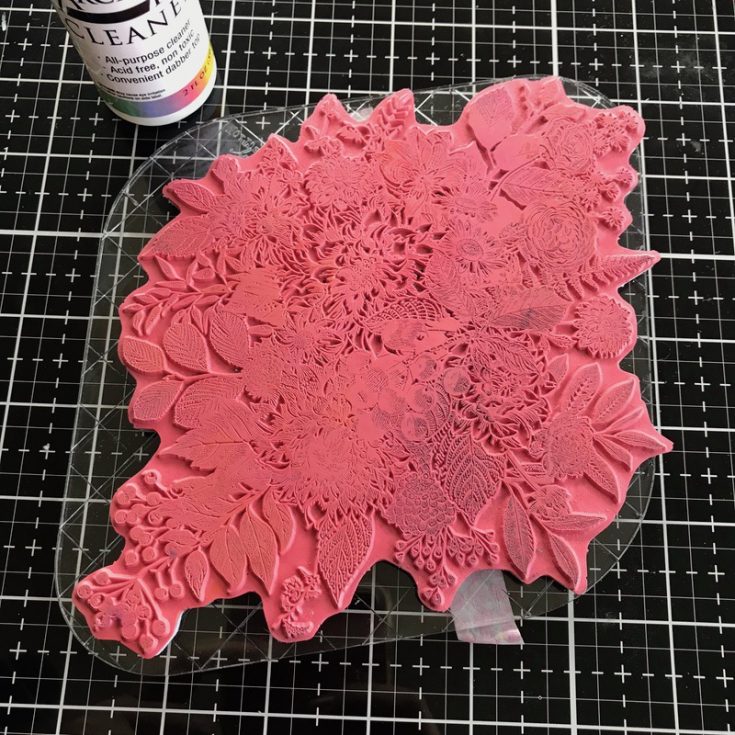
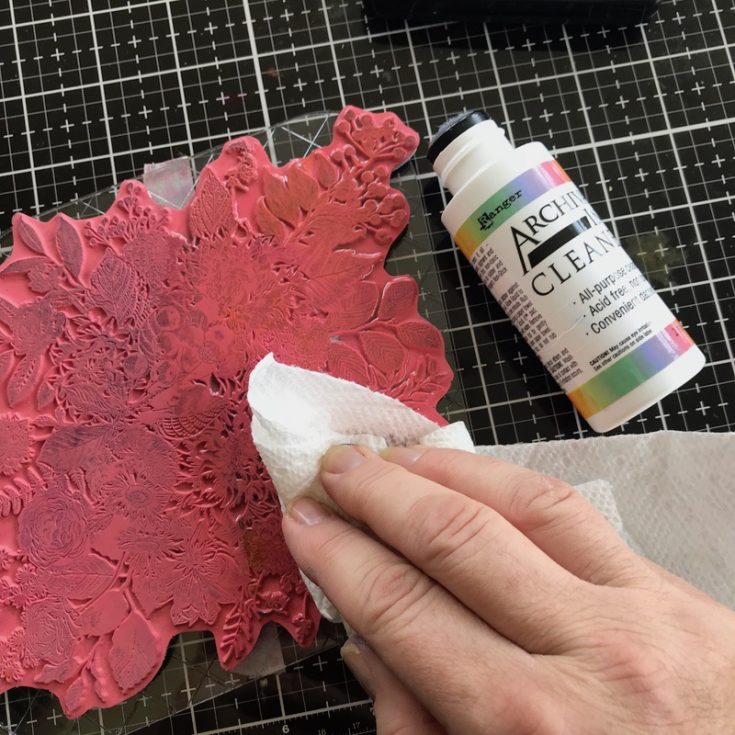
15. Clean your stamp – I used Ranger Archival Cleaner and it worked perfectly. Lest you think the Alcohol ink would damage or stain your red rubber stamps, you can see here it does not. I don’t know that I would wait for hours to clean it but I waited at least 10 minutes before cleaning and it left no residue or staining.
Setting the frame aside, let’s finish the Yupo sheet:
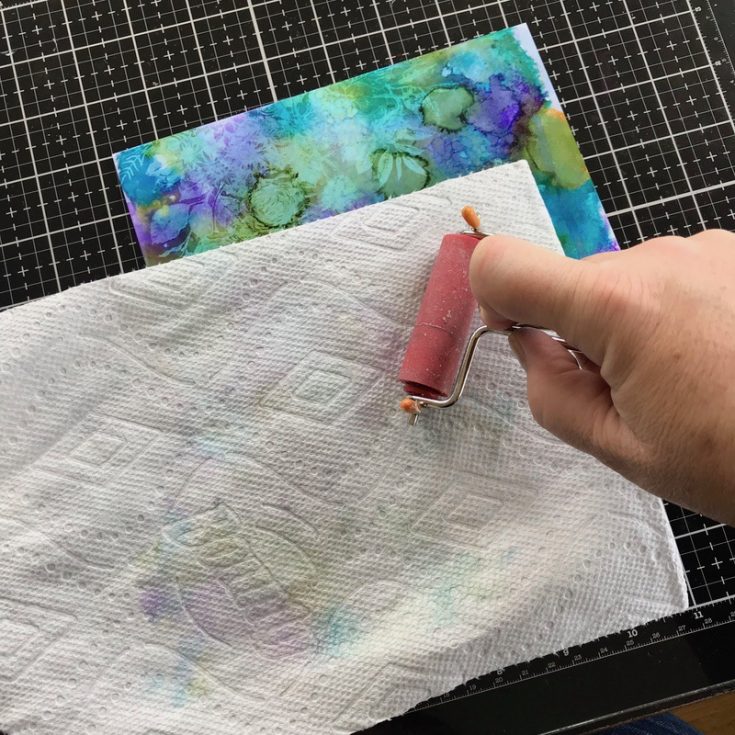
16. The next step is to dab over the surface with a clean paper towel to reveal the stamped image. Since the Yupo was a 5 x 7” sheet, I placed a paper towel over the surface and used my small brayer to remove the Lift-Ink. I rolled over the surface a few times and then flipped the paper towel over and repeated the action. You will need to use multiple paper towels until there is no ink residue being lifted away. Whether you have a small piece of Yupo or large, your goal is to dab the Lift-Ink away, not to move or rub it around. If you do that you will lose the detail in the stamped image.
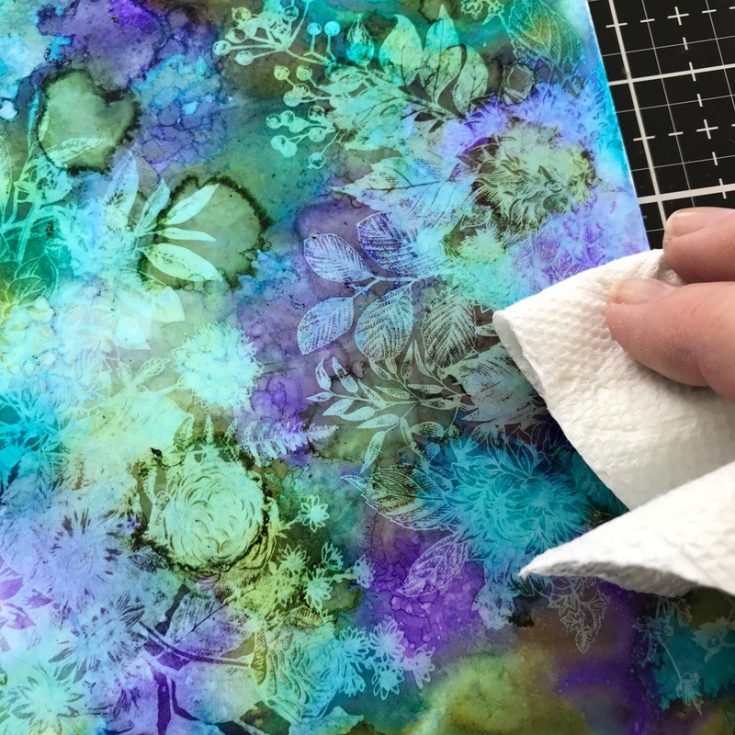
17. Once you get to this point, you can LIGHTLY buff over the image. My image was so dry using the brayer method that this step was almost unnecessary. Set aside to finish the frame.
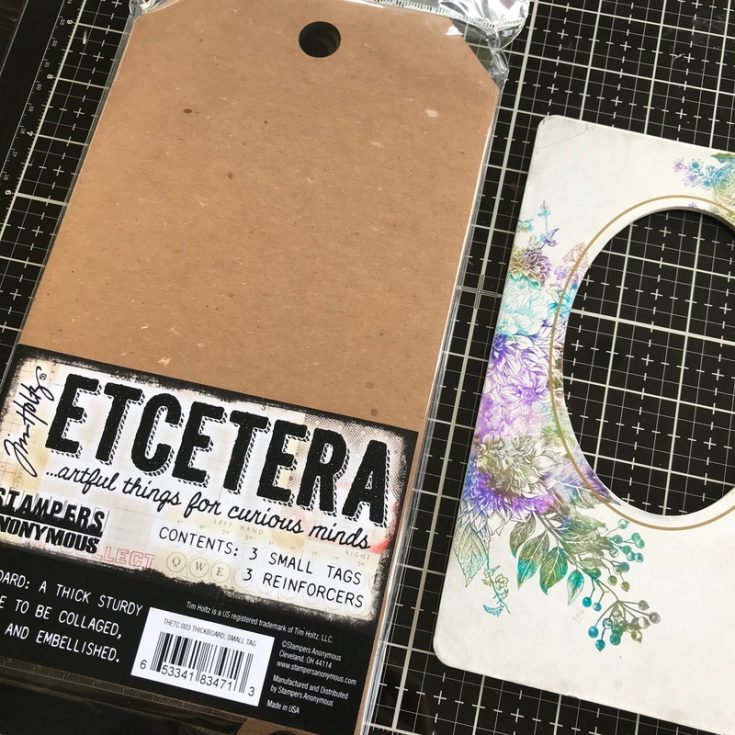
18. I chose a Small Etcetera Tag for my foundation.
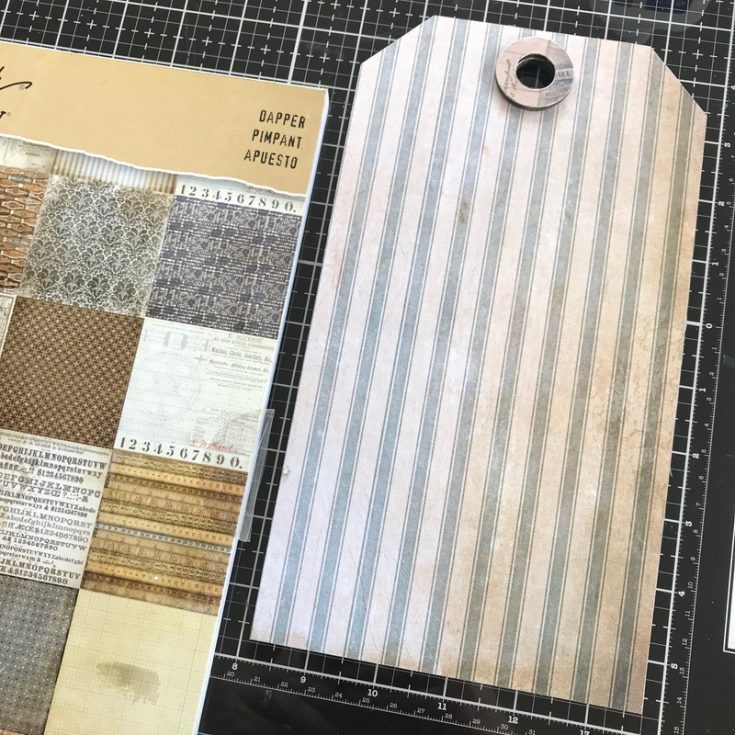
19. I used Collage Medium to adhere blue ticking paper from the Dapper Paper Stash. I also covered the small reinforcer and added it to the top hole.
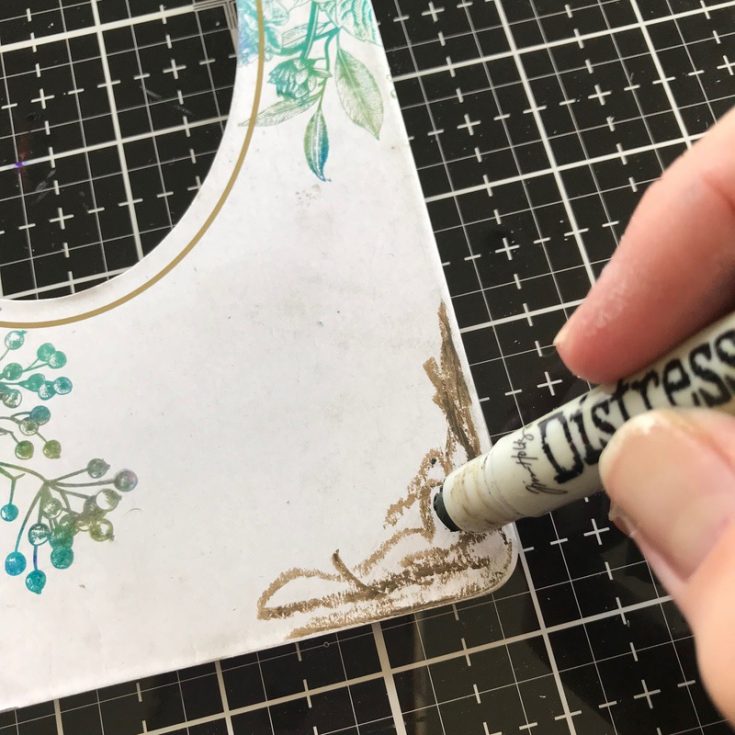
20. To finish the frame, use a Distress Crayon in Walnut Stain to scribble around the edge of the slick surface.
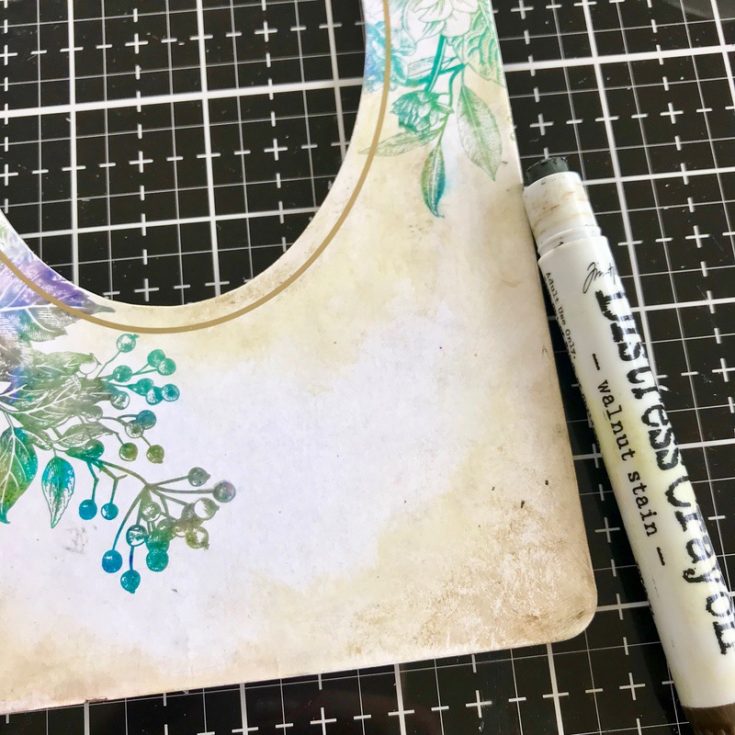
21. Rub in with a damp finger, then use a damp wet wipe to mottle the crayon surface.
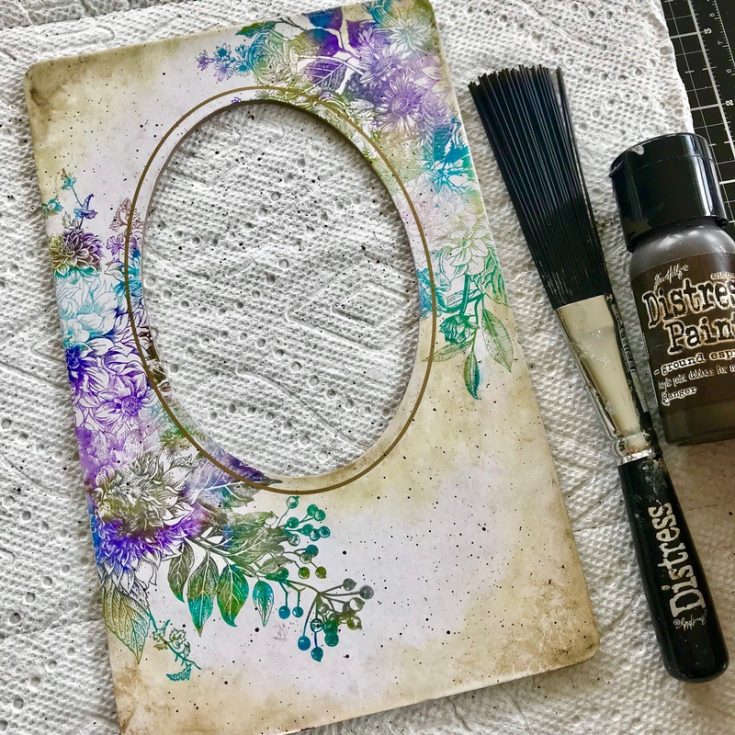
22. Place the Collage Frame on a paper towel. Use the Distress Splatter Brush and Ground Espresso Distress Paint to add a light splatter of paint over the surface. I think this one easy trick brings the stamping and Distress Crayon together to make a cohesive look.
Putting it all together:
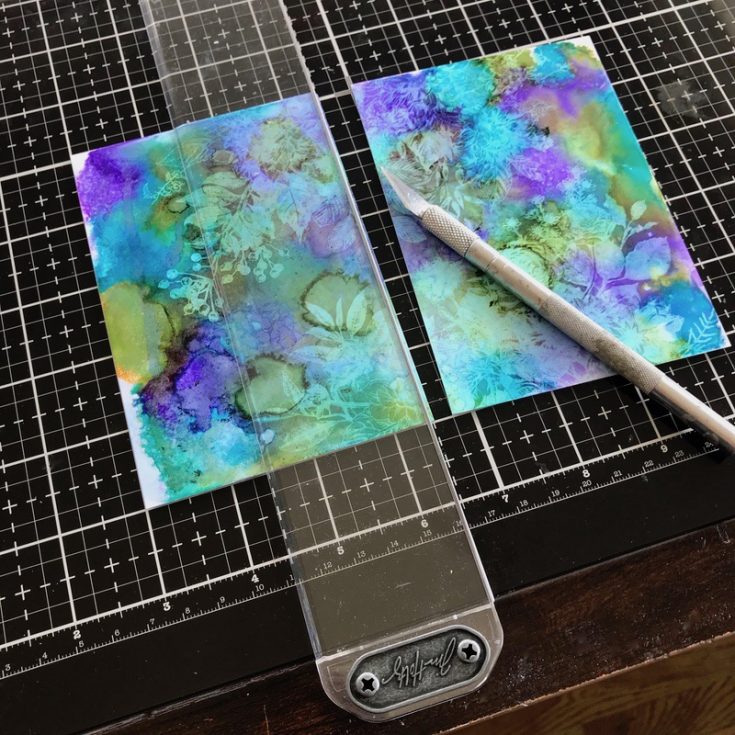
23. I used the Yupo sheet for the center of my Collage Frame. I only needed half of the piece so I placed the Yupo on my Tim Holtz Glass Media Mat and cut it with a cutting knife. I used the Media Edge (part of the Tonic Media Tool Set) to get a straight cut. It Media Edge has a lip edge that hooks the edge of the Glass Mat so your paper stays in position when cutting.
24. Add a DOUBLE stack of 3D foam squares to the back of the frame to raise it from the surface of the Etcetera Tag.
I also cut a piece of ribbon about 46” long. Fold the ribbon in half (so it should be 23” long now) and thread it through the reinforcer. Tie a bow, trimming off the excess ends.
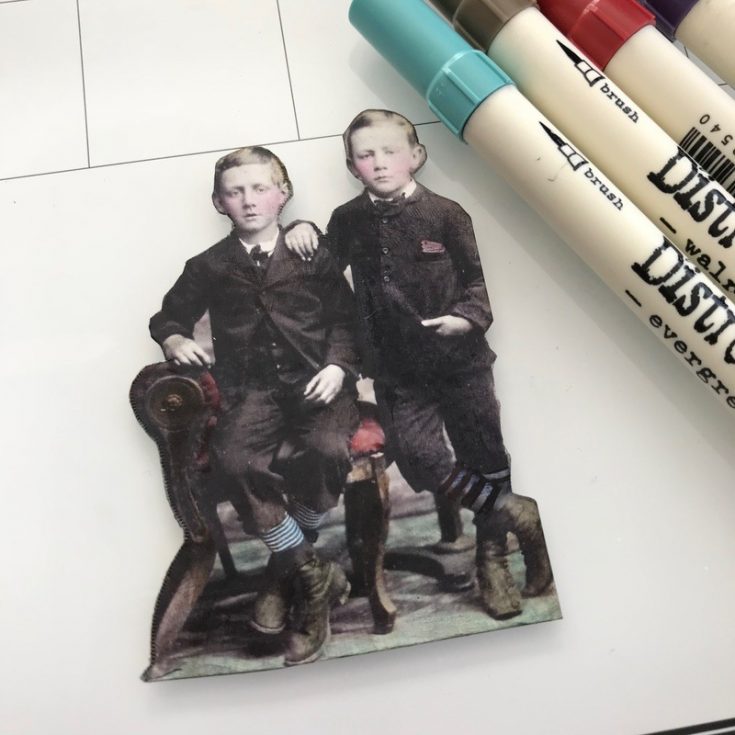
25. I chose a card from the Found Relatives pack for this piece. Be sure to use small sharp-tipped scissors, like the Tonic Mini Snips to cut around the boys. TIP: To get rid of any white on the cut edges, use a Blending Tool and Pumice Stone Distress Ink. It’s a magic pill that will tint the white edges and make them disappear.
Tint the boys using Distress Markers. Worn Lipstick is my go-to color for cheeks. The trick is color the cheek area, then tap over the cheeks with your fingertip until it’s the right intensity of pink. Remember, “tap” not wipe.
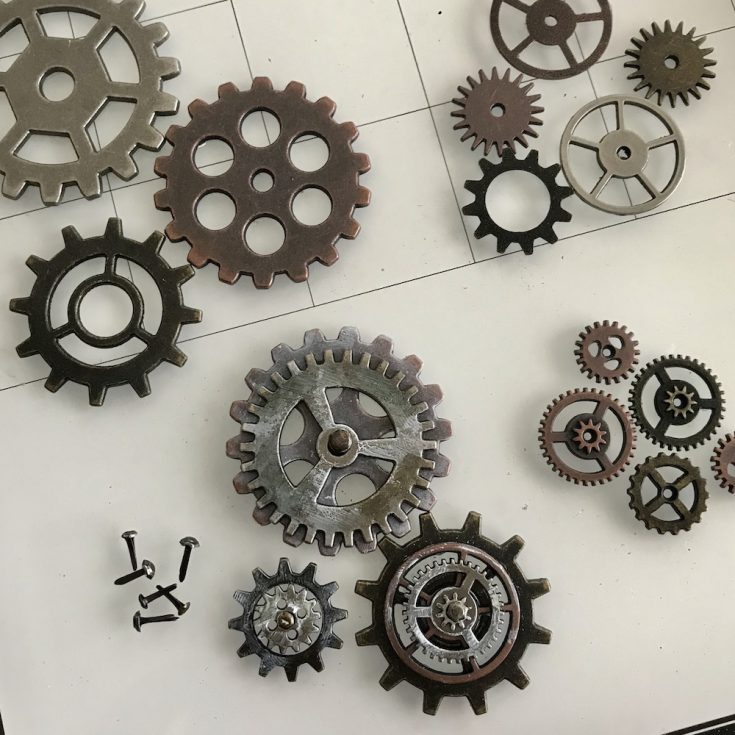
26. Combine gears from the Gadget Gears, Sprocket Gears and Mini Gears pack to make a
few metal adornments for the project. Once I created the stacks, I rubbed Picket Fence Distress Paint randomly over the surface of the gears.
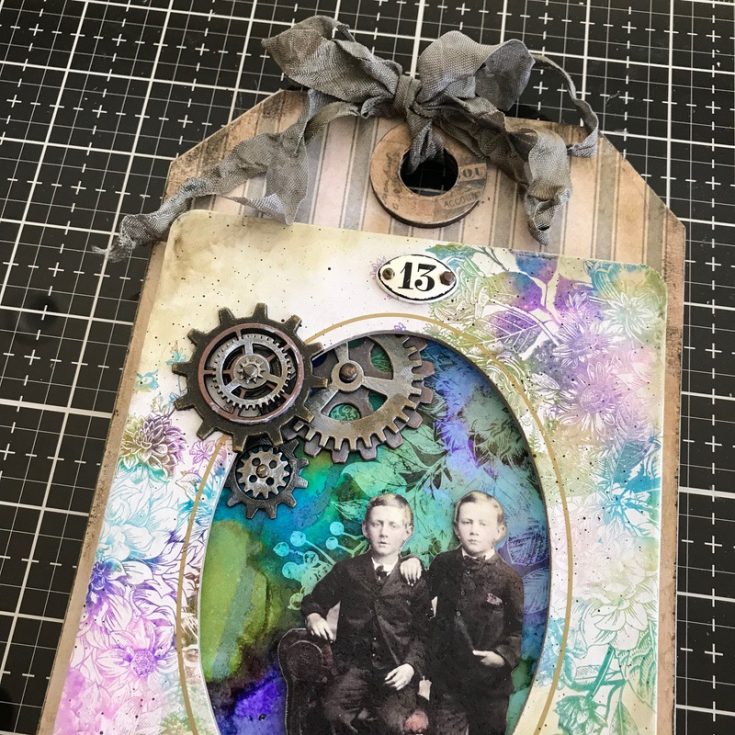
27. Add THIN 3D Foam Squares to the back of the boys and add to the center of the frame. Adhere the gears to the Collage Frame with Collage Medium. I also added Hex Fasteners to a Mini Plaquette and adhered it to the top of the Collage Frame.
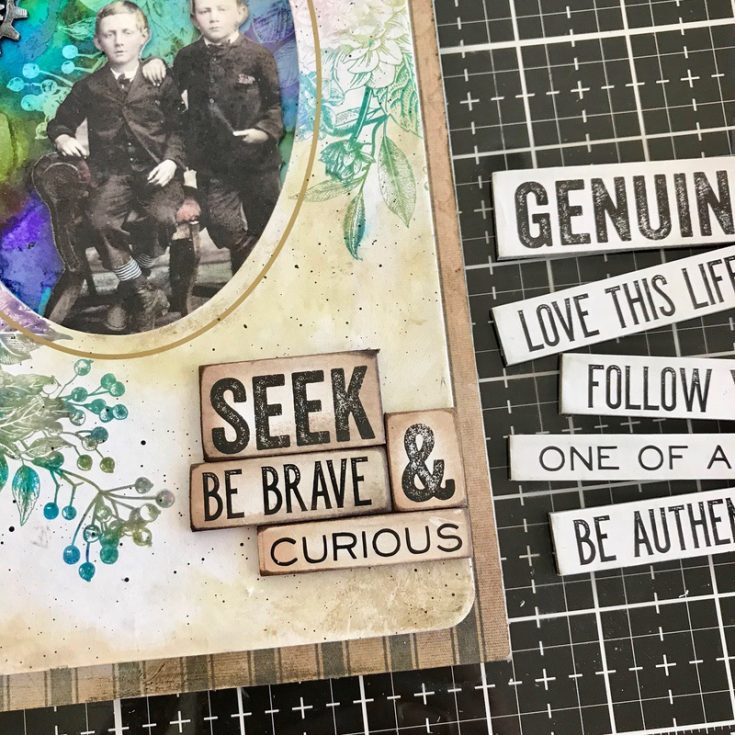
28. Choose words or a phrase from the Quote Chips pack. Sand the edges and ink with Walnut Stain Distress Ink. Adhere to the surface of the Collage Frame with Collage Medium.
So there you go! That was cool, wasn’t it? I love experimenting with Alcohol Ink color combinations and Lift-Ink (kind of addicting!) and we didn’t even get into the liquid Lift-Ink to use with stencils! Really so much fun playing around with these products!
Thank you, Ranger and Tim Holtz for creating such innovative products!
SUPPLIES:
|


Thanks so much for stopping by and thanks to Paula for the fabulous inspiration!


Sitting here in awe of your beautiful project! But also, thank you so much for taking the time to do the step by step instructions and photos. It is so much appreciated as well as helpful! Now I get the allure of the lift off ink! How cool is this stuff?! And the tag project you have made not only highlights it so well, but is just stunning! Thanks again! :)
This project is truly amazing! I wasn’t sure exactly what the Alcohol Lift Ink was for but I fully understand it now. I loved how you can make such a gorgeous image in an alcohol ink print. This project was so innovative. Great job!!
oh my gosh Paula…this is pure perfection!! The stamp with the lift…that’s just it right there in a nut shell…drop the mic!
LOVE…TFS
Oh my goodness… this is just stunning. I love your technique! I can’t wait to try it out!
This is the prettiest project. I just love everything about it! BRAVO!!!
WOWZERS! The combination of the yuppo oval background and the stamped boarder for the frame is awesome. Thank for all your tips!
Wow Paula what a beautiful tag and thank you so much for a great picture tutorial!
What an amazing technique!
Amazing work. That alcohol ink background is stunning! Great attention to detail. A gorgeous tag!
WOW! This is just incredible. Thank you for sharing these techniques!
Very stunning. Thanks for sharing.
Linda D.
This is an amazing project. The alcohol ink lift looks to be a fun new technique for play. Just when you think you have all you could possibly need, something new pops up! Lol!
WOW I am in awe looking at this amazing project!!!!
Beautiful Tag! Love the colors of the alcohol ink. And thanks for showing the alcohol lift technique.
Just beautiful! I learned a lot from watching this! Love it!
Paula your process is amazing! This turned out wonderful. I love Yupo paper, now I am excited to use a mister. That is so beautiful… thanks for going in steps. Nicely done.
LOVE
O
V
E
LO
VE
The frame looks great. It blends so well with the photo. Nice job
The plants are amazing as a frame. So pretty
This is gorgeous! I LOVE the colors of alcohol ink you chose. Also, I have some distress crayons but never knew what to do with them so I’m glad to see how you used them. Thank you for sharing!!
Gorgeous project! Such a great tutorial for using the Alcohol Lift-Ink too!
Awesome project! Thank you for the clear tutorial- I learned something today! : )
Gorgeous colors on this pretty tag!
Absolutely incredible!! I love every detail. This is so stunning. Thank you for the step by step for the details. I can’t wait to try something similar.
What a super way of stamping the frame! Love that you used colours on your artwork!
Fantastic tag. Love all the elements.
Thanks for sharing…
Beautiful project! Thanks for sharing this technique!
Wow! Awesome technique!!! Love the vintage look of this fantastic project!!! Thanks for sharing the tutorial!
Love the purples and teals!
wow what an incredible project – love the colors and how ou created the frame – very clever and inspiring:)
Bee-utiful colors in the background and amazing creation.
Melissa
“Sunshine HoneyBee”
The image transferred beautifully to the collage frame! I’ve got to do some experimenting of my own. Thanks for sharing Paula!
Fantastic product! the results are beautiful.
Beautiful. Wonderful
vintage feeling.
thanks for sharing
txmlhl(at)yahoo(dot)com
Gorgeous! I love the old fashioned look.
This is truly a little work of art.
What an incredible project! The tutorial with all the step-by-step photos was so helpful. How clever to use the lifted ink to stamp the floral design. Such a great technique! Thanks for the project idea, tutorial and photos.
This is a stunning tag Paula, beautifully done! A great tutorial on the entire process, thanks for sharing your lovely tag!
STUNNING!!!! I ABSOLUTELY LOVE seeing the process too, THANK YOU for showing us!!! ;)
Wow amazing!!!
Oh my word Paula… this is amazing! The technique with lift-ink YUMMY ( I know weird way to describe)… way cool colors! I KNOW Tim is grinning real big on this one :)
The stamp turned out beautifully with the alcohol inks!
WOW! Such a beautiful project and a great tutorial! These colors are stunning and your design is just delightful! Lift off has moved to the top of my wish list! Thank you for the inspiration! Hugs!
Good day! Behold is an important offer for you. http://bit.ly/2JMmwfz
So very pretty!!
Such a neat technique! I have not tried the lift ink yet – you achieved beautiful results! Your tag is impressive!
What a gorgeous project & wonderful tutorial! The lift technique is something I hadn’t seen–so fun!
Hi! That is a fine offer for you. http://bit.ly/2t7CeY7
Oh my, that is just stunning! I have never heard of that technique before … how cool is that?! I am so impressed with this beautiful design.
Awesome project!
Thanks for the inspiration.